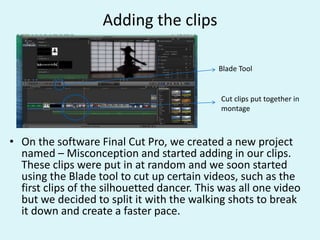
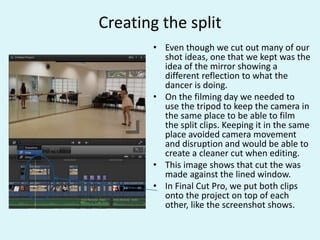
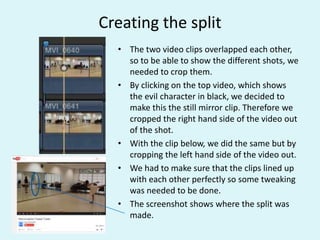
Editing the Teaser Trailer
By Chloe Chorlton
Getting Started
• When we started to create our teaser trailer, we found it
quite hard as we didn’t film all the parts that we planned
to. There were various reasons why such as, not enough
time but also because the shots did not look good or
they would not fit. An example of one shot we cut out
was the beginning one of the dancer turning the radio
on. Due to us cutting certain shots, this changed our
storyline and how we would make our trailer.
• The clips that we had, we felt were good but we were
unsure on how to place them in the trailer. This is where
we came up with the idea to create an even more
‘jumbled’ montage.
Adding the clips
• On the software Final Cut Pro, we created a new project
named – Misconception and started adding in our clips.
These clips were put in at random and we soon started
using the Blade tool to cut up certain videos, such as the
first clips of the silhouetted dancer. This was all one video
but we decided to split it with the walking shots to break
it down and create a faster pace.
Blade Tool
Cut clips put together in
montage
Creating the split
• Even though we cut out many of our
shot ideas, one that we kept was the
idea of the mirror showing a
different reflection to what the
dancer is doing.
• On the filming day we needed to
use the tripod to keep the camera in
the same place to be able to film
the split clips. Keeping it in the same
place avoided camera movement
and disruption and would be able to
create a cleaner cut when editing.
• This image shows that cut the was
made against the lined window.
• In Final Cut Pro, we put both clips
onto the project on top of each
other, like the screenshot shows.
Creating the split
• The two video clips overlapped each other,
so to be able to show the different shots, we
needed to crop them.
• By clicking on the top video, which shows
the evil character in black, we decided to
make this the still mirror clip. Therefore we
cropped the right hand side of the video out
of the shot.
• With the clip below, we did the same but by
cropping the left hand side of the video out.
• We had to make sure that the clips lined up
with each other perfectly so some tweaking
was needed to be done.
• The screenshot shows where the split was
made.
Colour
• As our trailer contained the silhouette/spotlight, this already created a lot of
contrasting light and colours.
• As our genre is a thriller, we felt that we needed to make some shots darker and
less bright with colour, such as when the character is walking down the street and
taps on the window. For this shot we again tried to create the split shot but we
did not use the tripod and therefore the shot is a bit wobble. To try mask this and
again adding colour, we added a ‘Rain’ effect so there is pathetic fallacy.
• In contrast, as our film is about dance, there are bright lights needed and so the
spotlight works well for this but again the normal lights show that this is a
working studio and not just a set.
Area used to split
Rain Effect used to create a mood
and contrast colour
Sound and Timings
• As our film is about dance, the timings of music and dance moved
had to be exact. When inserting our sound, we made sure that the
crash was when the camera is zoomed into the characters eyes, to
create more of a jump.
• We also made sure that when the dancers foot taps along with the
floor, it is in time with the beat.
• We also wanted our voice-overs to be in time with the dance and
with the correct moment in time so we changed these around a lot.
The screenshot shows them overlapping as the increased voices
creates more tension.
Music and Voice-overs
Foot taps in time with
the music
Titles
• After creating the film titles and credits using Adobe Flash, this movie clip also
had to be imported into the project file to then be uploaded.
• This was again simple to edit as the hard work of creating the titles and credits
had already been done on the other software so it was just a case of importing
to library, dragging to the end of the project and putting in place.
• However after finishing the titles, we had realised we had missed parts out and
so we created another adobe flash movie with credits and again imported them
into the library and added onto the project. These titles needed to go in
between the first ones made so the blade tool was again needed to be used to
cut lips and allow manoeuvring.
Inserted titles
Split in half to allow
the new titles to be
placed in the trailer
Blade Tool
Titles
• We also included some titles on clips that could not be
created in Adobe Flash
• We therefore had to use a pre made text animation and
dragged it onto the selected clip to add titles.
• We changed the font and colour to suit our trailer which
again was very easy to do.
Added text
Added text on the timeline
on top of the clip

Teaser Trailer Editing

  • 1.
    Editing the TeaserTrailer By Chloe Chorlton
  • 2.
    Getting Started • Whenwe started to create our teaser trailer, we found it quite hard as we didn’t film all the parts that we planned to. There were various reasons why such as, not enough time but also because the shots did not look good or they would not fit. An example of one shot we cut out was the beginning one of the dancer turning the radio on. Due to us cutting certain shots, this changed our storyline and how we would make our trailer. • The clips that we had, we felt were good but we were unsure on how to place them in the trailer. This is where we came up with the idea to create an even more ‘jumbled’ montage.
  • 3.
    Adding the clips •On the software Final Cut Pro, we created a new project named – Misconception and started adding in our clips. These clips were put in at random and we soon started using the Blade tool to cut up certain videos, such as the first clips of the silhouetted dancer. This was all one video but we decided to split it with the walking shots to break it down and create a faster pace. Blade Tool Cut clips put together in montage
  • 4.
    Creating the split •Even though we cut out many of our shot ideas, one that we kept was the idea of the mirror showing a different reflection to what the dancer is doing. • On the filming day we needed to use the tripod to keep the camera in the same place to be able to film the split clips. Keeping it in the same place avoided camera movement and disruption and would be able to create a cleaner cut when editing. • This image shows that cut the was made against the lined window. • In Final Cut Pro, we put both clips onto the project on top of each other, like the screenshot shows.
  • 5.
    Creating the split •The two video clips overlapped each other, so to be able to show the different shots, we needed to crop them. • By clicking on the top video, which shows the evil character in black, we decided to make this the still mirror clip. Therefore we cropped the right hand side of the video out of the shot. • With the clip below, we did the same but by cropping the left hand side of the video out. • We had to make sure that the clips lined up with each other perfectly so some tweaking was needed to be done. • The screenshot shows where the split was made.
  • 6.
    Colour • As ourtrailer contained the silhouette/spotlight, this already created a lot of contrasting light and colours. • As our genre is a thriller, we felt that we needed to make some shots darker and less bright with colour, such as when the character is walking down the street and taps on the window. For this shot we again tried to create the split shot but we did not use the tripod and therefore the shot is a bit wobble. To try mask this and again adding colour, we added a ‘Rain’ effect so there is pathetic fallacy. • In contrast, as our film is about dance, there are bright lights needed and so the spotlight works well for this but again the normal lights show that this is a working studio and not just a set. Area used to split Rain Effect used to create a mood and contrast colour
  • 7.
    Sound and Timings •As our film is about dance, the timings of music and dance moved had to be exact. When inserting our sound, we made sure that the crash was when the camera is zoomed into the characters eyes, to create more of a jump. • We also made sure that when the dancers foot taps along with the floor, it is in time with the beat. • We also wanted our voice-overs to be in time with the dance and with the correct moment in time so we changed these around a lot. The screenshot shows them overlapping as the increased voices creates more tension. Music and Voice-overs Foot taps in time with the music
  • 8.
    Titles • After creatingthe film titles and credits using Adobe Flash, this movie clip also had to be imported into the project file to then be uploaded. • This was again simple to edit as the hard work of creating the titles and credits had already been done on the other software so it was just a case of importing to library, dragging to the end of the project and putting in place. • However after finishing the titles, we had realised we had missed parts out and so we created another adobe flash movie with credits and again imported them into the library and added onto the project. These titles needed to go in between the first ones made so the blade tool was again needed to be used to cut lips and allow manoeuvring. Inserted titles Split in half to allow the new titles to be placed in the trailer Blade Tool
  • 9.
    Titles • We alsoincluded some titles on clips that could not be created in Adobe Flash • We therefore had to use a pre made text animation and dragged it onto the selected clip to add titles. • We changed the font and colour to suit our trailer which again was very easy to do. Added text Added text on the timeline on top of the clip