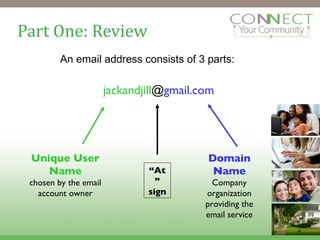
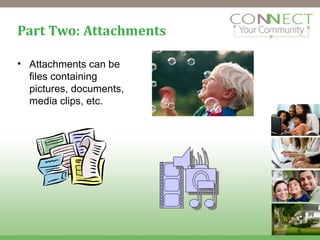
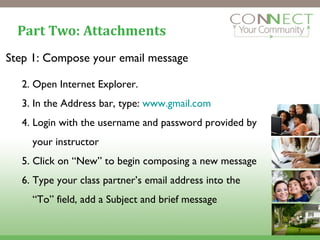
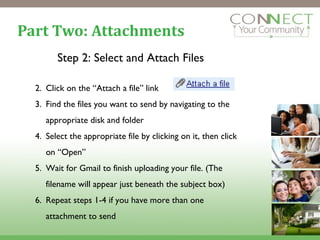
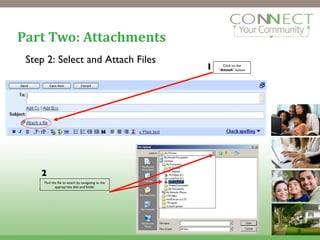
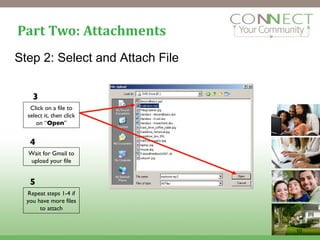
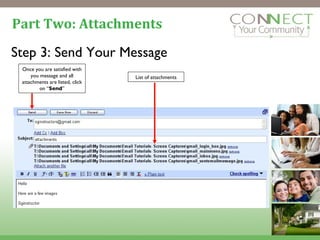
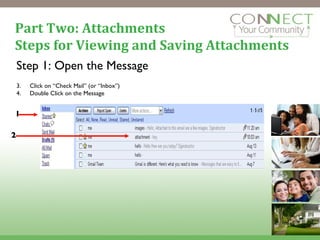
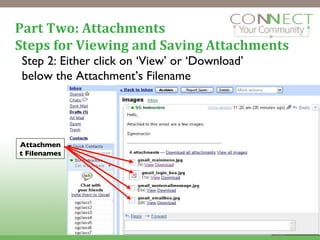
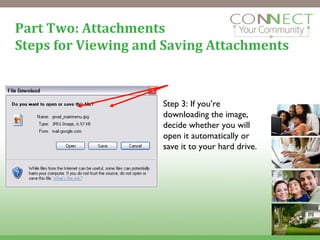
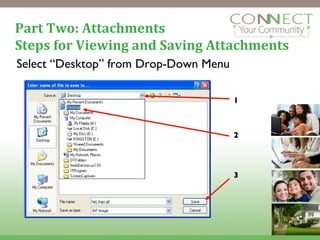
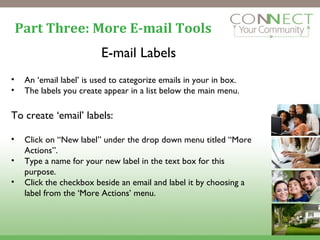
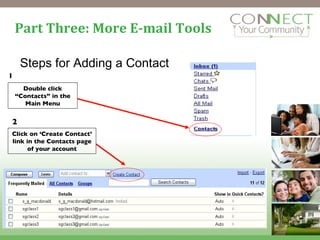
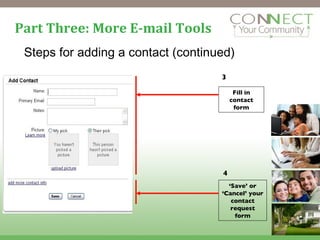
Advanced E-mail with GMail A CYC Electives Module 10-15-10
Class Outline Part 1 - Review Review of email basics Part 2 - Attachments Sending attachments Receiving & viewing attachments Part 3 – More Email Tools Creating folders to store messages Saving a contact to the address book
Part One: Review An electronic message sent from one computer to another. Email saves money and time compared to regular mail. An email message takes seconds to reach destination.
Part One: Review An email address consists of 3 parts: jackandjill @ gmail.com Unique User Name chosen by the email account owner “ At” sign Domain Name Company organization providing the email service
Part One: Review Email Terminology Review: Compose:  write an email to others. Reply:  reply to an email that you received. Forward:  pass on an email that you received to others. Draft:  save an unfinished email message to be completed later. Attachment :  You can send files (like pictures, music, software and documents) as attachments with your email.
Part Two: Attachments Attachments can be files containing pictures, documents, media clips, etc.
Part Two: Attachments Step 1: Compose your email message Open Internet Explorer. In the Address bar, type:  www.gmail.com Login with the username and password provided by your instructor Click on “New” to begin composing a new message Type your class partner’s email address into the “To” field, add a Subject and brief message
Part Two: Attachments Step 2: Select and Attach Files Click on the “Attach a file” link Find the files you want to send by navigating to the appropriate disk and folder Select the appropriate file by clicking on it, then click on “Open”  Wait for Gmail to finish uploading your file. (The filename will appear just beneath the subject box) Repeat steps 1-4 if you have more than one attachment to send
Part Two: Attachments Click on the “ Attach ” button 1 2 Find the file to attach by navigating to the appropriate disk and folder Step 2: Select and Attach Files
Part Two: Attachments Step 2: Select and Attach File Click on a file to select it, then click on “ Open ” 3 5 4 Wait for Gmail to upload your file Repeat steps 1-4 if you have more files to attach
Part Two: Attachments Step 3: Send Your Message Once you are satisfied with you message and all attachments are listed, click on “ Send ” List of attachments
Part Two: Attachments Steps for Viewing and Saving Attachments Step 1: Open the Message Click on “Check Mail” (or “Inbox”) Double Click on the Message  1 2
Part Two: Attachments Steps for Viewing and Saving Attachments Step 2: Either click on ‘View’ or ‘Download’ below the Attachment’s Filename Attachment Filenames
Part Two: Attachments Steps for Viewing and Saving Attachments Step 3: If you’re downloading the image, decide whether you will open it automatically or save it to your hard drive.
Part Two: Attachments Steps for Viewing and Saving Attachments Select “Desktop” from Drop-Down Menu 1 2 3
Part Two: Attachments Steps for Viewing and Saving Attachments Go to desktop and open attachments Minimize the browser window (by clicking on the minimize icon in the top-right section of the window) Find your saved attachments on the desktop Double click on each one to view. (Note – Because you have downloaded these attachments to your computer they will still be available in your GMail even after you sign out of your account.)
Part Two: Attachments Steps for Viewing and Saving Attachments Downloading or opening all attachments Step 1- Click ‘Download all attachments ’
Part Three: More E-mail Tools E-mail Labels An ‘email label’ is used to categorize emails in your in box. The labels you create appear in a list below the main menu. To create ‘email’ labels: Click on “New label” under the drop down menu titled “More Actions”. Type a name for your new label in the text box for this purpose. Click the checkbox beside an email and label it by choosing a label from the ‘More Actions’ menu.
Part Three: More E-mail Tools Steps for Adding a Contact Double click “ Contacts” in the Main Menu 1 Click on ‘Create Contact’ link in the Contacts page of your account 2
Part Three: More E-mail Tools Steps for adding a contact (continued) 3 Fill in contact form ‘ Save’ or ‘Cancel’ your contact request form 4
Conclusion Always Remember to  Sign Out !
Sources This curriculum was partially adapted from a slide presentation entitled “Advanced E-mail” created by the Indian Halifax Central Library. Additional content created by Connect Your Community, a project of  OneCommunity , funded by the federal  Broadband Technology Opportunities Program .
Creative Commons License This work is licensed under the Creative Commons Attribution 3.0 Unported License. To view a copy of this license, visit http://creativecommons.org/licenses/by/3.0

E1 cyc elective advanced e mail

  • 1.
    Advanced E-mail withGMail A CYC Electives Module 10-15-10
  • 2.
    Class Outline Part1 - Review Review of email basics Part 2 - Attachments Sending attachments Receiving & viewing attachments Part 3 – More Email Tools Creating folders to store messages Saving a contact to the address book
  • 3.
    Part One: ReviewAn electronic message sent from one computer to another. Email saves money and time compared to regular mail. An email message takes seconds to reach destination.
  • 4.
    Part One: ReviewAn email address consists of 3 parts: jackandjill @ gmail.com Unique User Name chosen by the email account owner “ At” sign Domain Name Company organization providing the email service
  • 5.
    Part One: ReviewEmail Terminology Review: Compose: write an email to others. Reply: reply to an email that you received. Forward: pass on an email that you received to others. Draft: save an unfinished email message to be completed later. Attachment : You can send files (like pictures, music, software and documents) as attachments with your email.
  • 6.
    Part Two: AttachmentsAttachments can be files containing pictures, documents, media clips, etc.
  • 7.
    Part Two: AttachmentsStep 1: Compose your email message Open Internet Explorer. In the Address bar, type: www.gmail.com Login with the username and password provided by your instructor Click on “New” to begin composing a new message Type your class partner’s email address into the “To” field, add a Subject and brief message
  • 8.
    Part Two: AttachmentsStep 2: Select and Attach Files Click on the “Attach a file” link Find the files you want to send by navigating to the appropriate disk and folder Select the appropriate file by clicking on it, then click on “Open” Wait for Gmail to finish uploading your file. (The filename will appear just beneath the subject box) Repeat steps 1-4 if you have more than one attachment to send
  • 9.
    Part Two: AttachmentsClick on the “ Attach ” button 1 2 Find the file to attach by navigating to the appropriate disk and folder Step 2: Select and Attach Files
  • 10.
    Part Two: AttachmentsStep 2: Select and Attach File Click on a file to select it, then click on “ Open ” 3 5 4 Wait for Gmail to upload your file Repeat steps 1-4 if you have more files to attach
  • 11.
    Part Two: AttachmentsStep 3: Send Your Message Once you are satisfied with you message and all attachments are listed, click on “ Send ” List of attachments
  • 12.
    Part Two: AttachmentsSteps for Viewing and Saving Attachments Step 1: Open the Message Click on “Check Mail” (or “Inbox”) Double Click on the Message 1 2
  • 13.
    Part Two: AttachmentsSteps for Viewing and Saving Attachments Step 2: Either click on ‘View’ or ‘Download’ below the Attachment’s Filename Attachment Filenames
  • 14.
    Part Two: AttachmentsSteps for Viewing and Saving Attachments Step 3: If you’re downloading the image, decide whether you will open it automatically or save it to your hard drive.
  • 15.
    Part Two: AttachmentsSteps for Viewing and Saving Attachments Select “Desktop” from Drop-Down Menu 1 2 3
  • 16.
    Part Two: AttachmentsSteps for Viewing and Saving Attachments Go to desktop and open attachments Minimize the browser window (by clicking on the minimize icon in the top-right section of the window) Find your saved attachments on the desktop Double click on each one to view. (Note – Because you have downloaded these attachments to your computer they will still be available in your GMail even after you sign out of your account.)
  • 17.
    Part Two: AttachmentsSteps for Viewing and Saving Attachments Downloading or opening all attachments Step 1- Click ‘Download all attachments ’
  • 18.
    Part Three: MoreE-mail Tools E-mail Labels An ‘email label’ is used to categorize emails in your in box. The labels you create appear in a list below the main menu. To create ‘email’ labels: Click on “New label” under the drop down menu titled “More Actions”. Type a name for your new label in the text box for this purpose. Click the checkbox beside an email and label it by choosing a label from the ‘More Actions’ menu.
  • 19.
    Part Three: MoreE-mail Tools Steps for Adding a Contact Double click “ Contacts” in the Main Menu 1 Click on ‘Create Contact’ link in the Contacts page of your account 2
  • 20.
    Part Three: MoreE-mail Tools Steps for adding a contact (continued) 3 Fill in contact form ‘ Save’ or ‘Cancel’ your contact request form 4
  • 21.
  • 22.
    Sources This curriculumwas partially adapted from a slide presentation entitled “Advanced E-mail” created by the Indian Halifax Central Library. Additional content created by Connect Your Community, a project of OneCommunity , funded by the federal Broadband Technology Opportunities Program .
  • 23.
    Creative Commons LicenseThis work is licensed under the Creative Commons Attribution 3.0 Unported License. To view a copy of this license, visit http://creativecommons.org/licenses/by/3.0