2
Class Outline
• Part1 - Introduction
– Explaining email
– Parts of an email address
– Types of email services
– Acquiring an email account
• Part 2 – Sending and
Receiving Email
– Signing in
– Composing and sending
– Checking mail
– Replying and Forwarding
Part 3 – Managing Your
Messages
– Deleting messages
– The “Trash” folder
– Email security
– Signing out
3.
3
Part 1: Introduction
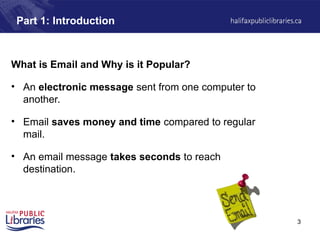
Whatis Email and Why is it Popular?
• An electronic message sent from one computer to
another.
• Email saves money and time compared to regular
mail.
• An email message takes seconds to reach
destination.
4.
4
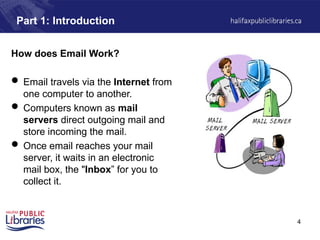
How does EmailWork?
Email travels via the Internet from
one computer to another.
Computers known as mail
servers direct outgoing mail and
store incoming the mail.
Once email reaches your mail
server, it waits in an electronic
mail box, the "Inbox” for you to
collect it.
Part 1: Introduction
5.
5
Part 1: Introduction
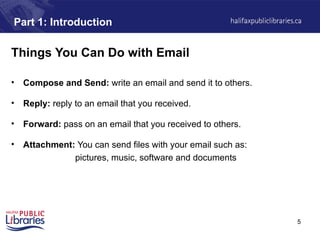
ThingsYou Can Do with Email
• Compose and Send: write an email and send it to others.
• Reply: reply to an email that you received.
• Forward: pass on an email that you received to others.
• Attachment: You can send files with your email such as:
pictures, music, software and documents
6.
6
Part 1: Introduction
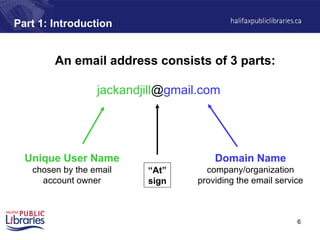
Anemail address consists of 3 parts:
Unique User Name
chosen by the email
account owner
Domain Name
company/organization
providing the email service
jackandjill@gmail.com
“At”
sign
7.
7
Part 1: Introduction
TwoWays to Get Email
1. Provided by your Internet Service Provider
Monthly fee for internet connection often includes email service.
• Aliant - ...@sympatico.ca
• Eastlink - …@eastlink.ca
2. Free Web-Based Service Providers
Advertising on the site pays for the service.
• Gmail - …@gmail.com
• Hotmail - …@hotmail.com
8.
8
Part 1: Introduction
TwoWays People Check Email
1. Web-Based Email
• Login to a web site
• Messages stay on the mail server
• Can be accessed from any computer with internet connection
2. Using Email Software
• Open and login to your email software application (e.g. Outlook)
• The application retrieves your messages from the mail server and
saves them to your computer’s hard drive
9.
9
Part 1: Introduction
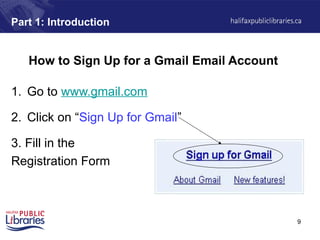
Howto Sign Up for a Gmail Email Account
1. Go to www.gmail.com
2. Click on “Sign Up for Gmail”
3. Fill in the
Registration Form
10.
10
Part 1: Introduction
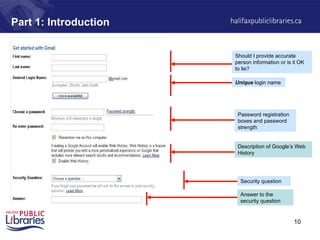
ShouldI provide accurate
person information or is it OK
to lie?
Unique login name
Password registration
boxes and password
strength
Security question
Answer to the
security question
Description of Google’s Web
History
11.
11
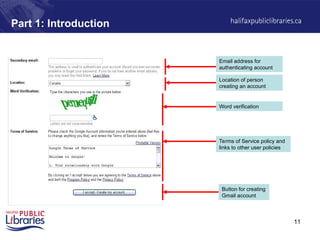
Part 1: Introduction
Emailaddress for
authenticating account
Location of person
creating an account
Word verification
Terms of Service policy and
links to other user policies
Button for creating
Gmail account
12.
12
Part 1: Introduction
GettingRegistration Help
1. Gmail provides a registration help section. Click
on “Help” at the bottom of the registration page.
2. Book a computer at the library and ask the
Information Desk staff for assistance.
13.
13
Part 2: Sendingand Receiving Email
Three Exercises
1. Signing in (“Logging In”) to Gmail
2. Sending a message to your class partner
3. Reading new messages in your “Inbox”
14.
14
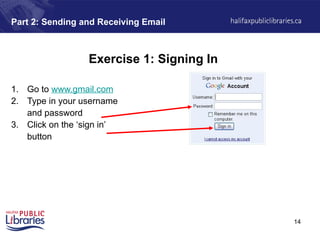
Part 2: Sendingand Receiving Email
Exercise 1: Signing In
1. Go to www.gmail.com
2. Type in your username
and password
3. Click on the ‘sign in’
button
16
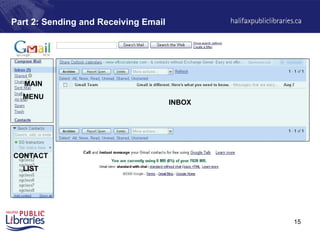
Part 2: Sendingand Receiving Email
Exercise 2: Sending an Email
To: Type full email
address of your class
partner
Subject: Type a
title for your message
Message: Type
your message in this
box
Send: Used
to send emails
17.
17
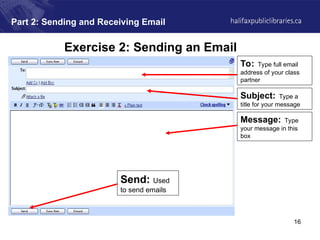
Part 2: Sendingand Receiving Email
Confirmation message:
Confirmation message and
link to sent message
18.
18
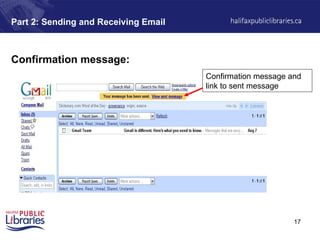
Part 2: Sendingand Receiving Email
Checking for New Email Messages
The number of new
messages in your
account appears beside
the Inbox link.
Main Menu
19.
19
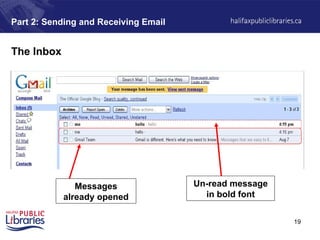
Part 2: Sendingand Receiving Email
The Inbox
Messages
already opened
Un-read message
in bold font
20.
20
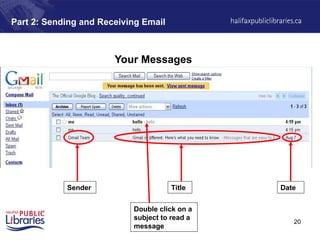
Part 2: Sendingand Receiving Email
Your Messages
Title
Sender Date
Double click on a
subject to read a
message
21.
21
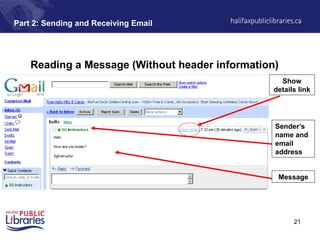
Reading a Message(Without header information)
Part 2: Sending and Receiving Email
Message
Sender’s
name and
email
address
Show
details link
22.
22
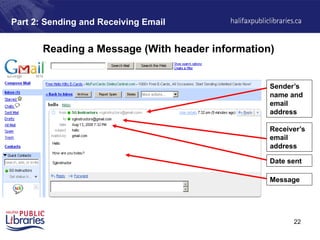
Part 2: Sendingand Receiving Email
Reading a Message (With header information)
Message
Date sent
Sender’s
name and
email
address
Receiver’s
email
address
23.
23
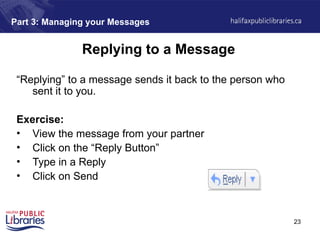
Part 3: Managingyour Messages
Replying to a Message
“Replying” to a message sends it back to the person who
sent it to you.
Exercise:
• View the message from your partner
• Click on the “Reply Button”
• Type in a Reply
• Click on Send
24.
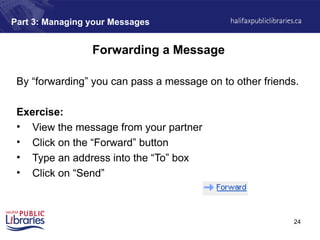
24
Part 3: Managingyour Messages
Forwarding a Message
By “forwarding” you can pass a message on to other friends.
Exercise:
• View the message from your partner
• Click on the “Forward” button
• Type an address into the “To” box
• Click on “Send”
25.
25
Part 3: Managingyour Messages
Three Ways to Delete Messages
1. Click on the delete button while viewing a message
OR
2. Click on the small arrow next to ‘Reply’ and select ‘Delete Message’
OR
3. From the “Inbox”
1. Click on the check box beside a message you want to delete
2. Click on the delete button
26.
26
Part 3: Managingyour Messages
The Trash Folder
• Deleted messages go to the “Trash” folder.
• If you delete something by accident, you can retrieve it from
“Trash”.
• If you delete a message in “Trash”, it is gone for good.
• You can delete everything in the “Trash” folder by clicking on
“Empty”
27.
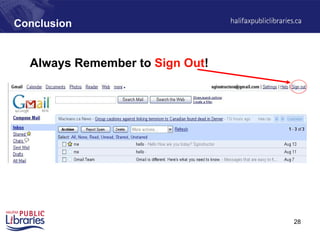
27
Conclusion
Email Security
• Alwayssign out, especially if you are using a public computer!
• Never send your SIN or bank account number by email.
• Beware of messages that:
– Ask for your bank account information, even if they say they want to put money
into your account (e.g. The Nigerian Scam)
– Ask you to click on a link, login and verify personal information (e.g. Phishing
bank scams)
– inform you that you have won a prize/money and ask for personal information in
order to give you your prize


![제 23회 보아즈(BOAZ) 빅데이터 컨퍼런스 - [MBOAX] : ABSA를 활용한 소비자 반응 분석 기반 운영 효율화 대시보드 설계](https://cdn.slidesharecdn.com/ss_thumbnails/3-1boaz23rdconferencemboax-260203102709-9d519923-thumbnail.jpg?width=640&height=640&fit=bounds)


