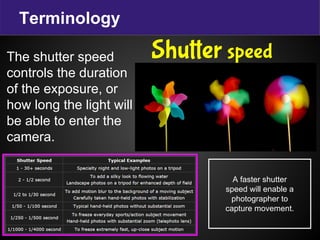
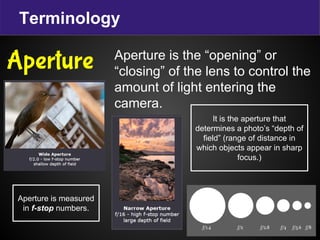
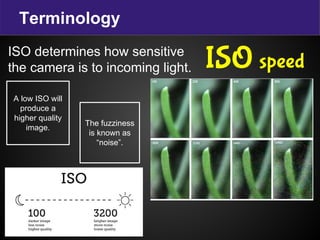
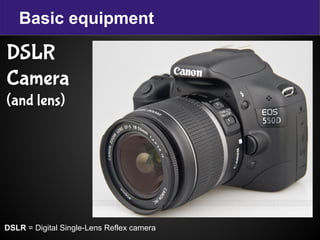
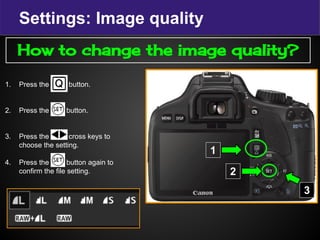
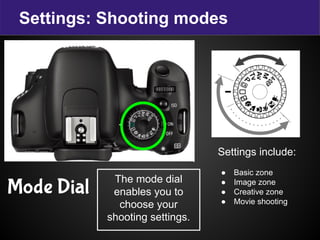
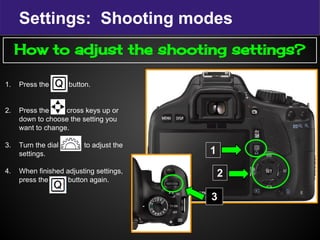
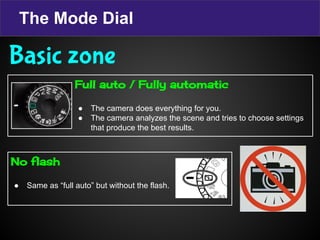
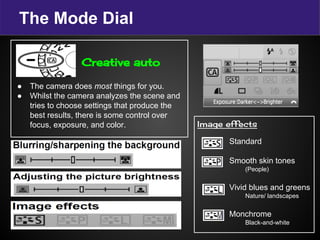
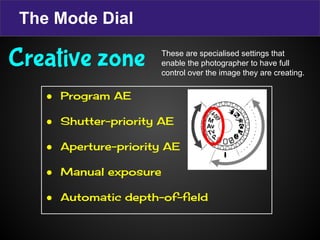
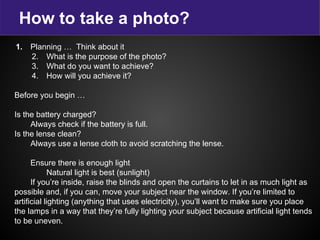
The document provides terminology and guidance for taking photos with a digital camera. It defines key terms like focus, exposure, aperture, shutter speed, and ISO. It describes camera parts such as the body, lens, flash, battery, memory card, LCD screen, and mode dial. It explains how to adjust settings for image quality, shooting modes, and erasing photos. Basic steps for taking a photo include planning the purpose, ensuring the camera is ready with charged battery and clean lens, and allowing enough light whether natural or artificial.
A Complete Guide to Manual DSLR PhotographyLearnPick
It’s a commonly known fact that most beginner photographers use the auto mode on their DSLR cameras to click snapshots in the best possible manner.
It’s a fair enough practice; there’s no denying this fact but, at the same time, you must also remember that the auto mode of a DSLR doesn’t use the camera to its full potential.
So if you are willing to step out of your comfort zone to the "manual” mode, this presentation can help.
Lighting Techniques in Photography
Natural Lights Vs Artificial Lights
Lighting Concepts
Three Point Lighting Techniques
Use of Three Points Lighting
Essentials rules of Lights in Photography
Importance of Light in Photography
Square Inverse Law
Understanding Exposure Triangle in PhotographyAbhijit Ghosh
The exposure triangle is a common way of associating the three variables that determine the exposure of a photograph: Aperture, Shutter speed, and ISO. One must balance all three of these to achieve a desired result, an adjustment of one requiring adjustments of at least one of the others. They do not only affect exposure, but are also the largest determiners of the global appearance of an image; thus, their mastery is absolutely crucial both for technique and composition.
Objective:
1. To learn how to use the exposure triangle to set a correct exposure in your camera.
2. To learn about the link between ISO, shutter speed and aperture.
3. To learn what aperture is, and how to use it creatively.
4. To learn what shutter speed is, and how to produce blur or freeze motion photos.
5. To learn what ISO is, and how to prevent 'noisy' photos.
Target Audience: Photography Enthusiasts
Agenda:
• To understand Correct Photograhy Exposure.
• To understand the components of Exposure Triangle.
• To know how to balance all the three elements of Exposure Triangle to achieve a desired result.
• Understanding the purpose and value of exposure is a must for photographers, particularly beginners who are serious about developing their craft.
Expected Outcomes:
By the end of the ppt/pdf, the participants will be able to:
1) Better understanding of each of the three exposure settings, how they are measured, what they do, and how they interact.
2) Better equipped to manipulate the exposure of your images, as well as the artistic presentation of motion, depth of field, and digital noise.
3) Better control of the manual mode in camera.
Understanding Camera Exposure, Aperture, ISO & Shutter SpeedRahat Kazmi
This tutorial has been put together to help new photographers to have understanding of basic DSLR functions so that they can start capturing professional looking images.
If this tutorial has been helpful, please Like our pages to support us and don't forget to share this with others.
Tutorial 1 - Basics of Digital PhotographyFahad Golra
In the second session of this 5 session workshop, I am going to explain the photography gear (lens) with special focus on focal length and maximum aperture. Then we will discuss about the introduction of exposure in photography.
Dr Dwivedi ended his presentation with a series of tips for taking better photos, based on his own learning and experiences. He kept the audience engaged throughout the presentation, which was interactive with many in the audience asking questions and at the end everyone was asked to go out with their cameras or cell phones and take pictures, which could then be shown to the team for advice and suggestions.
Through the Lens - Volumes of learning material on Film Making & Photography. Here is the 1st Volume of Through the Lens (Video Camera Techniques). This is for learning purpose not for commercial use. Hope this is will really helps media students. Write to me for to clarify any doubts - ebenezerannadoss@gmail.com
Live Video Streaming Camera Settings GuidePaul Richards
In the "Live Video Streaming Camera Settings Guide" we review the ideal camera settings for most cameras including aperture, shutter speed and gain along with a variety of advanced features. This guide is a comprehensive overview for users tuning cameras for conference spaces, production studios, live sports and even performances with low light. Tuning your camera for a proper exposure is key to effective live streaming because in many cases their is no post production. This is as ture in a coporate webinar as it is for live streaming competitive sports. Enjoy this live streaming camera settings guide built to be a informative tutorial on the foundations of photography and video camera operation.
This presentation was originally written to accompany a lecture and demonstration so you may find some of this a bit "off". Power through it and see what you can take from it.
Best Practices To Improve Your Digital Photographsguest694f6a5d
This presentation was originally written to go along with a lecture and demo. Because of this aspect you may find some of the material a bit confusing.
The French Revolution, which began in 1789, was a period of radical social and political upheaval in France. It marked the decline of absolute monarchies, the rise of secular and democratic republics, and the eventual rise of Napoleon Bonaparte. This revolutionary period is crucial in understanding the transition from feudalism to modernity in Europe.
For more information, visit-www.vavaclasses.com
Students, digital devices and success - Andreas Schleicher - 27 May 2024..pptxEduSkills OECD
Andreas Schleicher presents at the OECD webinar ‘Digital devices in schools: detrimental distraction or secret to success?’ on 27 May 2024. The presentation was based on findings from PISA 2022 results and the webinar helped launch the PISA in Focus ‘Managing screen time: How to protect and equip students against distraction’ https://www.oecd-ilibrary.org/education/managing-screen-time_7c225af4-en and the OECD Education Policy Perspective ‘Students, digital devices and success’ can be found here - https://oe.cd/il/5yV
Operation “Blue Star” is the only event in the history of Independent India where the state went into war with its own people. Even after about 40 years it is not clear if it was culmination of states anger over people of the region, a political game of power or start of dictatorial chapter in the democratic setup.
The people of Punjab felt alienated from main stream due to denial of their just demands during a long democratic struggle since independence. As it happen all over the word, it led to militant struggle with great loss of lives of military, police and civilian personnel. Killing of Indira Gandhi and massacre of innocent Sikhs in Delhi and other India cities was also associated with this movement.
This is a presentation by Dada Robert in a Your Skill Boost masterclass organised by the Excellence Foundation for South Sudan (EFSS) on Saturday, the 25th and Sunday, the 26th of May 2024.
He discussed the concept of quality improvement, emphasizing its applicability to various aspects of life, including personal, project, and program improvements. He defined quality as doing the right thing at the right time in the right way to achieve the best possible results and discussed the concept of the "gap" between what we know and what we do, and how this gap represents the areas we need to improve. He explained the scientific approach to quality improvement, which involves systematic performance analysis, testing and learning, and implementing change ideas. He also highlighted the importance of client focus and a team approach to quality improvement.
Model Attribute Check Company Auto PropertyCeline George
In Odoo, the multi-company feature allows you to manage multiple companies within a single Odoo database instance. Each company can have its own configurations while still sharing common resources such as products, customers, and suppliers.
Unit 8 - Information and Communication Technology (Paper I).pdfThiyagu K
This slides describes the basic concepts of ICT, basics of Email, Emerging Technology and Digital Initiatives in Education. This presentations aligns with the UGC Paper I syllabus.
How to Make a Field invisible in Odoo 17Celine George
It is possible to hide or invisible some fields in odoo. Commonly using “invisible” attribute in the field definition to invisible the fields. This slide will show how to make a field invisible in odoo 17.
1. Terminology
Focus is the clarity of detail in an image.
It should be clear and sharply defined.
Focus
The image on the left is
“out-of-focus”.
The image on the right
is “in-focus”.
2. Terminology
Exposure is the amount of light the image
sensor captures when taking a photo.
Overexposure
Too much light will wash out
the color and make it too bright.
Exposure
Underexposure
Not enough light will make it too
dark.
Exposure control:
Aperture
ISO speed
Shutter speed
3. Terminology
The shutter speed
controls the duration
of the exposure, or
how long the light will
be able to enter the
camera.
Shutter speed
A faster shutter
speed will enable a
photographer to
capture movement.
4. Terminology
Aperture is the “opening” or
“closing” of the lens to control the
amount of light entering the
camera.
Aperture
It is the aperture that
determines a photo’s “depth of
field” (range of distance in
which objects appear in sharp
focus.)
Aperture is measured
in f-stop numbers.
5. Terminology
ISO determines how sensitive
the camera is to incoming light. ISO speed
A low ISO will
produce a
higher quality
image.
The fuzziness
is known as
“noise”.
8. Parts of the camera
Body
The body is the main part
of a digital camera.
This is where the
“electronics” are located
such as the controls and
settings as well as the
image-processor and
other necessary features.
The body does not have a
lens, unless it is a
“compact” camera (point-
and-shoot). TIP: Never, ever, ever touch the mirror.
TIP: When changing lenses, minimise the mirror’s
exposure to dust or small particles.
9. Parts of the camera
Interchangeable lens
Interchangeable lenses are lenses that can be
removed from the camera body.
This enables a photographer to choose the lens
that is most suitable for their task.
Lens cap
The lens cap protects
the lens from dirt,
dust and scratches.
The smallest particle or
scratch on the lens can
ruin a photo.
TIP: Never, ever put your
finger on the lens.
TIP: Only use a lens cloth
to clean the lens (even a
tissue will damage the
lens).
10. Parts of the camera
Card slot SD cards
This is where the external
memory card is loaded.
Physical size:
SD card (blue)
Mini-SD (green)
Micro-SD (red)
Capacity:
SDSC (Standard) 1 MB - 2 GB
SDHC (High) 2 GB - 32 GB
SDXC (eXtended) 32 GB - 1 TB
Greater storage capacity will
enable you to take more photos
using higher quality settings.
SD = Secure Digital
11. Parts of the camera
Flash The flash is used to illuminate (brighten) the subject in poor or
dark light. This is very important to use when inside.
12. Parts of the camera
“On” and “Off”
Always turn the camera “off’ when
you are not using it. This will
enable to battery to last longer.
Shutter button
When the shutter button is
pushed down completely it will
take the photo.
If the shutter button is pushed
halfway down, it will “autofocus”
your image.
13. Parts of the camera
LCD monitor The LCD monitor has three functions:
1. Review photos
○ “Playback” images
2. Display menu settings
3. Live viewfinder
The monitor can be turned on or off
by pressing the “DISP.” button.
14. Parts of the camera
Battery compartment
The battery compartment is on
the bottom of the camera body.
Always check that you have a
battery and that it is fully
charged.
15. Parts of the camera
Battery charging
External charger
The battery is charged
by connecting the
charger to a power
outlet.
Some camera batteries can be
charged without removing them
from the camera. A cable can be
connected from the camera to a
USB port.
The LCD will show how much
battery power remains.
16. Settings: Erasing images
1. Press the “MENU” button.
2. Press the c cross keys to select
the tab.
3. Press the cross keys to select
the setting “Erase images”.
4. Press the set button.
5. Choose “Select and erase all images”.
6. Select “OK”.
7. Press the Set button.
1
2
How to erase ALL images?
3
4
17. Settings: Image quality
What is image quality?
The image quality
refers to the number of
pixels recorded in the
photo.
A pixel is a
single point on a
graphic image.
The more pixels the higher
the quality of the image
but a bigger file size
(less storage).
18. Settings: Image quality
RAW is an image captured on the camera that has not been
processed. It is the “raw” image which enables the photographer
complete control over editing.
RAW
A JPEG will make
changes and
adjustments to
compress the image
for storage.
19. Settings: Image quality
1. Press the button.
2. Press the set button.
3. Press the cross keys to
choose the setting.
4. Press the set button again to
confirm the file setting.
1
2
3
How to change the image quality?
20. Settings: Shooting modes
Mode Dial The mode dial
enables you to
choose your
shooting settings.
Settings include:
● Basic zone
● Image zone
● Creative zone
● Movie shooting
21. Settings: Shooting modes
1. Press the button.
2. Press the cross keys up or
down to choose the setting you
want to change.
3. Turn the dial to adjust the
settings.
4. When finished adjusting settings,
press the <Q> button again.
1
2
3
How to adjust the shooting settings?
22. The Mode Dial
Full auto / Fully automatic
● The camera does everything for you.
● The camera analyzes the scene and tries to choose settings
that produce the best results.
No flash
● Same as “full auto” but without the flash.
Basic zone
23. The Mode Dial
Creative auto
● The camera does most things for you.
● Whilst the camera analyzes the scene and
tries to choose settings that produce the
best results, there is some control over
focus, exposure, and color. Image effects
Standard
Smooth skin tones
(People)
Vivid blues and greens
Nature/ landscapes
Monchrome
Black-and-white
24. The Mode Dial
● Designed to produce softly focussed
backgrounds for flattering portraits.
● Same as portrait but combines flash with a
slow shutter speed to produce softer lighting
and brighter backgrounds.
Image zone
Portrait
Night portrait
25. The Mode Dial
● Produces softly focused backgrounds.
● Suitable for close-ups of flowers or
other natural subjects.
● Designed to keep both near and distant
objects in sharp focus.
Close-up
Landscape
26. The Mode Dial
● Faster shutter speed.
● Captures moving subjects without blurring.
Sports/ movement
27. The Mode Dial
● Ability to record digital movies.
Movie shooting
28. The Mode Dial
● Program AE
● Shutter-priority AE
● Aperture-priority AE
● Manual exposure
● Automatic depth-of-field
Creative zone These are specialised settings that
enable the photographer to have full
control over the image they are creating.
29. Experiment ..
In a team, experiment
with the different
settings and see how
creative you can be as
a photographer.
30. How to take a photo?
1. Planning … Think about it
2. What is the purpose of the photo?
3. What do you want to achieve?
4. How will you achieve it?
Before you begin …
Is the battery charged?
Always check if the battery is full.
Is the lense clean?
Always use a lense cloth to avoid scratching the lense.
Ensure there is enough light
Natural light is best (sunlight)
If you’re inside, raise the blinds and open the curtains to let in as much light as
possible and, if you can, move your subject near the window. If you’re limited to
artificial lighting (anything that uses electricity), you’ll want to make sure you place
the lamps in a way that they’re fully lighting your subject because artificial light tends
to be uneven.