Download to read offline

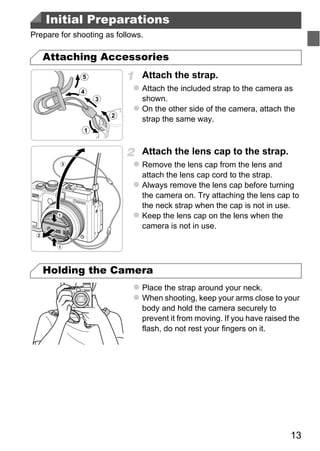
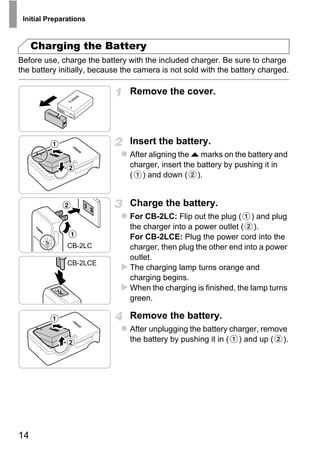
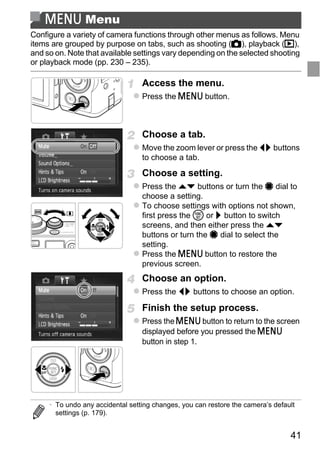
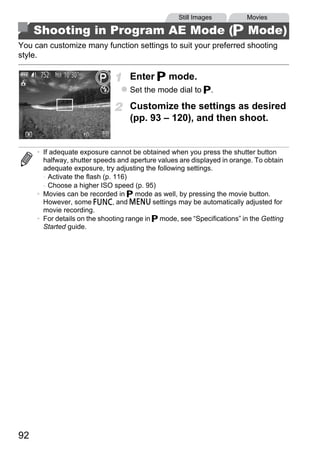
![Initial Preparations
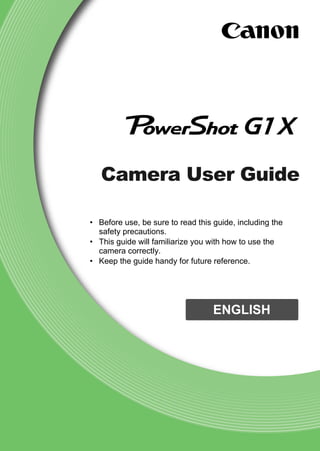
Using the Screen
Prepare the screen for use.
Open the screen ( ) and rotate it toward the
lens 180° ( ).
Close the screen in this orientation ( ).
• The screen can only open to approximately 175° in direction . Be
careful not to open the screen any further than this, as it will damage
the camera.
Adjusting the Screen Angle and Orientation
You can adjust the angle and orientation of
the screen as needed, to suit shooting
PY
conditions.
To protect the screen when the camera is not
O
in use, always keep it closed and facing the
camera body.
able to shoot a movie.C
• If the screen is closed and facing the camera body, you will not be
• When including yourself in shots, you can view a mirror image of yourself by
rotating the screen around toward the front of the camera. To cancel reverse
display, press the n button, choose [Reverse Disp.] on the 4 tab, and
press the qr buttons to choose [Off].
17](https://image.slidesharecdn.com/canonpowershotg1x-120924153241-phpapp01/85/Canon-power-shot-g1x-17-320.jpg)
![Initial Preparations
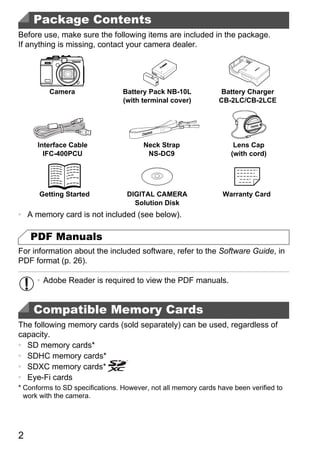
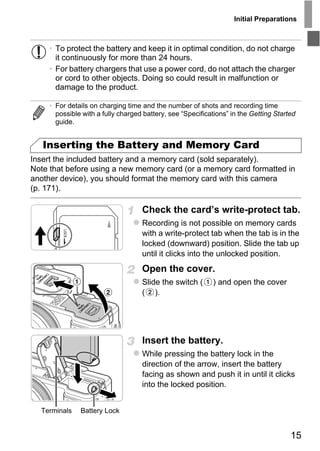
Setting the Date and Time
A screen for setting the date and time is displayed the first time you turn the
camera on. Be sure to specify the date and time, which is the basis for dates
and times added to your images.
Turn the camera on.
Press the power button.
The [Date/Time] screen is displayed.
Set the date and time.
Press the qr buttons to choose an option.
Press the op buttons or turn the 7 dial to
specify the date and time.
When finished, press the m button.
O PY
CSet the local time zone.
Press the qr buttons or turn the 7 dial to
choose your local time zone.
Finish the setup process.
Press the m button when finished. After a
confirmation message, the setting screen is
no longer displayed.
To turn off the camera, press the power
button.
18](https://image.slidesharecdn.com/canonpowershotg1x-120924153241-phpapp01/85/Canon-power-shot-g1x-18-320.jpg)
![Initial Preparations
• Unless you set the date, time, and local time zone, the [Date/Time]
screen will be displayed each time you turn the camera on. Specify
the correct information.
• To set daylight saving time (1 hour ahead), choose in step 2 and then
choose by pressing the op buttons or turning the 7 dial.
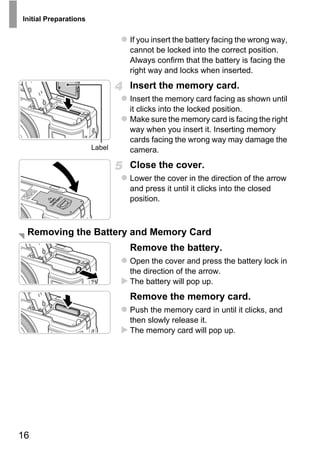
Changing the Date and Time
Adjust the date and time as follows.
Access the camera menu.
Press the n button.
PY
Choose [Date/Time].
Move the zoom lever to choose the 3 tab.
O
Press the op buttons or turn the 7 dial to
choose [Date/Time], and then press the m
C button.
Change the date and time.
Follow step 2 on p. 18 to adjust the settings.
Press the n button to close the menu.
• Date/time settings can be retained for about 3 weeks by the camera’s built-in
date/time battery (backup battery) after the battery pack is removed.
• The date/time battery will be charged in about 4 hours once you insert a charged
battery or connect the camera to an AC adapter kit (sold separately, p. 182),
even if the camera is left off.
• Once the date/time battery is depleted, the [Date/Time] screen will be displayed
when you turn the camera on. Follow the steps on p. 18 to set the date and time.
19](https://image.slidesharecdn.com/canonpowershotg1x-120924153241-phpapp01/85/Canon-power-shot-g1x-19-320.jpg)
![Initial Preparations
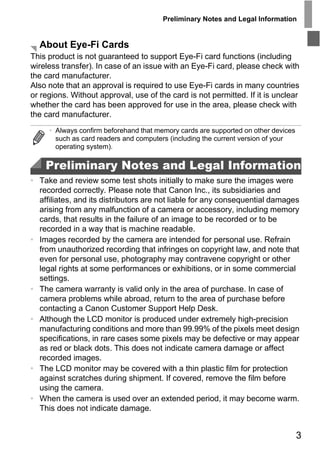
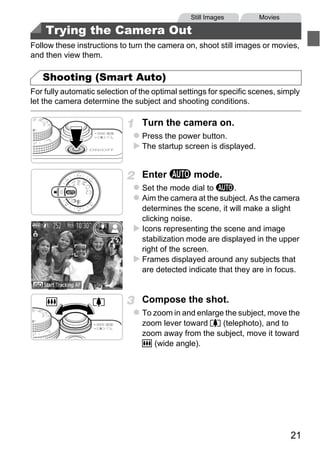
Display Language
The display language can be changed as needed.
Enter Playback mode.
Press the 1 button.
Access the setting screen.
Press and hold the m button, and then
immediately press the n button.
Set the display language.
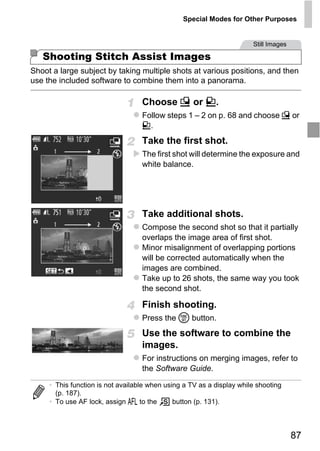
PY
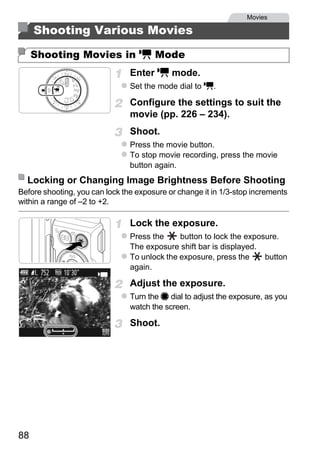
Press the opqr buttons or turn the 7 dial
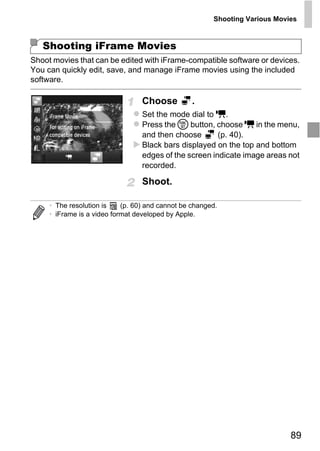
to choose a language, and then press the m
button.
C O
Once the display language has been set, the
setting screen is no longer displayed.
• A clock icon is displayed if you wait too long in step 2 after pressing the m
button before you press the n button. In this case, press the m button to
dismiss the clock icon and repeat step 2.
• You can also change the display language by pressing the n button and
choosing [Language ] on the 3 tab.
20](https://image.slidesharecdn.com/canonpowershotg1x-120924153241-phpapp01/85/Canon-power-shot-g1x-20-320.jpg)
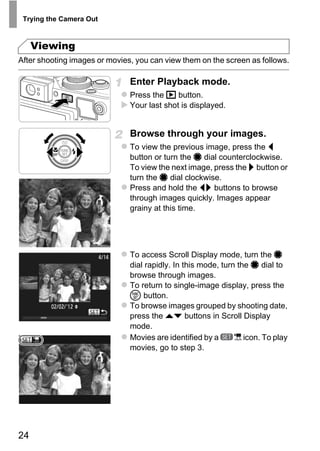
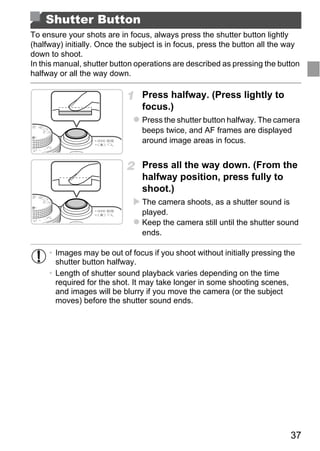
![Trying the Camera Out
Shoot.
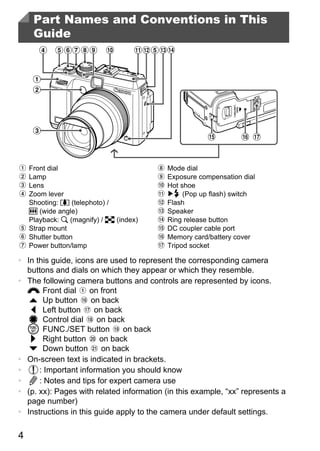
Shooting Still Images
Focus.
Press the shutter button lightly, halfway
down. The camera beeps twice after
focusing, and AF frames are displayed to
indicate image areas in focus.
AF Frames
PY
If [Raise the flash] appears on the screen,
move the switch to raise the flash. It will
O
fire when shooting. If you prefer not to use the
flash, push it down with your finger, into the
C
camera.
Shoot.
Press the shutter button all the way down.
As the camera shoots, a shutter sound is
played, and in low-light conditions when you
have raised the flash, it fires automatically.
Your shot remains displayed on the screen
for about two seconds.
Even while the shot is displayed, you can
take another shot by pressing the shutter
button again.
22](https://image.slidesharecdn.com/canonpowershotg1x-120924153241-phpapp01/85/Canon-power-shot-g1x-22-320.jpg)
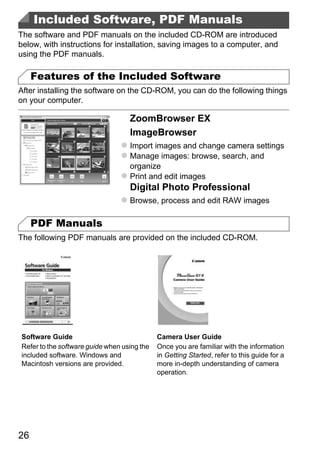
![Trying the Camera Out
Shooting Movies
Start shooting.
If the flash is already up, push it down with
your finger, into the camera.
Elapsed Time Press the movie button. The camera beeps
once as recording begins, and [ Rec] is
displayed with the elapsed time.
Black bars displayed on the top and bottom
edges of the screen indicate image areas not
recorded.
Once recording begins, you can take your
finger off the movie button.
Finish shooting.
PY
Press the movie button again to stop
shooting. The camera beeps twice as
recording stops.
C O
Recording will stop automatically when the
memory card becomes full.
23](https://image.slidesharecdn.com/canonpowershotg1x-120924153241-phpapp01/85/Canon-power-shot-g1x-23-320.jpg)
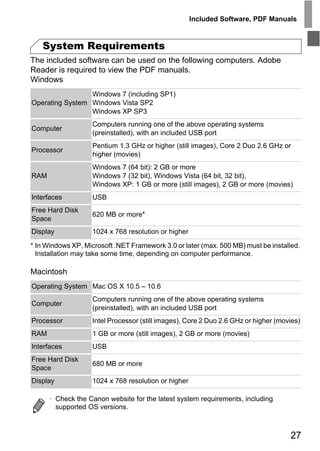
![Trying the Camera Out
Play movies.
Press the m button to access the movie
control panel, choose (either press the
qr buttons or turn the 7 dial), and then press
the m button again.
Playback now begins, and after the movie is
finished, is displayed.
To adjust the volume, press the op buttons.
• To switch to Shooting mode from Playback mode, press the shutter button
halfway.
Erasing the Images
You can choose and erase unneeded images one by one. Be careful when
erasing images, because they cannot be recovered.
PY
Choose an image to erase.
Press the qr buttons or turn the 7 dial to
C O
choose an image.
Erase the images.
Press the a button.
After [Erase?] is displayed, press the qr
buttons or turn the 7 dial to choose [Erase],
and then press the m button.
The current image is now erased.
To cancel erasure, press the qr buttons or
turn the 7 dial to choose [Cancel], and then
press the m button.
• You can also erase all images at once (p. 152).
25](https://image.slidesharecdn.com/canonpowershotg1x-120924153241-phpapp01/85/Canon-power-shot-g1x-25-320.jpg)
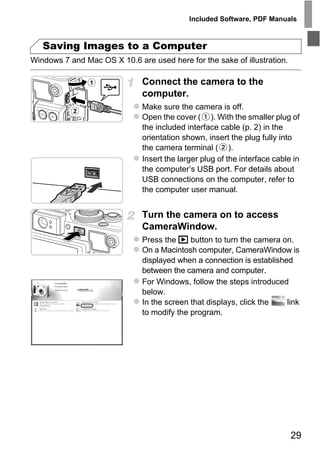
![Included Software, PDF Manuals
Installing the Software and PDF Manuals
Windows 7 and Mac OS X 10.6 are used here for the sake of illustration.
Insert the CD-ROM in the
computer’s CD-ROM drive.
Insert the included CD-ROM (DIGITAL
CAMERA Solution Disk) (p. 2) in the
computer’s CD-ROM drive.
On a Macintosh computer, after inserting the
disc, double-click the desktop disc icon to
open it, and then double-click the icon
displayed.
Install the files.
PY
In Windows, click [Easy Installation], or on a
Macintosh computer, click [Install]. Follow the
on-screen instructions to complete the
O
installation process.
C
If the [User Account Control] window is
displayed in Windows, follow the on-screen
instructions.
Complete the installation.
In Windows, click [Restart] or [Finish] and
remove the CD-ROM after the desktop is
displayed.
On a Macintosh computer, click [Finish] on
the screen after installation and remove the
CD-ROM when the desktop is displayed.
28](https://image.slidesharecdn.com/canonpowershotg1x-120924153241-phpapp01/85/Canon-power-shot-g1x-28-320.jpg)
![Included Software, PDF Manuals
Choose [Downloads Images From Canon
Camera using Canon CameraWindow] and
then click [OK].
Double click .
CameraWindow Save the images to the computer.
PY
Click [Import Images from Camera], and then
click [Import Untransferred Images].
O
Images are now saved to the Pictures folder
C
on the computer, in separate folders named
by date.
After images are saved, close
CameraWindow, press the 1 button to turn
the camera off, and unplug the cable.
For instructions on viewing images on a
computer, refer to the Software Guide.
30](https://image.slidesharecdn.com/canonpowershotg1x-120924153241-phpapp01/85/Canon-power-shot-g1x-30-320.jpg)
![Included Software, PDF Manuals
• In Windows 7, if the screen in step 2 is not displayed, click the icon in the
taskbar.
• To start CameraWindow in Windows Vista or XP, click [Downloads Images
From Canon Camera using Canon CameraWindow] on the screen displayed
when you turn the camera on in step 2. If CameraWindow is not displayed, click
the [Start] menu and choose [All Programs] [Canon Utilities]
[CameraWindow] [CameraWindow].
• On a Macintosh computer, if CameraWindow is not displayed after step 2, click
the [CameraWindow] icon in the Dock (the bar at the bottom of the desktop).
• Although you can save images to a computer simply by connecting your camera
to the computer without using the included software, the following limitations
apply.
- It may take a few minutes after you connect the camera to the computer until
camera images are accessible.
- Images shot in vertical orientation may be saved in horizontal orientation.
- RAW images (or JPEG images recorded with RAW images) may not be
saved.
- Image protection settings may be cleared from images saved to a computer.
- Some problems may occur when saving images or image information,
PY
depending on the operating system version, the software in use, or image file
sizes.
- Some functions provided by the included software may not be available, such
O
as editing movies or returning images to the camera.
Using the PDF Manuals
C
You can access the PDF manuals by double-clicking the desktop shortcut
icons created when the included CD-ROM is used for installation.
Adobe Reader is required to view the PDF manuals.
31](https://image.slidesharecdn.com/canonpowershotg1x-120924153241-phpapp01/85/Canon-power-shot-g1x-31-320.jpg)

![Shooting in Smart Auto Mode
Several AF frames are displayed when
multiple areas are in focus.
AF Frames
If [Raise the flash] appears on the screen,
move the switch to raise the flash. It will
fire when shooting. If you prefer not to use the
flash, push it down with your finger, into the
camera.
Shoot.
PY
Press the shutter button all the way down.
As the camera shoots, a shutter sound is
played, and in low-light conditions when you
O
have raised the flash, it fires automatically.
C
Your shot remains displayed on the screen
for about two seconds.
Even while the shot is displayed, you can
take another shot by pressing the shutter
button again.
Shooting Movies
Start shooting.
If the flash is already up, push it down with
your finger, into the camera.
Elapsed Time Press the movie button. The camera beeps
once as recording begins, and [ Rec] is
displayed with the elapsed time.
Black bars displayed on the top and bottom
edges of the screen indicate image areas not
recorded.
Once recording begins, you can take your
finger off the movie button.
45](https://image.slidesharecdn.com/canonpowershotg1x-120924153241-phpapp01/85/Canon-power-shot-g1x-45-320.jpg)
![Shooting in Smart Auto Mode
Resize the subject and
recompose the shot as needed.
To resize the subject, do the same thing as in
step 3 on p. 44.
However, note that the sound of camera
operations will be recorded.
When you recompose shots, the focus,
brightness, and colors will be automatically
adjusted.
Finish shooting.
Press the movie button again to stop
shooting. The camera beeps twice as
recording stops.
Recording will stop automatically when the
PY
memory card becomes full.
Still Images/Movies
press the p button (p. 39).
O
• To activate the screen when the camera is on but the screen is blank,
C
• To restore camera sound if you have accidentally deactivated it (by
holding the p button down while turning the camera on), press the
n button and choose [Mute] on the 3 tab, and then press the
qr buttons to choose [Off].
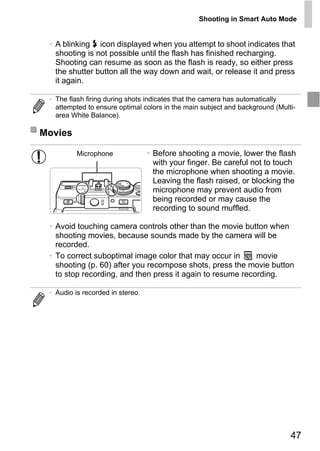
Still Images
• A flashing icon warns that images are more likely to be blurred
by camera shake. In this case, attach the camera to a tripod or take
other measures to keep it still.
• If your shots are dark despite the flash firing, move closer to the
subject. For details on the flash range, see “Specifications” in the
Getting Started guide.
• The subject may be too close if the camera only beeps once when you
press the shutter button halfway. For details on the focusing range
(shooting range), see “Specifications” in the Getting Started guide.
• To reduce red-eye and to assist in focusing, the lamp may be
activated when shooting in low-light conditions.
46](https://image.slidesharecdn.com/canonpowershotg1x-120924153241-phpapp01/85/Canon-power-shot-g1x-46-320.jpg)
![Shooting in Smart Auto Mode
Image Stabilization Icons
Optimal image stabilization for the shooting conditions is automatically
applied (Intelligent IS). Additionally, the following icons are displayed in A
mode.
Image stabilization for movies,
Image stabilization for still reducing strong camera shake,
images as when shooting while walking
(Dynamic IS)
Image stabilization for subtle
Image stabilization for still camera shake, such as when
images, when panning* shooting movies at telephoto
(Powered IS)
No image stabilization, because
Image stabilization for macro
the camera is mounted on a
shots (Hybrid IS)
tripod or held still by other means
PY
* Displayed when you pan, following moving subjects with the camera. When you follow
subjects moving horizontally, image stabilization only counteracts vertical camera
O
shake, and horizontal stabilization stops. Similarly, when you follow subjects moving
vertically, image stabilization only counteracts horizontal camera shake.
C
• To cancel image stabilization, set [IS Mode] to [Off] (p. 120). In this case, an IS
icon is not displayed.
49](https://image.slidesharecdn.com/canonpowershotg1x-120924153241-phpapp01/85/Canon-power-shot-g1x-49-320.jpg)
![Common, Convenient Features
Still Images Movies
Zooming In Closer on Subjects (Digital Zoom)
When distant subjects are too far away to enlarge using the optical zoom, use
digital zoom for up to about 16x enlargement.
Move the zoom lever toward i.
Hold the lever until zooming stops.
Zooming stops at the largest possible zoom
factor (before the image becomes grainy),
which is displayed when you release the
zoom lever.
Zoom Factor Move the zoom lever toward i
again.
The camera zooms in even closer on the
PY
subject, using digital zoom.
C O
• Zoomed images may look grainy, under some resolution settings
(p. 57) and zoom factors. In this case, the zoom factor is shown in
blue.
• Focal length when optical and digital zoom are combined is as follows (35mm
film equivalent).
28 – 448 mm (28 – 112 mm with optical zoom alone)
• To deactivate digital zoom, press the n button, choose [Digital Zoom] on
the 4 tab, and then choose [Off].
51](https://image.slidesharecdn.com/canonpowershotg1x-120924153241-phpapp01/85/Canon-power-shot-g1x-51-320.jpg)
![Common, Convenient Features
Still Images Movies
Using the Self-Timer
With the self-timer, you can include yourself in group photos or other timed
shots. The camera will shoot about 10 seconds after you press the shutter
button.
Configure the setting.
Press the m button, choose in the menu,
and then choose the ] option (p. 40).
Once the setting is complete, ] is displayed.
O PY
C
Shoot.
For Still Images: Press the shutter button
halfway to focus on the subject, and then
press it all the way down.
For Movies: Press the movie button.
Once you start the self-timer, the lamp will
blink and the camera will play a self-timer
sound.
Two seconds before the shot, the blinking
and sound will speed up. (When the flash
fires, the lamp will remain lit.)
To cancel shooting after you have triggered
the self-timer, press the n button.
To restore the original setting, choose in
step 1.
52](https://image.slidesharecdn.com/canonpowershotg1x-120924153241-phpapp01/85/Canon-power-shot-g1x-52-320.jpg)
![Common, Convenient Features
Using the Self-Timer to Avoid Camera Shake
This option delays shutter release until about two seconds after you have
pressed the shutter button. If the camera is unsteady while you are pressing
the shutter button, it will not affect your shot.
Configure the setting.
Follow step 1 on p. 52 and choose [.
Once the setting is complete, [ is displayed.
Follow step 2 on p. 52 to shoot.
Customizing the Self-Timer
You can specify the delay (0 – 30 seconds) and number of shots (1 – 10).
PY
Choose $.
Follow step 1 on p. 52, choose $, and then
O
press the n button.
C Configure the setting.
Turn the z dial to choose [Delay], either
press the qr buttons or turn the 7 dial to
choose [Shots], and then press the m
button.
Once the setting is complete, $ is displayed.
Follow step 2 on p. 52 to shoot.
• For movies shot using the self-timer, [Delay] represents the delay
before recording begins, but the [Shots] setting has no effect.
• When you specify multiple shots, image brightness and white balance are
determined by the first shot. More time is required between shots when the flash
fires or when you have specified to take many shots. Shooting will stop
automatically when the memory card becomes full.
• When a delay longer than two seconds is specified, two seconds before the
shot, the lamp blinking and self-timer sound will speed up. (When the flash fires,
the lamp will remain lit.)
53](https://image.slidesharecdn.com/canonpowershotg1x-120924153241-phpapp01/85/Canon-power-shot-g1x-53-320.jpg)
![Common, Convenient Features
Still Images
Adding the Shooting Date and Time
The camera can add the shooting date and time to images in the lower-right
corner. However, note that these cannot be removed. Confirm beforehand
that the date and time are correct (p. 18).
Configure the setting.
Press the n button, choose [Date
Stamp] on the 4 tab, and then choose the
desired option (p. 41).
Once the setting is complete, [DATE] is
displayed.
Shoot.
O PY
CAs you take shots, the camera adds the
shooting date or time to the lower-right corner
of images.
To restore the original setting, choose [Off] in
step 1.
• Images originally recorded without the date and time can be printed with this
information as follows. However, adding the date and time to images that
already have this information may cause it to be printed twice.
- Use camera DPOF print settings (p. 208) to print
- Use the included software to print
For details, refer to the Software Guide.
- Print using printer functions (p. 202)
54](https://image.slidesharecdn.com/canonpowershotg1x-120924153241-phpapp01/85/Canon-power-shot-g1x-54-320.jpg)
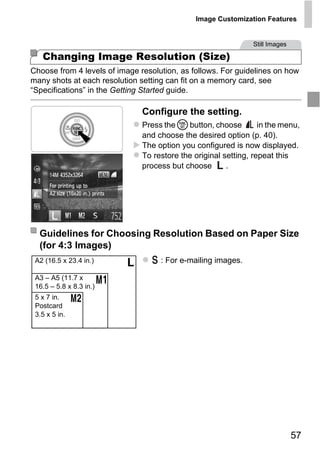
![Image Customization Features
Still Images
Changing the Aspect Ratio
Change the image aspect ratio (ratio of width to height) as follows.
Configure the setting.
Press the m button, choose in the menu,
and choose the desired option (p. 40).
Once the setting is complete, the screen
aspect ratio will be updated.
To restore the original setting, repeat this
process but choose .
PY
Same aspect ratio as HDTVs, used for display on widescreen HDTVs or similar
O
display devices.
C
Same aspect ratio as 35 mm film, used for printing images at 5 x 7-inch or postcard
sizes.
Native aspect ratio of the camera screen, used for printing images at 3.5 x 5-inch
or A-series sizes.
Square aspect ratio.
Aspect ratio commonly used for portraits.
• At aspect ratios other than , digital zoom (p. 51) is not available ([Digital
Zoom] is set to [Off]).
56](https://image.slidesharecdn.com/canonpowershotg1x-120924153241-phpapp01/85/Canon-power-shot-g1x-56-320.jpg)
![Image Customization Features
Still Images
Changing the Compression Ratio
(Image Quality)
Choose from two compression ratios, as follows: (Fine), (Normal). For
guidelines on how many shots at each compression ratio can fit on a memory
card, see “Specifications” in the Getting Started guide.
Configure the setting.
Press the m button, choose in the menu,
press the n button, and choose the
desired option (p. 40).
The option you configured is now displayed.
To restore the original setting, repeat this
process but choose .
O PY
Red-Eye Correction C Still Images
Red-eye that occurs in the flash photography can be automatically corrected
as follows.
Access the [Built-in Flash
Settings] screen.
Press the n button, choose [Flash
Control] on the 4 tab, and then press the m
button (p. 41).
58](https://image.slidesharecdn.com/canonpowershotg1x-120924153241-phpapp01/85/Canon-power-shot-g1x-58-320.jpg)
![Image Customization Features
Configure the setting.
Choose [Red-Eye Corr.], and then choose
[On] (p. 41).
Once the setting is complete, R is displayed.
To restore the original setting, repeat this
process but choose [Off].
• Red-eye correction may be applied to image areas other than eyes
(if the camera misinterprets red eye makeup as red pupils, for
example).
• You can also correct existing images (p. 164).
• You can also access the screen in step 2 when the flash is up by pressing the
r button and immediately pressing the n button.
PY
Still Images
Correcting Greenish Image Areas from
Mercury Lamps
O
In shots of evening scenes with subjects illuminated by mercury lamps, the
C
subjects or background may appear to have a greenish tinge. This greenish
tinge can be corrected automatically when shooting, using Multi-area White
Balance.
Configure the setting.
Press the n button, choose [Hg Lamp
Corr.] on the 4 tab, and then choose [On]
(p. 41).
Once the setting is complete, is
displayed.
To restore the original setting, repeat this
process but choose [Off].
59](https://image.slidesharecdn.com/canonpowershotg1x-120924153241-phpapp01/85/Canon-power-shot-g1x-59-320.jpg)
![Image Customization Features
• After you are finished shooting under mercury lamps, you should set
[Hg Lamp Corr.] back to [Off]. Otherwise, green hues not caused by
mercury lamps may be corrected by mistake.
• Try taking some test shots first, to make sure you obtain the desired results.
Movies
Changing Movie Image Quality
3 image quality settings are available. For guidelines on the maximum movie
length at each level of image quality that will fit on a memory card, see
“Specifications” in the Getting Started guide.
Configure the setting.
PY
Press the m button, choose in the menu,
and choose the desired option (p. 40).
O
The option you configured is now displayed.
To restore the original setting, repeat this
C process but choose .
60](https://image.slidesharecdn.com/canonpowershotg1x-120924153241-phpapp01/85/Canon-power-shot-g1x-60-320.jpg)
![Image Customization Features
Image
Resolution Frame Rate Details
Quality
1920 x 1080 24 fps For shooting in Full HD
1280 x 720 30 fps For shooting in HD
640 x 480 30 fps For shooting in standard definition
• In and modes, black bars displayed on the top and bottom edges of the
screen indicate image areas not recorded.
Movies
Using the Wind Filter
Distorted audio caused by recording when the wind is strong can be reduced.
However, the recording may sound unnatural when this option is used when
PY
there is no wind.
Configure the setting.
C O
Press the n button, choose [Wind Filter]
on the 4 tab, and then choose [On] (p. 41).
To restore the original setting, repeat this
process but choose [Off].
61](https://image.slidesharecdn.com/canonpowershotg1x-120924153241-phpapp01/85/Canon-power-shot-g1x-61-320.jpg)
![Helpful Shooting Features
Still Images
Using the Electronic Level
An electronic level can be displayed on the screen when shooting as a
guideline to determine if the camera is level.
Display the electronic level.
Press the p button several times to display
the electronic level.
O PY
Level the camera as needed.
C
Level the camera so that the center of the
electronic level is green.
• If the electronic level is not displayed in step 1, press the n button, and on
the 4 tab, choose [Custom Display]. Add a to or to choose the
electronic level.
• Tilting the camera too far forward or backward will prevent you from using the
electronic level, which will turn gray.
• The electronic level is not displayed during movie recording.
• If you hold the camera vertically, the orientation of the electronic level will be
updated automatically to match the camera orientation.
• If your shots are not level even if you use the electronic level, try calibrating the
electronic level (p. 176).
62](https://image.slidesharecdn.com/canonpowershotg1x-120924153241-phpapp01/85/Canon-power-shot-g1x-62-320.jpg)
![Helpful Shooting Features
Still Images
Magnifying the Area in Focus
You can check the focus by pressing the shutter button halfway to enlarge the
image area in the AF frame.
Configure the setting.
Press the n button, choose [AF-Point
Zoom] on the 4 tab, and then choose [On]
(p. 41).
O PY
Check the focus.
C
Press the shutter button halfway. The face
detected as the main subject is now
magnified.
To restore the original setting, choose [Off] in
step 1.
• The display will not magnify if a face was not detected, or if the
person is too close to the camera and their face is too large for the
screen.
• The display will not magnify when using the digital zoom (p. 51) or Tracking AF
(p. 55).
63](https://image.slidesharecdn.com/canonpowershotg1x-120924153241-phpapp01/85/Canon-power-shot-g1x-63-320.jpg)
![Helpful Shooting Features
Still Images
Checking for Closed Eyes
is displayed when the camera detects that people may have closed their
eyes.
Configure the setting.
Press the n button, choose [Blink
Detection] on the 4 tab, and then choose
[On] (p. 41).
Shoot.
A frame, accompanied by , is displayed
when the camera detects a person whose
eyes are closed.
PY
To restore the original setting, choose [Off] in
step 1.
O
• When you have specified multiple shots in $ mode, this function is only
C
available for the final shot.
64](https://image.slidesharecdn.com/canonpowershotg1x-120924153241-phpapp01/85/Canon-power-shot-g1x-64-320.jpg)
![Still Images
Customizing Camera Operation
Customize shooting functions on the 4 tab of the menu as follows.
For instructions on menu functions, see “n Menu” (p. 41).
Deactivating the AF Assist Beam
You can deactivate the lamp that normally lights up to help you focus when
you press the shutter button halfway in low-light conditions.
Configure the setting.
Press the n button, choose [AF-assist
Beam] on the 4 tab, and then choose [Off]
(p. 41).
To restore the original setting, repeat this
process but choose [On].
PY
Deactivating the Red-Eye Reduction Lamp
You can deactivate the red-eye reduction lamp that lights up to reduce red-
O
eye when the flash is used in low-light shots.
C Access the [Built-in Flash
Settings] screen.
Press the n button, choose [Flash
Control] on the 4 tab, and then press the m
button (p. 41).
Configure the setting.
Choose [Red-Eye Lamp], and then choose
[Off] (p. 41).
To restore the original setting, repeat this
process but choose [On].
65](https://image.slidesharecdn.com/canonpowershotg1x-120924153241-phpapp01/85/Canon-power-shot-g1x-65-320.jpg)
![Customizing Camera Operation
Changing the Image Display Period After Shots
Change how long images are displayed after shots as follows.
Configure the setting.
Press the n button, choose [Review] on
the 4 tab, and then choose the desired
option (p. 41).
To restore the original setting, repeat this
process but choose [2 sec.].
2 – 10 sec. Displays images for the specified time.
Displays images until you press the
Hold
shutter button halfway.
Off No image display after shots.
PY
Changing the Image Display Style After Shots
O
Change the way images are displayed after shots as follows.
C Configure the setting.
Press the n button, choose [Review
Info] on the 4 tab, and then choose the
desired option (p. 41).
To restore the original setting, repeat this
process but choose [Off].
Off Displays only the image.
Detailed Displays shooting details (p. 224).
Shows the area in the AF frame
magnified, enabling you to check the
Focus Check
focus. Follow the steps in “Checking
the Focus” (p. 139).
66](https://image.slidesharecdn.com/canonpowershotg1x-120924153241-phpapp01/85/Canon-power-shot-g1x-66-320.jpg)
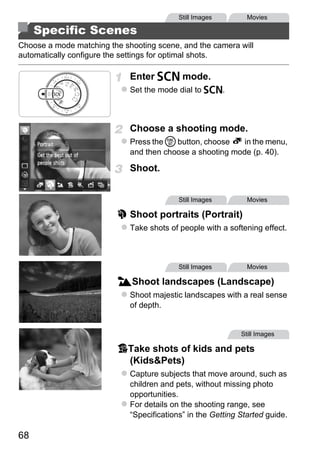
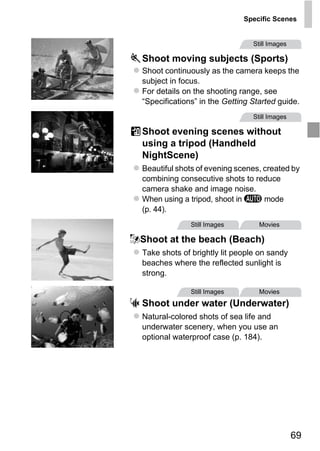
![Specific Scenes
Still Images Movies
OTake shots of foliage (Foliage)
Shoot trees and leaves, such as new growth,
autumn leaves or blossoms, in vivid colors.
Still Images Movies
P Shoot with snowy backgrounds
(Snow)
Bright, natural-colored shots of people
against snowy backgrounds.
Still Images Movies
t Shoot fireworks (Fireworks)
PY
Vivid shots of fireworks.
C O
• Because the camera will shoot continuously in
steady while shooting.
mode, hold it
• In mode, shooting conditions that cause excessive camera shake
or similar issues may prevent the camera from combining images,
and you may not be able to obtain the expected results.
• In t mode, mount the camera on a tripod or take other measures to
keep it still and prevent camera shake. In this case, set [IS Mode] to
[Off] (p. 120).
• In V, , , and S modes, shots may look grainy because the ISO speed
(p. 95) is increased to suit the shooting conditions.
70](https://image.slidesharecdn.com/canonpowershotg1x-120924153241-phpapp01/85/Canon-power-shot-g1x-70-320.jpg)
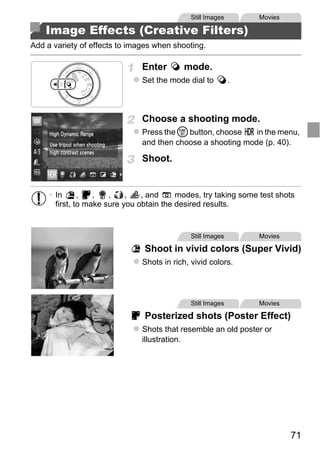
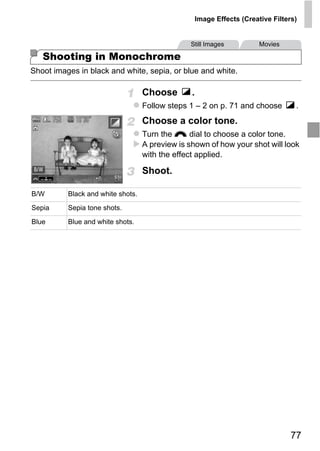
![Image Effects (Creative Filters)
Still Images
Shooting High-Contrast Scenes (High Dynamic
Range)
Three consecutive images are captured at different brightness levels each
time you shoot, and the camera combines image areas with optimal
brightness to create a single image. This mode can reduce the washed-out
highlights and loss of detail in shadows that tends to occur in high-contrast
shots.
Choose .
Follow steps 1 – 2 on p. 71 and choose .
Hold the camera still.
Mount the camera on a tripod or take other
PY
measures to keep it still and prevent camera
shake.
Shoot.
C O
When you press the shutter button all the way
down, the camera will take three shots and
combine them.
• Set the [IS Mode] to [Off] (p. 120) in this mode.
• Any subject movement will cause images to look blurry.
• There will be a delay before you can shoot again, as the camera processes and
combines the images.
72](https://image.slidesharecdn.com/canonpowershotg1x-120924153241-phpapp01/85/Canon-power-shot-g1x-72-320.jpg)
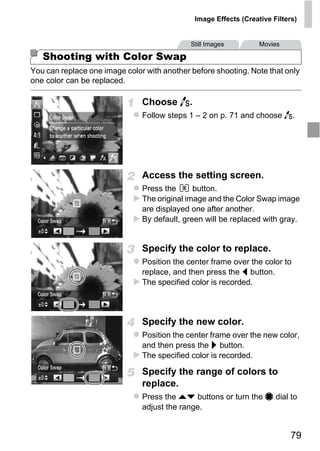
![Image Effects (Creative Filters)
Still Images
Shooting with a Toy Camera Effect (Toy
Camera Effect)
This effect makes images resemble shots from a toy camera by vignetting
(darker, blurred image corners) and changing the overall color.
Choose .
Follow steps 1 – 2 on p. 71 and choose .
Choose a color tone.
Turn the z dial to choose a color tone.
A preview is shown of how your shot will look
with the effect applied.
Shoot.
Standard
Warm
O PY
Shots resemble toy camera images.
Images have a warmer tone than with [Standard].
Cool
C
Images have a cooler tone than with [Standard].
76](https://image.slidesharecdn.com/canonpowershotg1x-120924153241-phpapp01/85/Canon-power-shot-g1x-76-320.jpg)

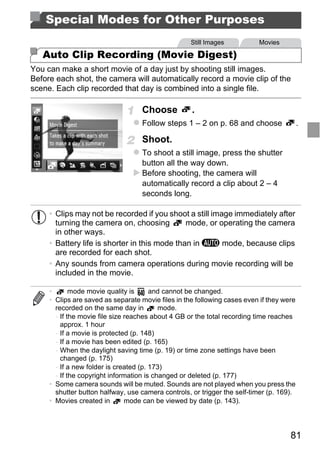
![Special Modes for Other Purposes
Still Images
Auto Shooting After Face Detection (Smart
Shutter)
Auto Shooting After Smile Detection
The camera shoots automatically after detecting a smile, even without you
pressing the shutter button.
Choose .
Follow steps 1 – 2 on p. 68 and choose ,
and then press the button.
Press the qr buttons or turn the 7 dial to
choose , and then press the button.
The camera now enters shooting standby
PY
mode, and [Smile Detection on] is displayed.
Aim the camera at a person.
O
Each time the camera detects a smile, it will
shoot after the lamp lights up.
CTo pause smile detection, press the p
button. Press the p button again to resume
detection.
• Switch to another mode when you finish shooting, or the camera will
continue shooting each time a smile is detected.
• You can also shoot as usual by pressing the shutter button.
• The camera can detect smiles more easily when subjects face the camera and
open their mouth wide enough so that teeth are visible.
• To change the number of shots, press the op buttons after choosing in
step 1. [Blink Detection] (p. 64) is only available for the final shot.
82](https://image.slidesharecdn.com/canonpowershotg1x-120924153241-phpapp01/85/Canon-power-shot-g1x-82-320.jpg)
![Special Modes for Other Purposes
Using the Wink Self-Timer
Aim the camera at a person and press the shutter button all the way down.
The camera will shoot about two seconds after a wink is detected.
Choose .
Follow steps 1 – 2 on p. 68 and choose ,
and then press the button.
Press the qr buttons or turn the 7 dial to
choose , and then press the button.
Compose the shot and press the
shutter button halfway.
Make sure a green frame is displayed around
the face of the person who will wink.
PY
Press the shutter button all the way
down.
The camera now enters shooting standby
C O
mode, and [Wink to take picture] is displayed.
The lamp blinks and the self-timer sound is
played.
Face the camera and wink.
The camera will shoot about two seconds
after detecting a wink by the person whose
face is inside the frame.
To cancel shooting after you have triggered
the self-timer, press the n button.
• If the wink is not detected, wink again slowly and deliberately.
• Winking may not be detected if eyes are obscured by hair, a hat, or glasses.
• Closing and opening both eyes at once will also be detected as a wink.
• If winking is not detected, the camera will shoot about 15 seconds later.
• To change the number of shots, press the op buttons after choosing in
step 1. [Blink Detection] (p. 64) is only available for the final shot.
• If no one is in the shooting area when the shutter button is pressed all the way
down, the camera will shoot after a person enters the shooting area and winks.
83](https://image.slidesharecdn.com/canonpowershotg1x-120924153241-phpapp01/85/Canon-power-shot-g1x-83-320.jpg)
![Special Modes for Other Purposes
Using the Face Self-Timer
The camera will shoot about two seconds after detecting that the face of
another person (such as the photographer) has entered the shooting area
(p. 108). This is useful when including yourself in group photos or similar shots.
Choose .
Follow steps 1 – 2 on p. 68 and choose ,
and then press the button.
Press the qr buttons or turn the 7 dial to
choose , and then press the button.
Compose the shot and press the
shutter button halfway.
Make sure a green frame is displayed around
the face you focus on and white frames
PY
around other faces.
Press the shutter button all the way
C
down.
O
The camera now enters shooting standby
mode, and [Look straight at camera to start
count down] is displayed.
The lamp blinks and the self-timer sound is
played.
Join the subjects in the shooting
area and look at the camera.
After the camera detects a new face, the
lamp blinking and self-timer sound will speed
up. (When the flash fires, the lamp will remain
lit.) About two seconds later, the camera will
shoot.
To cancel shooting after you have triggered
the self-timer, press the n button.
• Even if your face is not detected after you join the others in the shooting area,
the camera will shoot about 15 seconds later.
• To change the number of shots, press the op buttons after choosing in
step 1. [Blink Detection] (p. 64) is only available for the final shot.
84](https://image.slidesharecdn.com/canonpowershotg1x-120924153241-phpapp01/85/Canon-power-shot-g1x-84-320.jpg)
![Special Modes for Other Purposes
Still Images
High-Speed Continuous Shooting (High-speed
Burst HQ)
You can shoot a series of shots in rapid succession by holding the shutter button
all the way down. For details on continuous shooting speed, and maximum
number of continuous shots, see “Continuous Shooting Speed” (see
“Specifications” in the Getting Started guide).
HQ: High Quality
Choose .
Follow steps 1 – 2 on p. 68 and choose .
Shoot.
Hold the shutter button all the way down to
shoot continuously.
PY
Shooting stops when you release the shutter
button or reach the maximum number of
O
shots, after which [Busy] is displayed and the
shots are shown in the order you took them.
C
• Focus, image brightness, and color are determined by the first shot.
• The screen is blank while you are shooting.
• There may be a delay after continuous shooting before you can shoot again.
Additionally, depending on the memory card, there may be a delay before you
can shoot again. Speed Class 6 or higher memory cards are recommended.
• Shooting may slow down depending on shooting conditions, camera settings,
and the zoom position.
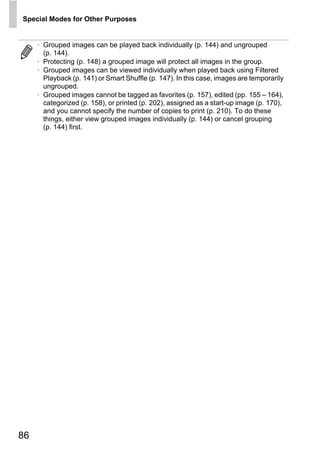
Images Displayed During Playback
Each set of images shot continuously is managed as a single group, and only
the first image in that group will be displayed. To indicate that the image is
part of a group, is displayed in the upper left of the screen.
• If you erase a grouped image (p. 152), all images in the group are
also erased. Be careful when erasing images.
85](https://image.slidesharecdn.com/canonpowershotg1x-120924153241-phpapp01/85/Canon-power-shot-g1x-85-320.jpg)


![Image Brightness (Exposure Compensation)
Changing the Metering Method
Adjust the metering method (how brightness is measured) to suit shooting
conditions as follows.
Press the button, turn the 7 dial to
choose the desired option, and then press
the button again.
The option you configured is now displayed.
For typical shooting conditions, including backlit shots.
Evaluative
Automatically adjusts exposure to match the shooting conditions.
Determines the average brightness of light across the entire image
Center
PY
area, calculated by treating brightness in the central area as more
Weighted Avg.
important.
Metering restricted to within the (Spot AE Point frame). You
O
Spot
can also link the Spot AE Point frame to the AF frame.
C
Linking the Spot AE Point Frame to the AF Frame
Set the metering method to
Follow the step above to choose .
.
Configure the setting.
Press the n button, choose [Spot AE
Point] on the 4 tab, and then choose [AF
Point] (p. 41).
The Spot AE Point frame will now be linked to
the movement of the AF frame (p. 110).
• Not available when [AF Frame] is set to [Face AiAF] (p. 108) or
[Tracking AF] (p. 111).
94](https://image.slidesharecdn.com/canonpowershotg1x-120924153241-phpapp01/85/Canon-power-shot-g1x-94-320.jpg)
![Image Brightness (Exposure Compensation)
Changing the ISO Speed
Press the o button, choose an option (either
press the qr buttons or turn the 7 dial), and
then press the m button.
The option you configured is now displayed.
Automatically adjusts the ISO speed to suit the
shooting mode and conditions.
For shooting outdoors in fair weather.
Low For shooting in cloudy conditions, or at
twilight.
PY
High For shooting night scenes, or in dark
rooms.
O
• To view the automatically set ISO speed when the camera is set to , press
the shutter button halfway.
C
• Although choosing a lower ISO speed may reduce image graininess, there may
be a greater risk of subject blurriness in some shooting conditions.
• Choosing a higher ISO speed will increase shutter speed, which may reduce
subject blurriness and increase the flash range. However, shots may look grainy.
• Press the button while in the setting screen to set .
Adjusting the Maximum ISO Speed
Maximum ISO speed when the camera is set to can be specified in a
range of – .
Access the setting screen.
Press the n button, choose [ISO Auto
Settings] on the 4 tab, and then press the
m button (p. 41).
95](https://image.slidesharecdn.com/canonpowershotg1x-120924153241-phpapp01/85/Canon-power-shot-g1x-95-320.jpg)
![Image Brightness (Exposure Compensation)
Configure the setting.
Choose [Max ISO Speed], and then choose
the desired option (p. 41).
Adjusting Sensitivity
Choose from three levels of sensitivity for .
Follow step 1 in “Adjusting the Maximum
ISO Speed” (p. 95) to access the setting
screen.
Choose [Rate of Change], and then choose
the desired option (p. 41).
O PY
• If you press the n button while in the ISO auto settings screen (p. 95), the
[ISO Auto Settings] screen will appear.
C
Changing the Noise Reduction Level (High ISO
NR)
You can choose from 3 levels of noise reduction: [Standard], [High], [Low].
This function is especially effective when shooting at high ISO speeds.
Choose a noise reduction level.
Press the n button, choose [High ISO
NR] in the 4 tab, and then choose the
desired option.
96](https://image.slidesharecdn.com/canonpowershotg1x-120924153241-phpapp01/85/Canon-power-shot-g1x-96-320.jpg)
![Image Brightness (Exposure Compensation)
Auto Exposure Bracketing (AEB Mode)
Three consecutive images are captured at different exposure levels (standard
exposure, underexposure, and then overexposure) each time you shoot. You
can adjust the amount of underexposure and overexposure (relative to
standard exposure) from –2 to +2 stops in 1/3-stop increments.
Choose .
Press the m button, choose in the menu,
and then choose (p. 40).
Configure the setting.
PY
Press the n button, and then adjust the
setting by pressing the qr buttons or turning
the 7 dial.
C O
• AEB is only available in ! mode (pp. 22, 45).
• Continuous shooting (p. 104) is not available in this mode.
• If exposure compensation is already in use (p. 93), the value specified for that
function is treated as the standard exposure level for this function.
• You can also access the setting screen of step 2 by pressing the n button
when the exposure compensation screen (p. 93) is displayed.
• Three shots are taken, regardless of any quantity specified in $ (p. 53).
• [Blink Detection] (p. 64) is only available for the final shot.
97](https://image.slidesharecdn.com/canonpowershotg1x-120924153241-phpapp01/85/Canon-power-shot-g1x-97-320.jpg)
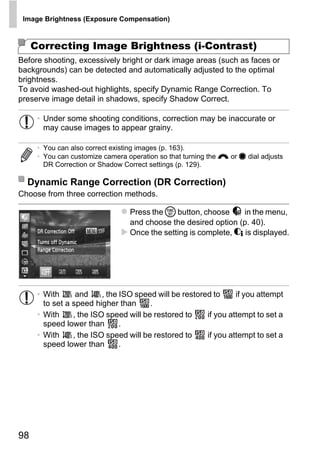
![Image Brightness (Exposure Compensation)
Shadow Correct
Press the m button, choose in the menu,
press the n button, and choose
(p. 40).
Once the setting is complete, @ is displayed.
Using the ND Filter
To shoot at slower shutter speeds and smaller aperture values, use the ND
filter, which reduces light intensity to 1/8 the actual level (equivalent to 3
stops).
Press the m button, choose in the menu,
PY
and then choose (p. 40).
C O
• Mount the camera on a tripod or take other measures to keep it still
and prevent camera shake. In this case, set [IS Mode] to [Off]
(p. 120).
99](https://image.slidesharecdn.com/canonpowershotg1x-120924153241-phpapp01/85/Canon-power-shot-g1x-99-320.jpg)
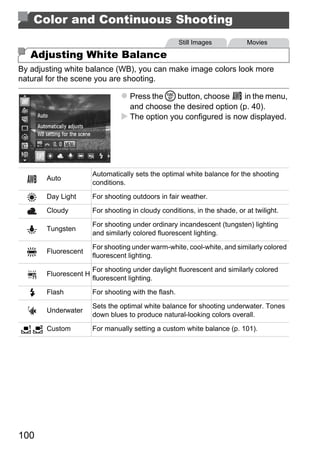
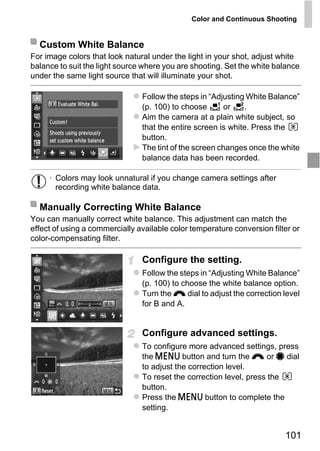
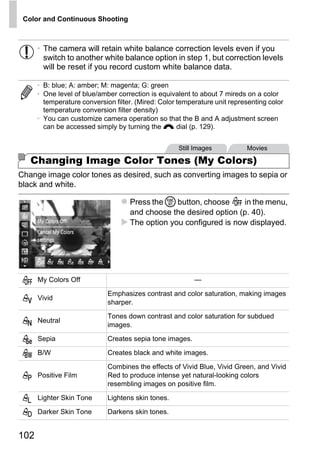
![Color and Continuous Shooting
Still Images
Continuous Shooting
Hold the shutter button all the way down to shoot continuously.
Configure the setting.
Press the m button, choose in the menu,
and choose the desired option (p. 40).
The option you configured is now displayed.
Shoot.
Hold the shutter button all the way down to
shoot continuously.
Mode Description
PY
Continuous shooting, with the focus and exposure determined
W Continuous
when you press the shutter button halfway.
Continuous Continuous shooting and focusing.
O
Shooting AF [AF Frame] is set to [Center] and cannot be changed.
C
Continuous shooting, with the focus fixed at the position
Continuous
determined in manual focusing. In t mode, focus is determined
Shooting LV*
by the first shot.
* In t mode (p. 70), AF lock (p. 114), or manual focus mode (p. 106), is changed to
.
* For details on the continuous shooting speed in each mode, see “Specifications” in the
Getting Started guide.
• Cannot be used with the self-timer (p. 52) or [Blink Detection] (p. 64).
• Shooting may stop momentarily or continuous shooting may slow
down depending on shooting conditions, camera settings, and the
zoom position.
• As more shots are taken, shooting may slow down.
• Shooting may slow down if the flash fires.
104](https://image.slidesharecdn.com/canonpowershotg1x-120924153241-phpapp01/85/Canon-power-shot-g1x-104-320.jpg)

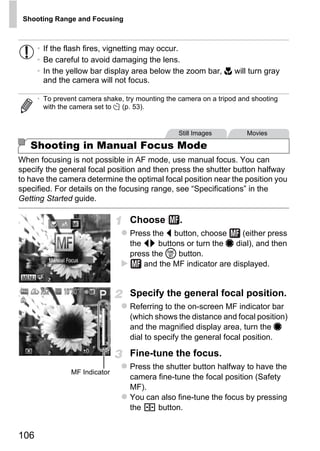
![Shooting Range and Focusing
• AF frame mode or size cannot be changed while focusing manually
(p. 108). If you want to change the AF frame mode or size, cancel
manual focus mode first.
• Focusing is possible when using the digital zoom (p. 51) or digital
tele-converter, or when using a TV as a display (p. 187), but the
magnified display will not appear.
• To focus more accurately, try attaching the camera to a tripod to stabilize it.
• To hide the magnified display area, press the n button and set [MF-Point
Zoom] on the 4 tab to [Off] (p. 41).
• To deactivate automatic focus fine-tuning when the shutter button is pressed
halfway, press the n button and set [Safety MF] on the 4 tab to [Off]
(p. 41).
Still Images Movies
Digital Tele-Converter
PY
The focal length of the lens can be increased by approximately 1.5x or 1.9x.
This can reduce camera shake because the shutter speed is faster than it
O
would be if you zoomed (including using digital zoom) in to the same zoom
factor.
C Press the n button, choose [Digital
Zoom] on the 4 tab, and then choose the
desired option (p. 41).
The view is enlarged and the zoom factor is
displayed on the screen.
• Images will look grainy at a resolution (p. 57) of or . In this
case, the zoom factor is shown in blue.
• The digital tele-converter cannot be used with digital zoom (p. 51)
and AF-point zoom (p. 63).
• The digital tele-converter is only available when the aspect ratio is
.
107](https://image.slidesharecdn.com/canonpowershotg1x-120924153241-phpapp01/85/Canon-power-shot-g1x-107-320.jpg)
![Shooting Range and Focusing
• The respective focal lengths when using [1.5x] and [1.9x] are 42.0 – 168 mm
and 53.2 – 213 mm (35mm film equivalent).
• The shutter speed may be equivalent when you move the zoom lever all the way
toward i for maximum telephoto, and when you zoom in to enlarge the subject
to the same size following step 2 on p. 51.
Still Images Movies
Changing the AF Frame Mode
Change the AF (auto focus) frame mode to suit the shooting conditions as
follows.
Press the n button, choose [AF Frame]
on the 4 tab, and then choose the desired
option (p. 41).
O PY Still Images Movies
C
Face AiAF
• Detects people’s faces, and then sets the focus, exposure (evaluative
metering only), and white balance ( only).
• After you aim the camera at the subject, a white frame is displayed around
the person’s face determined by the camera to be the main subject, and up
to two gray frames are displayed around other detected faces.
• When the camera detects movement, frames will follow moving subjects,
within a certain range.
• After you press the shutter button halfway, up to nine green frames are
displayed around faces in focus.
108](https://image.slidesharecdn.com/canonpowershotg1x-120924153241-phpapp01/85/Canon-power-shot-g1x-108-320.jpg)
![Shooting Range and Focusing
• If faces are not detected, or when only gray frames are displayed
(without a white frame), up to nine green frames are displayed in the
areas in focus when you press the shutter button halfway.
• If faces are not detected when Servo AF (p. 112) is set to [On], the
AF frame is displayed in the center of the screen when you press the
shutter button halfway.
• Examples of faces that cannot be detected:
- Subjects that are distant or extremely close
- Subjects that are dark or light
- Faces in profile, at an angle, or partly hidden
• The camera may misinterpret non-human subjects as faces.
• No AF frames are displayed if the camera cannot focus when you
press the shutter button halfway.
Still Images
PY
FlexiZone/Center
One AF frame is displayed. Effective for reliable focusing.
With [FlexiZone], you can move and resize the AF frame (p. 110).
C O
• A yellow AF frame is displayed with if the camera cannot focus
when you press the shutter button halfway. Note that AF-point
zooming (p. 63) is not possible.
Still Images
Recomposing Shots While the Focus is Locked
As long as you keep the shutter button pressed halfway, the focus and
exposure are locked. You can recompose shots as needed before shooting.
This feature is called Focus Lock.
Focus.
Aim the camera so that the subject is
centered, and then press the shutter button
halfway.
Confirm that the AF frame displayed around
the subject is green.
109](https://image.slidesharecdn.com/canonpowershotg1x-120924153241-phpapp01/85/Canon-power-shot-g1x-109-320.jpg)
![Shooting Range and Focusing
Recompose the shot.
Keeping the shutter button pressed halfway,
move the camera to recompose the shot.
Shoot.
Press the shutter button all the way down.
Still Images
Moving and Resizing AF Frames (FlexiZone)
When you want to change the position or size of the AF frame, set the AF
frame mode to [FlexiZone] (p. 109).
Prepare to move the AF frame.
Press the button. The AF frame turns
orange.
PY
Move and resize the AF frame.
Turn the 7 dial to move the AF frame, or
C O
press the opqr buttons to move it by a
smaller amount.
To return the AF frame to the original position
in the center, keep the button held down.
To reduce the AF frame size, press the
n button. Press it again to restore it to
the original size.
Complete the settings.
Press the button.
• AF frames are displayed at normal size when you use the digital
zoom (p. 51) or digital tele-converter (p. 107), and in manual focus
mode (p. 106).
• You can also link the Spot AE Point frame to the AF frame (p. 94).
110](https://image.slidesharecdn.com/canonpowershotg1x-120924153241-phpapp01/85/Canon-power-shot-g1x-110-320.jpg)
![Shooting Range and Focusing
Still Images
Choosing Subjects to Focus On (Tracking AF)
Shoot after choosing a subject to focus on as follows.
Choose [Tracking AF].
Follow the steps in “Changing the AF Frame
Mode” (p. 108) to choose [Tracking AF].
is displayed in the center of the screen.
Choose a subject to focus on.
Aim the camera so that is on the desired
subject, and then press the button.
PY
When the subject is detected, the camera
beeps and is displayed. Even if the
O
subject moves, the camera will continue to
C
track the subject within a certain range.
If no subject is detected, is displayed.
To cancel tracking, press the button
again.
Shoot.
Press the shutter button halfway.
changes to a blue , which follows the
subject as the camera continues to adjust the
focus and exposure (Servo AF) (p. 112).
Press the shutter button all the way down to
shoot.
Even after your shot, is still displayed and
the camera continues to track the subject.
111](https://image.slidesharecdn.com/canonpowershotg1x-120924153241-phpapp01/85/Canon-power-shot-g1x-111-320.jpg)
![Shooting Range and Focusing
• [Servo AF] is set to [On] and cannot be changed.
• Tracking may not be possible when subjects are too small or move
too rapidly, or when subject color or brightness matches that of the
background too closely.
• [AF-Point Zoom] on the 4 tab is not available.
• e is not available.
• The camera can detect subjects even if you press the shutter button halfway
without pressing the button. After your shot, is displayed in the center
of the screen.
Still Images
Shooting with Servo AF
This mode helps avoid missing shots of subjects in motion, because the
camera continues to focus on the subject and adjust the exposure as long as
PY
you press the shutter button halfway.
O
Configure the setting.
C
Press the n button, choose [Servo AF]
on the 4 tab, and then choose [On]. (p. 41).
Focus.
The focus and exposure are maintained
where the blue AF frame is displayed while
you are pressing the shutter button halfway.
• Focusing may not be possible in some shooting conditions.
• In low-light conditions, Servo AF may not be activated (AF frames
may not turn blue) when you press the shutter button halfway. In this
case, the focus and exposure are set according to the specified AF
frame mode.
• If adequate exposure cannot be obtained, shutter speeds and
aperture values are displayed in orange. Release the shutter button,
and then press it halfway again.
• AF lock shooting is not available.
• [AF-Point Zoom] on the 4 tab is not available.
• Not available when using the self-timer (p. 52).
112](https://image.slidesharecdn.com/canonpowershotg1x-120924153241-phpapp01/85/Canon-power-shot-g1x-112-320.jpg)
![Shooting Range and Focusing
Still Images
Changing the Focus Setting
You can change default camera operation of constantly focusing on subjects
it is aimed at, even when the shutter button is not pressed. Instead, you can
limit camera focusing to the moment you press the shutter button halfway.
Press the n button, choose [Continuous
AF] on the 4 tab, and then choose [Off]
(p. 41).
Helps avoid missing sudden photo
opportunities, because the camera
On
constantly focuses on subjects until you
press the shutter button halfway.
Conserves battery power, because the
Off
PY
camera does not focus constantly.
Still Images
C O
Choosing a Person to Focus On (Face Select)
You can shoot after choosing a specific person’s face to focus on.
Set the AF frame to [Face AiAF]
(p. 108).
Enter Face Select mode.
Aim the camera at the person’s face and
press the button.
After [Face Select : On] is displayed, a face
frame is displayed around the face
detected as the main subject.
Even if the subject moves, the face frame
follows the subject within a certain range.
If a face is not detected, is not displayed.
113](https://image.slidesharecdn.com/canonpowershotg1x-120924153241-phpapp01/85/Canon-power-shot-g1x-113-320.jpg)
![Shooting Range and Focusing
Choose the face to focus on.
To switch the face frame to another
detected face, press the button.
After you have switched the face frame to all
detected faces, [Face Select : Off] is
displayed, and the specified AF frame mode
screen is displayed again.
Shoot.
Press the shutter button halfway. After the
camera focuses, changes to .
Press the shutter button all the way down to
shoot.
PY
Still Images Movies
Shooting with the AF Lock
C O
The focus can be locked. After you lock the focus, the focal position will not
change even when you release your finger from the shutter button.
Lock the focus.
With the shutter button pressed halfway,
press the q button.
The focus is now locked, and and the MF
indicator are displayed.
To unlock the focus, after you release the
shutter button, press the q button again and
choose (either press the qr buttons or
turn the 7 dial).
Compose the shot and shoot.
114](https://image.slidesharecdn.com/canonpowershotg1x-120924153241-phpapp01/85/Canon-power-shot-g1x-114-320.jpg)
![Shooting Range and Focusing
Still Images
Focus Bracketing (Focus-BKT Mode)
Three consecutive images are captured each time you shoot, with the first
one at the focal distance you set manually and the others at farther and
nearer focal positions determined by presets. The distance from your
specified focus can be set in three levels.
Choose .
Press the m button, choose in the menu,
and then choose (p. 40).
Configure the setting.
PY
Press the n button, and then adjust the
setting by pressing the qr buttons or turning
O
the 7 dial.
C
• Focus bracketing is only available in ! mode (pp. 22, 45).
• Continuous shooting (p. 104) is not available in this mode.
• You can also access the setting screen in step 2 by choosing in step 1 on
p. 106 and immediately pressing the n button.
• Three shots are taken, regardless of any quantity specified in $ (p. 53).
• [Blink Detection] (p. 64) is only available for the final shot.
115](https://image.slidesharecdn.com/canonpowershotg1x-120924153241-phpapp01/85/Canon-power-shot-g1x-115-320.jpg)
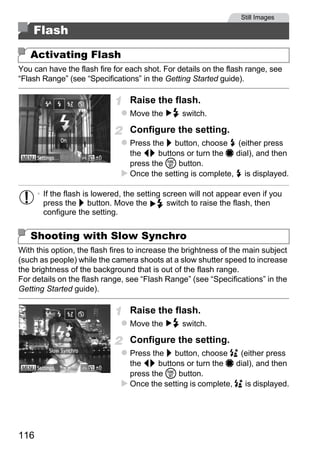
![Flash
Shoot.
Even after the flash fires, ensure that the
main subject does not move until the shutter
sound is finished playing.
• Mount the camera on a tripod or take other measures to keep it still
and prevent camera shake. In this case, set [IS Mode] to [Off]
(p. 120).
• If the flash is lowered, the setting screen will not appear even if you
press the r button. Move the switch to raise the flash, then
configure the setting.
Adjusting the Flash Exposure Compensation
Just as with regular exposure compensation (p. 93), you can adjust the flash
exposure from –2 to +2 stops, in 1/3-stop increments.
PY
Raise the flash, press the r button and
O
immediately turn the z dial to choose the
compensation level, and then press the m
C button.
Once the setting is complete, X is displayed.
• When there is a risk of overexposure, the camera automatically adjusts the
shutter speed or aperture value during the flash shots to reduce washed-out
highlights and shoot at optimal exposure. However, you can deactivate
automatic adjustment of the shutter speed and aperture value by accessing
n (p. 41) and setting [Safety FE] in [Flash Control] on the 4 tab to [Off].
• You can also configure the flash exposure compensation by choosing X in the
FUNC. menu (p. 40), or by accessing n (p. 41) and choosing [Flash Exp.
Comp] in [Flash Control] on the 4 tab.
• You can also access the [Built-in Flash Settings] n screen as follows
(except when an external flash (sold separately) is attached to the camera).
- Press and hold the r button for at least one second.
- When the flash is up, press the r button and immediately press the n
button.
117](https://image.slidesharecdn.com/canonpowershotg1x-120924153241-phpapp01/85/Canon-power-shot-g1x-117-320.jpg)
![Flash
Shooting with the FE Lock
Just as with the AE lock (p. 93), you can lock the exposure for the flash shots.
Raise the flash and set it to h
(p. 116).
Lock the flash exposure.
Aim the camera at the subject to shoot with
the exposure locked, and then press the
button.
The flash fires, and when is displayed,
the flash output level is retained.
Compose the shot and shoot.
PY
After one shot, FE is unlocked and is no
longer displayed.
O
• FE: Flash Exposure
Changing the Flash Timing C
Change the timing of the flash and shutter release as follows.
Access the setting screen.
Press the n button, choose [Flash
Control] on the 4 tab, and then press the m
button (p. 41).
Configure the setting.
Choose [Shutter Sync.], and then choose the
desired option (p. 41).
1st- The flash fires immediately after the shutter
curtain opens.
2nd- The flash fires immediately before the
curtain shutter closes.
118](https://image.slidesharecdn.com/canonpowershotg1x-120924153241-phpapp01/85/Canon-power-shot-g1x-118-320.jpg)
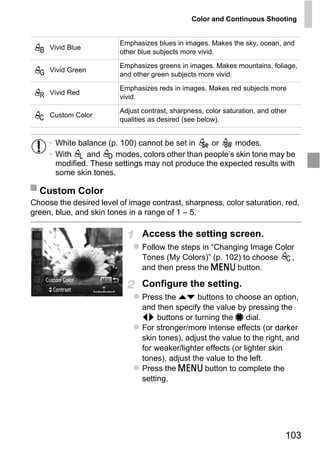
![Still Images
Shooting RAW Images
RAW images are “raw” (unprocessed) data, recorded with essentially no loss
of image quality from the camera’s internal image processing. Use the included
software to adjust RAW images as desired with minimal loss of image quality.
Press the m button, choose in the menu,
and choose the desired option (p. 40).
Records JPEG images. JPEG images are processed in the camera for optimal
image quality and compressed to reduce file size. However, the compression
process is irreversible, and images cannot be restored to their original,
unprocessed state. Image processing may also cause some loss of image quality.
PY
Records RAW images. RAW images are “raw” (unprocessed) data, recorded with
essentially no loss of image quality from the camera’s image processing. The data
cannot be used in this state for viewing or printing on a computer. You must first use
O
the included software (Digital Photo Professional) to convert images to ordinary
JPEG or TIFF files. Images can be adjusted with minimal loss of image quality.
C
For details on resolution and the number of shots that will fit on a card, see
“Specifications” in the Getting Started guide.
Records two images, both a RAW image and a JPEG image, for each shot.
The JPEG image can be printed or viewed on a computer without using the
included software.
• When transferring RAW images (or RAW and JPEG images recorded
together) to a computer, always use the included software (p. 26).
• Digital zoom (p. 51), date stamps (p. 54), and red-eye reduction
(p. 58) are set to [Off] in and modes. Additionally, i-Contrast
(p. 163), My Colors (p. 102) and noise reduction level (p. 96) settings
are not available.
• The aspect ratio setting (p. 56) is only applied to JPEG images. RAW images
are always shot at an aspect ratio of .
• To erase images, display the image and press p button (p. 152). Choose
from [Erase ], [Erase JPEG], or [Erase +JPEG] to erase the image.
• The file extension for JPEG images is .JPG, and the extension for RAW images
is .CR2.
119](https://image.slidesharecdn.com/canonpowershotg1x-120924153241-phpapp01/85/Canon-power-shot-g1x-119-320.jpg)
![Other Settings
Still Images Movies
Changing the IS Mode Settings
Access the setting screen.
Press the n button, choose [IS Settings]
on the 4 tab, and then press the m button
(p. 41).
Configure the setting.
Choose [IS Mode], and then choose the
desired option (p. 41).
Optimal image stabilization for the
Continuous shooting conditions is automatically
applied (Intelligent IS) (p. 49).
Image stabilization is active only at the
PY
Shoot Only*
moment of shooting.
Off Deactivates image stabilization.
O
*The setting is changed to [Continuous] for movie
C
recording.
• If image stabilization cannot prevent camera shake, mount the
camera on a tripod or take other measures to hold it still. In this case,
set [IS Mode] to [Off].
120](https://image.slidesharecdn.com/canonpowershotg1x-120924153241-phpapp01/85/Canon-power-shot-g1x-120-320.jpg)
![Other Settings
Movies
Deactivating Powered IS
Powered IS reduces slow camera shake that may occur when recording
telephoto movies. However, this option may not produce the expected results
when used for the stronger camera shake that may occur when shooting
while walking or when moving the camera to match subject movement. In this
case, set Powered IS to [Off].
Follow the steps in “Changing the IS Mode
Settings” (p. 120) to access the [IS Settings]
screen.
Choose [Powered IS], and then choose [Off]
(p. 41).
PY
• [Powered IS] settings are not applied when [IS Mode] is set to [Off].
C O
121](https://image.slidesharecdn.com/canonpowershotg1x-120924153241-phpapp01/85/Canon-power-shot-g1x-121-320.jpg)

![Still Images
Specific Shutter Speeds (Tv Mode)
Set your preferred shutter speed before shooting as follows. The camera
automatically adjusts the aperture value to suit your shutter speed.
For details on available shutter speeds, see “Specifications” in the Getting
Started guide.
Enter M mode.
Set the mode dial to M.
Set the shutter speed.
Turn the z dial to set the shutter speed.
• With slow shutter speeds, there will be a delay before you can shoot
again, as the camera processes images to reduce noise.
• When shooting at low shutter speeds on a tripod, you should set [IS
PY
Mode] to [Off] (p. 120).
• Maximum shutter speed with the flash is 1/2000 second.
O
If you specify a faster speed, the camera will automatically reset the
speed to 1/2000 second before shooting.
C
• Orange display of aperture values when you press the shutter button
halfway indicates that the settings deviate from standard exposure.
Adjust the shutter speed until the aperture value is displayed in white,
or use safety shift (p. 125).
• M: Time value
• You can customize camera operation so that turning the 7 dial changes the
shutter speed (p. 129).
124](https://image.slidesharecdn.com/canonpowershotg1x-120924153241-phpapp01/85/Canon-power-shot-g1x-124-320.jpg)
![Still Images
Specific Aperture Values (Av Mode)
Set your preferred aperture value before shooting as follows. The camera
automatically adjusts the shutter speed to suit your aperture value.
For details on available aperture values, see “Specifications” in the Getting
Started guide.
Enter B mode.
Set the mode dial to B.
Set the aperture value.
Turn the z dial to set the aperture value.
• Orange display of shutter speeds when you press the shutter button
halfway indicates that the settings deviate from standard exposure.
Adjust the aperture value until the shutter speed is displayed in white,
PY
or use safety shift (see below).
• B: Aperture value (size of the opening made by the iris in the lens)
O
• To avoid exposure problems in M and B modes, you can have the camera
C
automatically adjust the shutter speed or aperture value, even when standard
exposure cannot otherwise be obtained. Press the n button and set
[Safety Shift] on the 4 tab to [On] (p. 41).
However, safety shift is disabled when the flash fires.
• You can customize camera operation so that turning the 7 dial changes the
aperture value (p. 129).
125](https://image.slidesharecdn.com/canonpowershotg1x-120924153241-phpapp01/85/Canon-power-shot-g1x-125-320.jpg)
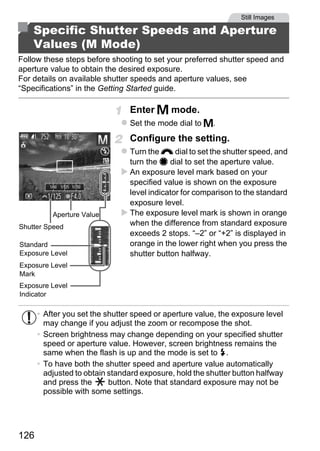
![Specific Shutter Speeds and Aperture Values (M Mode)
• D: Manual
• Calculation of standard exposure is based on the specified metering method
(p. 94).
• You can customize camera operation so that turning the 7 dial changes shutter
speed and turning the z dial changes the aperture value (p. 129).
Adjusting the Flash Output
Choose from the three flash levels in D mode.
Enter D mode.
Set the mode dial to D.
Configure the setting.
Raise the flash, press the r button and
immediately turn the z dial to choose the
PY
flash output level, then press the m button.
Once the setting is complete, X is displayed.
C O
• You can also set the flash level by choosing X in the FUNC. menu (p. 40), or
by accessing n (p. 41) and choosing [Flash Output] in [Flash Control] on
the 4 tab.
• You can set the flash level in M or B mode by accessing n (p. 41),
choosing [Flash Control] on the 4 tab, and then setting [Flash Mode] to
[Manual].
• You can also access the [Built-in Flash Settings] n screen as follows
(except when an external flash (sold separately) is attached to the camera).
- Press and hold the r button for at least one second.
- When the flash is up, press the r button and immediately press the n
button.
127](https://image.slidesharecdn.com/canonpowershotg1x-120924153241-phpapp01/85/Canon-power-shot-g1x-127-320.jpg)
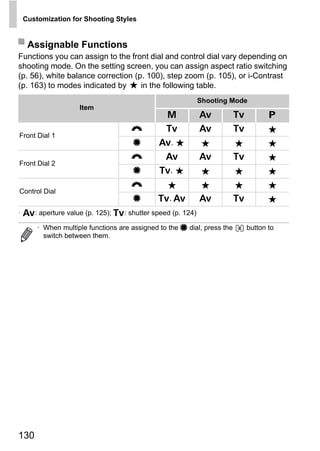
![Customization for Shooting Styles
Still Images Movies
Customizing Display Information
Customize what information is shown in various display modes (switched by
pressing the p button), and whether or not the information is shown on the
LCD monitor or viewfinder.
Access the setting screen.
Press the n button, choose [Custom
Display] on the 4 tab, and then press the m
button (p. 41).
Configure the setting.
Press the opqr buttons or turn the 7 dial
to choose an item, and then press the m
button. Items you choose for display are
PY
labeled with .
In [LCD/Viewfinder] (p. 39), you can specify
O
to show or hide this information in LCD
monitor or viewfinder display modes
C (switched by pressing the p button). Press
the opqr buttons or turn the 7 dial to
choose the screen ( ,
press the m button.
, or ), and then
To hide this information in the display mode
(accessed by pressing the p button), add
to the icon. Note that the current display
mode cannot be modified.
Selected items (labeled with a ) will be
included in display.
Shooting Info Displays shooting information (p. 222).
Grid Lines Displays a reference grid.
Electronic Level Displays the electronic level (p. 62).
Histogram Displays a histogram (p. 138), in G, M, B, and D modes.
128](https://image.slidesharecdn.com/canonpowershotg1x-120924153241-phpapp01/85/Canon-power-shot-g1x-128-320.jpg)
![Customization for Shooting Styles
• Settings will not be saved if you press the shutter button halfway and
return to the shooting screen from the custom display settings
screen.
• Grayed-out items can also be specified, but they may not be
displayed in some shooting modes.
• Grid lines are not recorded in your shots.
Still Images Movies
Assigning Functions to the Front Dial and
Control Dial
Assign commonly used functions to the front dial and control dial, by shooting
mode.
PY
Access the setting screen.
O
Press the n button, choose [Set z7
Func.] on the 4 tab, and then press the m
C
button (p. 41).
Configure the setting.
Press the qr buttons to choose an item.
To configure the settings, press the op
buttons, choose an item (either press the
opqr buttons or turn the 7 dial), and then
turn the z dial to change the function.
129](https://image.slidesharecdn.com/canonpowershotg1x-120924153241-phpapp01/85/Canon-power-shot-g1x-129-320.jpg)
![Customization for Shooting Styles
Still Images Movies
Assigning Functions to the Button
Access the setting screen.
Press the n button, choose [Set Shortcut
button] on the 4 tab, and then press the m
button (p. 41).
Configure the setting.
Press the opqr buttons or turn the 7 dial
to choose a function to assign, and then
press the m button.
Use the assigned function as
needed.
PY
Press the button to activate the assigned
function.
O
• To restore default settings, choose .
• Icons labeled with indicate that the function is not available in the current
C
shooting mode or under current function conditions.
• When the or function is used, each press of the button records white
balance data (p. 101), and the white balance settings change to or .
• When the % function is used, each press of the button adjusts and locks
the focus, and % is displayed on the screen.
• Pressing the button when the function is used deactivates screen
display. To restore the display, do any of the following.
- Press any button (other than the power button)
- Hold the camera in another orientation
- Open and close the screen
- Raise and lower the flash
131](https://image.slidesharecdn.com/canonpowershotg1x-120924153241-phpapp01/85/Canon-power-shot-g1x-131-320.jpg)
![Customization for Shooting Styles
Still Images
Saving Shooting Settings
Save commonly used shooting modes and your configured function settings
for reuse. To access saved settings later, simply turn the mode dial to or
. Even settings that are usually cleared when you switch shooting modes
or turn the camera off (such as self-timer settings) can be retained this way.
Settings that can be saved
• Shooting modes (G, M, B, and D)
• Items set in G, M, B, or D modes (pp. 93 – 126)
• Shooting menu settings
• Zoom positions
• Manual focus positions (p. 106)
• My Menu settings (p. 133)
PY
Enter a shooting mode with
settings you want to save, and
O
change the settings as desired.
C Configure the setting.
Press the n button, choose [Save
Settings] on the 4 tab, and then press the
m button.
Save the settings.
Press the qr buttons or turn the 7 dial to
choose the destination, and then press the
m button.
132](https://image.slidesharecdn.com/canonpowershotg1x-120924153241-phpapp01/85/Canon-power-shot-g1x-132-320.jpg)
![Customization for Shooting Styles
• To edit saved settings (except their shooting mode), choose or
, change the settings, and then repeat steps 2 – 3. These setting
details are not applied in other shooting modes.
• To clear information you have saved to or and restore default values,
turn the mode dial to or and choose [Reset All] (p. 179).
Still Images Movies
Saving Commonly Used Shooting Menus (My
Menu)
Save up to five commonly used shooting menus as menus on the tab, for
instant access to all of these items from a single screen.
Access the setting screen.
PY
Press the n button, choose [My Menu
settings] on the tab, and then press the
O
m button (p. 41).
C Configure the setting.
Press the op buttons or turn the 7 dial to
choose [Select items], and then press the m
button.
Press the op buttons or turn the 7 dial to
choose menus to save (up to five), and then
press the m button.
is displayed.
To cancel saving, press the m button. is
no longer displayed.
Press the n button.
133](https://image.slidesharecdn.com/canonpowershotg1x-120924153241-phpapp01/85/Canon-power-shot-g1x-133-320.jpg)
![Customization for Shooting Styles
Rearrange the menu list order, as
needed.
Press the op buttons or turn the 7 dial to
choose [Sort], and then press the m button.
Press the op buttons or turn the 7 dial to
choose a menu to move, and then press the
m button.
Press the op buttons or turn the 7 dial to
change the order, and then press the m
button.
Press the n button.
• Grayed-out items in step 2 can also be specified, but they may not be
available in some shooting modes.
PY
• To make My Menu immediately accessible by pressing the n button in
Shooting mode, choose [Set default view] and press the qr buttons to choose
[Yes].
C O
134](https://image.slidesharecdn.com/canonpowershotg1x-120924153241-phpapp01/85/Canon-power-shot-g1x-134-320.jpg)
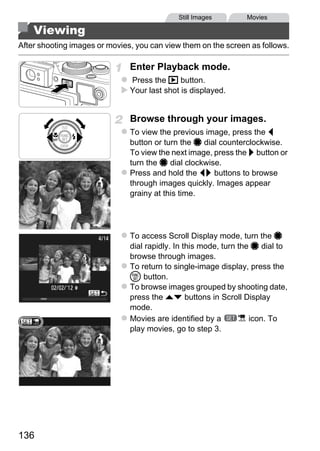
![Viewing
Play movies.
To start playback, press the m button to
access the movie control panel, choose
(either press the qr buttons or turn the 7
dial), and then press the m button again.
Adjust the volume.
Press the op buttons to adjust the volume.
Pause playback.
To pause playback, press the m button. The
movie control panel is displayed. To resume
playback, press the qr buttons or turn the 7
dial to choose , and then press the m
button.
PY
After the movie is finished, is
displayed.
O
• To switch to Shooting mode from Playback mode, press the shutter button
halfway.
C
• To deactivate Scroll Display, press the n button, choose [Scroll Display]
on the 1 tab, and then choose [Off].
• For playback from the last image viewed, press the n button, choose
[Resume] on the 1 tab, and then [Last seen].
• To change the transition shown between images, press the n button,
choose [Transition] on the 1 tab, and then press the qr buttons to choose the
effect.
137](https://image.slidesharecdn.com/canonpowershotg1x-120924153241-phpapp01/85/Canon-power-shot-g1x-137-320.jpg)
![Viewing
Still Images Movies
Switching Display Modes
Press the p button to view other information on the screen, or to hide the
information. For details on the information displayed, see p. 222.
No information is Simple Detailed Enables you to check
displayed Information Information the focus (p. 139)*
Display Display
*Not shown for movies.
• Switching display modes by pressing the p button is also possible immediately
PY
after you shoot, while your shot is displayed. However, simple information
display is not available. To change the initial display mode, press the n
button and choose [Review Info] on the 4 tab (p. 66).
O
Overexposure Warning (for Image Highlights)
C
Washed-out highlights in the image flash on the screen in detailed information
display.
Histogram
High The graph in detailed information display is a
histogram showing the distribution of
brightness in the image. The horizontal axis
represents the degree of brightness, and the
Low
vertical axis, how much of the image is at
Dark Bright each level of brightness. Viewing the
histogram is a way to check exposure.
The histogram can also be accessed while
shooting (pp. 128, 224).
138](https://image.slidesharecdn.com/canonpowershotg1x-120924153241-phpapp01/85/Canon-power-shot-g1x-138-320.jpg)


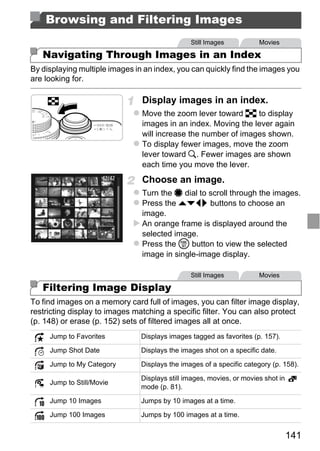
![Browsing and Filtering Images
Filtering Display by , , , or
Choose filter conditions.
In single-image display, press the d button,
and then press the op buttons to choose a
search filter (jump method).
When filtering by , , or , press the
qr buttons to choose a filter condition. Turn
the 7 dial to view only those images that
Filter Conditions match your filter conditions.
Press the n button to restore single-
image display.
View the filtered images.
Press the m button to start browsing filtered
images. The jump method and a yellow frame
PY
are displayed.
To view images filtered by your chosen
O
condition, press the qr buttons or turn the 7
dial.
CPressing the d button will display [Filtered
playback settings cleared]. To cancel filtered
playback, press the m button.
• When the camera has found no corresponding images for some
filters, those filters will not be available.
• Options for viewing filtered images (step 2) include “Navigating Through Images
in an Index” (p. 141), “Viewing Slideshows” (p. 146), and “Magnifying Images”
(p. 145). You can protect, erase, or print all filtered images at once by choosing
“All Filtered Images” in “Protecting Images” (p. 148), “Erasing All Images”
(p. 152), or “Adding Images to Print Orders (DPOF)” (p. 208).
• If you recategorize images (p. 158) or edit them and save them as new images
(p. 160), a message is displayed and filtered playback ends.
142](https://image.slidesharecdn.com/canonpowershotg1x-120924153241-phpapp01/85/Canon-power-shot-g1x-142-320.jpg)
![Browsing and Filtering Images
Jumping by or Images
Choose a jump method in single-image
display by pressing the d button and then
pressing the op buttons.
Press the qr buttons to use the specified
jump method.
Press the n button to restore single-
image display.
Using the Front Dial to Jump
Turn the front dial to jump images using the , , and functions.
Choose a jump method in single-image
display by turning the z dial and then
pressing the op buttons.
PY
Turn the z dial to use the specified jump
method.
C O
• Turning the z dial when browsing images in index display will jump to the
previous or next image according to the jump method chosen in single-image
display. However, if you have chosen
switched to .
or , the jump method will be
Movies
Viewing Movie Digest Movies
Movies created in mode (p. 81) can be viewed by date.
Choose a movie.
Press the n button to choose [Movie
Digest Playback] in the 1 tab, then choose a
date.
Play the movie.
Press the m button to start playback.
143](https://image.slidesharecdn.com/canonpowershotg1x-120924153241-phpapp01/85/Canon-power-shot-g1x-143-320.jpg)
![Browsing and Filtering Images
Still Images
Viewing Individual Images in a Group
Grouped images shot in mode (p. 85) are generally displayed together,
but they can also be viewed individually.
Choose an image group.
Press the qr buttons or turn the 7 dial to
choose an image labeled , and then
press the m button.
View individual images in the
group.
PY
Pressing the qr buttons or turning the 7 dial
will display only images in the group.
Pressing the d button will display [Display all
C O
images]. Press m to cancel group playback.
• During group playback (step 2), you can browse through images quickly
(“Navigating Through Images in an Index” (p. 141)) and magnify them
(“Magnifying Images” (p. 145)). You can protect, erase, or print all images in a
group at once by choosing “All Images in Group” in “Protecting Images” (p. 148),
“Erasing All Images” (p. 152), or “Adding Images to Print Orders (DPOF)”
(p. 208).
• To ungroup images so that you can view them individually, press the n
button, choose [Group Images] on the 1 tab, and then choose [Off] (p. 41).
However, grouped images cannot be ungrouped during individual playback.
144](https://image.slidesharecdn.com/canonpowershotg1x-120924153241-phpapp01/85/Canon-power-shot-g1x-144-320.jpg)
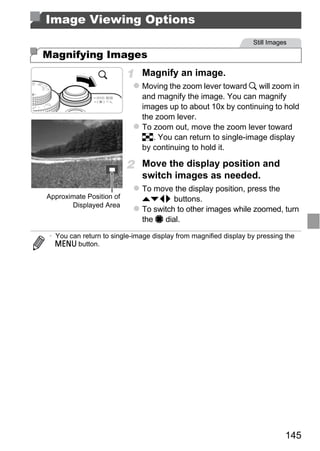
![Image Viewing Options
Still Images Movies
Viewing Slideshows
Automatically play back images from a memory card as follows.
Access the setting screen.
Press the n button and choose
[Slideshow] on the 1 tab (p. 41).
Configure the setting.
Choose a menu item to configure, and then
choose the desired option (p. 41).
PY
Start automatic playback.
Press the op buttons or turn the 7 dial to
C O
choose [Start], and then press the m button.
The slideshow will start a few seconds after
[Loading image...] is displayed.
Press the n button to stop the
slideshow.
• The camera’s power-saving functions (p. 36) are deactivated during
slideshows.
• To pause or resume slideshows, press the m button.
• You can switch to other images during playback by pressing the qr buttons or
turning the 7 dial. For fast-forward or fast-rewind, hold the qr buttons down.
• [Play Time] cannot be modified when [Bubble] is chosen in [Effect].
• You can also start slideshows from single-image display by pressing and
holding the m button and immediately pressing the button.
146](https://image.slidesharecdn.com/canonpowershotg1x-120924153241-phpapp01/85/Canon-power-shot-g1x-146-320.jpg)
![Image Viewing Options
Still Images
Auto Playback of Similar Images (Smart
Shuffle)
Based on the current image, the camera offers four images similar to it that
you may wish to view. After you choose to view one of those images, the
camera offers four more images. This is an enjoyable way to play back
images in an unexpected order. Try this feature after you have taken many
shots, in many kinds of scenes.
Choose Smart Shuffle.
Press the n button, choose [Smart
Shuffle] on the 1 tab, and then press the m
button (p. 41).
Four candidate images are displayed.
O PY
Choose an image.
Press the opqr buttons to choose the
C
image you want to view next.
Your chosen image is displayed in the center,
surrounded by the next four candidate
images.
For full-screen display of the center image,
press the m button. To restore the original
display, press the m button again.
Press the n button to restore single-
image display.
• Only still images shot with this camera are played back using Smart
Shuffle.
• [Smart Shuffle] is not available in the following cases:
- There are less than 50 shots taken with this camera
- An unsupported image is currently displayed
- The current image is being played in filtered playback
147](https://image.slidesharecdn.com/canonpowershotg1x-120924153241-phpapp01/85/Canon-power-shot-g1x-147-320.jpg)
![Still Images Movies
Protecting Images
Protect important images to prevent accidental erasure by the camera
(pp. 152).
Choosing a Selection Method
Access the setting screen.
Press the n button, and then choose
[Protect] on the 1 tab (p. 41).
Choose a selection method.
Choose a menu item and a setting as desired
(p. 41).
PY
To return to the menu screen, press the
n button.
C O
• Protected images on a memory card will be erased if you format the
card (pp. 171, 172).
• Protected images cannot be erased by the camera. To erase them, cancel
protection settings first.
148](https://image.slidesharecdn.com/canonpowershotg1x-120924153241-phpapp01/85/Canon-power-shot-g1x-148-320.jpg)
![Protecting Images
Choosing Images Individually
Choose [Select].
Following step 2 on p. 148, choose [Select]
and press the m button.
Choose an image.
Press the qr buttons or turn the 7 dial to
choose an image, and then press the m
button. is displayed.
To cancel protection, press the m button
again. is no longer displayed.
Repeat this process to specify other images.
Protect the images.
Press the n button. A confirmation
PY
message is displayed.
Press the qr buttons or turn the 7 dial to
O
choose [OK], and then press the m button.
C
• Images will not be protected if you switch to Shooting mode or turn
the camera off before finishing the setup process in step 3.
149](https://image.slidesharecdn.com/canonpowershotg1x-120924153241-phpapp01/85/Canon-power-shot-g1x-149-320.jpg)
![Protecting Images
Selecting a Range
Choose [Select Range].
Following step 2 on p. 148, choose [Select
Range] and press the m button.
Choose a starting image.
Press the m button.
Press the qr buttons or turn the 7 dial to
choose an image, and then press the m
button.
O PY
C
Choose an ending image.
Press the r button to choose [Last image],
and then press the m button.
Press the qr buttons or turn the 7 dial to
choose an image, and then press the m
button.
Images before the first image cannot be
selected as the last image.
150](https://image.slidesharecdn.com/canonpowershotg1x-120924153241-phpapp01/85/Canon-power-shot-g1x-150-320.jpg)
![Protecting Images
Protect the images.
Press the p button to choose [Protect], and
then press the m button.
• You can also choose the first or last image by turning the 7 dial when the top
screen in steps 2 and 3 is displayed.
Specifying All Images at Once
Choose [All Images].
Following step 2 on p. 148, choose [All
PY
Images] and press the m button.
Protect the images.
O
Press the op buttons or turn the 7 dial to
choose [Protect], and then press the m
C button.
• To cancel protection for groups of images, choose [Unlock] in step 4 of
“Selecting a Range” or in step 2 of “Specifying All Images at Once”.
151](https://image.slidesharecdn.com/canonpowershotg1x-120924153241-phpapp01/85/Canon-power-shot-g1x-151-320.jpg)
![Still Images Movies
Erasing Images
You can choose and erase unneeded images one by one. Be careful when
erasing images, because they cannot be recovered.
Choose an image to erase.
Press the qr buttons or turn the 7 dial to
choose an image.
Erase the images.
Press the a button.
After [Erase?] is displayed, press the qr
buttons or turn the 7 dial to choose [Erase],
and then press the m button.
The current image is now erased.
To cancel erasure, press the qr buttons or
turn the 7 dial to choose [Cancel], and then
PY
press the m button.
Erasing All Images
C O
You can erase all images at once. Be careful when erasing images, because
they cannot be recovered. However, protected images (p. 148) cannot be
erased.
Choosing a Selection Method
Access the setting screen.
Press the n button, and then choose
[Erase] on the 1 tab (p. 41).
Choose a selection method.
Choose a menu item and a setting as desired
(p. 41).
Press the op buttons to choose a selection
method, and then press the m button.
To return to the menu screen, press the
n button.
152](https://image.slidesharecdn.com/canonpowershotg1x-120924153241-phpapp01/85/Canon-power-shot-g1x-152-320.jpg)
![Erasing Images
Choosing Images Individually
Choose [Select].
Following step 2 on p. 152, choose [Select]
and press the m button.
Choose an image.
Once you follow step 2 on p. 149 to choose
an image, is displayed.
To cancel erasure, press the m button
again. is no longer displayed.
Repeat this process to specify other images.
Erase the images.
Press the n button. A confirmation
PY
message is displayed.
Press the qr buttons or turn the 7 dial to
choose [OK], and then press the m button.
Selecting a Range
C O
Choose [Select Range].
Following step 2 on p. 152, choose [Select
Range] and press the m button.
Choose images.
Follow steps 2 – 3 on p. 150 to specify
images.
Erase the images.
Press the p button to choose [Erase], and
then press the m button.
153](https://image.slidesharecdn.com/canonpowershotg1x-120924153241-phpapp01/85/Canon-power-shot-g1x-153-320.jpg)
![Erasing Images
Specifying All Images at Once
Choose [All Images].
Following step 2 on p. 152, choose [All
Images] and press the m button.
Erase the images.
Press the qr buttons or turn the 7 dial to
choose [OK], and then press the m button.
O PY
C
154](https://image.slidesharecdn.com/canonpowershotg1x-120924153241-phpapp01/85/Canon-power-shot-g1x-154-320.jpg)
![Still Images Movies
Rotating Images
Change the orientation of images and save them as follows.
Choose [Rotate].
Press the n button, and then choose
[Rotate] on the 1 tab (p. 41).
Rotate the image.
Press the qr buttons or turn the 7 dial to
choose an image.
The image is rotated 90° each time you press
the m button.
To return to the menu screen, press the
PY
n button.
O
• Movies with an image quality of or cannot be rotated.
• Rotation is not possible when [Auto Rotate] is set to [Off] (see below).
C
Deactivating Auto Rotation
Follow these steps to deactivate automatic rotation by the camera, which
rotates images shot in vertical orientation so they are displayed vertically on
the camera.
Press the n button, choose [Auto
Rotate] on the 1 tab, and then choose [Off]
(p. 41).
155](https://image.slidesharecdn.com/canonpowershotg1x-120924153241-phpapp01/85/Canon-power-shot-g1x-155-320.jpg)
![Rotating Images
• Images cannot be rotated when you set [Auto Rotate] to [Off].
Additionally, images already rotated will be displayed in the original
orientation.
• In Smart Shuffle (p. 147) mode, even if [Auto Rotate] is set to [Off],
images shot vertically will be displayed vertically, and rotated images
will be displayed in the rotated orientation.
O PY
C
156](https://image.slidesharecdn.com/canonpowershotg1x-120924153241-phpapp01/85/Canon-power-shot-g1x-156-320.jpg)
![Still Images Movies
Image Categories
You can tag images as favorites and assign them to My Category (p. 158). By
choosing a category in filtered playback, you can restrict the following
operations to all of those images.
• Viewing (p. 136), Viewing Slideshows (p. 146), Protecting Images (p. 148),
Erasing Images (p. 152), Adding Images to Print Orders (DPOF) (p. 208)
Tagging Images as Favorites
Choose [Favorites].
Press the n button, and then choose
[Favorites] on the 1 tab (p. 41).
PY
Choose an image.
Press the qr buttons or turn the 7 dial to
choose an image, and then press the m
C O
button. is displayed.
To untag the image, press the m button
again. is no longer displayed.
Repeat this process to choose additional
images.
Finish the setup process.
Press the n button. A confirmation
message is displayed.
Press the qr buttons or turn the 7 dial to
choose [OK], and then press the m button.
• Images will not be tagged as favorites if you switch to Shooting mode
or turn the camera off before finishing the setup process in step 3.
• Favorite images will have a three-star rating ( ) when transferred
to computers running Windows 7 or Windows Vista. (Does not apply to movies
or RAW images.)
157](https://image.slidesharecdn.com/canonpowershotg1x-120924153241-phpapp01/85/Canon-power-shot-g1x-157-320.jpg)
![Image Categories
Organizing Images by Category (My Category)
You can organize images into categories. Note that images are automatically
categorized at the time of shooting, according to shooting conditions.
:Images with detected faces, or images shot in I or V mode.
:Images detected as , , or in A mode, or images shot in J,
O, or mode.
: Images shot in , w, S, P, or t mode.
Choosing a Selection Method
Access the setting screen.
Press the n button, and then choose
[My Category] on the 1 tab (p. 41).
O PY
Choose a selection method.
Choose a menu item and a setting as desired
C (p. 41).
To return to the menu screen, press the
n button.
Choosing Images Individually
Choose [Select].
Following step 2 above, choose [Select] and
press the m button.
Choose an image.
Press the qr buttons or turn the 7 dial to
choose an image.
158](https://image.slidesharecdn.com/canonpowershotg1x-120924153241-phpapp01/85/Canon-power-shot-g1x-158-320.jpg)
![Image Categories
Choose a category.
Press the op buttons to choose the
category, and then press the m button.
is displayed.
To cancel selection, press the m button
again. is no longer displayed.
Repeat this process to choose additional
images.
Finish the setup process.
Press the n button. A confirmation
message is displayed. Press the qr buttons
or turn the 7 dial to choose [OK], and then
press the m button.
PY
• Images will not be assigned to a category if you switch to Shooting mode
or turn the camera off before finishing the setup process in step 4.
Selecting a Range
C O
Choose [Select Range].
Following step 2 on p. 158, choose [Select
Range] and press the m button.
Choose images.
Follow steps 2 – 3 on p. 150 to specify images.
Choose a category.
Press the p button to choose the type of
image, and then press the qr buttons or turn
the 7 dial to choose a category.
Finish the setup process.
Press the p button to choose [Select], and
then press the m button.
• You can clear the selection of all images in the [Select Range] category by
choosing [Deselect] in step 4.
159](https://image.slidesharecdn.com/canonpowershotg1x-120924153241-phpapp01/85/Canon-power-shot-g1x-159-320.jpg)
![Still Images
Editing Still Images
• Image editing (pp. 160 – 164) is only available when the memory
card has sufficient free space.
Resizing Images
Save a copy of images at a lower resolution.
Choose [Resize].
Press the n button, and then choose
[Resize] on the 1 tab (p. 41).
Choose an image.
Press the qr buttons or turn the 7 dial to
choose an image, and then press the m
PY
button.
Choose an image size.
O
Press the qr buttons or turn the 7 dial to
choose the size, and then press the m
Cbutton.
[Save new image?] is displayed.
Save the new image.
Press the qr buttons or turn the 7 dial to
choose [OK], and then press the m button.
The image is now saved as a new file.
Review the new image.
Press the n button. [Display new
image?] is displayed.
Press the qr buttons or turn the 7 dial to
choose [Yes], and then press the m button.
The saved image is now displayed.
160](https://image.slidesharecdn.com/canonpowershotg1x-120924153241-phpapp01/85/Canon-power-shot-g1x-160-320.jpg)
![Editing Still Images
• Editing is not possible for images saved as in step 3.
• RAW images cannot be edited.
• Images cannot be resized to a higher resolution.
Cropping
You can specify a portion of an image to save as a separate image file.
Choose [Trimming].
Press the n button, and then choose
[Trimming] on the 1 tab (p. 41).
Choose an image.
PY
Press the qr buttons or turn the 7 dial to
choose an image, and then press the m
O
button.
Cropping Area
C
Resolution After Cropping
Adjust the cropping area.
A frame is displayed around the portion of the
image to be cropped.
The original image is shown in the upper left,
and a preview of the image as cropped is
shown in the lower right.
To resize the frame, move the zoom lever.
To move the frame, press the opqr buttons.
To change the frame orientation, press the
Preview of Image m button.
After Cropping Faces detected in the image are shown with
gray frames around them (in the upper-left
image), which can be used for cropping.
Switch between frames as needed by turning
the 7 dial.
Press the n button.
Save as a new image and review.
Follow steps 4 – 5 on p. 160.
161](https://image.slidesharecdn.com/canonpowershotg1x-120924153241-phpapp01/85/Canon-power-shot-g1x-161-320.jpg)
![Editing Still Images
• Editing is not possible for images shot at a resolution of (p. 57) or
resized to (p. 160).
• RAW images cannot be edited.
• Images supported for cropping will have the same aspect ratio after cropping.
• Cropped images will have a smaller resolution than uncropped images.
Changing Image Color Tones (My Colors)
You can adjust image colors and then save the edited image as a separate
file. For details on each option, see p. 102.
Choose [My Colors].
Press the n button, and then choose
[My Colors] on the 1 tab (p. 41).
PY
Choose an image.
Press the qr buttons or turn the 7 dial to
C
button.
O
choose an image, and then press the m
Choose an option.
Press the qr buttons or turn the 7 dial to
choose an option, and then press the m
button.
Save as a new image and review.
Follow steps 4 – 5 on p. 160.
• Image quality of pictures you repeatedly edit this way will be a little
lower each time, and you may not be able to obtain the desired color.
• Colors of RAW images cannot be edited.
• The color of images edited using this function may vary slightly from the color of
images shot using My Colors (p. 102).
162](https://image.slidesharecdn.com/canonpowershotg1x-120924153241-phpapp01/85/Canon-power-shot-g1x-162-320.jpg)
![Editing Still Images
Correcting Image Brightness (i-Contrast)
Excessively dark image areas (such as faces or backgrounds) can be
detected and automatically adjusted to the optimal brightness. Insufficient
overall image contrast is also automatically corrected, to make subjects stand
out better. Choose from four correction levels, and then save the image as a
separate file.
Choose [i-Contrast].
Press the n button, and then choose [i-
Contrast] on the 1 tab (p. 41).
Choose an image.
Press the qr buttons or turn the 7 dial to
choose an image, and then press the m
button.
PY
Choose an option.
Press the qr buttons or turn the 7 dial to
C O
choose an option, and then press the m
button.
Save as a new image and review.
Follow steps 4 – 5 on p. 160.
• For some images, correction may be inaccurate or may cause
images to appear grainy.
• Images may look grainy after repeated editing using this function.
• RAW images cannot be edited this way.
• If [Auto] does not produce the expected results, try correcting images using
[Low], [Medium], or [High].
163](https://image.slidesharecdn.com/canonpowershotg1x-120924153241-phpapp01/85/Canon-power-shot-g1x-163-320.jpg)
![Editing Still Images
Correcting Red-Eye
Automatically corrects images affected by red-eye. You can save the
corrected image as a separate file.
Choose [Red-Eye Correction].
Press the n button, and then choose
[Red-Eye Correction] on the 1 tab (p. 41).
Choose an image.
Press the qr buttons or turn the 7 dial to
choose an image.
Correct the image.
Press the m button.
Red-eye detected by the camera is now
PY
corrected, and frames are displayed around
corrected image areas.
O
Enlarge or reduce images as needed. Follow
the steps in “Magnifying Images” (p. 145).
C Save as a new image and review.
Press the opqr buttons or turn the 7 dial
to choose [New File], and then press the m
button.
The image is now saved as a new file.
Follow step 5 on p. 160.
• Some images may not be corrected accurately.
• To overwrite the original image with the corrected image, choose
[Overwrite] in step 4. In this case, the original image will be erased.
• Protected images cannot be overwritten.
• RAW images cannot be edited this way.
• Red-eye correction can be applied to JPEG images shot in , but
the original image cannot be overwritten.
164](https://image.slidesharecdn.com/canonpowershotg1x-120924153241-phpapp01/85/Canon-power-shot-g1x-164-320.jpg)
![Movies
Editing Movies
You can cut movies to remove unneeded portions at the beginning or end.
Choose *.
Following steps 1 – 3 on p. 136, choose *
and press the m button.
The movie editing panel and editing bar are
now displayed.
Movie Editing Panel
Specify portions to cut.
Press the op buttons to choose or .
To view the portions you can cut (identified by
on the screen), press the qr buttons or
PY
turn the 7 dial to move . Cut the beginning
of the movie (from ) by choosing , and
cut the end of the movie by choosing .
Movie Editing Bar
C O
Even if you move to a position other than a
mark, choosing
portion from the nearest
choosing
will only cut the
to the left, and
will cut the portion from the
nearest to the right.
Review the edited movie.
Press the op buttons to choose , and
then press the m button. The edited movie is
now played.
To edit the movie again, repeat step 2.
To cancel editing, press the op buttons to
choose . Press the m button, choose
[OK] (either press the qr buttons or turn the
7 dial), and then press the m button again.
165](https://image.slidesharecdn.com/canonpowershotg1x-120924153241-phpapp01/85/Canon-power-shot-g1x-165-320.jpg)
![Editing Movies
Save the edited movie.
Press the op buttons to choose , and then
press the m button.
Press the opqr buttons or turn the 7 dial
to choose [New File], and then press the m
button.
The movie is now saved as a new file.
• To overwrite the original movie with the cut one, choose [Overwrite]
in step 4. In this case, the original movie will be erased.
• Only [Overwrite] is available when memory cards lack sufficient free
space.
• Movies may not be saved if the battery runs out while saving is in
progress.
• When editing movies, you should use a fully charged battery or an
PY
AC adapter kit (sold separately, p. 182).
C O
166](https://image.slidesharecdn.com/canonpowershotg1x-120924153241-phpapp01/85/Canon-power-shot-g1x-166-320.jpg)
![Adjusting Basic Camera Functions
Functions can be configured on the 3 tab. Customize commonly used
functions as desired, for greater convenience (p. 41).
Silencing Camera Operations
Silence camera sounds and movies as follows.
Choose [Mute], and then choose [On].
• Operation can also be silenced by holding down the p button as you turn the
camera on.
• Sound is not played during movies if you mute camera sounds (p. 136). To
PY
restore sound during movies, press the o button. Adjust volume with the op
buttons, as needed.
Adjusting the Volume
C O
Adjust the volume of individual camera sounds as follows.
Choose [Volume], and then press the m
button.
Choose an item, and then press the qr
buttons to adjust the volume.
168](https://image.slidesharecdn.com/canonpowershotg1x-120924153241-phpapp01/85/Canon-power-shot-g1x-168-320.jpg)
![Adjusting Basic Camera Functions
Customizing Sounds
Customize camera operating sounds as follows.
Choose [Sound Options], and then press the
m button.
Choose an item, and then press the qr
buttons to choose an option.
Preset sounds
1, 2
(cannot be modified)
Preset sounds
3 Can be changed by using the included
software.
• The default shutter sound is used in mode (p. 85), regardless of any
changes to [Shutter Sound].
Hiding Hints and Tips
O PY
Hints and tips are normally shown when you choose FUNC. menu (p. 40) or
C
Menu (p. 41) items. If you prefer, you can deactivate this information.
Choose [Hints & Tips], and then choose [Off].
169](https://image.slidesharecdn.com/canonpowershotg1x-120924153241-phpapp01/85/Canon-power-shot-g1x-169-320.jpg)
![Adjusting Basic Camera Functions
Screen Brightness
Adjust screen brightness as follows.
Choose [LCD Brightness], and then press the
qr buttons to adjust the brightness.
• For maximum brightness, press and hold the p button for at least one second
when the shooting screen is displayed or when in single-image display. (This
will override the [LCD Brightness] setting on the 3 tab.) To restore the original
brightness, press and hold the p button again for at least one second or restart
the camera.
PY
Start-up Screen
O
Customize the start-up screen shown after you turn the camera on as follows.
C Choose [Start-up Image], and then press the
m button.
Press the qr buttons or turn the 7 dial to
choose an option.
No start-up image
Preset images
1, 2
(cannot be modified)
Preset images
3 Assign desired shots, or use the included
software to change the image.
170](https://image.slidesharecdn.com/canonpowershotg1x-120924153241-phpapp01/85/Canon-power-shot-g1x-170-320.jpg)
![Adjusting Basic Camera Functions
Customizing the Start-up Screen
Access the [Start-up Image] screen
in Playback mode.
Press the 1 button.
Following the previous procedure, choose [3]
and press the m button.
Choose one of your shots.
Choose an image and press the m button.
After [Register?] is displayed, choose [OK]
(either press the qr buttons or turn the 7
dial), and then press the m button.
PY
• The previous start-up setting is overwritten when you assign a new
start-up image.
C O
• You can assign the operating sounds and start-up images for your camera from
the included software. For details, refer to the Software Guide.
Formatting Memory Cards
Before using a new memory card or a card formatted in another device, you
should format the card with this camera.
Formatting erases all data on a memory card. Before formatting, copy images
on the memory card to a computer, or take other steps to back them up.
An Eye-Fi card (p. 212) contains software on the card itself. Before formatting
an Eye-Fi card, install the software on a computer.
Access the [Format] screen.
Choose [Format], and then press the m
button.
Choose [OK].
Press the qr buttons or turn the 7 dial to
choose [OK], and then press the m button.
171](https://image.slidesharecdn.com/canonpowershotg1x-120924153241-phpapp01/85/Canon-power-shot-g1x-171-320.jpg)
![Adjusting Basic Camera Functions
Format the memory card.
To begin the formatting process, press the
op buttons or turn the 7 dial to choose
[OK], and then press the m button.
When formatting is finished, [Memory card
formatting complete] is displayed. Press the
m button.
• Formatting or erasing data on a memory card only changes file
management information on the card and does not erase the data
completely. When transferring or disposing of memory cards, take
steps to protect personal information if necessary, as by physically
destroying cards.
• The total card capacity indicated on the formatting screen may be less than the
advertised capacity.
PY
Low-Level Formatting
O
Perform low-level formatting in these cases: [Memory card error] is displayed,
the camera is not working correctly, card image reading/writing is slower,
C
continuous shooting is slower, or movie recording suddenly stops. Low-level
formatting erases all data on a memory card. Before low-level formatting, copy
images on the memory card to a computer, or take other steps to back them up.
Perform low-level formatting.
On the screen in step 2 on p. 171, press the
op buttons or turn the 7 dial to choose
[Low Level Format], and then select this
option (mark with a ) by pressing the qr
buttons.
Press the opqr buttons or turn the 7 dial
to choose [OK], press the m button, and
then follow step 3 on p. 171 to format (low-
level format) the memory card.
• Low-level formatting takes longer than “Formatting Memory Cards” (p. 171),
because data is erased from all storage regions of the memory card.
• You can cancel low-level formatting in progress by choosing [Stop]. In this case,
all data will be erased, but the memory card can be used normally.
172](https://image.slidesharecdn.com/canonpowershotg1x-120924153241-phpapp01/85/Canon-power-shot-g1x-172-320.jpg)
![Adjusting Basic Camera Functions
File Numbering
Your shots are automatically numbered in sequential order (0001 – 9999) and
saved in folders that store up to 2,000 images each. You can change how the
camera assigns file numbers.
Choose [File Numbering], and then choose
an option.
Images are numbered
consecutively (until the 9999th shot
Continuous
is taken/saved) even if you switch
memory cards.
Image numbering is reset to 0 if you
Auto Reset switch memory cards, or when a
new folder is created.
PY
• Regardless of the option selected in this setting, shots may be numbered
consecutively after the last number of existing images on newly inserted
memory cards. To start saving shots from 0001, use an empty (or formatted
(p. 171)) memory card.
O
• Refer to the Software Guide for information on the card folder structure and
image formats.
Date-Based Image Storage C
Instead of saving images in folders created each month, you can have the
camera create folders each day you shoot to store shots taken that day.
Choose [Create Folder], and then choose
[Daily].
Images will now be saved in folders created
on the shooting date.
173](https://image.slidesharecdn.com/canonpowershotg1x-120924153241-phpapp01/85/Canon-power-shot-g1x-173-320.jpg)
![Adjusting Basic Camera Functions
Lens Retraction Timing
The lens is normally retracted for safety about one minute after you press the
1 button in Shooting mode (p. 36). To have the lens retracted immediately
after you press the 1 button, set the retraction timing to [0 sec.].
Choose [Lens Retract], and then choose [0
sec.].
Power-Saving Adjustment
PY
Adjust the timing of automatic camera and screen deactivation (Auto Power
Down and Display Off, respectively) as needed (p. 36).
O
Access the [Power Saving] screen.
C
Choose [Power Saving], and then press the
m button.
Configure the settings.
After choosing an item, press the qr buttons
to adjust it as needed.
• To conserve battery power, you should normally choose [On] for
[Auto Power Down] and [1 min.] or less for [Display Off].
• The [Display Off] setting is applied even if you set [Auto Power Down] to [Off].
174](https://image.slidesharecdn.com/canonpowershotg1x-120924153241-phpapp01/85/Canon-power-shot-g1x-174-320.jpg)
![Adjusting Basic Camera Functions
World Clock
To ensure that your shots will have the correct local date and time when you
travel abroad, simply register the destination in advance and switch to that
time zone. This convenient feature eliminates the need to change the Date/
Time setting manually.
Before using the world clock, be sure to set the date and time (p. 18) and your
home time zone.
Specify your destination.
Choose [Time Zone], and then press the m
button.
Press the op buttons or turn the 7 dial to
choose [ World], and then press the m
button.
Press the qr buttons or turn the 7 dial to
PY
choose the destination.
To set daylight saving time (1 hour ahead),
O
press the op buttons to choose .
Press the m button.
C Switch to the destination time
zone.
Press the op buttons or turn the 7 dial to
choose [ World], and then press the
n button.
is now shown on the shooting screen
(p. 222).
• Adjusting the date or time while in mode (p. 19) will automatically update
your [ Home] time and date.
175](https://image.slidesharecdn.com/canonpowershotg1x-120924153241-phpapp01/85/Canon-power-shot-g1x-175-320.jpg)
![Adjusting Basic Camera Functions
Date and Time
Adjust the date and time as follows.
Access the [Date/Time] screen.
Choose [Date/Time], and then press the m
button.
Configure the setting.
Press the qr buttons to choose an item, and
then adjust the setting, either by pressing the
op buttons or turning the 7 dial.
Metric/Non-Metric Display
Change the unit of measurement shown in the MF indicator (p. 106) and
PY
zoom bar (p. 44) from m/cm to ft/in as needed.
Choose [Distance Units], and then choose [ft/
O
in].
C
Electronic Level Calibration
Calibrate the electronic level if it seems ineffective in helping you level the
camera.
For greater calibration accuracy, display grid lines (p. 128) to help you level
the camera in advance.
Level the camera.
Mount the camera on a tripod and make sure
it is level.
176](https://image.slidesharecdn.com/canonpowershotg1x-120924153241-phpapp01/85/Canon-power-shot-g1x-176-320.jpg)
![Adjusting Basic Camera Functions
Access the [Electronic Level]
screen.
Choose [Electronic Level], and then press the
m button.
Calibrate the electronic level.
Choose [Calibrate] and press the m button.
A confirmation message is displayed.
Choose [OK], and then press the m button.
Resetting the Electronic Level
Restore the electronic level to its original state as follows. Note that this is not
possible unless you have calibrated the electronic level.
Choose [Electronic Level], and then press the
PY
m button.
Choose [Reset], and then press the m
button.
O
Once the electronic level has been reset, the
C
menu screen is displayed again.
Setting Copyright Information to Record in
Images
To record the author’s name and copyright details in images, set this
information beforehand as follows.
Access the setting screen.
Choose [Copyright Info], and then press the
m button.
Press the op buttons or turn the 7 dial to
choose [Enter Author’s Name] or [Enter
Copyright Details], and then press the m
button.
177](https://image.slidesharecdn.com/canonpowershotg1x-120924153241-phpapp01/85/Canon-power-shot-g1x-177-320.jpg)
![Adjusting Basic Camera Functions
Enter a name.
Press the opqr buttons or turn the 7 dial
to choose a character, and then press the m
button to enter it.
Up to 63 characters can be used.
Press the a button to delete single
characters.
Turn the z dial or choose or and
press the m button to move the cursor.
Save the settings.
Press the n button. [Accept changes?]
is displayed.
Press the qr buttons or turn the 7 dial to
choose [Yes], and then press the m button.
The information set here will now be recorded
PY
in images.
• To check the information entered, choose [Display Copyright Info] on the screen
O
in step 1, and then press the m button.
C
• You can also use the included software (p. 26) to enter, change, and delete
copyright information. Some characters entered with the included software may
not display on the camera, but will be correctly recorded in images.
• You can view, change, and delete copyright information recorded in images by
using the included software after saving images to a computer.
Deleting All Copyright Information
You can delete both the author’s name and copyright details at the same time
as follows.
Follow step 1 on p. 177 and choose [Delete
Copyright Info].
Press the qr buttons or turn the 7 dial to
choose [OK], and then press the m button.
• The copyright info already recorded in images will not be deleted.
178](https://image.slidesharecdn.com/canonpowershotg1x-120924153241-phpapp01/85/Canon-power-shot-g1x-178-320.jpg)
![Adjusting Basic Camera Functions
Display Language
Change the display language as needed.
Access the [Language] screen.
Choose [Language ], and then press the
m button.
Configure the setting.
Press the opqr buttons or turn the 7 dial
to choose a language, and then press the m
button.
• You can also access the [Language] screen in Playback mode by pressing and
holding the m button and immediately pressing the n button.
PY
Adjusting Other Settings
The following settings can also be adjusted on the 3 tab.
• [Video System] (p. 187)
• [Ctrl via HDMI] (p. 188)
• [Eye-Fi Settings] (p. 212)
C O
Restoring Defaults
If you accidentally change a setting, you can restore default camera settings.
Access the [Reset All] screen.
Choose [Reset All], and then press the m
button.
Restore default settings.
Press the qr buttons or turn the 7 dial to
choose [OK], and then press the m button.
Default settings are now restored.
179](https://image.slidesharecdn.com/canonpowershotg1x-120924153241-phpapp01/85/Canon-power-shot-g1x-179-320.jpg)
![Adjusting Basic Camera Functions
• The following functions are not restored to default settings.
- 3 tab settings [Time Zone] (p. 175), [Date/Time] (p. 176), [Language ]
(p. 179), [Video System] (p. 186), and the image assigned to [Start-up Image]
(p. 170)
- Custom white balance data you have recorded (p. 101)
- Colors chosen in Color Accent (p. 78) or Color Swap (p. 79)
- Shooting mode chosen in K (p. 68) or (p. 71) mode
- Exposure compensation (p. 93) setting
- The movie mode (p. 88)
- Calibrated value for the electronic level (p. 176)
- Copyright information (p. 177)
O PY
C
180](https://image.slidesharecdn.com/canonpowershotg1x-120924153241-phpapp01/85/Canon-power-shot-g1x-180-320.jpg)
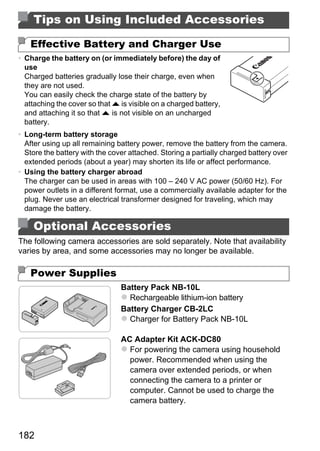
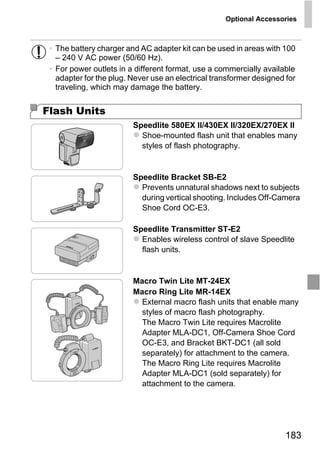


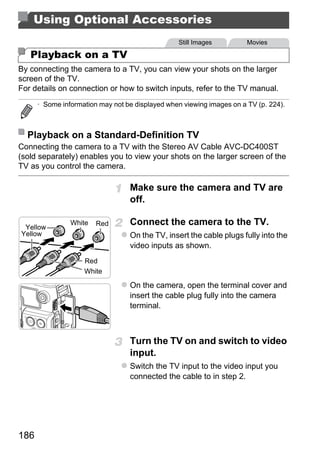
![Using Optional Accessories
Turn the camera on.
Press the 1 button to turn the camera on.
Images from the camera are now displayed
on the TV. (Nothing is displayed on the
camera screen.)
When finished, turn off the camera and TV
before disconnecting the cable.
• Correct display is not possible unless the camera video output format
(NTSC or PAL) matches the TV format. To change the video output
format, press the n button and choose [Video System] on the
3 tab.
• When the camera and TV are connected, you can also shoot while previewing
shots on the larger screen of the TV. To shoot, follow the same steps as when
using the camera screen.
PY
Playback on a High-Definition TV
Connecting the camera to an HDTV with the HDMI Cable HTC-100 (sold
Movies shot at a resolution of or
O
separately) enables you to view your shots on the larger screen of the TV.
C
can be viewed in high-definition.
Make sure the camera and TV are
off.
Connect the camera to the TV.
On the TV, insert the cable plug fully into the
HDMI input as shown.
On the camera, open the terminal cover and
insert the cable plug fully into the camera
terminal.
187](https://image.slidesharecdn.com/canonpowershotg1x-120924153241-phpapp01/85/Canon-power-shot-g1x-187-320.jpg)
![Using Optional Accessories
Display images.
Follow steps 3 – 4 on p. 186 to display
images.
• Camera operating sounds are not played while the camera is connected to an
HDTV.
Controlling the Camera with a TV Remote
Connecting the camera to an HDMI CEC-compatible TV enables playback
(including slideshow playback) using the TV remote control.
In this case, you will need to adjust some TV settings. For details, refer to the
TV user manual.
Configure the settings.
Press the n button, choose [Ctrl via
PY
HDMI] on the 3 tab, and then choose [Enable]
(p. 41).
O
Connect the camera to the TV.
C
Follow steps 1 – 2 on p. 187 to connect the
camera to the TV.
Display images.
Turn on the TV. On the camera, press the 1
button.
Images from the camera are now displayed
on the TV. (Nothing is displayed on the
camera screen.)
Control the camera with the TV
remote.
Press the qr buttons on the remote to
browse images.
To display the camera control panel, press
the OK/Select button. Select control panel
items by pressing the qr buttons to choose
an item, and then pressing the OK/Select
button again.
188](https://image.slidesharecdn.com/canonpowershotg1x-120924153241-phpapp01/85/Canon-power-shot-g1x-188-320.jpg)
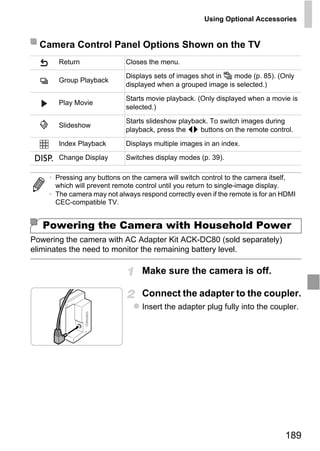
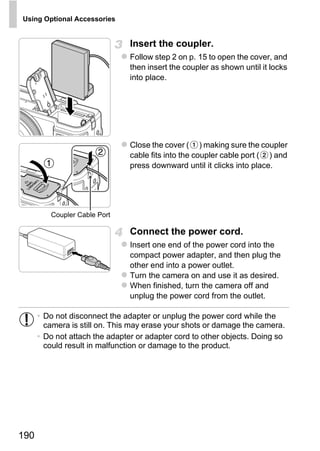
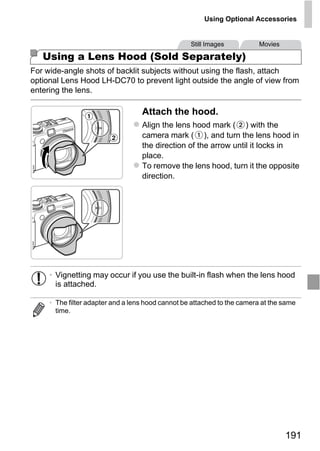
![Using Optional Accessories
Still Images Movies
Using Lens Filters (Sold Separately)
Attaching a lens filter to the camera protects the lens and allows you to shoot
with various effects. To attach a lens filter, you will need Filter Adapter FA-
DC58C (sold separately).
Attach the filter adapter.
Align the notches on the camera and the filter
adapter and turn the adapter in the direction
of the arrow until locked.
To remove the filter adapter, turn it in the
opposite direction.
Attach a filter.
PY
Turn the filter in the direction of the arrow to
attach it to the camera.
Make sure not to attach the filter too tightly.
C O
Doing so could prevent removal of the filter
and damage the camera.
• We recommend the use of genuine Canon filters (58 mm dia.).
• When not using auto focus to shoot, set the manual focus option
[Safety MF] to [On].
• If you use the built-in flash with the filter adapter attached, portions of
the image may appear darker.
• When using the filter adapter, be sure to use only one filter at a time.
Attaching multiple filters, or accessories such as a heavy lens, may
cause the attachments to fall off or damage the camera or adapter.
• Do not grip the filter adapter tightly.
• Remove the filter adapter when not using a filter.
• The filter adapter and a lens hood cannot be attached to the camera at the same
time.
192](https://image.slidesharecdn.com/canonpowershotg1x-120924153241-phpapp01/85/Canon-power-shot-g1x-192-320.jpg)

![Using Optional Accessories
Still Images Movies
Speedlite 580EX II/430EX II/320EX/270EX II
These optional flash units can provide bright lighting and meet a variety of
flash photography needs.
Attach the flash unit to the hot
shoe.
Turn the flash on, and then turn the
camera on.
A red h icon is now displayed.
The flash pilot lamp will light up when the
flash is ready.
Choose shooting mode G, M,
PY
B, or D.
Flash settings can only be configured in
O
these modes. In other modes, the flash is
adjusted and fired automatically, as needed.
CSet the white balance to h (p. 100).
Configure settings for the external
flash.
Press the n button, choose [Flash
Control] on the 4 tab, and then press the m
button.
Options already set on the flash itself are
displayed.
Press the op buttons or turn the 7 dial to
choose an item, and then adjust the setting
by pressing the qr buttons.
Available settings vary depending on the
shooting mode and the flash attached
(p. 200).
194](https://image.slidesharecdn.com/canonpowershotg1x-120924153241-phpapp01/85/Canon-power-shot-g1x-194-320.jpg)
![Using Optional Accessories
• Settings for the built-in flash cannot be configured while a Speedlite EX series
flash is attached, because that setting screen is no longer accessible.
• You can also access the setting screen by pressing the r button for at least one
second.
• Flash settings in shooting mode can be configured just as they are in G
mode.
• 580EX II only: [Flash Control] is not available if the external flash has been set
up for stroboscopic flash.
• 320EX only: Auto LED lighting is only available in low-light movie recording or
in Movie mode. In this case, the icon is shown.
Still Images Movies
Using Speedlite Bracket SB-E2 (Sold Separately)
Using the optional Speedlite Bracket SB-E2
can help prevent unnatural shadows next to
subjects during vertical shooting.
To keep the LCD screen out of the way of the
PY
bracket, use the screen closed and facing
outward.
Macro Ring Lite MR-14EX
C O
This optional flash unit enables many styles of macro flash photography.
Requires Macrolite Adapter MLA-DC1 (sold separately) for attachment to the
Still Images
camera.
Remove the ring.
Make sure the camera is off.
Hold down the ring release button ( ) and
turn the ring in the direction of the arrow ( ).
Align the mark on the ring with the mark
on the camera, and then lift the ring off.
195](https://image.slidesharecdn.com/canonpowershotg1x-120924153241-phpapp01/85/Canon-power-shot-g1x-195-320.jpg)
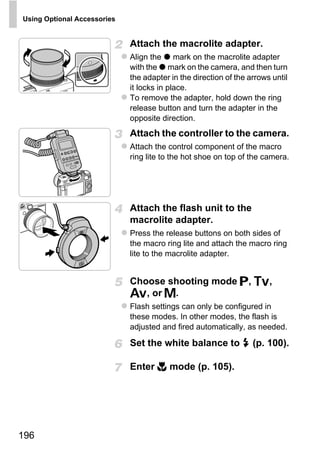
![Using Optional Accessories
Set [ND Filter] to [On] (p. 99).
Configure the external flash.
Follow step 5 on p. 194 to adjust the settings.
• Keep cords (from the macro ring lite) away from flash heads.
• When using a tripod, adjust the position of the legs to prevent them
from coming into contact with the flash heads.
• Use the screen to compose shots, because the viewfinder cannot be
used with these accessories attached.
Macro Twin Lite MT-24EX
This optional flash unit enables many styles of macro flash photography.
Requires Macrolite Adapter MLA-DC1, Off-Camera Shoe Cord OC-E3, and
Bracket BKT-DC1 (all sold separately) for attachment to the camera.
PY
Remove the ring and attach the
O
macrolite adapter.
C
Follow steps 1 – 2 on p. 195 to remove the
ring, and then attach the macrolite adapter.
Attach the off-camera shoe cord to
the bracket.
Slide the bracket screw to the outer end of the
bracket. Align the bracket screw with the
tripod socket of the off-camera shoe cord,
and then tighten the screw to secure it.
197](https://image.slidesharecdn.com/canonpowershotg1x-120924153241-phpapp01/85/Canon-power-shot-g1x-197-320.jpg)
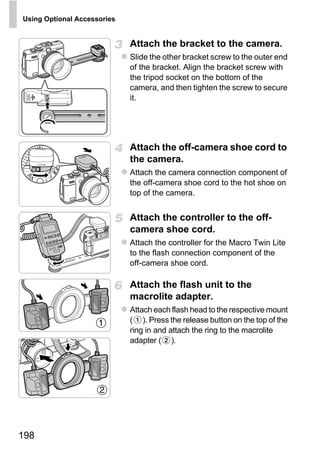
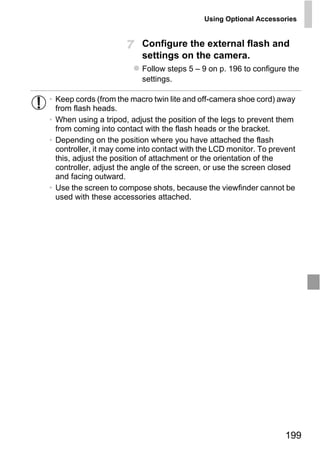
![Using Optional Accessories
Still Images
Camera Settings Available with an External Flash (Sold
Separately)
The following settings are available in G, M, B, or D mode. In other
shooting modes, only [Red-Eye Corr.] and [Red-Eye Lamp] can be
configured. (The flash is adjusted and fired automatically, as needed.)
Shooting Mode
Item Options
G M B D
Auto*1 —
Flash Mode
Manual*2
Flash Exp. Comp*3 –3 to +3 —
1/128*5 to 1/1
Flash Output*4
(in 1/3-stop increments)
PY
Shutter Sync. 1st-curtain/2nd-curtain/Hi-speed
On
O
Slow Synchro
Off — —
Wireless Func.*6
Red-Eye Corr.
Red-Eye Lamp
On/Off
On/Off
On/Off
C
On —
Safety FE*7
Off
Clear Flash Settings*8
*1 E-TTL mode is used for the flash.
*2 M mode is used for the flash.
In D shooting mode, E-TTL mode is also available for the flash. In this case, when the
flash fires, flash exposure compensation set on the flash is applied to the flash output
level set on the camera.
*3 Can be configured only when [Flash Mode] is [Auto] and flash exposure compensation
set on the flash is [+0]. When you adjust flash exposure compensation on the flash, the
camera display will be updated (580EX II and 430EX II only).
*4 Can be configured when [Flash Mode] is [Manual]. Linked to settings on the flash unit.
*5 1/64 for Speedlite 430EX II/320EX/270EX II, Macro Ring Lite MR-14EX, and Macro
Twin Lite MT-24EX.
200](https://image.slidesharecdn.com/canonpowershotg1x-120924153241-phpapp01/85/Canon-power-shot-g1x-200-320.jpg)
![Using Optional Accessories
*6 For options other than On/Off, configure the setting on the flash unit itself. Not available
with Speedlite 430EX II/320EX/270EX II, Macro Ring Lite MR-14EX, or Macro Twin
Lite MT-24EX. When this setting is set to [On], [Shutter Sync.] cannot be set to [2nd-
curtain]. (If [Shutter Sync.] is set to [2nd-curtain], it will be changed to [1st-curtain].)
*7 Can only be configured when [Flash Mode] is [Auto].
*8 Restores all default settings. You can also restore defaults for [Slow Synchro], [Safety
FE], [Red-Eye Corr.], and [Red-Eye Lamp] by using [Reset All] in the 3 menu on the
camera (p. 179).
• Flash settings in shooting mode can be configured just as they are in G
mode.
O PY
C
201](https://image.slidesharecdn.com/canonpowershotg1x-120924153241-phpapp01/85/Canon-power-shot-g1x-201-320.jpg)
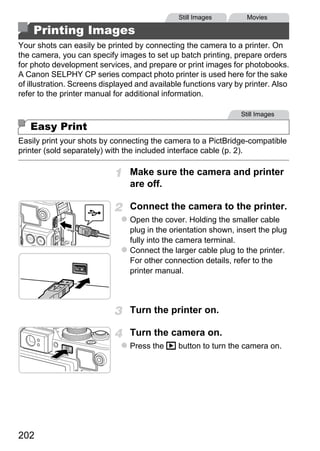
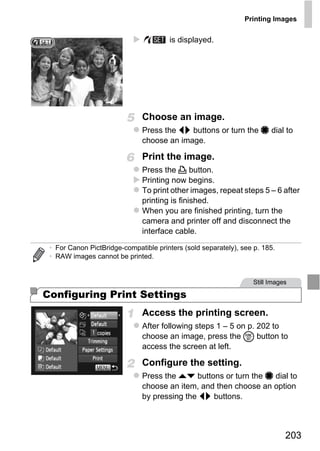
![Printing Images
Default Matches current printer settings.
Date Prints images with the date added.
File No. Prints images with the file number added.
Both Prints images with both the date and file number added.
Off —
Default Matches current printer settings.
Off —
Uses information from the time of shooting to print under
On
optimal settings.
Red-Eye 1 Corrects red-eye.
No. of Copies Choose the number of copies to print.
Trimming — Specify a desired image area to print (see below).
PY
Paper
— Specify the paper size, layout, and other details (p. 205).
Settings
C O
Cropping Images Before Printing (Trimming)
By cropping images before printing, you can print a desired image area
instead of the entire image.
Choose [Trimming].
After following step 1 on p. 203 to access the
printing screen, choose [Trimming] and press
the m button.
A cropping frame is now displayed, indicating
the image area to print.
Adjust the cropping frame as
needed.
To resize the frame, move the zoom lever.
To move the frame, press the opqr
buttons.
To rotate the frame, turn the 7 dial.
When finished, press the m button.
204](https://image.slidesharecdn.com/canonpowershotg1x-120924153241-phpapp01/85/Canon-power-shot-g1x-204-320.jpg)
![Printing Images
Print the image.
On the screen in step 1, press the op
buttons or turn the 7 dial to choose [Print],
and then press the m button.
• Cropping may not be possible at small image sizes, or at some
aspect ratios.
• Dates may not be printed correctly if you crop images shot with [Date
Stamp] selected.
Choosing Paper Size and Layout Before Printing
Choose [Paper Settings].
After following step 1 on p. 203 to access the
printing screen, choose [Paper Settings] and
press the m button.
O PY
Choose a paper size.
C Press the op buttons or turn the 7 dial to
choose an option, and then press the m
button.
Choose a type of paper.
Press the op buttons or turn the 7 dial to
choose an option, and then press the m
button.
205](https://image.slidesharecdn.com/canonpowershotg1x-120924153241-phpapp01/85/Canon-power-shot-g1x-205-320.jpg)
![Printing Images
Choose a layout.
Press the op buttons or turn the 7 dial to
choose an option.
When choosing [N-up], press the qr buttons
to specify the number of images per sheet.
Press the m button.
Print the image.
Available Layout Options
Default Matches current printer settings.
Bordered Prints with blank space around the image.
Borderless Borderless, edge-to-edge printing.
PY
N-up Choose how many images to print per sheet.
Prints images for identification purposes.
ID Photo
O
Only available for images with a resolution of L and an aspect ratio of 4:3.
Choose the print size.
C
Fixed Size
Choose from 3.5 x 5 in., postcard, or wide-format prints.
Printing ID Photos
Choose [ID Photo].
Following steps 1 – 4 on p. 205, choose [ID
Photo] and press the m button.
Choose the long and short side
length.
Press the op buttons or turn the 7 dial to
choose an item. Choose the length by
pressing the qr buttons, and then press the
m button.
206](https://image.slidesharecdn.com/canonpowershotg1x-120924153241-phpapp01/85/Canon-power-shot-g1x-206-320.jpg)
![Printing Images
Choose the printing area.
Follow step 2 on p. 204 to choose the printing
area.
Print the image.
Movies
Printing Movie Scenes
Access the printing screen.
Follow steps 1 – 5 on p. 202 to choose a
PY
movie, and then press the m button.
Press the qr buttons to choose c, and then
press the m button. The screen at left is
C O
displayed.
Choose a printing method.
Press the op buttons or turn the 7 dial to
choose , and then press the qr buttons to
choose the printing method.
Print the image.
Movie Printing Options
Single Prints the current scene as a still image.
Prints a series of scenes, a certain interval apart, on a single sheet of
Sequence paper. You can also print the folder number, file number, and elapsed
time for the frame by setting [Caption] to [On].
• To cancel printing in progress, press the m button.
• [ID Photo] and [Sequence] are not available with Canon PictBridge-compatible
printer models earlier than CP720 and CP730.
207](https://image.slidesharecdn.com/canonpowershotg1x-120924153241-phpapp01/85/Canon-power-shot-g1x-207-320.jpg)
![Printing Images
Still Images
Adding Images to Print Orders (DPOF)
Batch printing (p. 211) and ordering prints from a photo development service
can be set up on the camera. Choose up to 998 images on a memory card
and configure relevant settings, such as the number of copies, as follows. The
printing information you prepare this way will conform DPOF (Digital Print
Order Format) standards.
• RAW images cannot be included in print orders.
Adding Images to Print Orders via the c Button
You can add images to print orders (DPOF) after your shot or later during
playback simply by pressing the c button.
PY
Choose an image.
Press the qr buttons or turn the 7 dial to
O
choose an image.
C
Add the image to the print list.
Press the c button.
Press the op buttons to specify the number
of prints. Choose [Add] by pressing the qr
buttons or turning the 7 dial, and then press
the m button.
To remove the image from the print order,
repeat steps 1 – 2 but choose [Remove] by
pressing the qr buttons or turning the 7
dial, and then press the m button.
• Print orders cannot be set up while the camera is connected to a printer.
208](https://image.slidesharecdn.com/canonpowershotg1x-120924153241-phpapp01/85/Canon-power-shot-g1x-208-320.jpg)
![Printing Images
Configuring Print Settings
Specify the printing format, whether to add the date or file number, and other
settings as follows. These settings apply to all images in the print order.
Press the n button, and then choose
[Print Settings] on the 2 tab. Choose and
configure settings as desired (p. 41).
Standard One image is printed per sheet.
Smaller versions of multiple images are printed per
Print Type Index
sheet.
PY
Both Both standard and index formats are printed.
On Images are printed with the shooting date.
Date
O
Off —
On Images are printed with the file number.
C
File No.
Off —
All image print order settings are cleared after
Clear DPOF On
printing.
data
Off —
• Not all of your DPOF settings may be applied in printing by the printer
or photo development service, in some cases.
• may be displayed on the camera to warn you that the memory
card has print settings that were configured on another camera.
Changing the print settings using this camera may overwrite all
previous settings.
• Setting [Date] to [On] may cause some printers to print the date twice.
• Specifying [Index] will prevent you from choosing [On] for both [Date] and [File
No.] at the same time.
• The date is printed in a format matching setting details in [Date/Time] on the 3
tab, accessible by pressing the n button (p. 18).
• Index printing is not available on some Canon PictBridge-compatible printers
(sold separately).
209](https://image.slidesharecdn.com/canonpowershotg1x-120924153241-phpapp01/85/Canon-power-shot-g1x-209-320.jpg)
![Printing Images
Setting Up Printing for Individual Images
Choose [Select Images & Qty.].
Press the n button, choose [Select
Images & Qty.] on the 2 tab, and then press
the m button.
Choose an image.
Press the qr buttons or turn the 7 dial to
choose an image, and then press the m
button.
You can now specify the number of copies.
If you specify index printing for the image, it is
labeled with a icon. To cancel index
printing for the image, press the m button
PY
again. is no longer displayed.
Specify the number of prints.
O
Press the op buttons or turn the 7 dial to
specify the number of prints (up to 99).
CTo set up printing for other images and
specify the number of prints, repeat steps 2 –
3.
Printing quantity cannot be specified for index
prints. You can only choose which images to
print, by following step 2.
When finished, press the n button to
return to the menu screen.
Setting Up Printing for a Range of Images
Choose [Select Range].
Following step 1 above, choose [Select
Range] and press the m button.
Choose images.
Follow steps 2 – 3 on p. 150 to specify
images.
210](https://image.slidesharecdn.com/canonpowershotg1x-120924153241-phpapp01/85/Canon-power-shot-g1x-210-320.jpg)
![Printing Images
Configure the print settings.
Press the op buttons to choose [Order],
and then press the m button.
Setting Up Printing for All Images
Choose [Select All Images].
Following step 1 on p. 210, choose [Select All
Images] and press the m button.
Configure the print settings.
Press the qr buttons or turn the 7 dial to
choose [OK], and then press the m button.
Clearing All Print Orders
Choose [Clear All Selections].
PY
Following step 1 on p. 210, choose [Clear All
Selections] and press the m button.
C O
Confirm clearing the order.
Press the qr buttons or turn the 7 dial to
choose [OK], and then press the m button.
Printing Images Added to Print Orders (DPOF)
When images have been added to the print
list (pp. 208 – 211), the screen at left is
displayed after you connect the camera to a
PictBridge-compatible printer. Press the op
buttons to choose [Print now], and then
simply press the m button to print the
images in the print list.
Any DPOF print job that you temporarily stop
will be resumed from the next image.
211](https://image.slidesharecdn.com/canonpowershotg1x-120924153241-phpapp01/85/Canon-power-shot-g1x-211-320.jpg)
![Still Images Movies
Using an Eye-Fi Card
Before using an Eye-Fi card, always confirm that local use is permitted (p. 3).
Inserting a prepared Eye-Fi card enables automatic wireless transfer of
images to a computer or uploading to a photo-sharing website.
Images are transferred by the Eye-Fi card. Refer to the card’s user manual or
contact the manufacturer for instructions on preparing and using cards or
resolving transfer problems.
• When using an Eye-Fi card, keep the following points in mind.
• Cards may continue to transmit radio waves even when [Eye-Fi
trans.] is set to [Disable] (p. 213). Remove the Eye-Fi card before
entering hospitals, aircraft, or other areas where transmission is
prohibited.
• When troubleshooting image transfer issues, check the card and
computer settings. For details, refer to the card’s user manual.
• Poor wireless connections may cause image transfer to take a long
PY
time, and transfer may be interrupted in some cases.
• Eye-Fi cards may become hot, due to their transfer functions.
O
• Battery power will be consumed faster than in normal use.
• Camera operation may become sluggish. To resolve this, try setting
C
[Eye-Fi trans.] to [Disable].
Connection status of Eye-Fi cards in the camera can be checked on the
shooting screen (in regular information display mode) or playback screen (in
simple information display mode).
(Gray) Not connected
(Blinking white) Connecting
(White) Connected
(Animated) Transfer in progress
Interrupted
Error acquiring Eye-Fi card information (Restart the camera.
Repeated display of this icon may indicate a problem with the
card.)
Images labeled with a icon have been transferred.
212](https://image.slidesharecdn.com/canonpowershotg1x-120924153241-phpapp01/85/Canon-power-shot-g1x-212-320.jpg)
![Using an Eye-Fi Card
• Power saving (p. 36) on the camera is temporarily disabled during image
transfer.
• Choosing mode will interrupt the Eye-Fi connection. Although the Eye-Fi
connection will be restored after you choose another shooting mode or enter
Playback mode, the camera may transfer any movies made in mode again.
Checking Connection Information
Check the access point SSID used by the Eye-Fi card or the connection
status, as needed.
Press the n button, choose [Eye-Fi
Settings] on the 3 tab, and then press the
m button.
Choose [Connection info], and then press the
m button.
The connection information screen is
PY
displayed.
O
Disabling Eye-Fi Transfer
C
Configure the setting as follows to disable Eye-Fi transfer by the card, if
necessary.
Choose [Disable] in [Eye-Fi trans.].
Press the n button, choose [Eye-Fi
Settings] on the 3 tab, and then press the
m button.
Choose [Eye-Fi trans.], and then choose
[Disable].
• [Eye-Fi Settings] is not shown unless an Eye-Fi card is in the camera
with its write-protect tab in the unlocked position. For this reason, you
cannot change settings for an inserted Eye-Fi card if the write-protect
tab is in the locked position.
213](https://image.slidesharecdn.com/canonpowershotg1x-120924153241-phpapp01/85/Canon-power-shot-g1x-213-320.jpg)

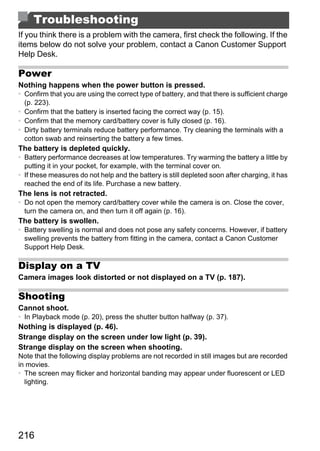
![Troubleshooting
h flashes on the screen when the shutter button is pressed, and shooting is
not possible (p. 47).
is displayed when the shutter button is pressed halfway (p. 46).
• Set [IS mode] to [Continuous] (p. 120).
• Raise the flash and set the flash mode to h (p. 116).
• Increase the ISO speed (p. 95).
• Mount the camera on a tripod or take other measures to keep it still. In this case, set [IS
Mode] to [Off] (p. 120).
Shots are out of focus.
• Press the shutter button halfway to focus on subjects before pressing it all the way down
to shoot (p. 37).
• Make sure subjects are within focusing range (see “Specifications” in the Getting
Started guide).
• Set [AF-assist Beam] to [On] (p. 65).
• Confirm that unneeded functions such as macro are deactivated.
• Try shooting with focus lock or AF lock (pp. 109, 114).
No AF frames are displayed and the camera does not focus when the shutter
button is pressed halfway.
PY
• To have AF frames displayed and the camera focus correctly, try composing the shot
with higher-contrast subject areas centered before you press the shutter button
halfway. Otherwise, try pressing the shutter button halfway repeatedly.
O
Subjects in shots look too dark.
Raise the flash and set the flash mode to h (p. 116).
C
•
• Adjust brightness by using exposure compensation (p. 93).
• Adjust contrast by using i-Contrast (pp. 98, 163).
• Use spot metering or AE lock (pp. 93, 94).
Subjects look too bright, highlights are washed-out.
• Lower the flash and set the flash mode to ! (p. 45).
• Adjust brightness by using exposure compensation (p. 93).
• Use spot metering or AE lock (pp. 93, 94).
• Reduce the lighting on subjects.
Shots look too dark despite the flash firing (p. 46).
• Shoot within flash range (p. 116).
• Adjust brightness by using flash exposure compensation or changing the flash output
level (pp. 117, 127).
• Increase the ISO speed (p. 95).
Subjects in flash shots look too bright, highlights are washed-out.
• Shoot within flash range (p. 116).
• Lower the flash and set the flash mode to ! (p. 45).
• Adjust brightness by using flash exposure compensation or changing the flash output
level (pp. 117, 127).
White dots or similar image artifacts appear in flash shots.
• This is caused by light from the flash reflecting off dust or airborne particles.
217](https://image.slidesharecdn.com/canonpowershotg1x-120924153241-phpapp01/85/Canon-power-shot-g1x-217-320.jpg)
![Troubleshooting
Shots look grainy.
• Lower the ISO speed (p. 95).
• High ISO speeds in some shooting modes may cause grainy images (p. 70).
Subjects are affected by red-eye (p. 58).
• Set [Red-Eye Lamp] to [On] (p. 65) to activate the red-eye reduction lamp (p. 4) in flash
shots. For best results, have subjects look at the red-eye reduction lamp. Also try
increasing the lighting in indoor scenes and shooting at closer range.
• Edit images using red-eye correction (p. 164).
Recording to the memory card takes too long, or continuous shooting is
slower.
• Use the camera to perform low-level formatting of the memory card (p. 172).
Shooting settings or FUNC. menu settings are not available.
• Available setting items vary by shooting mode. Refer to “Functions Available in Each
Shooting Mode”, “FUNC. Menu”, and “Shooting Menu” (pp. 226 – 233).
Shooting Movies
Cannot shoot movies (p. 17).
PY
The elapsed time shown is incorrect, or recording is interrupted.
• Use the camera to format the memory card, or switch to a card that supports high-speed
recording. Note that even if the elapsed time display is incorrect, the length of movies
O
on the memory card corresponds to the actual recording time (p. 171).
is displayed and shooting stops automatically.
C
The camera’s internal memory buffer filled up as the camera could not record to the
memory card quickly enough. Try one of the following measures.
• Use the camera to perform low-level formatting of the memory card (p. 172).
• Lower the image quality (p. 60).
• Switch to a memory card that supports high-speed recording (see “Specifications” in the
Getting Started guide).
Zooming is not possible.
• Zooming is not possible when shooting movies in modes that do not support digital
zoom.
• Zooming is not possible when shooting movies in mode.
Subjects look distorted.
• Subjects that pass in front of the camera quickly may look distorted. This is not a
malfunction.
Playback
Playback is not possible.
• Image or movie playback may not be possible if a computer is used to rename files or
alter the folder structure. Refer to the Software Guide for details on folder structure and
file names.
218](https://image.slidesharecdn.com/canonpowershotg1x-120924153241-phpapp01/85/Canon-power-shot-g1x-218-320.jpg)
![Troubleshooting
Playback stops, or audio skips.
• Switch to a memory card that you have performed low-level formatting on with the
camera (p. 172).
• There may be brief interruptions when playing movies copied to memory cards that
have slow read speeds.
• When movies are played on a computer, frames may be dropped and audio may skip
if computer performance is inadequate.
Computer
Cannot transfer images to a computer.
When attempting to transfer images to the computer via a cable, try reducing the transfer
speed as follows.
• Press the 1 button to enter Playback mode. Hold the n button down as you press
the o and m buttons at the same time. On the next screen, press the qr buttons to
choose [B], and then press the m button.
Eye-Fi Cards
PY
Cannot transfer images (p. 212).
C O
219](https://image.slidesharecdn.com/canonpowershotg1x-120924153241-phpapp01/85/Canon-power-shot-g1x-219-320.jpg)
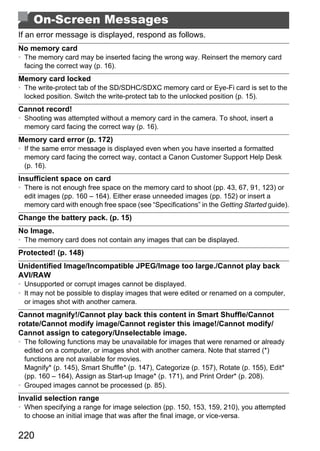
![On-Screen Messages
Exceeded selection limit
• More than 998 images were selected for Print Order (p. 208). Choose 998 images or
less.
• Print Order (p. 208) settings could not be saved correctly. Reduce the number of
selected images and try again.
• You attempted to choose more than 500 images in Protect (p. 148), Erase (p. 152),
Favorites (p. 157), My Category (p. 158), or Print Order (p. 208).
Communication error
• An excessive amount of images (approx. 1,000) on the memory card prevented printing
or image transfer to a computer. To transfer the images, use a commercially available
USB card reader. To print, insert the memory card directly into the printer card slot.
Naming error!
• When the highest folder number (999), and the highest image number (9999) has been
reached, new folders cannot be created, and images cannot be recorded. In the 3
menu, change [File Numbering] to [Auto Reset] (p. 173), or format the memory card
(p. 171).
PY
Lens Error
• This error may occur if the lens is held while it is moving, or when the camera is used
in dusty or sandy locations.
O
• Frequent display of this error message may indicate camera damage. In this case,
contact a Canon Customer Support Help Desk.
C
A camera error was detected (error number)
• If this error message is displayed immediately after a shot, the image may not have
been saved. Switch to Playback mode to check for the image.
• Frequent display of this error message may indicate camera damage. In this case, write
down the error number (Exx) and contact a Canon Customer Support Help Desk.
File Error
• It may not be possible to print computer-edited images or images shot with another
camera.
Print error
• Check the paper size setting. If this error message is displayed when the setting is
correct, restart the printer and complete the setting on the camera again.
Ink absorber full
• Contact a Canon Customer Support Help Desk to request assistance with ink absorber
replacement.
221](https://image.slidesharecdn.com/canonpowershotg1x-120924153241-phpapp01/85/Canon-power-shot-g1x-221-320.jpg)
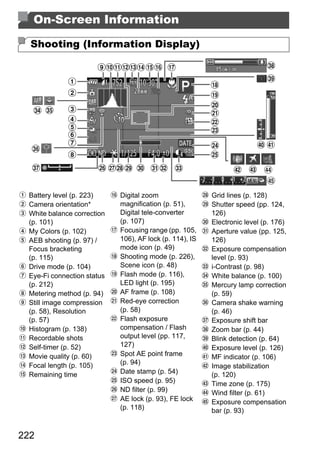
![On-Screen Information
* : Regular orientation, : Held vertically
The camera detects the shooting orientation and adjusts settings for optimal shots.
Orientation is also detected during playback, and in either orientation, the camera
automatically rotates images as needed.
However, the orientation may not be detected correctly when the camera is pointed
straight up or down.
Battery Level
An on-screen icon or message indicates the battery charge level.
Display Details
Sufficient charge
Slightly depleted, but sufficient
(Blinking red) Nearly depleted—charge the battery soon
[Change the battery pack.] Depleted—charge the battery immediately
O PY
C
223](https://image.slidesharecdn.com/canonpowershotg1x-120924153241-phpapp01/85/Canon-power-shot-g1x-223-320.jpg)
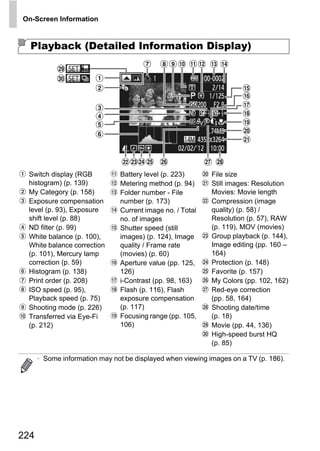
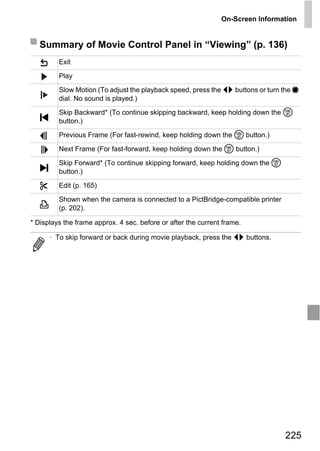
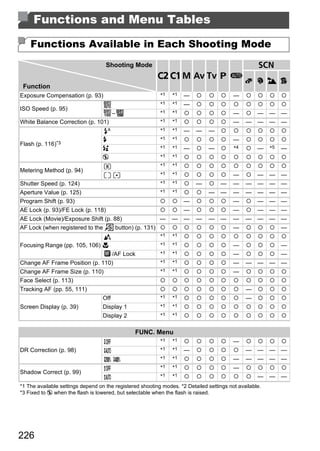
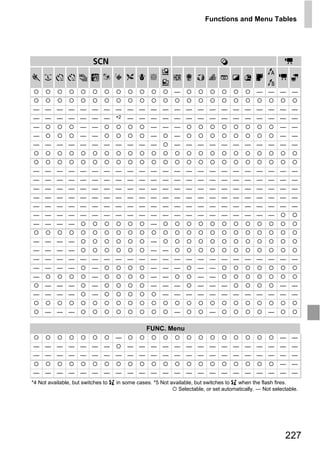
![Functions and Menu Tables
Shooting Mode K
D BM G A
I J V
Function
*1 *1
*1 *1 — — — —
White Balance (p. 100) h *1 *1 — — — —
S *1 *1 — — — —
*2 *1 *1 — — — —
*1 *1
*3
My Colors (p. 102) *3 *1 *1 — — — —
*4
*1 *1
Bracketing (pp. 115, 97) *1 *1 — — — — — —
*1 *1 — — — — —
*1 *1
Drive Mode (p. 104) W *1 *1 — —
PY
*5 *1 *1 — —
*1 *1
] *1 *1
O
Self-Timer (p. 52)
[ *1 *1
C
$ *1 *1
Delay*6 *1 *1
Self-Timer Settings (p. 53)
Shots*7 *1 *1 —
Flash Exposure Compensation (p. 117) *1 *1 — — — — —
Flash Output Level (p. 127) *1 *1 — — — — — —
*1 *1 — — — —
ND Filter (p. 99)
*1 *1
Still Image Aspect Ratio (p. 56) *1 *1 —
Image Type (p. 119) *1 *1 — — — — —
*1 *1
Resolution (p. 57) *1 *1
Compression (p. 58) *1 *1
*1 *1
Movie Quality (p. 60) *1 *1
*1 *1
*1 The available settings depend on the registered shooting modes. *2 Not available in x or v.
*3 White balance is not available. *4 Set in a range of 1 – 5: contrast, sharpness, color saturation, red, green, blue,
and skin tone. *5 is set with , AF lock, or t.
228](https://image.slidesharecdn.com/canonpowershotg1x-120924153241-phpapp01/85/Canon-power-shot-g1x-228-320.jpg)
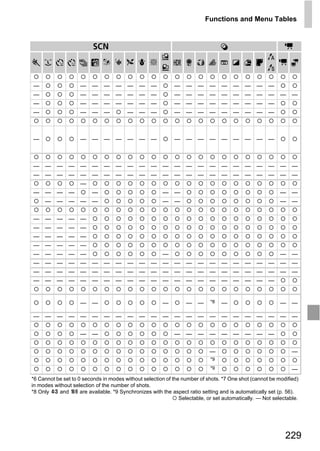
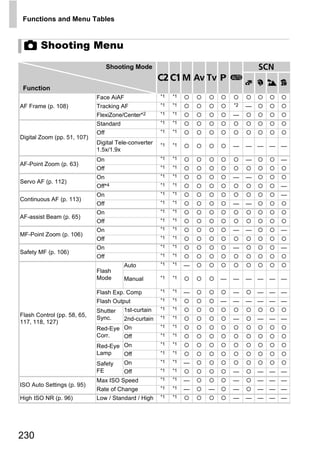

![Functions and Menu Tables
Shooting Mode K
D BM G A
I J V
Function
Hg Lamp Corr. (p. 59) On/Off* — — — — — — — — — —
Center *1 *1 — — — —
Spot AE Point (p. 94) *1 *1
AF Point — — — — —
On *1 *1 — — — — — — —
Safety Shift (p. 125)
Off *1 *1
On *1 *1
Wind Filter (p. 61)
Off *1 *1
Off *1 *1
2 sec. *1 *1
Review (p. 66)
3 – 10 sec. *1 *1
Hold *1 *1
PY
Off *1 *1
Review Info (p. 66) Detailed *1 *1
Focus Check *1 *1
O
On *1 *1
Blink Detection (p. 64) *1 *1
Off
C
Shooting Info *1 *1
Grid Lines *1 *1
Custom Display (p. 128) *1 *1
Electronic Level
Histogram *1 *1
On *1 *1
Reverse Disp. (p. 17) *1 *1
Off
Off *1 *1
IS Mode Continuous *1 *1
IS Settings (p. 120) Shoot Only *1 *1 —
*1 *1
Powered On
IS Off *1 *1
Off *1 *1
Date Stamp (p. 54) Date *1 *1
Date & Time *1 *1
Set z7 Func. (p. 129) *1 *1 — — — — —
Set Shortcut button (p. 131) *1 *1
Save Settings (p. 132) — — — — —
*1 The available settings depend on the registered shooting modes. *2 Only available by pressing the o button
(p. 108).
*3 [FlexiZone] in G, M, B and D modes, and [Center] in all other modes.
232](https://image.slidesharecdn.com/canonpowershotg1x-120924153241-phpapp01/85/Canon-power-shot-g1x-232-320.jpg)
![Functions and Menu Tables
K E
x T
w S O P t E
v Y
— — — — — — — — — — — — — — — — — — — — — — —
— — — — — — — — — — — — — — — — — — — — — — —
— — — — — — — — — — — — — — — — — — — — — — —
— — — — — — — — — — — — — — — — — — — — — — —
—
—
— —
— —
— —
— —
PY
— —
— — —
— — —
O
— — — — — — — — — — — — —
C —
—
— — —
—
— — — — — — — — — — — — — —
— — — — — — — — — — — — — —
— — — — — — — — — — — — — — — — — — — — — — —
— — — — — — — — — — — — — — — — — — — — — — —
*4 [On] when subject movement is detected in A mode.
Selectable, or set automatically. — Not selectable.
233](https://image.slidesharecdn.com/canonpowershotg1x-120924153241-phpapp01/85/Canon-power-shot-g1x-233-320.jpg)
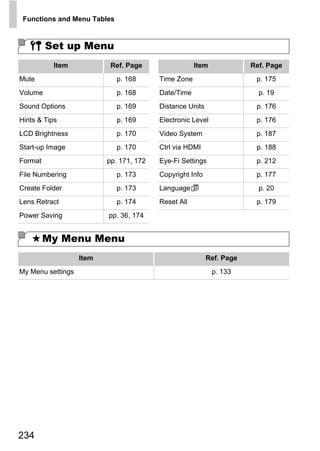
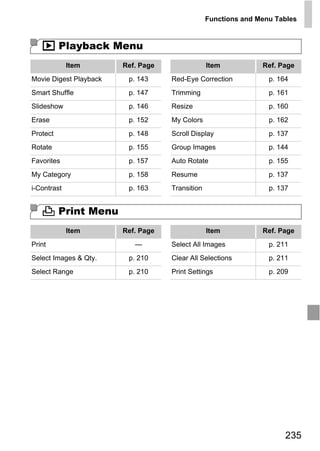
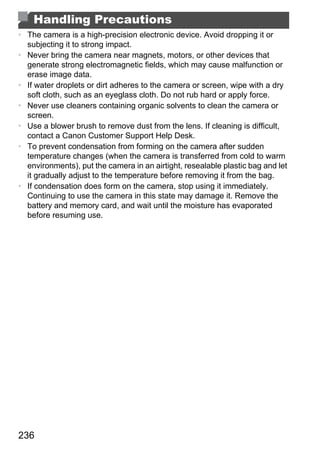
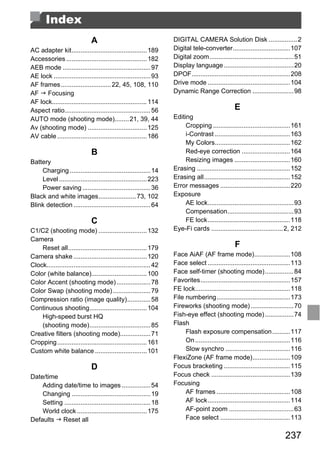
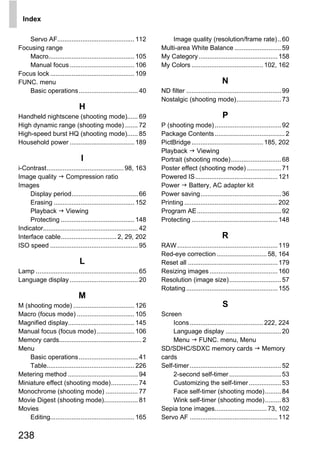


The document provides instructions for safely using the camera, noting to read all guidelines before use, avoid direct sunlight exposure which could damage the camera or eyes, and properly store the battery when not in use to prevent damage from leakage. Safety warnings include not using the flash near eyes, keeping the camera out of reach of children, and avoiding heat, moisture, and impact to prevent injury or equipment malfunction.


