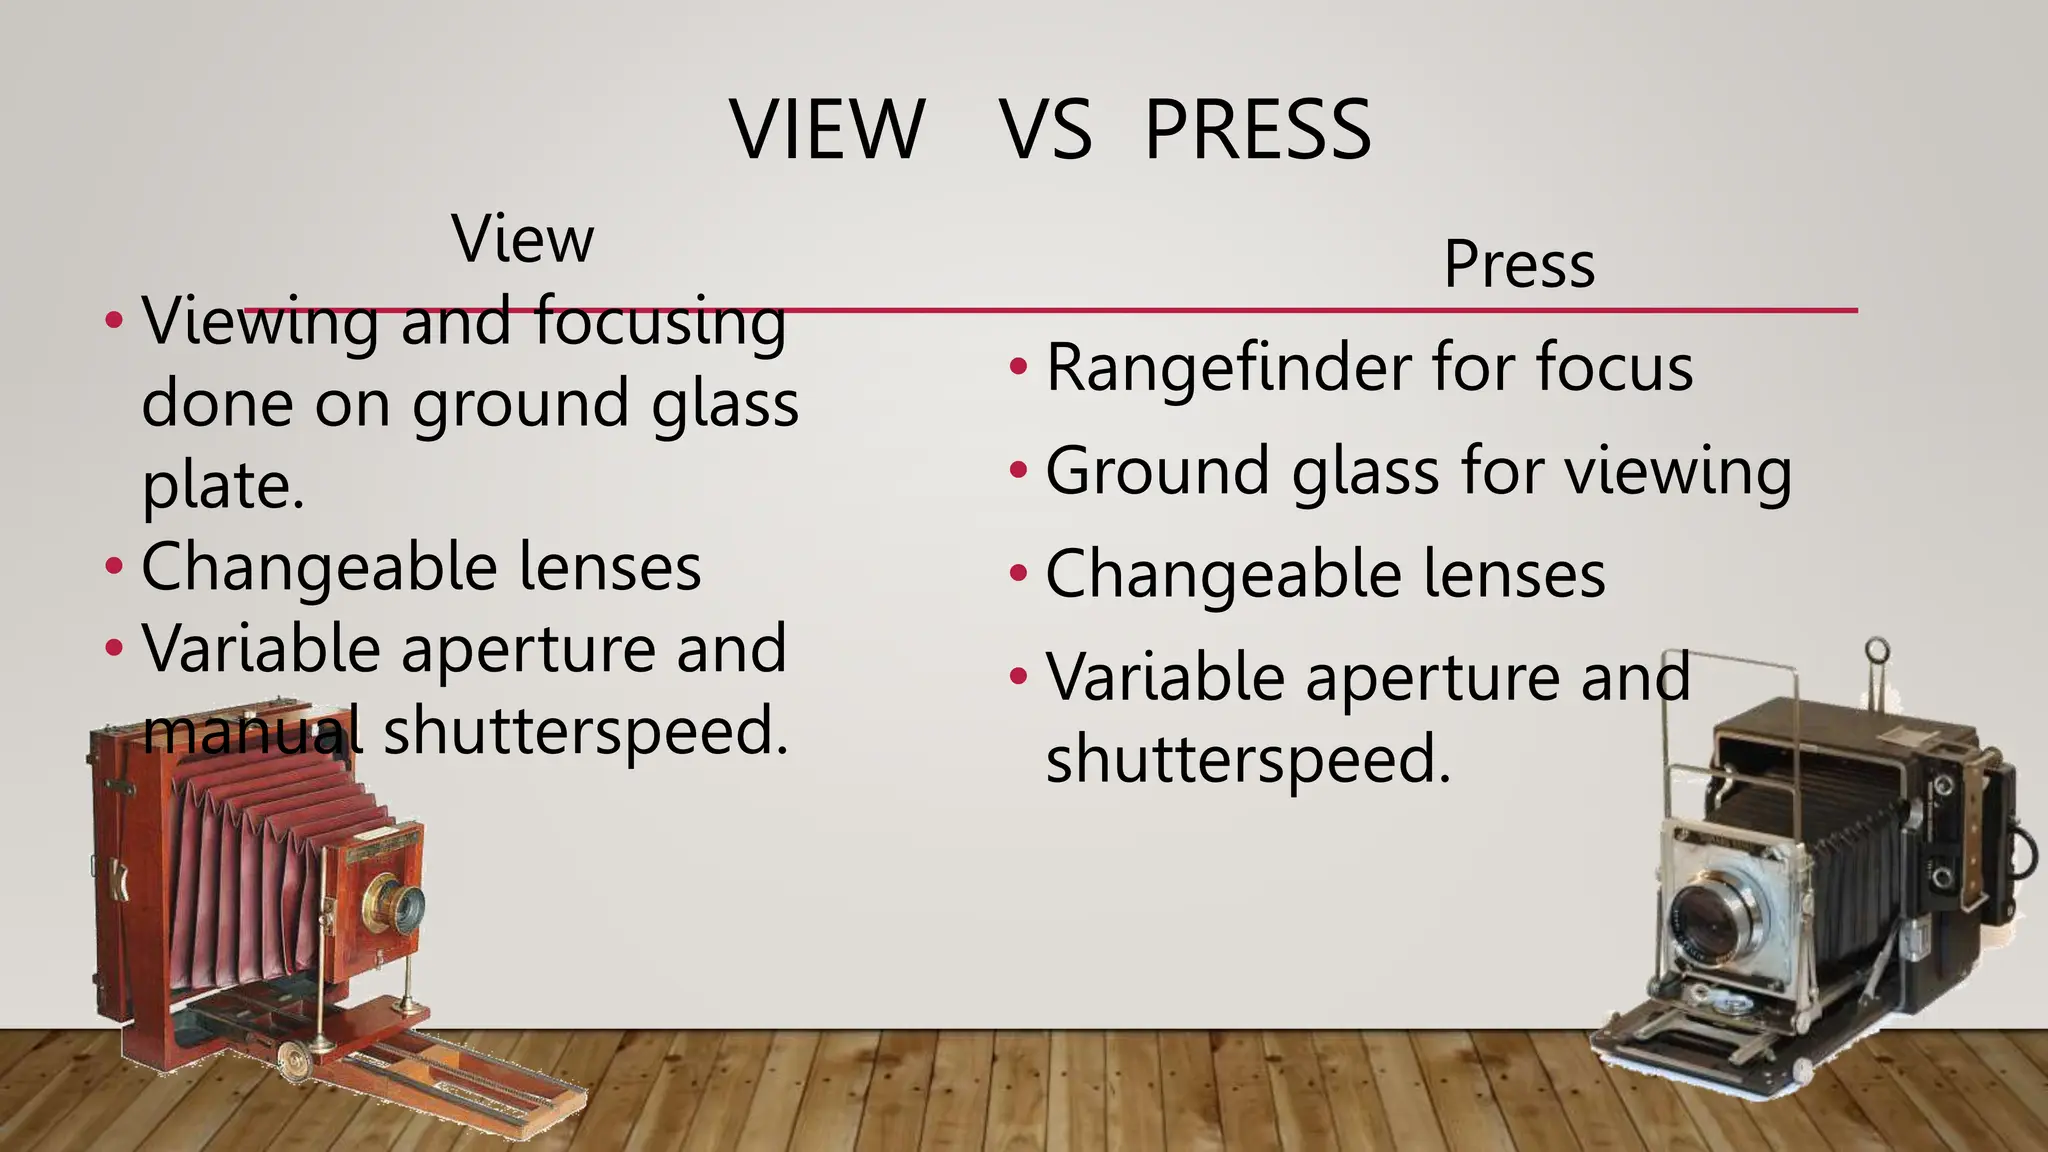
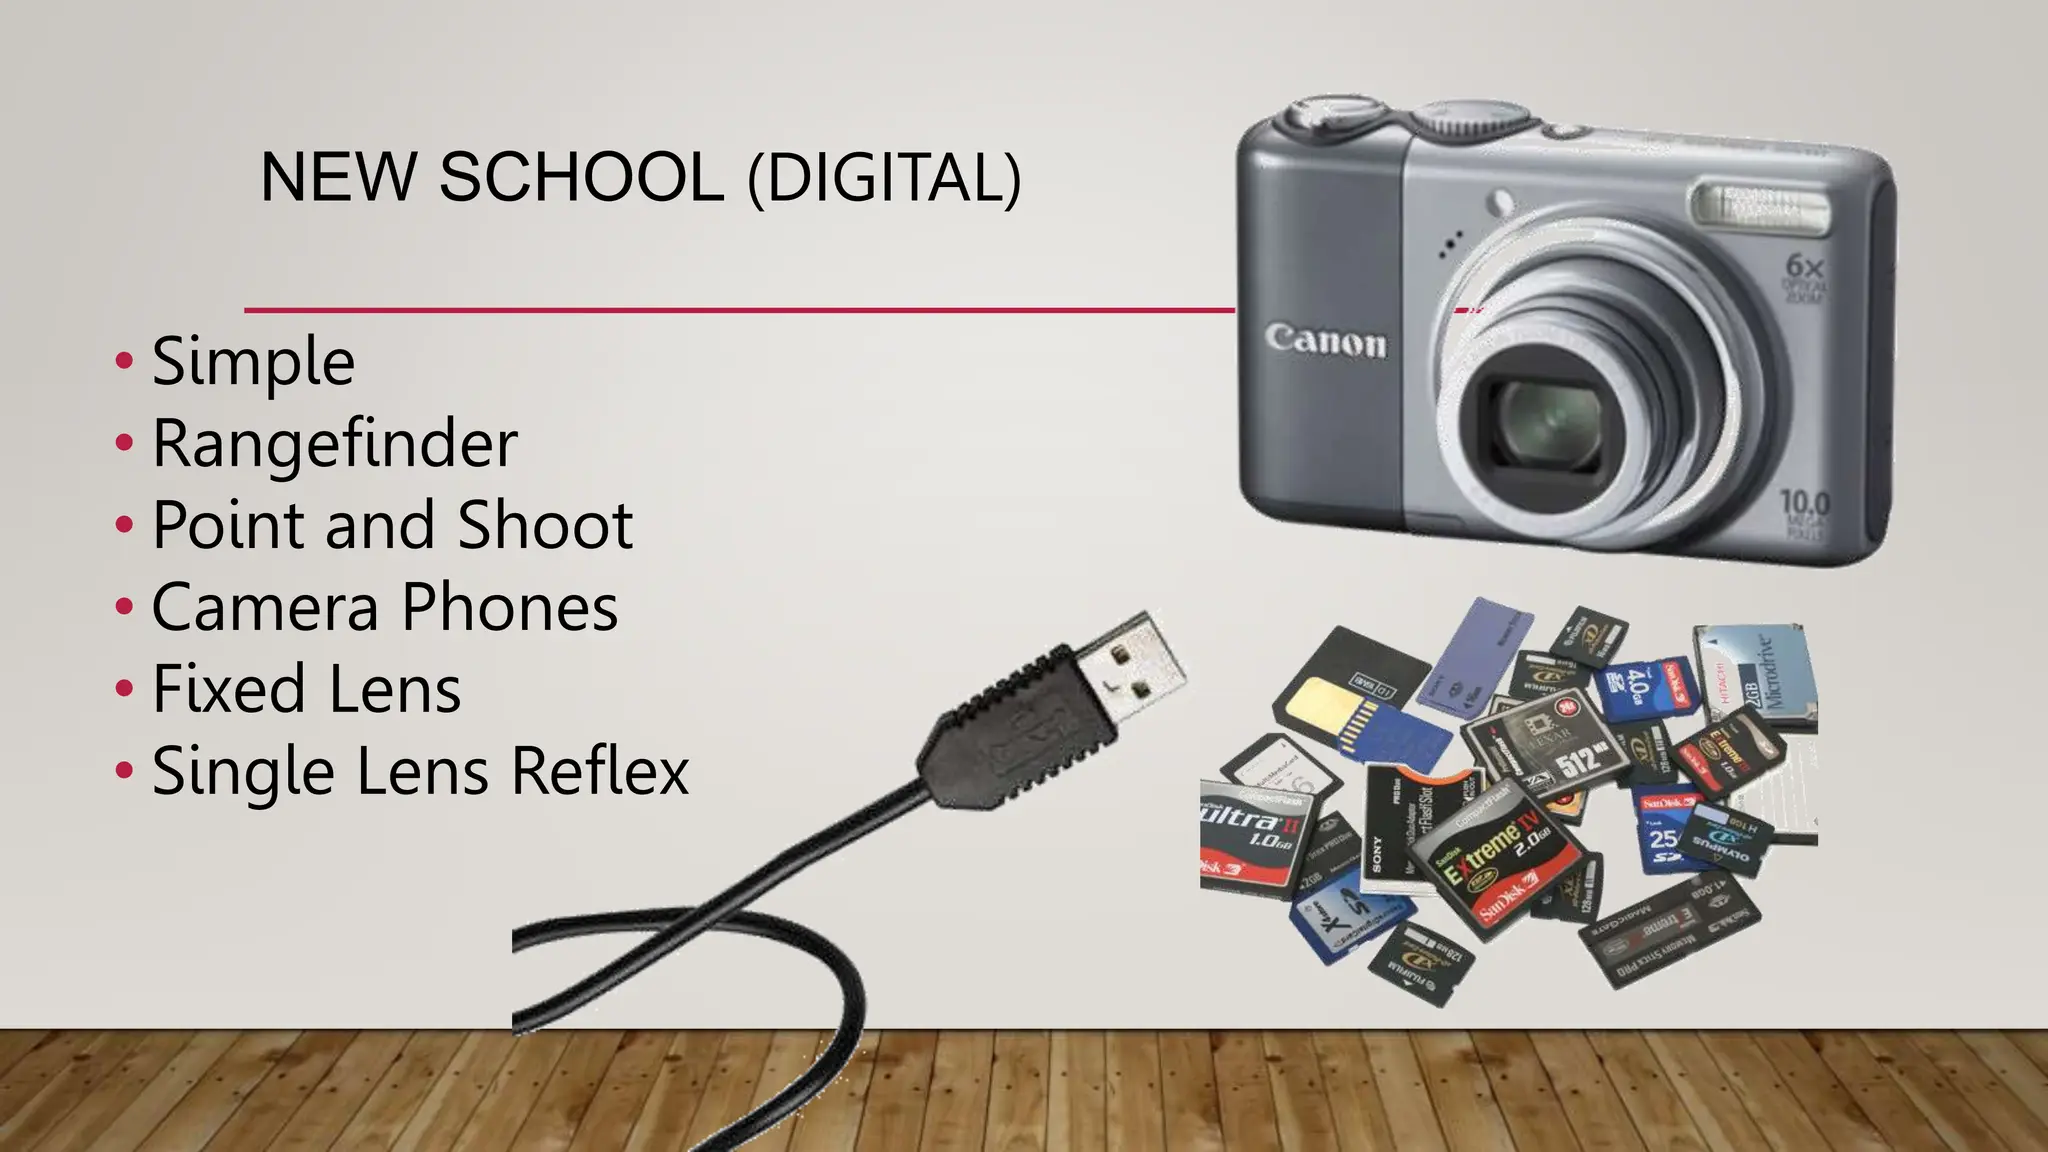
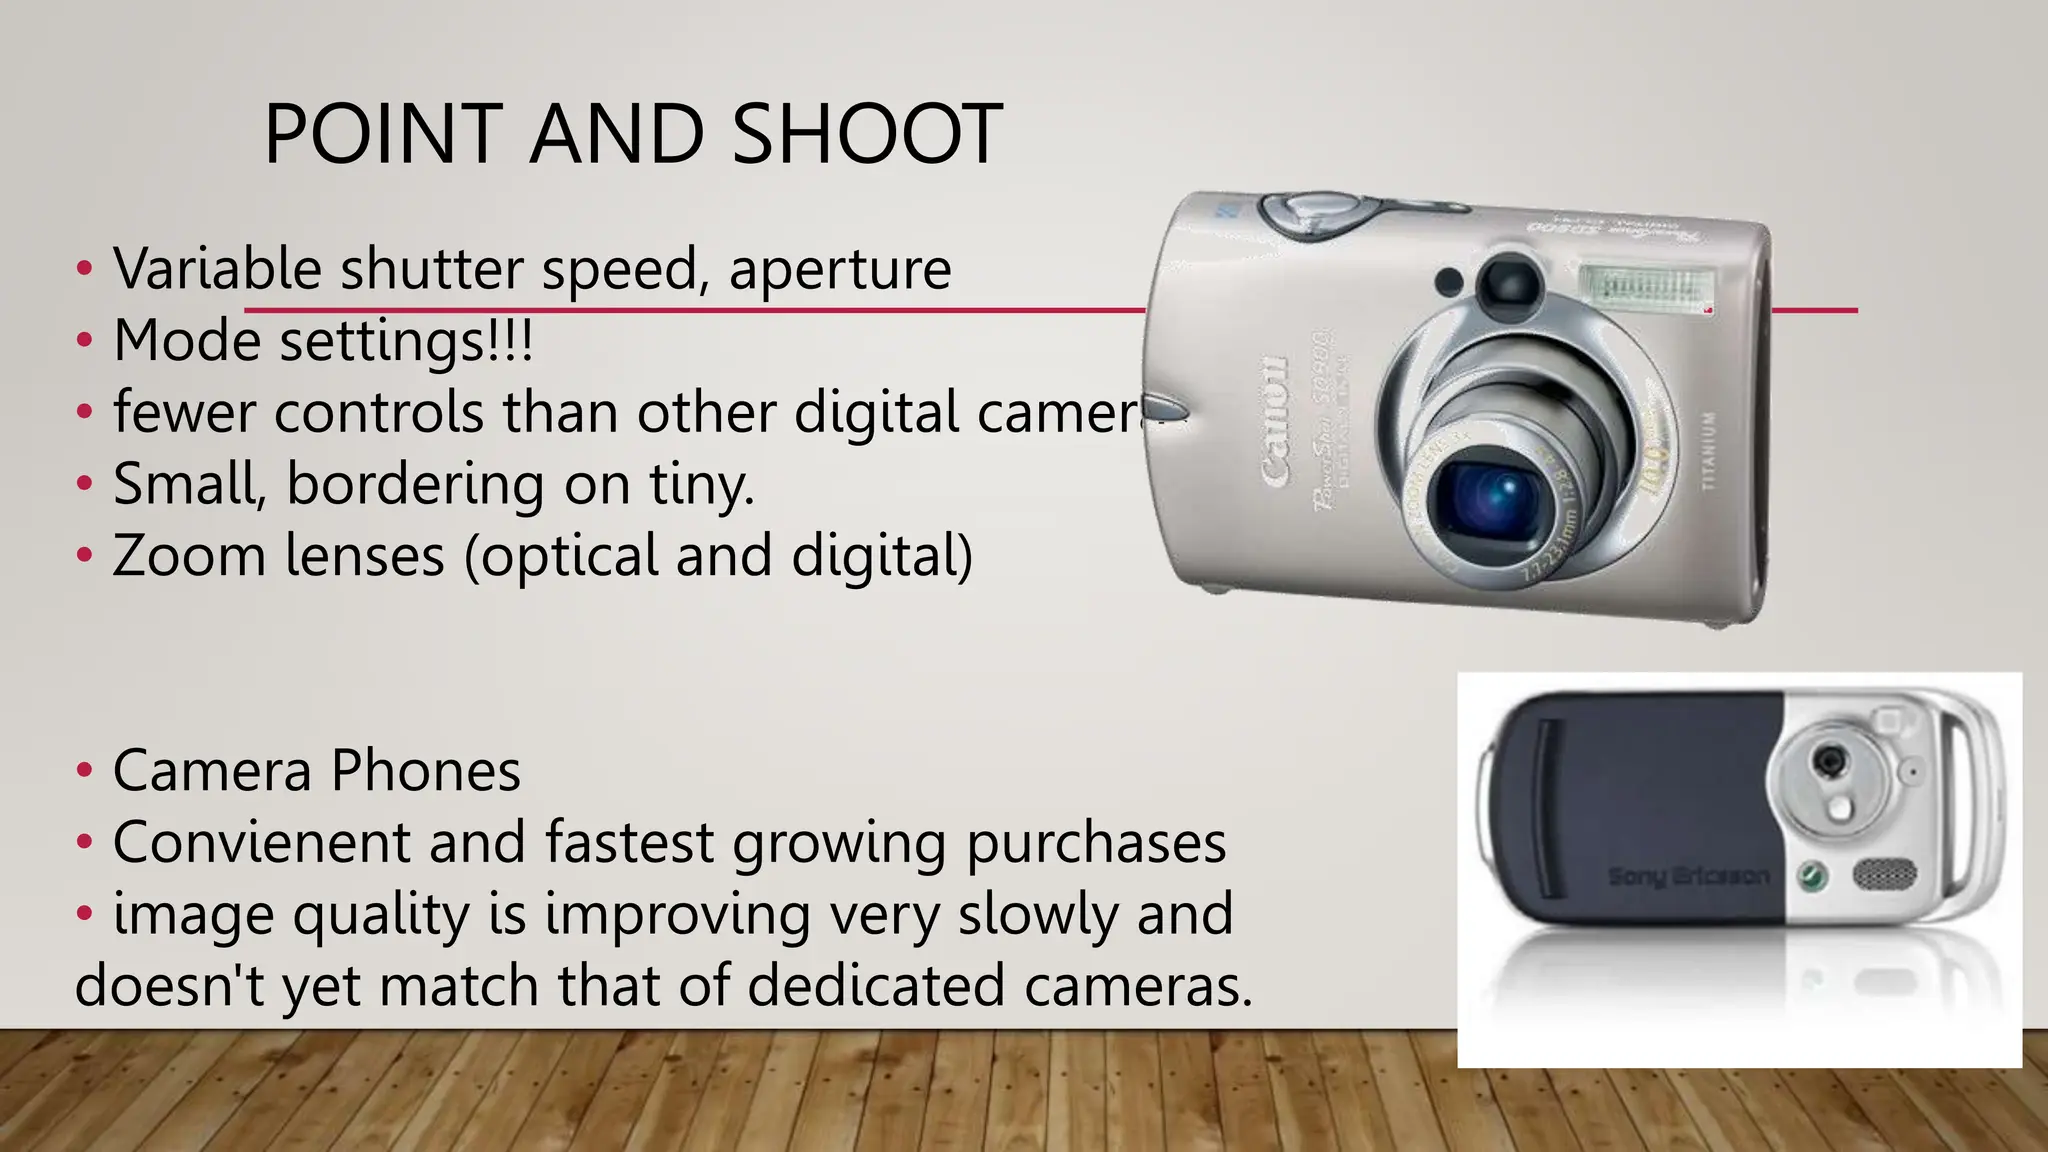
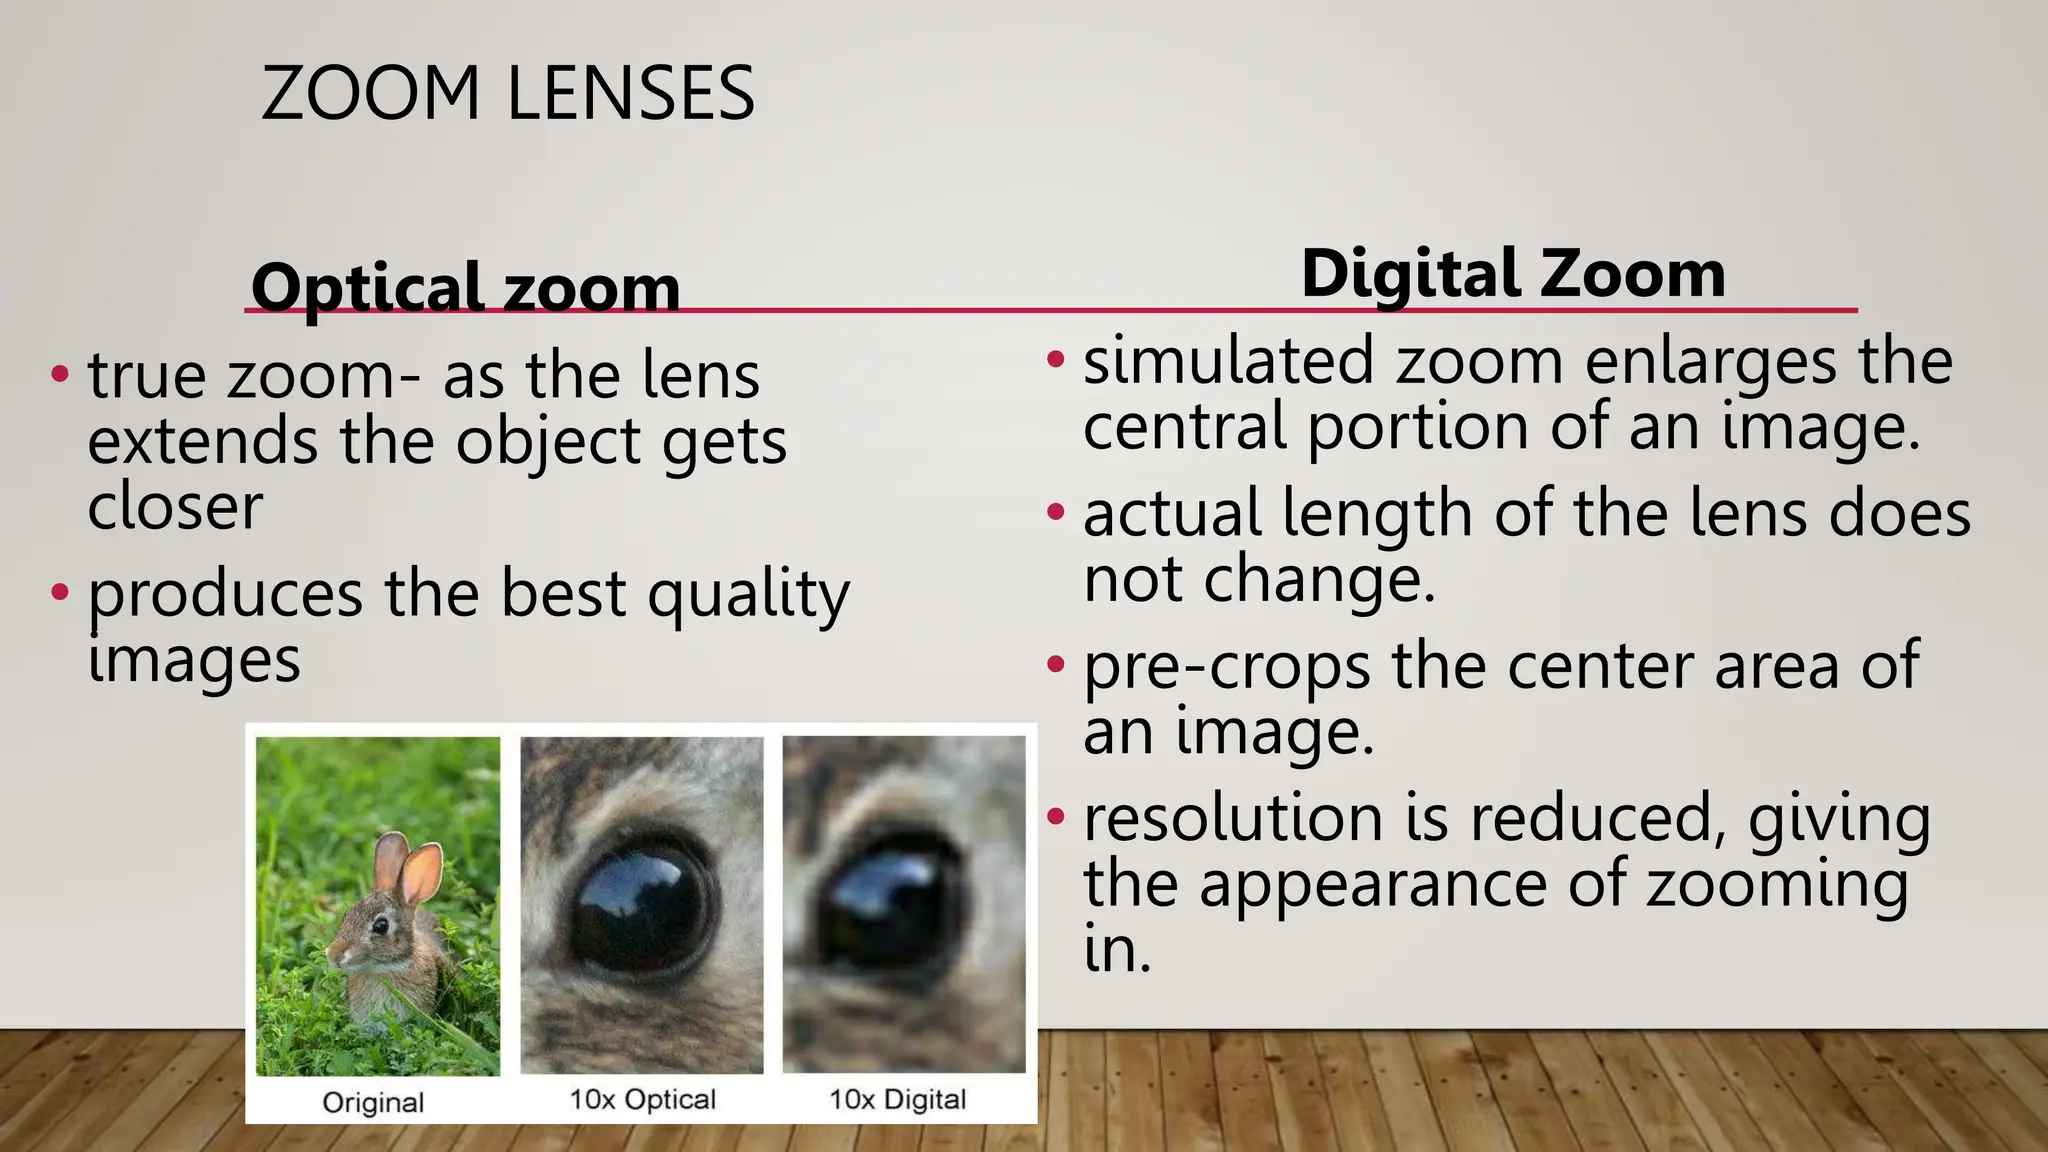
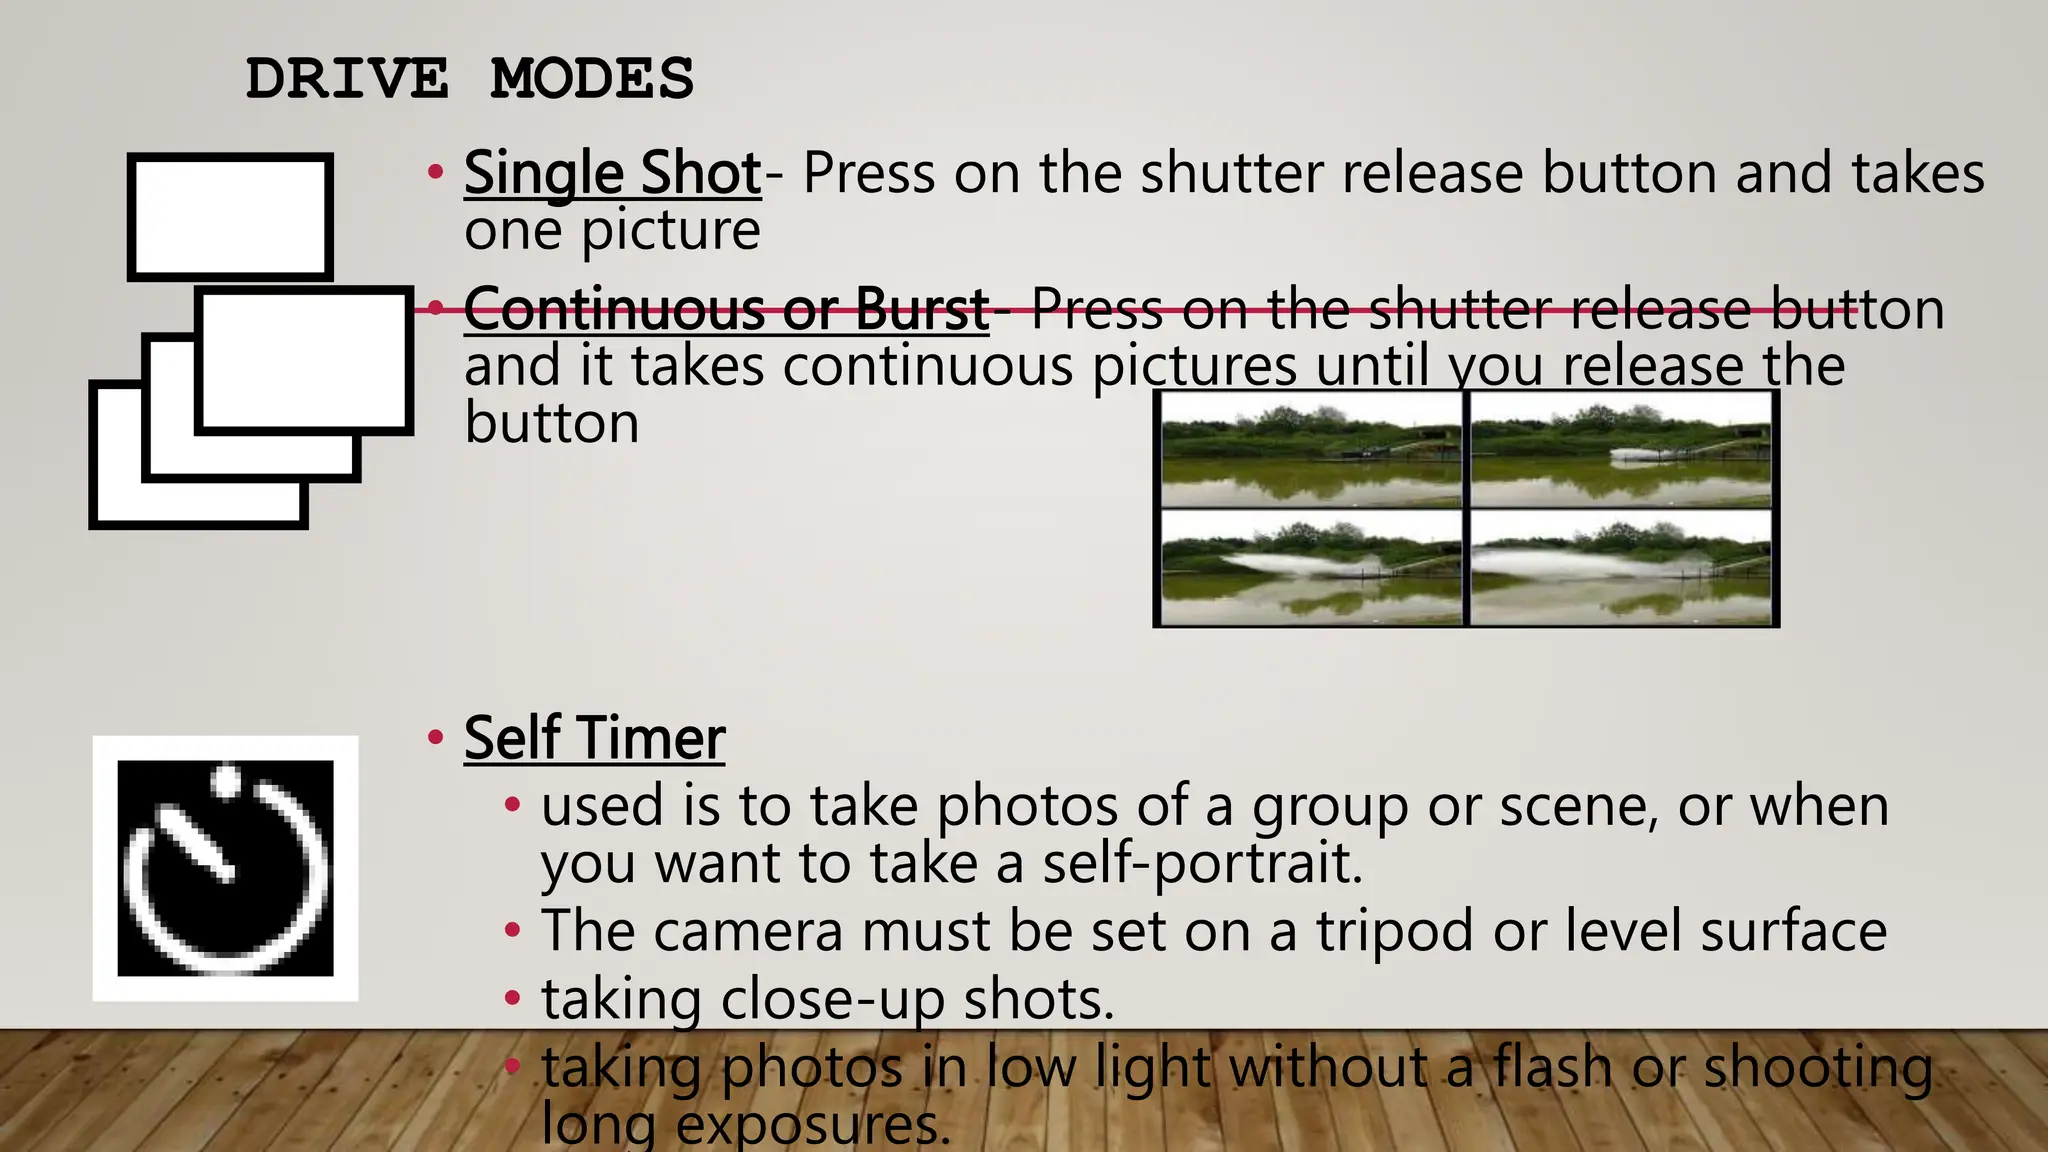
TYPES OF
CAMERA
OLD SCHOOL VS. NEW SCHOOL
OLD SCHOOL (FILM CAMERAS)
•Simple
•Rangefinder
•Single Lens Reflex (SLR)
•Twin Lens Reflex (TLR)
•View
•Press
SIMPLE VS RANGEFINDER
Simple
•Fixed focus, aperture
and shutterspeed.
Rangefinder
•Focusing device
(rangefinder)
•Variable aperture and
shutterspeed
SLR VS TLR
Single Lens Reflex
• Same lens for viewing,
focusing and exposure.
• Variable shutter speed,
aperture and lens
Twin Lens Reflex
• One lens for focusing and
viewing
• One lens for exposure
• Variable shutter speed,
aperture and lens
VIEW VS PRESS
View
• Viewing and focusing
done on ground glass
plate.
• Changeable lenses
• Variable aperture and
manual shutterspeed.
Press
• Rangefinder for focus
• Ground glass for viewing
• Changeable lenses
• Variable aperture and
shutterspeed.
NEW SCHOOL (DIGITAL)
• Simple
• Rangefinder
• Point and Shoot
• Camera Phones
• Fixed Lens
• Single Lens Reflex
POINT AND SHOOT
• Variable shutter speed, aperture
• Mode settings!!!
• fewer controls than other digital cameras
• Small, bordering on tiny.
• Zoom lenses (optical and digital)
• Camera Phones
• Convienent and fastest growing purchases
• image quality is improving very slowly and
doesn't yet match that of dedicated cameras.
ZOOM LENSES
Optical zoom
• true zoom- as the lens
extends the object gets
closer
• produces the best quality
images
Digital Zoom
• simulated zoom enlarges the
central portion of an image.
• actual length of the lens does
not change.
• pre-crops the center area of
an image.
• resolution is reduced, giving
the appearance of zooming
in.
FIXED LENS VS. SLR (DIGITALLY)
Fixed Lens
• Variable shutter speed,
aperture and focus
• Non changeable lens
• Same lens for viewing,
focusing and exposure.
Single Lens Reflex
• Same lens for viewing,
focusing and exposure.
• Variable shutterspeed,
aperture and lens
FILM VS. DIGITAL
All cameras are basically black boxes with a lens to gather the light, a means to focus
the image, an aperture that determines how bright the light is, and a shutter that
determines how long the light enters.
Film
•Light enters through the
lens
•Light “burns” the silver
halide emulsion on the film
•Film is developed
Digital
•Light enters through the lens
•Pixels collect light intensities
•Converts into digital number
and retranslates for the screen
SETTINGS AND
MODES
AUTOMATIC MODES
• Auto- fully automatic, point-and-shoot
mode; camera selects all settings.
• Program AE - camera automatically sets the
shutterspeed and aperture based on the
brightness of the scene. User can adjust
some settings such as exposure
compensation, white balance, ISO, focusing
and metering modes.
• Auto Focus AF- camera selects depth of field
and subject of focus.
P
AF
A U T O
AUTO SCENE MODES
• Portrait – photos of people during the day. Aperture is larger
(less depth of field, blurry background), “ISO” is slower for less
fine detail, shutterspeed is variable, but quicker to avoid
capturing movement. Flash used when necessary. Focus is 3-10
ft in front of you.
• Night Portrait - take photos of a subject against a night scene.
Aperture, focus and “ISO” are same as portrait but
shutterspeeds are low - Use of tripod recommended. The built-
built-in flash and red-eye reduction are enabled.
• Landscape - take photos of wide scenes. Aperture is small to
pick up detail, shutterspeed is variable, “ISO” is fast for detail.
No flash. Focuses on a distant object 10 - ∞ ft.
• Night Scene - photograph nightscapes. Same as Landscape
but with slow shutterspeeds. Use of tripod recommended.
Focus is 10 - ∞
• Macro - take close-up shots of small objects, flowers and
insects. Aperture small for detail, shutterspeed is fast, and
“ISO” is fast. Focus is 0-3 ft. Hold the camera steady or use
use a tripod.
• Sports- take photos of a fast moving subject. Aperture is
smaller (more depth of field), fast shutter speeds to “freeze”
the action and fast “ISO” to capture more light. Best when
taking photos bright light; pre-focusing recommended.
Focus is 3-10 ft.
• Slow Shutterspeed –intentionally blur moving objects.
Aperture small for deetail, shutterspeed is slowed to blur
movement and “ISO” is slowere for less detail. Focus is 3-10
AUTO SPECIAL LIGHTING MODES
• Beach/Snow - photograph beach, snow and sunlit water
scenes. Exposure and white balance are set to help prevent
the scene from becoming washed out looking.
• Fireworks - shutter speed and exposure are set for
shooting fireworks; pre-focusing & use of tripod
recommended.
• Party - take photos in a dim lit room; aperture and shutter
speed are automatically adjusted for room brightness.
Captures indoor background lighting or candlelight. Hold
the camera very steady when using this mode.
AUTO SPECIAL LIGHTING MODES
• Sunset - take photos of sunsets and sunrises; helps keep the
deep hues in the scene.
• Aquarium (Underwater) - selects ISO, white balance and
color balance to photograph fish and other items in an
indoor aquarium.
• Foliage - photographs autumn, garden and similar scenes
in vivid colors.
• Backlight - eliminates dark shadows when light is coming
from behind a subject, or when the subject is in the shade.
The built-in flash automatically fires to “fill in” the shadows.
SEMI-AUTOMATIC/MANUAL MODES
• Shutter priority (Tv) - User selects shutter speed and
the camera automatically selects the aperture.
• Aperture priority (Av) - User selects aperture and the
camera automatically selects shutter speed.
• Manual mode- User manually selects the shutter
speed and aperture. An Exposure Display visible on
the LCD or electronic viewfinder shows the amount a
photo will be over- or underexposed. Long exposures
are taken in manual mode.
Tv
Av
M
DRIVE MODES
• Single Shot- Press on the shutter release button and takes
one picture
• Continuous or Burst- Press on the shutter release button
and it takes continuous pictures until you release the
button
• Self Timer
• used is to take photos of a group or scene, or when
you want to take a self-portrait.
• The camera must be set on a tripod or level surface
• taking close-up shots.
• taking photos in low light without a flash or shooting
long exposures.
FLASH MODES
• Automatic mode — Flash triggers automatically when
the camera determines more light is needed in a scene.
Turn off this mode in places that forbid inside flash
photography such as museums.
• Red-eye reduction — Fires the flash several times just
prior to exposing a photo. Reduces the reflection in a
subject’s eyes that causes red-eye. The rapid flashes
cause a subject’s pupils to contract and helps minimize
the red-eye effect. Inform subjects before using this
mode as the pre-flashes can cause people to look
startled.
A
FLASH MODES
• Forced (fill-in) flash — Keeps the flash on in situations where
automatic mode would keep it off. Used when additional
illumination is needed, such as when the main source of light
is in the back of a subject or shadows prevent details from
showing. Can be effectively used outside when subjects are
within the flash range.
• Suppressed flash — Turns the flash off.
• Slow sync (also called night scene) — Use to capture a dimly
lit background at night. The flash fires briefly to light the
foreground subject. Tripod or other camera support
recommended.
• Rear-curtain sync — Similar to slow synch but flash doesn’t
fire until right before the shutter closes. Tripod or other
camera support recommended.
SLOW
REAR
SOURCES:
http://afbgraphics.com/Client4/ART141%20Intro%20to%20B&W%20Photography/LECTURES/class_2_C
AMERACONTROLS_EXPOSURE.ppt#340http://afbgraphics.com/Client4/ART141%20Intro%20to%20B&
W%20Photography/LECTURES/class_2_CAMERACONTROLS_EXPOSURE.ppt#340,30,Bring
http://www.digicamhelp.com/camera-features/camera-modes/flash-modes/
https://www.images.google/imgres?imgurl
http://www.photo.net/equipment/digital/basics/digital_zoom_vs_optical_zoom.jpg&imgrefurl
http://www.shortcourses.com/guide/guide1-3.html

Types of Camera (Old school VS New School

  • 1.
  • 2.
    OLD SCHOOL (FILMCAMERAS) •Simple •Rangefinder •Single Lens Reflex (SLR) •Twin Lens Reflex (TLR) •View •Press
  • 3.
    SIMPLE VS RANGEFINDER Simple •Fixedfocus, aperture and shutterspeed. Rangefinder •Focusing device (rangefinder) •Variable aperture and shutterspeed
  • 4.
    SLR VS TLR SingleLens Reflex • Same lens for viewing, focusing and exposure. • Variable shutter speed, aperture and lens Twin Lens Reflex • One lens for focusing and viewing • One lens for exposure • Variable shutter speed, aperture and lens
  • 5.
    VIEW VS PRESS View •Viewing and focusing done on ground glass plate. • Changeable lenses • Variable aperture and manual shutterspeed. Press • Rangefinder for focus • Ground glass for viewing • Changeable lenses • Variable aperture and shutterspeed.
  • 6.
    NEW SCHOOL (DIGITAL) •Simple • Rangefinder • Point and Shoot • Camera Phones • Fixed Lens • Single Lens Reflex
  • 7.
    POINT AND SHOOT •Variable shutter speed, aperture • Mode settings!!! • fewer controls than other digital cameras • Small, bordering on tiny. • Zoom lenses (optical and digital) • Camera Phones • Convienent and fastest growing purchases • image quality is improving very slowly and doesn't yet match that of dedicated cameras.
  • 8.
    ZOOM LENSES Optical zoom •true zoom- as the lens extends the object gets closer • produces the best quality images Digital Zoom • simulated zoom enlarges the central portion of an image. • actual length of the lens does not change. • pre-crops the center area of an image. • resolution is reduced, giving the appearance of zooming in.
  • 9.
    FIXED LENS VS.SLR (DIGITALLY) Fixed Lens • Variable shutter speed, aperture and focus • Non changeable lens • Same lens for viewing, focusing and exposure. Single Lens Reflex • Same lens for viewing, focusing and exposure. • Variable shutterspeed, aperture and lens
  • 10.
    FILM VS. DIGITAL Allcameras are basically black boxes with a lens to gather the light, a means to focus the image, an aperture that determines how bright the light is, and a shutter that determines how long the light enters. Film •Light enters through the lens •Light “burns” the silver halide emulsion on the film •Film is developed Digital •Light enters through the lens •Pixels collect light intensities •Converts into digital number and retranslates for the screen
  • 11.
  • 12.
    AUTOMATIC MODES • Auto-fully automatic, point-and-shoot mode; camera selects all settings. • Program AE - camera automatically sets the shutterspeed and aperture based on the brightness of the scene. User can adjust some settings such as exposure compensation, white balance, ISO, focusing and metering modes. • Auto Focus AF- camera selects depth of field and subject of focus. P AF A U T O
  • 13.
    AUTO SCENE MODES •Portrait – photos of people during the day. Aperture is larger (less depth of field, blurry background), “ISO” is slower for less fine detail, shutterspeed is variable, but quicker to avoid capturing movement. Flash used when necessary. Focus is 3-10 ft in front of you. • Night Portrait - take photos of a subject against a night scene. Aperture, focus and “ISO” are same as portrait but shutterspeeds are low - Use of tripod recommended. The built- built-in flash and red-eye reduction are enabled. • Landscape - take photos of wide scenes. Aperture is small to pick up detail, shutterspeed is variable, “ISO” is fast for detail. No flash. Focuses on a distant object 10 - ∞ ft.
  • 14.
    • Night Scene- photograph nightscapes. Same as Landscape but with slow shutterspeeds. Use of tripod recommended. Focus is 10 - ∞ • Macro - take close-up shots of small objects, flowers and insects. Aperture small for detail, shutterspeed is fast, and “ISO” is fast. Focus is 0-3 ft. Hold the camera steady or use use a tripod. • Sports- take photos of a fast moving subject. Aperture is smaller (more depth of field), fast shutter speeds to “freeze” the action and fast “ISO” to capture more light. Best when taking photos bright light; pre-focusing recommended. Focus is 3-10 ft. • Slow Shutterspeed –intentionally blur moving objects. Aperture small for deetail, shutterspeed is slowed to blur movement and “ISO” is slowere for less detail. Focus is 3-10
  • 15.
    AUTO SPECIAL LIGHTINGMODES • Beach/Snow - photograph beach, snow and sunlit water scenes. Exposure and white balance are set to help prevent the scene from becoming washed out looking. • Fireworks - shutter speed and exposure are set for shooting fireworks; pre-focusing & use of tripod recommended. • Party - take photos in a dim lit room; aperture and shutter speed are automatically adjusted for room brightness. Captures indoor background lighting or candlelight. Hold the camera very steady when using this mode.
  • 16.
    AUTO SPECIAL LIGHTINGMODES • Sunset - take photos of sunsets and sunrises; helps keep the deep hues in the scene. • Aquarium (Underwater) - selects ISO, white balance and color balance to photograph fish and other items in an indoor aquarium. • Foliage - photographs autumn, garden and similar scenes in vivid colors. • Backlight - eliminates dark shadows when light is coming from behind a subject, or when the subject is in the shade. The built-in flash automatically fires to “fill in” the shadows.
  • 17.
    SEMI-AUTOMATIC/MANUAL MODES • Shutterpriority (Tv) - User selects shutter speed and the camera automatically selects the aperture. • Aperture priority (Av) - User selects aperture and the camera automatically selects shutter speed. • Manual mode- User manually selects the shutter speed and aperture. An Exposure Display visible on the LCD or electronic viewfinder shows the amount a photo will be over- or underexposed. Long exposures are taken in manual mode. Tv Av M
  • 18.
    DRIVE MODES • SingleShot- Press on the shutter release button and takes one picture • Continuous or Burst- Press on the shutter release button and it takes continuous pictures until you release the button • Self Timer • used is to take photos of a group or scene, or when you want to take a self-portrait. • The camera must be set on a tripod or level surface • taking close-up shots. • taking photos in low light without a flash or shooting long exposures.
  • 19.
    FLASH MODES • Automaticmode — Flash triggers automatically when the camera determines more light is needed in a scene. Turn off this mode in places that forbid inside flash photography such as museums. • Red-eye reduction — Fires the flash several times just prior to exposing a photo. Reduces the reflection in a subject’s eyes that causes red-eye. The rapid flashes cause a subject’s pupils to contract and helps minimize the red-eye effect. Inform subjects before using this mode as the pre-flashes can cause people to look startled. A
  • 20.
    FLASH MODES • Forced(fill-in) flash — Keeps the flash on in situations where automatic mode would keep it off. Used when additional illumination is needed, such as when the main source of light is in the back of a subject or shadows prevent details from showing. Can be effectively used outside when subjects are within the flash range. • Suppressed flash — Turns the flash off. • Slow sync (also called night scene) — Use to capture a dimly lit background at night. The flash fires briefly to light the foreground subject. Tripod or other camera support recommended. • Rear-curtain sync — Similar to slow synch but flash doesn’t fire until right before the shutter closes. Tripod or other camera support recommended. SLOW REAR
  • 21.