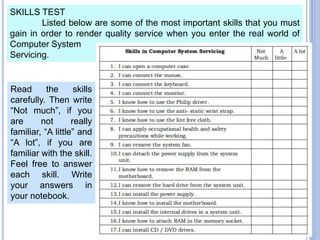
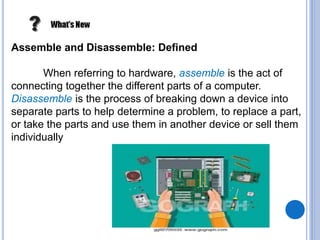
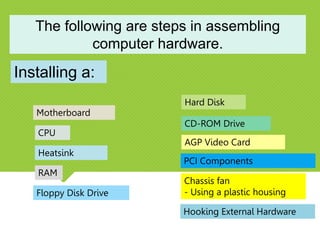
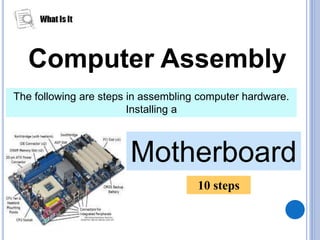
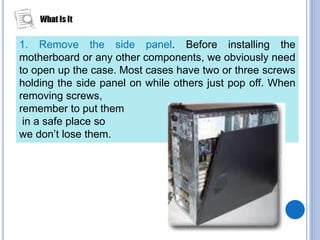
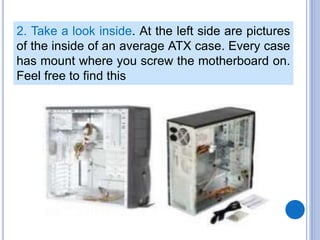
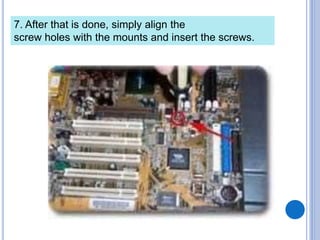
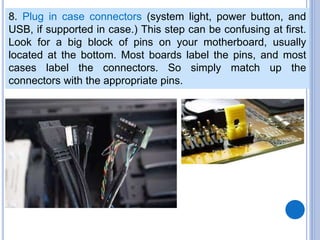
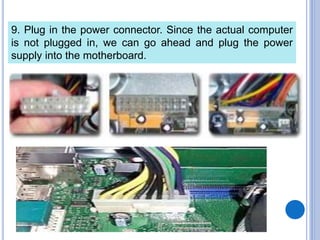
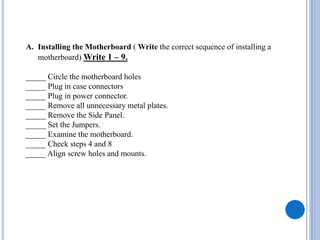
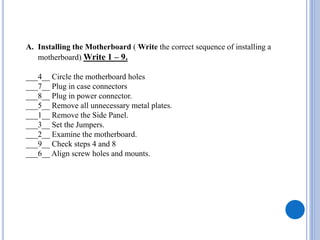
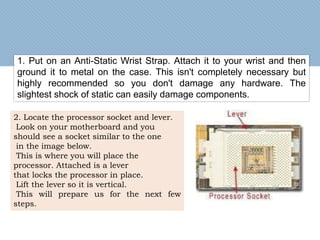
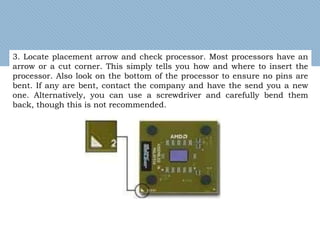
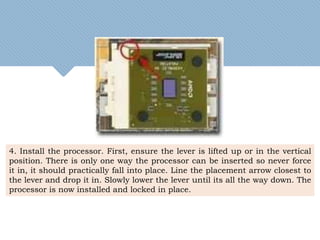
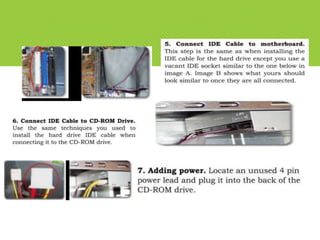
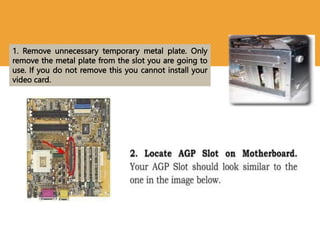
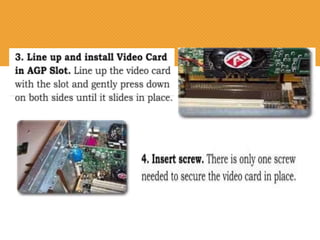
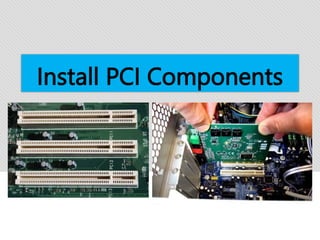
SlideShare a Scribd company logo
GREETING!!!
PRAYER
Lord, we offer to you our class today.
We pray that through your Divine Guidance,
we would learn how to listen attentively to the inputs of everyone.
May we participate actively in the discussions and activities, so we
could learn more while having fun.
May we value each other’s contributions as a building block towards
harmony and peace.
Grant that as we interact with one another, we recognize the fact that
all our learning activities should be accomplished for your greater
glory.
Grant that we recognize YOU in each of our classmates and teachers.
And we would be able to apply correctly what we have learned from
school.
All these we ask in your powerful name.
Amen.
After going through this module, you are expected to:
1. define computer hardware;
2. differentiate assemble from disassemble;
3. identify the hardware parts according to their
functions;
4. enumerate the steps in computer hardware assembly;
5. state the importance of following the correct
procedures in connecting the PC parts.
Lesson 2
Computer Assembly
At the end of the lesson, you are expected to:
1. define computer Assembly
2. differentiate computer assembly from disassembly
3. enumerate the steps in computer hardware assembly
4. state the importance of following the correct
procedures in connecting the PC parts.
SKILLS TEST
Listed below are some of the most important skills that you must
gain in order to render quality service when you enter the real world of
Computer System
Servicing.
Read the skills
carefully. Then write
“Not much”, if you
are not really
familiar, “A little” and
“A lot”, if you are
familiar with the skill.
Feel free to answer
each skill. Write
your answers in
your notebook.
After answering try to group the data…..
Not much A little A lot
Write the numbers where they belong
Ex.
- if your no. 1 belong to a little column write number 1 on A little column if your
answer on no. 2 is not much….write no. 2 on not much column….
So we can interpret the data easily
Or count how many number belong to each
column
Assemble and Disassemble: Defined
Assemble ?
Disassemble?
Assemble and Disassemble: Defined
When referring to hardware, assemble is the act of
connecting together the different parts of a computer.
Disassemble is the process of breaking down a device into
separate parts to help determine a problem, to replace a part,
or take the parts and use them in another device or sell them
individually
The following are steps in assembling
computer hardware.
Installing a:
Motherboard
CPU
Heatsink
RAM
Floppy Disk Drive
Hard Disk
CD-ROM Drive
AGP Video Card
PCI Components
Chassis fan
- Using a plastic housing
Hooking External Hardware
Computer Assembly
The following are steps in assembling computer hardware.
Installing a
Motherboard
10 steps
1. Remove the side panel. Before installing the
motherboard or any other components, we obviously need
to open up the case. Most cases have two or three screws
holding the side panel on while others just pop off. When
removing screws,
remember to put them
in a safe place so
we don’t lose them.
2. Take a look inside. At the left side are pictures
of the inside of an average ATX case. Every case
has mount where you screw the motherboard on.
Feel free to find this
3. Examine the motherboard. Make sure you are grounded
using an antistatic wrist strap. When handling a
motherboard or configuring the jumpers place the
motherboard on the static bag it came in. Don't sit it on the
carpet.
4. Before you can continue, you need to set the jumpers
on your motherboard. The best way to explain this is
read your manual for proper terminology and
placement. Look for a
on setting jumpers.
Some
motherboard
are
jumperless
while others
are not.
5.Every motherboard has holes for screws. We
have circled the holes to easily locate them.
6. Remove all unnecessary metal plates. Pop out any
unnecessary temporary metal plates on the back of the
case so the motherboard can slide comfortably into place
as shown at the right side.
7. After that is done, simply align the
screw holes with the mounts and insert the screws.
8. Plug in case connectors (system light, power button, and
USB, if supported in case.) This step can be confusing at first.
Look for a big block of pins on your motherboard, usually
located at the bottom. Most boards label the pins, and most
cases label the connectors. So simply match up the
connectors with the appropriate pins.
9. Plug in the power connector. Since the actual computer
is not plugged in, we can go ahead and plug the power
supply into the motherboard.
10. Double check steps 4 and 8! Always double
check your work to ensure you haven't forgotten
anything
A. Installing the Motherboard ( Write the correct sequence of installing a
motherboard) Write 1 – 9.
_____ Circle the motherboard holes
_____ Plug in case connectors
_____ Plug in power connector.
_____ Remove all unnecessary metal plates.
_____ Remove the Side Panel.
_____ Set the Jumpers.
_____ Examine the motherboard.
_____ Check steps 4 and 8
_____ Align screw holes and mounts.
A. Installing the Motherboard ( Write the correct sequence of installing a
motherboard) Write 1 – 9.
___4__ Circle the motherboard holes
___7__ Plug in case connectors
___8__ Plug in power connector.
___5__ Remove all unnecessary metal plates.
___1__ Remove the Side Panel.
___3__ Set the Jumpers.
___2__ Examine the motherboard.
___9__ Check steps 4 and 8
___6__ Align screw holes and mounts.
INSTALLING THE CPU
(STEPS)
1. Put on an Anti-Static Wrist Strap. Attach it to your wrist and then
ground it to metal on the case. This isn't completely necessary but
highly recommended so you don't damage any hardware. The
slightest shock of static can easily damage components.
2. Locate the processor socket and lever.
Look on your motherboard and you
should see a socket similar to the one
in the image below.
This is where you will place the
processor. Attached is a lever
that locks the processor in place.
Lift the lever so it is vertical.
This will prepare us for the next few
steps.
3. Locate placement arrow and check processor. Most processors have an
arrow or a cut corner. This simply tells you how and where to insert the
processor. Also look on the bottom of the processor to ensure no pins are
bent. If any are bent, contact the company and have the send you a new
one. Alternatively, you can use a screwdriver and carefully bend them
back, though this is not recommended.
4. Install the processor. First, ensure the lever is lifted up or in the vertical
position. There is only one way the processor can be inserted so never force
it in, it should practically fall into place. Line the placement arrow closest to
the lever and drop it in. Slowly lower the lever until its all the way down. The
processor is now installed and locked in place.
B. Installing the CPU ( Write the correct sequence of installing a CPU) Write 1 –
4.
_____Put on an Anti-Static Wrist Strap.
_____ Locate placement arrow and check processor.
_____ Install the processor.
_____Locate the processor socket and lever.
B. Installing the CPU ( Write the correct sequence of installing a CPU) Write 1 –
4.
___1__Put on an Anti-Static Wrist Strap.
___3__ Locate placement arrow and check processor.
___4__ Install the processor.
___2__Locate the processor socket and lever.
Installing the Heatsink
1. Locate the thermal pad or apply thermal gel. Under the heatsink there
should be a thermal pad. Simply pull away and remove the plastic film. In
some instances, there is no thermal pad so you need to apply a thermal
gel. Most heat sinks come with this so apply a little bit in the middle of the
processor where there is a raised area like in picture B.
2. Place the heatsink on the processor. Never tilt the heat sink when
installing it. This could damage the processor. Picture A) shows the
incorrect way while picture B) shows the correct way to install the heat
sink.
3. Heat Sink should not touch the
socket when fully attached.
4. Attach the clip to first plastic tab on socket.
5. Line up second clip with tab and attach. Check to ensure the second
clip is aligned with the second plastic tab. Using a flathead screwdriver
and without applying pressure to heat sink, push down on the clip and
away so it can move past the tab then slightly push inward to attach.
6. Plug in power lead. The power lead is usually located near the
processor. Please refer back to the motherboard user’s back to the
motherboard user’s manual for details on its location. Look for a
“Jumper and Connector Guide” section then look for a free fan connector
named “CPU Fan Power” or something similar.
Installing the RAM
Installing the Floppy
Disk Drive
1. Remove the second side panel from the case. Using the same steps for
removing the first side panel to remove the second. This will enable you
to screw the components in on both sides so it’s more securely in place.
2. Remove the faceplate and insert drive into the floppy bay. On the
front of cases there are plastic plates. These just pop out, usually just
push it out from the inside. Slide the 3½” floppy drive into the floppy
bay as shown below.
6. Hook it up to the Floppy Drive. Using the same FDD
cable, connect the other end to the back of the floppy drive.
Again, there should only be one way it can go in, but to
make sure it is installed properly, line up the red wire on
the FDD cable with Pin #1.
7. Adding power. This is the easiest step. Grab an unused power cable,
preferably one with two leads on it. We recommend this since we can use
the
second lead for the hard drive in the next lesson. With the power lead in
hand, connect it to the back of the floppy drive. The power lead can only be
inserted
Installing the Hard Disk
1. Set the Hard Drive Jumper. Open your hard drive user’s manual to the
jumper section and read it if you haven't already. If you only have one hard
drive, set the jumper to "Master" or "Single" depending on your brand of
hard drive. If you have two, set the one you are going to put an operating
system on to "Master" and the second to "Slave." NOTE: If you are using
more than one Hard Drive, its best to use the same IDE cable for both.
Note: Hard Drives generate a lot of heat so when installing
one, set it as far away from other components as possible.
Some cases still have hard drive bays near the power supply.
Power supplies generate a small magnetic field which can
damage or cause problems with your hard drive so avoid this
Installing CD-ROM
Drive
1. Set the Jumper on the CD-ROM. Grab your CD-ROM user’s manual
to the jumper section and read it if you haven't already. If you only have
one CD-ROM, set the jumper to "Master" or "Single" depending on your
brand of CD-ROM. If you have two, set one to "Master" and the second
to "Slave." NOTE: If you are using more than one CD-ROM, it's best to
use the same IDE cable for both.
3. Attach audio cable. You can either do
this step now and string the cable
through the bay or wait until you have
the CD-ROM installed. Using the cable
shown below, simply connect it to the
back of the CD-ROM drive. I will show
where to plug in the other end in our PCI
section.
Installing the AGP Video
Card
1. Remove unnecessary temporary metal plate. Only
remove the metal plate from the slot you are going to
use. If you do not remove this you cannot install your
video card.
Install PCI Components
5. Give it CD sound. Remember that audio cable
from the CD-ROM drive? Now we will connect
the other end of it. If you want to hear audio
when playing a cd in your CD-ROM, you need to
connect the CD-ROM to the Sound Card (or
motherboard if your sound card is integrated in)
using the audio cable as seen below. Refer to
your sound card owner’s manual for correct
placement.
6. Repeat for any other components. Every
component is different but as long as it's PCI
compatible, it is installed the same way (except for
the audio cable. It is installed only on sound cards
and motherboards.)
Installing Chassis Fan
https://www.youtube.com/watch?v=WOOZ7qjSzy4
How to Assemble Motherboard | Basic
How To Build Assemble a Computer Step by Step
https://www.youtube.com/watch?v=hWB2UHCT0dw
PA-HELP - How to build a PC - Part 1 - Choosing the parts (IN TAGALOG!)
https://www.youtube.com/watch?v=34vFyKWC7cE
PA-HELP - How to build a PC - Part 2 (IN TAGALOG!)
https://www.youtube.com/watch?v=5Tkgac1W79Q

More Related Content

What's hot

Disassembling a PC
Disassembling a PCDisassembling a PC
Disassembling a PC
University of Dhaka
 
Computer systems servicing cbc
Computer systems servicing cbcComputer systems servicing cbc
Computer systems servicing cbc
Hanzel Metrio
 
Install network cable module CSS NC2
Install network cable module CSS NC2Install network cable module CSS NC2
Install network cable module CSS NC2
wilfredo dela cerna
 
Ict 9 module 4, lesson 1.3 diagnosing computer systems
Ict 9 module 4, lesson 1.3 diagnosing computer systemsIct 9 module 4, lesson 1.3 diagnosing computer systems
Ict 9 module 4, lesson 1.3 diagnosing computer systems
Yonel Cadapan
 
CSS NC II Module : Set-up Computer Networks
CSS NC II Module : Set-up Computer NetworksCSS NC II Module : Set-up Computer Networks
CSS NC II Module : Set-up Computer Networks
Eric Talamisan
 
Ch 2 computer assembly disassembly
Ch 2 computer  assembly disassemblyCh 2 computer  assembly disassembly
Ch 2 computer assembly disassemblymekashaw tizazu
 
CSS L07 - Preparing the Installer
CSS L07 - Preparing the InstallerCSS L07 - Preparing the Installer
CSS L07 - Preparing the Installer
Marvin Bronoso
 
Ict 9 module 3, lesson 2.1 safety precautions
Ict 9 module 3, lesson 2.1 safety precautionsIct 9 module 3, lesson 2.1 safety precautions
Ict 9 module 3, lesson 2.1 safety precautions
Yonel Cadapan
 
CSS-Budget-of-Work-SY-2022-2023.docx
CSS-Budget-of-Work-SY-2022-2023.docxCSS-Budget-of-Work-SY-2022-2023.docx
CSS-Budget-of-Work-SY-2022-2023.docx
Angel Villalon
 
358111385 computer-systems-servicing-dll
358111385 computer-systems-servicing-dll358111385 computer-systems-servicing-dll
358111385 computer-systems-servicing-dll
Prince Rainier
 
How to prepare a portable bootable devices
How to prepare a portable bootable devicesHow to prepare a portable bootable devices
How to prepare a portable bootable devices
iankeithsomoza
 
Final Demo Semi Detailed Lesson Plan in TLE 2 (LAN Cabling)
Final Demo Semi Detailed Lesson Plan in TLE 2 (LAN Cabling)Final Demo Semi Detailed Lesson Plan in TLE 2 (LAN Cabling)
Final Demo Semi Detailed Lesson Plan in TLE 2 (LAN Cabling)
Manila Central University
 
Lo1.3 diagnosing computer systems
Lo1.3 diagnosing computer systemsLo1.3 diagnosing computer systems
Lo1.3 diagnosing computer systems
Frya Lora
 
Assembling the computer
Assembling the computerAssembling the computer
Assembling the computer
Santosh Kulkarni
 
Computer hardware servicing practice occupational health and safety procedure
Computer hardware servicing   practice occupational health and safety procedure Computer hardware servicing   practice occupational health and safety procedure
Computer hardware servicing practice occupational health and safety procedure
Grayzon Gonzales, LPT
 
Straight&Cross-over cable connection
Straight&Cross-over cable connectionStraight&Cross-over cable connection
Straight&Cross-over cable connection
Horacio Aceveda
 
TLE ICT 10 CSS MELC (UNOFFICIAL)
TLE ICT 10 CSS MELC (UNOFFICIAL)TLE ICT 10 CSS MELC (UNOFFICIAL)
TLE ICT 10 CSS MELC (UNOFFICIAL)
Leonel Rivas
 
Grade-10-DLP-CSS-June 5-6.docx
Grade-10-DLP-CSS-June 5-6.docxGrade-10-DLP-CSS-June 5-6.docx
Grade-10-DLP-CSS-June 5-6.docx
Angelito Villalon
 
Cblm installing and configuring computer system and networks
Cblm installing and configuring computer system and networksCblm installing and configuring computer system and networks
Cblm installing and configuring computer system and networks
Julietcoronado
 
CSS CORE 1 - INSTALL & CONFIGURE COMPUTER SYSTEMS AND NETWORKS
CSS CORE 1 - INSTALL & CONFIGURE COMPUTER SYSTEMS AND NETWORKSCSS CORE 1 - INSTALL & CONFIGURE COMPUTER SYSTEMS AND NETWORKS
CSS CORE 1 - INSTALL & CONFIGURE COMPUTER SYSTEMS AND NETWORKS
Eric Talamisan
 

What's hot (20)

Disassembling a PC
Disassembling a PCDisassembling a PC
Disassembling a PC
 
Computer systems servicing cbc
Computer systems servicing cbcComputer systems servicing cbc
Computer systems servicing cbc
 
Install network cable module CSS NC2
Install network cable module CSS NC2Install network cable module CSS NC2
Install network cable module CSS NC2
 
Ict 9 module 4, lesson 1.3 diagnosing computer systems
Ict 9 module 4, lesson 1.3 diagnosing computer systemsIct 9 module 4, lesson 1.3 diagnosing computer systems
Ict 9 module 4, lesson 1.3 diagnosing computer systems
 
CSS NC II Module : Set-up Computer Networks
CSS NC II Module : Set-up Computer NetworksCSS NC II Module : Set-up Computer Networks
CSS NC II Module : Set-up Computer Networks
 
Ch 2 computer assembly disassembly
Ch 2 computer  assembly disassemblyCh 2 computer  assembly disassembly
Ch 2 computer assembly disassembly
 
CSS L07 - Preparing the Installer
CSS L07 - Preparing the InstallerCSS L07 - Preparing the Installer
CSS L07 - Preparing the Installer
 
Ict 9 module 3, lesson 2.1 safety precautions
Ict 9 module 3, lesson 2.1 safety precautionsIct 9 module 3, lesson 2.1 safety precautions
Ict 9 module 3, lesson 2.1 safety precautions
 
CSS-Budget-of-Work-SY-2022-2023.docx
CSS-Budget-of-Work-SY-2022-2023.docxCSS-Budget-of-Work-SY-2022-2023.docx
CSS-Budget-of-Work-SY-2022-2023.docx
 
358111385 computer-systems-servicing-dll
358111385 computer-systems-servicing-dll358111385 computer-systems-servicing-dll
358111385 computer-systems-servicing-dll
 
How to prepare a portable bootable devices
How to prepare a portable bootable devicesHow to prepare a portable bootable devices
How to prepare a portable bootable devices
 
Final Demo Semi Detailed Lesson Plan in TLE 2 (LAN Cabling)
Final Demo Semi Detailed Lesson Plan in TLE 2 (LAN Cabling)Final Demo Semi Detailed Lesson Plan in TLE 2 (LAN Cabling)
Final Demo Semi Detailed Lesson Plan in TLE 2 (LAN Cabling)
 
Lo1.3 diagnosing computer systems
Lo1.3 diagnosing computer systemsLo1.3 diagnosing computer systems
Lo1.3 diagnosing computer systems
 
Assembling the computer
Assembling the computerAssembling the computer
Assembling the computer
 
Computer hardware servicing practice occupational health and safety procedure
Computer hardware servicing   practice occupational health and safety procedure Computer hardware servicing   practice occupational health and safety procedure
Computer hardware servicing practice occupational health and safety procedure
 
Straight&Cross-over cable connection
Straight&Cross-over cable connectionStraight&Cross-over cable connection
Straight&Cross-over cable connection
 
TLE ICT 10 CSS MELC (UNOFFICIAL)
TLE ICT 10 CSS MELC (UNOFFICIAL)TLE ICT 10 CSS MELC (UNOFFICIAL)
TLE ICT 10 CSS MELC (UNOFFICIAL)
 
Grade-10-DLP-CSS-June 5-6.docx
Grade-10-DLP-CSS-June 5-6.docxGrade-10-DLP-CSS-June 5-6.docx
Grade-10-DLP-CSS-June 5-6.docx
 
Cblm installing and configuring computer system and networks
Cblm installing and configuring computer system and networksCblm installing and configuring computer system and networks
Cblm installing and configuring computer system and networks
 
CSS CORE 1 - INSTALL & CONFIGURE COMPUTER SYSTEMS AND NETWORKS
CSS CORE 1 - INSTALL & CONFIGURE COMPUTER SYSTEMS AND NETWORKSCSS CORE 1 - INSTALL & CONFIGURE COMPUTER SYSTEMS AND NETWORKS
CSS CORE 1 - INSTALL & CONFIGURE COMPUTER SYSTEMS AND NETWORKS
 

Similar to Computer Assembly and Disassembly (2nd Lesson part 2).ppt

2.3
2.32.3
COMPUTER HARDWARE SERVICING-ICT TLE 7 LESSON 4.pptx
COMPUTER HARDWARE SERVICING-ICT TLE 7 LESSON 4.pptxCOMPUTER HARDWARE SERVICING-ICT TLE 7 LESSON 4.pptx
COMPUTER HARDWARE SERVICING-ICT TLE 7 LESSON 4.pptx
MarycrisLopez6
 
Css grade 11 week 4
Css grade 11 week 4Css grade 11 week 4
Css grade 11 week 4
Danilo Anos
 
Assemble a desktop pc
Assemble a desktop pcAssemble a desktop pc
Assemble a desktop pcRajat Gupta
 
ict 10 4 second q.pptx
ict 10 4 second q.pptxict 10 4 second q.pptx
ict 10 4 second q.pptx
TerrenceRamirez1
 
pcassemblyanddisassembly-230302040324-f22ec706 (3).pdf
pcassemblyanddisassembly-230302040324-f22ec706 (3).pdfpcassemblyanddisassembly-230302040324-f22ec706 (3).pdf
pcassemblyanddisassembly-230302040324-f22ec706 (3).pdf
DeveshSharma588046
 
COMPUTER MAINTENANCE TECHNOLOGY ppt.pptx
COMPUTER MAINTENANCE TECHNOLOGY ppt.pptxCOMPUTER MAINTENANCE TECHNOLOGY ppt.pptx
COMPUTER MAINTENANCE TECHNOLOGY ppt.pptx
NioLemuelLazatinConc
 
COMPUTER MAINTENANCE TECHNOLOGY ppt.pptx
COMPUTER MAINTENANCE TECHNOLOGY ppt.pptxCOMPUTER MAINTENANCE TECHNOLOGY ppt.pptx
COMPUTER MAINTENANCE TECHNOLOGY ppt.pptx
NioLemuelLazatinConc
 
pc assembly 1111111pc assembly 1111111- Copy.pptx
pc assembly 1111111pc assembly 1111111- Copy.pptxpc assembly 1111111pc assembly 1111111- Copy.pptx
pc assembly 1111111pc assembly 1111111- Copy.pptx
CarloCimacio
 
PC Assembly, PC Disassembly, and Connecting PC Peripherals
PC Assembly, PC Disassembly, and Connecting PC PeripheralsPC Assembly, PC Disassembly, and Connecting PC Peripherals
PC Assembly, PC Disassembly, and Connecting PC Peripherals
AldosPauloSegundo
 
How to disassem-WPS Office.docx
How to disassem-WPS Office.docxHow to disassem-WPS Office.docx
How to disassem-WPS Office.docx
jocelyn secang
 
Steps to install motherboard
Steps to install motherboardSteps to install motherboard
Steps to install motherboard
dipaknandankar
 
Computer assembly
Computer assemblyComputer assembly
Computer assembly
MLG College of Learning, Inc
 
Installation of motherboard
Installation of motherboardInstallation of motherboard
Installation of motherboard
Ruchika Sinha
 
Review.pptx
Review.pptxReview.pptx
Review.pptx
Elrene Cruz
 
Desktop assembly
Desktop assemblyDesktop assembly
Desktop assembly
Chandramouli P
 
Assemble your pc
Assemble your pcAssemble your pc
Assemble your pc
Tapan Khilar
 
how to-build-a-computer
how to-build-a-computerhow to-build-a-computer
how to-build-a-computerhemachandardr
 
Computer hardware basic -shashank
Computer hardware basic  -shashankComputer hardware basic  -shashank
Computer hardware basic -shashank
techbed
 
ASSEMBLY-AND-DISASSEMBLY.pptx
ASSEMBLY-AND-DISASSEMBLY.pptxASSEMBLY-AND-DISASSEMBLY.pptx
ASSEMBLY-AND-DISASSEMBLY.pptx
Virgilio Paglingayen
 

Similar to Computer Assembly and Disassembly (2nd Lesson part 2).ppt (20)

2.3
2.32.3
2.3
 
COMPUTER HARDWARE SERVICING-ICT TLE 7 LESSON 4.pptx
COMPUTER HARDWARE SERVICING-ICT TLE 7 LESSON 4.pptxCOMPUTER HARDWARE SERVICING-ICT TLE 7 LESSON 4.pptx
COMPUTER HARDWARE SERVICING-ICT TLE 7 LESSON 4.pptx
 
Css grade 11 week 4
Css grade 11 week 4Css grade 11 week 4
Css grade 11 week 4
 
Assemble a desktop pc
Assemble a desktop pcAssemble a desktop pc
Assemble a desktop pc
 
ict 10 4 second q.pptx
ict 10 4 second q.pptxict 10 4 second q.pptx
ict 10 4 second q.pptx
 
pcassemblyanddisassembly-230302040324-f22ec706 (3).pdf
pcassemblyanddisassembly-230302040324-f22ec706 (3).pdfpcassemblyanddisassembly-230302040324-f22ec706 (3).pdf
pcassemblyanddisassembly-230302040324-f22ec706 (3).pdf
 
COMPUTER MAINTENANCE TECHNOLOGY ppt.pptx
COMPUTER MAINTENANCE TECHNOLOGY ppt.pptxCOMPUTER MAINTENANCE TECHNOLOGY ppt.pptx
COMPUTER MAINTENANCE TECHNOLOGY ppt.pptx
 
COMPUTER MAINTENANCE TECHNOLOGY ppt.pptx
COMPUTER MAINTENANCE TECHNOLOGY ppt.pptxCOMPUTER MAINTENANCE TECHNOLOGY ppt.pptx
COMPUTER MAINTENANCE TECHNOLOGY ppt.pptx
 
pc assembly 1111111pc assembly 1111111- Copy.pptx
pc assembly 1111111pc assembly 1111111- Copy.pptxpc assembly 1111111pc assembly 1111111- Copy.pptx
pc assembly 1111111pc assembly 1111111- Copy.pptx
 
PC Assembly, PC Disassembly, and Connecting PC Peripherals
PC Assembly, PC Disassembly, and Connecting PC PeripheralsPC Assembly, PC Disassembly, and Connecting PC Peripherals
PC Assembly, PC Disassembly, and Connecting PC Peripherals
 
How to disassem-WPS Office.docx
How to disassem-WPS Office.docxHow to disassem-WPS Office.docx
How to disassem-WPS Office.docx
 
Steps to install motherboard
Steps to install motherboardSteps to install motherboard
Steps to install motherboard
 
Computer assembly
Computer assemblyComputer assembly
Computer assembly
 
Installation of motherboard
Installation of motherboardInstallation of motherboard
Installation of motherboard
 
Review.pptx
Review.pptxReview.pptx
Review.pptx
 
Desktop assembly
Desktop assemblyDesktop assembly
Desktop assembly
 
Assemble your pc
Assemble your pcAssemble your pc
Assemble your pc
 
how to-build-a-computer
how to-build-a-computerhow to-build-a-computer
how to-build-a-computer
 
Computer hardware basic -shashank
Computer hardware basic  -shashankComputer hardware basic  -shashank
Computer hardware basic -shashank
 
ASSEMBLY-AND-DISASSEMBLY.pptx
ASSEMBLY-AND-DISASSEMBLY.pptxASSEMBLY-AND-DISASSEMBLY.pptx
ASSEMBLY-AND-DISASSEMBLY.pptx
 

Recently uploaded

Model Attribute Check Company Auto Property
Model Attribute  Check Company Auto PropertyModel Attribute  Check Company Auto Property
Model Attribute Check Company Auto Property
Celine George
 
Synthetic Fiber Construction in lab .pptx
Synthetic Fiber Construction in lab .pptxSynthetic Fiber Construction in lab .pptx
Synthetic Fiber Construction in lab .pptx
Pavel ( NSTU)
 
Welcome to TechSoup New Member Orientation and Q&A (May 2024).pdf
Welcome to TechSoup   New Member Orientation and Q&A (May 2024).pdfWelcome to TechSoup   New Member Orientation and Q&A (May 2024).pdf
Welcome to TechSoup New Member Orientation and Q&A (May 2024).pdf
TechSoup
 
Unit 2- Research Aptitude (UGC NET Paper I).pdf
Unit 2- Research Aptitude (UGC NET Paper I).pdfUnit 2- Research Aptitude (UGC NET Paper I).pdf
Unit 2- Research Aptitude (UGC NET Paper I).pdf
Thiyagu K
 
1.4 modern child centered education - mahatma gandhi-2.pptx
1.4 modern child centered education - mahatma gandhi-2.pptx1.4 modern child centered education - mahatma gandhi-2.pptx
1.4 modern child centered education - mahatma gandhi-2.pptx
JosvitaDsouza2
 
TESDA TM1 REVIEWER FOR NATIONAL ASSESSMENT WRITTEN AND ORAL QUESTIONS WITH A...
TESDA TM1 REVIEWER  FOR NATIONAL ASSESSMENT WRITTEN AND ORAL QUESTIONS WITH A...TESDA TM1 REVIEWER  FOR NATIONAL ASSESSMENT WRITTEN AND ORAL QUESTIONS WITH A...
TESDA TM1 REVIEWER FOR NATIONAL ASSESSMENT WRITTEN AND ORAL QUESTIONS WITH A...
EugeneSaldivar
 
The French Revolution Class 9 Study Material pdf free download
The French Revolution Class 9 Study Material pdf free downloadThe French Revolution Class 9 Study Material pdf free download
The French Revolution Class 9 Study Material pdf free download
Vivekanand Anglo Vedic Academy
 
Acetabularia Information For Class 9 .docx
Acetabularia Information For Class 9  .docxAcetabularia Information For Class 9  .docx
Acetabularia Information For Class 9 .docx
vaibhavrinwa19
 
Adversarial Attention Modeling for Multi-dimensional Emotion Regression.pdf
Adversarial Attention Modeling for Multi-dimensional Emotion Regression.pdfAdversarial Attention Modeling for Multi-dimensional Emotion Regression.pdf
Adversarial Attention Modeling for Multi-dimensional Emotion Regression.pdf
Po-Chuan Chen
 
Honest Reviews of Tim Han LMA Course Program.pptx
Honest Reviews of Tim Han LMA Course Program.pptxHonest Reviews of Tim Han LMA Course Program.pptx
Honest Reviews of Tim Han LMA Course Program.pptx
timhan337
 
The Roman Empire A Historical Colossus.pdf
The Roman Empire A Historical Colossus.pdfThe Roman Empire A Historical Colossus.pdf
The Roman Empire A Historical Colossus.pdf
kaushalkr1407
 
Unit 8 - Information and Communication Technology (Paper I).pdf
Unit 8 - Information and Communication Technology (Paper I).pdfUnit 8 - Information and Communication Technology (Paper I).pdf
Unit 8 - Information and Communication Technology (Paper I).pdf
Thiyagu K
 
Language Across the Curriculm LAC B.Ed.
Language Across the  Curriculm LAC B.Ed.Language Across the  Curriculm LAC B.Ed.
Language Across the Curriculm LAC B.Ed.
Atul Kumar Singh
 
"Protectable subject matters, Protection in biotechnology, Protection of othe...
"Protectable subject matters, Protection in biotechnology, Protection of othe..."Protectable subject matters, Protection in biotechnology, Protection of othe...
"Protectable subject matters, Protection in biotechnology, Protection of othe...
SACHIN R KONDAGURI
 
Instructions for Submissions thorugh G- Classroom.pptx
Instructions for Submissions thorugh G- Classroom.pptxInstructions for Submissions thorugh G- Classroom.pptx
Instructions for Submissions thorugh G- Classroom.pptx
Jheel Barad
 
June 3, 2024 Anti-Semitism Letter Sent to MIT President Kornbluth and MIT Cor...
June 3, 2024 Anti-Semitism Letter Sent to MIT President Kornbluth and MIT Cor...June 3, 2024 Anti-Semitism Letter Sent to MIT President Kornbluth and MIT Cor...
June 3, 2024 Anti-Semitism Letter Sent to MIT President Kornbluth and MIT Cor...
Levi Shapiro
 
Lapbook sobre os Regimes Totalitários.pdf
Lapbook sobre os Regimes Totalitários.pdfLapbook sobre os Regimes Totalitários.pdf
Lapbook sobre os Regimes Totalitários.pdf
Jean Carlos Nunes Paixão
 
Phrasal Verbs.XXXXXXXXXXXXXXXXXXXXXXXXXX
Phrasal Verbs.XXXXXXXXXXXXXXXXXXXXXXXXXXPhrasal Verbs.XXXXXXXXXXXXXXXXXXXXXXXXXX
Phrasal Verbs.XXXXXXXXXXXXXXXXXXXXXXXXXX
MIRIAMSALINAS13
 
How libraries can support authors with open access requirements for UKRI fund...
How libraries can support authors with open access requirements for UKRI fund...How libraries can support authors with open access requirements for UKRI fund...
How libraries can support authors with open access requirements for UKRI fund...
Jisc
 
How to Make a Field invisible in Odoo 17
How to Make a Field invisible in Odoo 17How to Make a Field invisible in Odoo 17
How to Make a Field invisible in Odoo 17
Celine George
 

Recently uploaded (20)

Model Attribute Check Company Auto Property
Model Attribute  Check Company Auto PropertyModel Attribute  Check Company Auto Property
Model Attribute Check Company Auto Property
 
Synthetic Fiber Construction in lab .pptx
Synthetic Fiber Construction in lab .pptxSynthetic Fiber Construction in lab .pptx
Synthetic Fiber Construction in lab .pptx
 
Welcome to TechSoup New Member Orientation and Q&A (May 2024).pdf
Welcome to TechSoup   New Member Orientation and Q&A (May 2024).pdfWelcome to TechSoup   New Member Orientation and Q&A (May 2024).pdf
Welcome to TechSoup New Member Orientation and Q&A (May 2024).pdf
 
Unit 2- Research Aptitude (UGC NET Paper I).pdf
Unit 2- Research Aptitude (UGC NET Paper I).pdfUnit 2- Research Aptitude (UGC NET Paper I).pdf
Unit 2- Research Aptitude (UGC NET Paper I).pdf
 
1.4 modern child centered education - mahatma gandhi-2.pptx
1.4 modern child centered education - mahatma gandhi-2.pptx1.4 modern child centered education - mahatma gandhi-2.pptx
1.4 modern child centered education - mahatma gandhi-2.pptx
 
TESDA TM1 REVIEWER FOR NATIONAL ASSESSMENT WRITTEN AND ORAL QUESTIONS WITH A...
TESDA TM1 REVIEWER  FOR NATIONAL ASSESSMENT WRITTEN AND ORAL QUESTIONS WITH A...TESDA TM1 REVIEWER  FOR NATIONAL ASSESSMENT WRITTEN AND ORAL QUESTIONS WITH A...
TESDA TM1 REVIEWER FOR NATIONAL ASSESSMENT WRITTEN AND ORAL QUESTIONS WITH A...
 
The French Revolution Class 9 Study Material pdf free download
The French Revolution Class 9 Study Material pdf free downloadThe French Revolution Class 9 Study Material pdf free download
The French Revolution Class 9 Study Material pdf free download
 
Acetabularia Information For Class 9 .docx
Acetabularia Information For Class 9  .docxAcetabularia Information For Class 9  .docx
Acetabularia Information For Class 9 .docx
 
Adversarial Attention Modeling for Multi-dimensional Emotion Regression.pdf
Adversarial Attention Modeling for Multi-dimensional Emotion Regression.pdfAdversarial Attention Modeling for Multi-dimensional Emotion Regression.pdf
Adversarial Attention Modeling for Multi-dimensional Emotion Regression.pdf
 
Honest Reviews of Tim Han LMA Course Program.pptx
Honest Reviews of Tim Han LMA Course Program.pptxHonest Reviews of Tim Han LMA Course Program.pptx
Honest Reviews of Tim Han LMA Course Program.pptx
 
The Roman Empire A Historical Colossus.pdf
The Roman Empire A Historical Colossus.pdfThe Roman Empire A Historical Colossus.pdf
The Roman Empire A Historical Colossus.pdf
 
Unit 8 - Information and Communication Technology (Paper I).pdf
Unit 8 - Information and Communication Technology (Paper I).pdfUnit 8 - Information and Communication Technology (Paper I).pdf
Unit 8 - Information and Communication Technology (Paper I).pdf
 
Language Across the Curriculm LAC B.Ed.
Language Across the  Curriculm LAC B.Ed.Language Across the  Curriculm LAC B.Ed.
Language Across the Curriculm LAC B.Ed.
 
"Protectable subject matters, Protection in biotechnology, Protection of othe...
"Protectable subject matters, Protection in biotechnology, Protection of othe..."Protectable subject matters, Protection in biotechnology, Protection of othe...
"Protectable subject matters, Protection in biotechnology, Protection of othe...
 
Instructions for Submissions thorugh G- Classroom.pptx
Instructions for Submissions thorugh G- Classroom.pptxInstructions for Submissions thorugh G- Classroom.pptx
Instructions for Submissions thorugh G- Classroom.pptx
 
June 3, 2024 Anti-Semitism Letter Sent to MIT President Kornbluth and MIT Cor...
June 3, 2024 Anti-Semitism Letter Sent to MIT President Kornbluth and MIT Cor...June 3, 2024 Anti-Semitism Letter Sent to MIT President Kornbluth and MIT Cor...
June 3, 2024 Anti-Semitism Letter Sent to MIT President Kornbluth and MIT Cor...
 
Lapbook sobre os Regimes Totalitários.pdf
Lapbook sobre os Regimes Totalitários.pdfLapbook sobre os Regimes Totalitários.pdf
Lapbook sobre os Regimes Totalitários.pdf
 
Phrasal Verbs.XXXXXXXXXXXXXXXXXXXXXXXXXX
Phrasal Verbs.XXXXXXXXXXXXXXXXXXXXXXXXXXPhrasal Verbs.XXXXXXXXXXXXXXXXXXXXXXXXXX
Phrasal Verbs.XXXXXXXXXXXXXXXXXXXXXXXXXX
 
How libraries can support authors with open access requirements for UKRI fund...
How libraries can support authors with open access requirements for UKRI fund...How libraries can support authors with open access requirements for UKRI fund...
How libraries can support authors with open access requirements for UKRI fund...
 
How to Make a Field invisible in Odoo 17
How to Make a Field invisible in Odoo 17How to Make a Field invisible in Odoo 17
How to Make a Field invisible in Odoo 17
 

Computer Assembly and Disassembly (2nd Lesson part 2).ppt

  • 2. PRAYER Lord, we offer to you our class today. We pray that through your Divine Guidance, we would learn how to listen attentively to the inputs of everyone. May we participate actively in the discussions and activities, so we could learn more while having fun. May we value each other’s contributions as a building block towards harmony and peace. Grant that as we interact with one another, we recognize the fact that all our learning activities should be accomplished for your greater glory. Grant that we recognize YOU in each of our classmates and teachers. And we would be able to apply correctly what we have learned from school. All these we ask in your powerful name. Amen.
  • 3. After going through this module, you are expected to: 1. define computer hardware; 2. differentiate assemble from disassemble; 3. identify the hardware parts according to their functions; 4. enumerate the steps in computer hardware assembly; 5. state the importance of following the correct procedures in connecting the PC parts.
  • 5. At the end of the lesson, you are expected to: 1. define computer Assembly 2. differentiate computer assembly from disassembly 3. enumerate the steps in computer hardware assembly 4. state the importance of following the correct procedures in connecting the PC parts.
  • 6. SKILLS TEST Listed below are some of the most important skills that you must gain in order to render quality service when you enter the real world of Computer System Servicing. Read the skills carefully. Then write “Not much”, if you are not really familiar, “A little” and “A lot”, if you are familiar with the skill. Feel free to answer each skill. Write your answers in your notebook.
  • 7. After answering try to group the data….. Not much A little A lot Write the numbers where they belong Ex. - if your no. 1 belong to a little column write number 1 on A little column if your answer on no. 2 is not much….write no. 2 on not much column…. So we can interpret the data easily Or count how many number belong to each column
  • 8. Assemble and Disassemble: Defined Assemble ? Disassemble?
  • 9. Assemble and Disassemble: Defined When referring to hardware, assemble is the act of connecting together the different parts of a computer. Disassemble is the process of breaking down a device into separate parts to help determine a problem, to replace a part, or take the parts and use them in another device or sell them individually
  • 10. The following are steps in assembling computer hardware. Installing a: Motherboard CPU Heatsink RAM Floppy Disk Drive Hard Disk CD-ROM Drive AGP Video Card PCI Components Chassis fan - Using a plastic housing Hooking External Hardware
  • 11. Computer Assembly The following are steps in assembling computer hardware. Installing a Motherboard 10 steps
  • 12. 1. Remove the side panel. Before installing the motherboard or any other components, we obviously need to open up the case. Most cases have two or three screws holding the side panel on while others just pop off. When removing screws, remember to put them in a safe place so we don’t lose them.
  • 13. 2. Take a look inside. At the left side are pictures of the inside of an average ATX case. Every case has mount where you screw the motherboard on. Feel free to find this
  • 14. 3. Examine the motherboard. Make sure you are grounded using an antistatic wrist strap. When handling a motherboard or configuring the jumpers place the motherboard on the static bag it came in. Don't sit it on the carpet.
  • 15. 4. Before you can continue, you need to set the jumpers on your motherboard. The best way to explain this is read your manual for proper terminology and placement. Look for a on setting jumpers. Some motherboard are jumperless while others are not.
  • 16. 5.Every motherboard has holes for screws. We have circled the holes to easily locate them.
  • 17. 6. Remove all unnecessary metal plates. Pop out any unnecessary temporary metal plates on the back of the case so the motherboard can slide comfortably into place as shown at the right side.
  • 18. 7. After that is done, simply align the screw holes with the mounts and insert the screws.
  • 19. 8. Plug in case connectors (system light, power button, and USB, if supported in case.) This step can be confusing at first. Look for a big block of pins on your motherboard, usually located at the bottom. Most boards label the pins, and most cases label the connectors. So simply match up the connectors with the appropriate pins.
  • 20. 9. Plug in the power connector. Since the actual computer is not plugged in, we can go ahead and plug the power supply into the motherboard.
  • 21. 10. Double check steps 4 and 8! Always double check your work to ensure you haven't forgotten anything
  • 22. A. Installing the Motherboard ( Write the correct sequence of installing a motherboard) Write 1 – 9. _____ Circle the motherboard holes _____ Plug in case connectors _____ Plug in power connector. _____ Remove all unnecessary metal plates. _____ Remove the Side Panel. _____ Set the Jumpers. _____ Examine the motherboard. _____ Check steps 4 and 8 _____ Align screw holes and mounts.
  • 23. A. Installing the Motherboard ( Write the correct sequence of installing a motherboard) Write 1 – 9. ___4__ Circle the motherboard holes ___7__ Plug in case connectors ___8__ Plug in power connector. ___5__ Remove all unnecessary metal plates. ___1__ Remove the Side Panel. ___3__ Set the Jumpers. ___2__ Examine the motherboard. ___9__ Check steps 4 and 8 ___6__ Align screw holes and mounts.
  • 25. 1. Put on an Anti-Static Wrist Strap. Attach it to your wrist and then ground it to metal on the case. This isn't completely necessary but highly recommended so you don't damage any hardware. The slightest shock of static can easily damage components. 2. Locate the processor socket and lever. Look on your motherboard and you should see a socket similar to the one in the image below. This is where you will place the processor. Attached is a lever that locks the processor in place. Lift the lever so it is vertical. This will prepare us for the next few steps.
  • 26. 3. Locate placement arrow and check processor. Most processors have an arrow or a cut corner. This simply tells you how and where to insert the processor. Also look on the bottom of the processor to ensure no pins are bent. If any are bent, contact the company and have the send you a new one. Alternatively, you can use a screwdriver and carefully bend them back, though this is not recommended.
  • 27. 4. Install the processor. First, ensure the lever is lifted up or in the vertical position. There is only one way the processor can be inserted so never force it in, it should practically fall into place. Line the placement arrow closest to the lever and drop it in. Slowly lower the lever until its all the way down. The processor is now installed and locked in place.
  • 28. B. Installing the CPU ( Write the correct sequence of installing a CPU) Write 1 – 4. _____Put on an Anti-Static Wrist Strap. _____ Locate placement arrow and check processor. _____ Install the processor. _____Locate the processor socket and lever.
  • 29. B. Installing the CPU ( Write the correct sequence of installing a CPU) Write 1 – 4. ___1__Put on an Anti-Static Wrist Strap. ___3__ Locate placement arrow and check processor. ___4__ Install the processor. ___2__Locate the processor socket and lever.
  • 31. 1. Locate the thermal pad or apply thermal gel. Under the heatsink there should be a thermal pad. Simply pull away and remove the plastic film. In some instances, there is no thermal pad so you need to apply a thermal gel. Most heat sinks come with this so apply a little bit in the middle of the processor where there is a raised area like in picture B.
  • 32. 2. Place the heatsink on the processor. Never tilt the heat sink when installing it. This could damage the processor. Picture A) shows the incorrect way while picture B) shows the correct way to install the heat sink.
  • 33. 3. Heat Sink should not touch the socket when fully attached. 4. Attach the clip to first plastic tab on socket.
  • 34. 5. Line up second clip with tab and attach. Check to ensure the second clip is aligned with the second plastic tab. Using a flathead screwdriver and without applying pressure to heat sink, push down on the clip and away so it can move past the tab then slightly push inward to attach.
  • 35. 6. Plug in power lead. The power lead is usually located near the processor. Please refer back to the motherboard user’s back to the motherboard user’s manual for details on its location. Look for a “Jumper and Connector Guide” section then look for a free fan connector named “CPU Fan Power” or something similar.
  • 37.
  • 38.
  • 39.
  • 41. 1. Remove the second side panel from the case. Using the same steps for removing the first side panel to remove the second. This will enable you to screw the components in on both sides so it’s more securely in place. 2. Remove the faceplate and insert drive into the floppy bay. On the front of cases there are plastic plates. These just pop out, usually just push it out from the inside. Slide the 3½” floppy drive into the floppy bay as shown below.
  • 42.
  • 43. 6. Hook it up to the Floppy Drive. Using the same FDD cable, connect the other end to the back of the floppy drive. Again, there should only be one way it can go in, but to make sure it is installed properly, line up the red wire on the FDD cable with Pin #1.
  • 44. 7. Adding power. This is the easiest step. Grab an unused power cable, preferably one with two leads on it. We recommend this since we can use the second lead for the hard drive in the next lesson. With the power lead in hand, connect it to the back of the floppy drive. The power lead can only be inserted
  • 46. 1. Set the Hard Drive Jumper. Open your hard drive user’s manual to the jumper section and read it if you haven't already. If you only have one hard drive, set the jumper to "Master" or "Single" depending on your brand of hard drive. If you have two, set the one you are going to put an operating system on to "Master" and the second to "Slave." NOTE: If you are using more than one Hard Drive, its best to use the same IDE cable for both. Note: Hard Drives generate a lot of heat so when installing one, set it as far away from other components as possible. Some cases still have hard drive bays near the power supply. Power supplies generate a small magnetic field which can damage or cause problems with your hard drive so avoid this
  • 47.
  • 48.
  • 50. 1. Set the Jumper on the CD-ROM. Grab your CD-ROM user’s manual to the jumper section and read it if you haven't already. If you only have one CD-ROM, set the jumper to "Master" or "Single" depending on your brand of CD-ROM. If you have two, set one to "Master" and the second to "Slave." NOTE: If you are using more than one CD-ROM, it's best to use the same IDE cable for both. 3. Attach audio cable. You can either do this step now and string the cable through the bay or wait until you have the CD-ROM installed. Using the cable shown below, simply connect it to the back of the CD-ROM drive. I will show where to plug in the other end in our PCI section.
  • 51.
  • 52.
  • 53. Installing the AGP Video Card
  • 54. 1. Remove unnecessary temporary metal plate. Only remove the metal plate from the slot you are going to use. If you do not remove this you cannot install your video card.
  • 55.
  • 57.
  • 58. 5. Give it CD sound. Remember that audio cable from the CD-ROM drive? Now we will connect the other end of it. If you want to hear audio when playing a cd in your CD-ROM, you need to connect the CD-ROM to the Sound Card (or motherboard if your sound card is integrated in) using the audio cable as seen below. Refer to your sound card owner’s manual for correct placement. 6. Repeat for any other components. Every component is different but as long as it's PCI compatible, it is installed the same way (except for the audio cable. It is installed only on sound cards and motherboards.)
  • 60.
  • 61.
  • 62.
  • 63. https://www.youtube.com/watch?v=WOOZ7qjSzy4 How to Assemble Motherboard | Basic How To Build Assemble a Computer Step by Step https://www.youtube.com/watch?v=hWB2UHCT0dw PA-HELP - How to build a PC - Part 1 - Choosing the parts (IN TAGALOG!) https://www.youtube.com/watch?v=34vFyKWC7cE PA-HELP - How to build a PC - Part 2 (IN TAGALOG!) https://www.youtube.com/watch?v=5Tkgac1W79Q