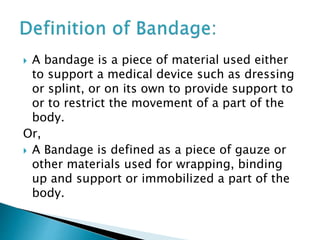
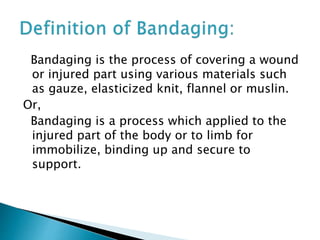
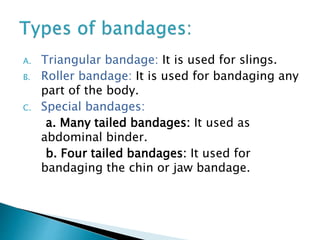
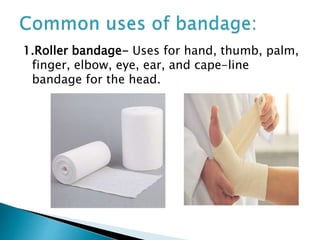
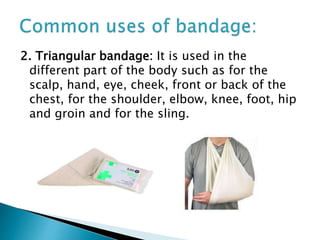
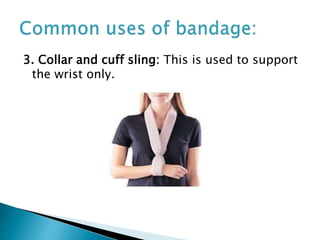
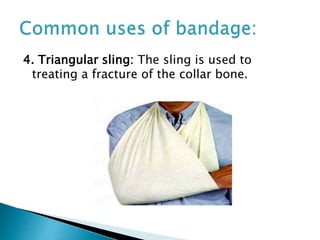
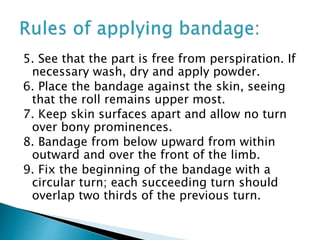
2. A bandage is a piece of material used either
to support a medical device such as dressing
or splint, or on its own to provide support to
or to restrict the movement of a part of the
body.
Or,
A Bandage is defined as a piece of gauze or
other materials used for wrapping, binding
up and support or immobilized a part of the
body.
3. Bandaging is the process of covering a wound
or injured part using various materials such
as gauze, elasticized knit, flannel or muslin.
Or,
Bandaging is a process which applied to the
injured part of the body or to limb for
immobilize, binding up and secure to
support.
4. A. Triangular bandage: It is used for slings.
B. Roller bandage: It is used for bandaging any
part of the body.
C. Special bandages:
a. Many tailed bandages: It used as
abdominal binder.
b. Four tailed bandages: It used for
bandaging the chin or jaw bandage.
5. c. T bandage: It used holding dressing over
perineum.
6. d. Crepe and plastic bandages: It used for
joints and varicose veins and also used in
sprain.
e. Crinoline and plaster of Paris bandages:
It used for making casts.
7. 1. To fix and retain dressing or splint in a
position.
2. To give support to an injured part.
3. To apply pressure to stop
bleeding/hemorrhage.
4. To prevent and reduce swelling.
5. To immobilize an injured part so as to relive
pain.
6. To prevent contamination of a wound.
7. To secure splints in position.
8. 8. To retain warmth.
9. To correct hemorrhage by means of
pressure.
10. To correct deformity.
11. To absorb discharge.
12. To prevent infection and avoid further
injury.
13. To restrict movement.
14. To provide physical comfort.
9. 1.Roller bandage- Uses for hand, thumb, palm,
finger, elbow, eye, ear, and cape-line
bandage for the head.
10. 2. Triangular bandage: It is used in the
different part of the body such as for the
scalp, hand, eye, cheek, front or back of the
chest, for the shoulder, elbow, knee, foot, hip
and groin and for the sling.
11. 3. Collar and cuff sling: This is used to support
the wrist only.
12. 4. Triangular sling: The sling is used to
treating a fracture of the collar bone.
13. 5. Many tailed bandage: Used as chest and
abdominal area for the support.
14. 6. Crepe or elastic bandages: this is
comfortable and give good support .uses in
joints, varicose veins and sprains.
15. 7. Plaster: It used for fracture in the limbs or
long bone of the lower limbs, upper limbs,
femur.
16. 8. Rubber bandage: Used to control and
prevent bleeding but should not applied more
than 30 minutes at a time.
17. 1. Place the patient and the injured part which is
to be bandaged in comfortable position.
2. Apply bandages when patient is sitting or lying
down position.
3. Injured part should be well supported in
position.
4. Bandaging are never applied directly over
wounds.
5. Avoid pressure over painful area.
6. The bandage should not be very loose or tight.
7. Bandage always should be neat and clean.
18. 8.Never use dirty or wet or unroll bandage.
9. Use a tightly roller bandages of the correct
width.
10. Support the part to be bandaged
throughout the procedure.
11. Always stand in front of the patient, except
when applying cape-line bandage.
12. Bandage a limb in the position in which it is
to remain. E.g.- forearm and hand should be
prone.
19. 13. Hold the bandage with the head of roll
uppermost and apply the outer surface of the
bandage to the part, never unroll more than a
few inches of bandages at a time.
14. Apply bandage from medical outwards and
from below upwards maintaining even
pressure throughout.
15. Begin the bandage with a firm oblique turn
to fix it and below each successive turn to
cover two thirds of the previous one with the
free edges lying parallel.
20. 16. Make any reverse or crossing line on the
outer side of the limb except, when this
brings the bandage over a wound or bony
prominence, in which case, it must be on the
front of the limb.
17. Pad the axilla or groin when bandaging
these parts , so that two surfaces of skin do
not touch each other beneath the bandage.
18. Finish off with a straight turn above the
part, hold the end and fasten with the saftey
pin.
21. 1. Have the patient in a comfortable position
either sitting up or lying down.
2. Choose the right bandage according to the
site.
3. Stand opposite the patient and on the same
site of the part to be bandaged except in
cases of cape-line and neck bandages. Be
comfortable yourself.
4. Place and support the limb in the correct
position,
22. 5. See that the part is free from perspiration. If
necessary wash, dry and apply powder.
6. Place the bandage against the skin, seeing
that the roll remains upper most.
7. Keep skin surfaces apart and allow no turn
over bony prominences.
8. Bandage from below upward from within
outward and over the front of the limb.
9. Fix the beginning of the bandage with a
circular turn; each succeeding turn should
overlap two thirds of the previous turn.
23. 10. Keep all margins parallel and let the
crossing and reversing be in one line towards
the outer aspects.
11. Keep the pressure uniform throughout
leave fingers and toes exposed where
possible, so skin of any can be directed.
12. Finish by securing the ends needs neatly
with a circular turn.