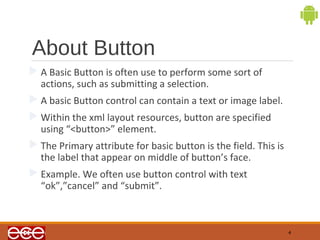
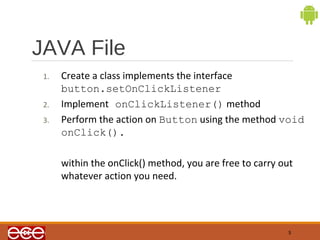
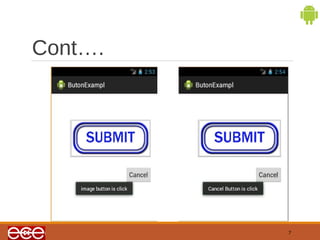
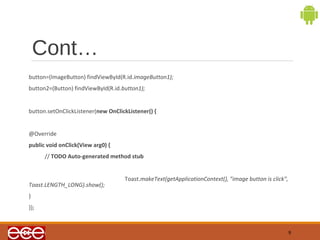
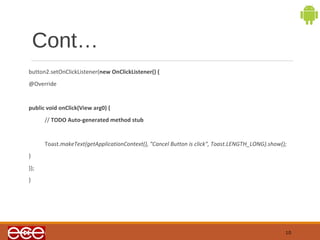
Android Button 
BHAVIN JOSHI 
125010693017 
1
Index 
 About Button 
 XML File 
 Java File 
 Example 
2
XML File 
<Button 
android:id="@+id/button1" 
android:layout_width="wrap_content" 
android:layout_height="wrap_content” 
android:text=“radiobutton" /> 
<ImageButton 
android:id="@+id/img_button1" 
android:layout_width="wrap_content" 
android:layout_height="wrap_content” 
android:src=“@drawable/droid” 
/> 
3
About Button 
A Basic Button is often use to perform some sort of 
actions, such as submitting a selection. 
A basic Button control can contain a text or image label. 
Within the xml layout resources, button are specified 
using “<button>” element. 
The Primary attribute for basic button is the field. This is 
the label that appear on middle of button’s face. 
Example. We often use button control with text 
“ok”,”cancel” and “submit”. 
4
JAVA File 
5 
1. Create a class implements the interface 
button.setOnClickListener 
2. Implement onClickListener() method 
3. Perform the action on Button using the method void 
onClick(). 
within the onClick() method, you are free to carry out 
whatever action you need.
Example 
<?xml version="1.0" encoding="utf-8"?> 
<LinearLayout xmlns:android="http://schemas.android.com/apk/res/android" 
android:layout_width="fill_parent" 
android:layout_height="fill_parent" 
android:orientation="vertical" > 
<ImageButton 
android:id="@+id/image_button" 
android:layout_width="wrap_content" 
android:layout_height="wrap_content“ 
android:src=“@drawable/submit/” /> 
<Button 
android:id="@+id/button1“ 
android:layout_width="wrap_content" 
android:layout_height="wrap_content" 
android:text="@string/Cancel” /> 
</LinearLayout> 
6
Cont…. 
7
Java Code of Example 
package sl.mc; 
import android.os.Bundle; 
import android.app.Activity; 
import android.view.View; 
import android.view.View.OnClickListener; 
import android.widget.Button; 
import android.widget.ImageButton; 
import android.widget.Toast; 
public class MainActivity extends Activity { 
ImageButton button; 
Button button2; 
@Override 
protected void onCreate(Bundle savedInstanceState) { 
super.onCreate(savedInstanceState); 
setContentView(R.layout.activity_main); 
8
Cont… 
button=(ImageButton) findViewById(R.id.imageButton1); 
button2=(Button) findViewById(R.id.button1); 
button.setOnClickListener(new OnClickListener() { 
@Override 
public void onClick(View arg0) { 
// TODO Auto-generated method stub 
Toast.makeText(getApplicationContext(), "image button is click", 
Toast.LENGTH_LONG).show(); 
} 
}); 
9
Cont… 
button2.setOnClickListener(new OnClickListener() { 
@Override 
public void onClick(View arg0) { 
// TODO Auto-generated method stub 
Toast.makeText(getApplicationContext(), "Cancel Button is click", Toast.LENGTH_LONG).show(); 
} 
}); 
} 
10
Thank You 
11

Android Button

  • 1.
    Android Button BHAVINJOSHI 125010693017 1
  • 2.
    Index  AboutButton  XML File  Java File  Example 2
  • 3.
    XML File <Button android:id="@+id/button1" android:layout_width="wrap_content" android:layout_height="wrap_content” android:text=“radiobutton" /> <ImageButton android:id="@+id/img_button1" android:layout_width="wrap_content" android:layout_height="wrap_content” android:src=“@drawable/droid” /> 3
  • 4.
    About Button ABasic Button is often use to perform some sort of actions, such as submitting a selection. A basic Button control can contain a text or image label. Within the xml layout resources, button are specified using “<button>” element. The Primary attribute for basic button is the field. This is the label that appear on middle of button’s face. Example. We often use button control with text “ok”,”cancel” and “submit”. 4
  • 5.
    JAVA File 5 1. Create a class implements the interface button.setOnClickListener 2. Implement onClickListener() method 3. Perform the action on Button using the method void onClick(). within the onClick() method, you are free to carry out whatever action you need.
  • 6.
    Example <?xml version="1.0"encoding="utf-8"?> <LinearLayout xmlns:android="http://schemas.android.com/apk/res/android" android:layout_width="fill_parent" android:layout_height="fill_parent" android:orientation="vertical" > <ImageButton android:id="@+id/image_button" android:layout_width="wrap_content" android:layout_height="wrap_content“ android:src=“@drawable/submit/” /> <Button android:id="@+id/button1“ android:layout_width="wrap_content" android:layout_height="wrap_content" android:text="@string/Cancel” /> </LinearLayout> 6
  • 7.
  • 8.
    Java Code ofExample package sl.mc; import android.os.Bundle; import android.app.Activity; import android.view.View; import android.view.View.OnClickListener; import android.widget.Button; import android.widget.ImageButton; import android.widget.Toast; public class MainActivity extends Activity { ImageButton button; Button button2; @Override protected void onCreate(Bundle savedInstanceState) { super.onCreate(savedInstanceState); setContentView(R.layout.activity_main); 8
  • 9.
    Cont… button=(ImageButton) findViewById(R.id.imageButton1); button2=(Button) findViewById(R.id.button1); button.setOnClickListener(new OnClickListener() { @Override public void onClick(View arg0) { // TODO Auto-generated method stub Toast.makeText(getApplicationContext(), "image button is click", Toast.LENGTH_LONG).show(); } }); 9
  • 10.
    Cont… button2.setOnClickListener(new OnClickListener(){ @Override public void onClick(View arg0) { // TODO Auto-generated method stub Toast.makeText(getApplicationContext(), "Cancel Button is click", Toast.LENGTH_LONG).show(); } }); } 10
  • 11.