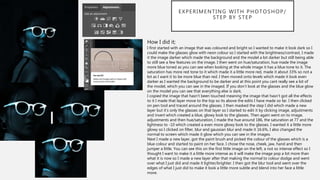
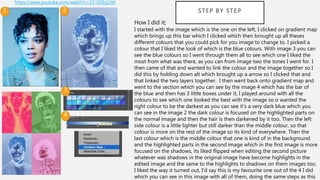
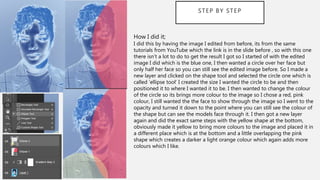
SlideShare a Scribd company logo
1 of 13
PROBLEM SOLVING
PRACTICAL AND TECHNICAL
PROBLEMS
Backing up:
Whilst doing my FMP I don’t want to lose any work during
it as it will slow me down, when I wanting to make sure im
up to date just incase I want to go back when I think of new
things. So by updating my work and saving it throughout
my work will stop this from happening. I will save it to the
computer, emails and memory stick.
Working from home:
If I fall behind at college I will make sure I will complete it to
keep up to date. I don’t have PowerPoint downloaded on my
computer or have photoshop so I have to do my writing work
on notes and then email it to myself. To fix this problem I will
make sure I really get my work completed so I don’t have to do
it at home or if that doesn’t work out then I will see if I can try
and download PowerPoint. However it didn’t work when I tired
last year.
Software:
At college I use Microsoft PowerPoint, all
my products that I will be making will be
created in photoshop. If the software that
I want to use doesn’t work, I will try and
restart the computer, if that doesn’t work
I will try another computer.
Storage:
My memory stick has 2 years full of work and has recently
become full. How I solved this problem was having to move
some of my first years work to the documents folder on finder
so I still have my first years work but its not taking up anymore
of my storage on my memory stick.
Power:
If the computer I’m using shuts off or crashes on me as I have mentioned
in the other situations that might happen, I will hopefully be remembering
to save my work regularly so if the power cuts off or the computer crashes
I will hopefully won’t lose too much, even if I don’t save my work that I
started on the day of the computer crashing I won’t be too far behind as I
will still remember what I was talking about and it will only lose a day
which is better than anything longer. If the computer freezes then in the
mean time I could think about what im going to do next on some paper so
im prepared with the next step im wanting to do so im not losing anymore
time.
Equipment:
I will be taking some photography of a
few people so I will use a college camera,
I will take an extra memory card. if
something goes wrong with the camera I
could use my phone or someone else’s
phone depending whose camera is better.
BACKING UP
Backing up is the most important when doing a big project especially this one. If my computer decided to
crash or files come corrupted which thankfully hasn’t happened to me before so im hoping it doesn’t this
time as it would be a pain to restart everything again. I can imagine it would take days to redo everything
from the beginning and remembering where you got information as its in the slides of the work. When I
find information that will help me a lot I like to make sure I put a lot of text with it to explain why I’ve got
this information and how it will help me in my project so having that lost will be really annoying to restart it
all. If I lost my work at the production part, near the end I wont have enough time to restart from the
beginning as that would have been 3 months lost and wont be able to do that in a week or 2 to prevent
this from happening, every day I will save my work to my memory stick, computer and email it to myself. If
anything des happen I will obviously try my hardest to get it back to where it was however there might not
even work and I will end up with my work not being what I wanting it to be like.
EQUIPMENT
The equipment that I will be using will be a camera, studio lights, tripod and a computer which I can get
from college as they have a large amount of equipment to use. If anything happens to where I cant get the
equipment Im wanting to use I could use my phone or another camera from someone else. Lights I could
use the daylight as I will be also doing some photos outside depending how that turns out I could continue
that if the lights aren’t working. Then with the tripod if I cant get one of them I still think my images will turn
out fine with myself just holding it, just taking my time taking them so im not shaking or anything that can
cause the image to look blurry or anything. I will also take another memory card and a battery with the
camera, if anything happens to the camera with the memory card storage gets full and the battery if the
camera is getting a low battery I will have a back up which won’t waste time having to find another one or
get another camera which might not be available.
POWER
Having a problem with the power hasn’t never happened to me before thankfully but it could happen and im
not sure how to solve it. Having a power problem could be anything to the computer crashing or there being a
power cut. The first thing I would do is to save my work regularly so if these situations do happen then at least
it wont be all gone I would just lose a little which will hopefully be fine to catch up with. I will try to remember
to save my work either every hour or every 20 minutes, could also do after every slide depending how long it
takes for each slide but then I know as soon as I finish a slide I know it will be saved as I will be saving a lot
during and after finishing it. If the computer crashes which could potential happen I will have saved my work so
I won’t have to stress about it too much. If this does happen I wont waste time complaining about it I will get
on with it and just try as hard to get to where it was before as I will be wasting more time it will have a
negative effect to my work. Again if this does happen then I could do things by hand planning what im
wanting to do next so I’m not wasting anymore time.
WORKING
FROM HOME
with working from home I have come across with some problems lie I have said before I haven’t got
PowerPoint or photoshop anything like that, that I would use at college at home. So when it comes to finishing
off a PowerPoint I have to write it on notes or on another type of software and then email it to my student
email and then transfer it over to the PowerPoint which is annoying but if im running behind that’s the only
way I can do it which is fine but takes more time when I have to copy it out when im back at college. When it
comes to production I have to do it at college I don’t have photoshop at home and that’s what I use, so there's
no way of me really doing it at home so I try my best to get to a good point of my production to the point
where I don’t have to continue it at home. I am going to try and see if there is a way to fix the problem of
PowerPoint on my computer to see if it would let me download it as it wouldn’t let me last time as it will make
it a lot easier for myself, as it will save a lo of time writing it back out on the actual place its meant to be. It
waste a bit of time but at least its got to do with my work but I could move on to another part of my work
without doing the copying part.
THEORETICAL PROBLEMS
Weather/location:
With the weather situation im wanting it to be a nice day so no wind or rain, blue skies so when I take the picture the lighting is bright so its easy to see
the images. That would be the best weather for me as it’ll just make it look clearer to look at and just nice to look at. Having nice weather just makes
things look nicer and happier where if the weather was bad it’ll look dark, very depressing looking. If this does happen with the horrible weather it might
still work as my work isn’t really based on one thing, how im wanting to do graphic design effects so if it is dark and depressing outside I might be able
to change that style of image into something cool looking so it might not be a bad thing but id rather have a nicer day as I will have a wider range of
things to do to it.
The location part to my work is anywhere really, if im doing more of a close up of someone then I will want it to be in the studio at college as you can
choose a white/black background which is helpful. If I want to do a photo outside to create a cool effect which I have gotten a few ideas from when I was
doing my research, so either in a town or woods depending what I'm trying to make.
Production time:
The deadline with the FMP is very important to stick to as it will help if
anything happens to your work or you become ill or anything you will be able
to have time to go and fix it or to catch up you won’t be missing too much
work as you have stuck to the deadline. I want to make sure that all the writing
work is completed before I do my production work as I want to really focus on
that part the most. I also think with the time management altogether is
important because its important to get all your work done to its best standards
before moving on to do something different as it will get confusing when
going back especially when doing this project. Will help when it comes to
missing days or something happens with your work then it won’t be too bad to
get back to where you were as you’re up to date with everything.
Models:
Making sure I have enough models, male and females for my
work and making sure that they know what to do and where to
go and wear which is important for me as it will help me when it
comes to taking my image I want everything to be sorted so im
not having to change the dates to taking the images or not
getting the image I want because they’re not wearing the create
clothes I Imaginate when planning.
Transport:
When planning with my models to get a
place to meet I want to make sure that
it’s on a responsible day where
transports are currently running and can
get when we want to. I’ve experienced
this before where someone train got
canceled so we had to organize another
day, as we wanted it at specific place,
time and location.
Refreshments:
Making sure when I’m out getting my
images with my models to have
refreshments as we might not know how
long we’re going to be out for, so need
to make sure were all energized and
hydrated which important as we’re going
to be outside taking the photos.
PRODUCTION TIME
MODELS
Deadlines for production is important as its really important that part as you’re showing what you have been
talking about for months so making sure what you have spoken about in your other pieces of work look
good and is going to look amazing, having to actual create that is important as you can now show what
your ideas were come to life. I’m wanting to make sure that all my writing work is done before making the
products, I want to just focus on my production and nothing else. I will have 7 weeks to finish my product I
will want to make sure I have all my ideas for the amount of pages I wanting to do. Im hoping to get loads
of graphic design details done during this time maybe make more than I was planning if I found I don’t have
enough or I still have time and want to make more. If I don’t complete my production time, I will try my
hardest to see if I can complete it before the invigilator come in to see our work. Im also not in on Mondays
and Wednesdays so if I’m still behind then I can come in everyday to get it finished. This is a longer
production time so I think I should be able to get it done so I think there will not be a problem with the
production time. The worse thing that can happen is not making my product the best it can be.
With my work I’m wanting models to create what im wanting to do. It’s not necessary as I could be the
model myself as most of the ideas I would like to do can be created by myself so if there is a problem with
getting models or the model not being able to get there or they cancel last minute I could replace them. I
don’t usually like being a model for my work as I find it easier to have other people, plus im not a huge fan
editing myself as I don’t like being in photos so its just better to have someone else I don’t feel
uncomfortable editing my face. The problems to the models like I have mentioned they can either cancel or
not turn up without letting me know, might not be able to get there which is linked with the transport part
which I will talk about. I will have to make sure that there’s a date, time and place planned so everyone
knows what’s happening. Will also have to make sure that I have said to them what I would like them to
wear which again isn’t that important as most of my work will be edited into weird graphic design effects so
it might not be a much of a problem.
WEATHER/LOCATION
TRANSPORT
Weather is important in my case as I will want to take a few images outside as I have some things planned so
the weather needs to be nice as it will look a lot better. If the weather is nice it will help a lot with the lighting
as I will have to rely on the light to make sure the image is bright enough and it will just make the image a lot
nicer as it will be bright ad bring out the colours rather it being dark and gloomy which will create a
depressing look to it which Is not what were wanting. Obviously if the day we have picked turns out it’s going
to be raining or look dark out then I might have to change the day we planned if I can, if that doesn’t turn out
okay then I will have to change the idea I had and maybe do something in the studio.
Location is important again as I have planned mine to be in a house, college studio and outside, so the house
situation is my brothers so I will have to plan to see when I can go over and seeing if my model is available
that day to come as well as he has a prop that I would like to use. College studio is more for a professional
look, more for the front cover and then outside for some street effects so I think the locations will be fine and
wont cause too much of a problem. Maybe my brothers house might be hard but I think then it still will be
fine as the model im wanting to use is part of my family.
The transport is again important when it comes to taking pictures as I will have to make sure myself and my
models are all getting the correct bus and correct time, making sure we’re meeting at the same place and
then can just start with taking the photos. Im hoping that the day is nice as well as it can become busier
when its raining as people will want to go out and not get wet so they decide to drive or get the public bus.
We will most likely be doing this on a weekend or on the days we’re off, I personally think the weekend will
be really busy as its something to do on the weekends to go out, however if we did it on our days off so
Mondays and Wednesdays it might be quieter as people will be at school and work so it might be better as
it will be quieter.
EXPERIMENTS
EXPERIMENTING WITH PHOTOSHOP/
STEP BY STEP
How I did it;
I first started with an image that was coloured and bright so I wanted to make it look dark so I
could make the glasses glow with neon colour so I started with the brightness/contrast, I made
it the image darker which made the background and the model a lot darker but still being able
to still see a few features on the image. I then went on hue/saturation, hue made the image
more blue toned as you can see when looking at the whole image it has a blue tone to it. The
saturation has more red tone to it which made it a little more red, made it about 33% so not a
lot as I want it to be more blue than red. I then moved onto levels which made it look even
darker as I wanted the background to be darker and at this point you cant really see a lot of
the model, which you can see in the imaged. If you don’t look at the glasses and the blue glow
on the model you can see that everything else is dark.
I copied the image that hasn’t been touched meaning the image that hasn’t got all the effects
to it I made that layer move to the top so its above the edits I have made so far. I then clicked
on pen tool and traced around the glasses. I then masked the step I did which made a new
layer but it’s only the glasses on that layer so I started to edit it by clicking image, adjustments
and invert which created a blue, glowy look to the glasses. Then again went on to image,
adjustments and then hue/saturation, I made the hue around 186, the saturation at 77 and the
lightness to -10 which created a even more glowy look to the glasses. I wanted it a little more
glowy so I clicked on filter, blur and gaussian blur and made it 16.6%, I also changed the
normal to screen which made it glow which you can see in the images.
Next I made a new layer, got the paint brush and picked the colour of the glasses which is a
blue colour and started to paint on her face. I chose the nose, cheek, jaw, hand and then
jumper a little. You can see this on the first little image on the left, a not so intense effect so I
thought I want to make it a little more intense as it will make the image pop a lot more than
what it is now so I made a new layer after that making the normal to colour dodge and went
over what I just did and made it lighter/brighter. I then got the blur tool and went over the
edges of what I just did to make it look a little more subtle and blend into her face a little
more.
STEP BY STEP
https://www.youtube.com/watch?v=27-XSSrj2rM
How I did it;
I started with the image which is the one on the left, I clicked on gradient map
which brings up this bar which I clicked which then brought up all theses
different colours that you could pick for you image to change to. I picked a
colour that I liked the look of which is the blue colours. With image 3 you can
see the blue colours so I went through them all to see which one I liked the
most from what was there, as you can from image two the tones I went for. I
then came of that and wanted to link the colour and the image together so I
did this by holding down alt which brought up a arrow so I clicked that and
that linked the two layers together. I then went back onto gradient map and
went to the section which you can see by the image 4 which has the bar of
the blue and then has 3 little boxes under it, I played around with all the
colours to see which one looked the best with the image so o wanted the
right colour to be the darkest as you can see it’s a very dark blue which you
can see in the image 2 the dark colour is focused on the highlighted parts on
the normal image and then the hair is then darkened by it too. Then the left
side colour is a little lighter but still darker than the middle colour, so that
colour is more on the rest of the image so its kind of everywhere. Then the
last colour which is the middle colour that one is kind of in the background
and the highlighted parts in the second image which in the first image is more
focused on the shadows, its liked flipped when editing the second picture
whatever was shadows in the original image have become highlights in the
edited image and the same to the highlights to shadows on them images too.
I liked the way it turned out, I'd say this is my favourite one out of the 4 I did
which you can see in this image with all of them, doing the same steps as this
1 2
3
4
STEP BY STEP
How I did it;
I did this by having the image I edited from before, its from the same
tutorials from YouTube which the link is in the slide before , so with this one
there isn’t a lot to do to get the result I got so I started of with the edited
image I did which is the blue one, I then wanted a circle over her face but
only half her face so you can still see the edited image before. So I made a
new layer and clicked on the shape tool and selected the circle one which is
called ‘ellipse tool’ I created the size I wanted the circle to be and then
positioned it to where I wanted it to be. I then wanted to change the colour
of the circle so its brings more colour to the image so I chose a red, pink
colour, I still wanted the the face to show through the image so I went to the
opacity and turned it down to the point where you can still see the colour of
the shape but can see the models face through it. I then got a new layer
again and did the exact same steps with the yellow shape at the bottom,
obviously made it yellow to bring more colours to the image and placed it in
a different place which is at the bottom and a little overlapping the pink
shape which creates a darker a light orange colour which again adds more
colours which I like.
STEP BY STEP
https://www.youtube.com/watch?v=5ogHpgHyHnI
1 2
3
4
5
6 7
8
First step I did was get an image of some flowers I wanted and
started to edit the background to it as it had a background colour I
didn’t like and I just wanted the flowers on their own so I used the
polygonal tool which I wasn't sure if that was the right tool to use
but it worked for me so I stuck with that. When I had the flowers by
themselves I then wanted to add a background colour which I chose
a orange colour as you can see, I feel that it gives a really nice
contrast with the rest of the colours of the flowers so I stuck with
that one. I then got the shape tool which was the rectangle shape
and made the shape to go over the flowers to see what size I wanted
it to be, I went onto properties and I got rid of the inside of theshape and then chose the colour for the boarder of the shape which I chose a yellow colour again to
add more colours to the image, I found that the thickness of the boarder wasn’t thick enough so I
made it bigger so you could se it better which you can see in image 3. I then clicked on the rectangle
layer and made a mask icon so I can then give the illustration that some of the flowers are on top of
the boarder. I did this by getting the rubber tool and removed a bit of the boarder where I wanted a
bit of the flower/plant to look like its on top. I then used the paint brush so if I removed either too
much or it was messy looking I used the paint tool to add the boarder back to make it look like the
plant is coming above the boarder. I did this on each side of the boarder too but in different places to
it looks nicer as you can see in image 3 again you can see that it looks like the flowers are above the
boarder. Before moving on, away from the flowers I wanted to add some drop shadows to make the
flowers look like they’re coming out of the page to make it look like it has a 3D effect, I did this by
double clicking on the layer and went to drop shadow and messed around to see where I wanted the
shadows to come from and then went into outer glow to create more effects which you ca see from
image 2. I then added text to it by clicking the tool T and types out the letters the person was typing
out on the tutorial I was watching which you can see on image 7 and placed them in the same order
the person did. I did the exact same as the boarder but on the letters and made some of the plants to
overlap on the letters to make it look like the letters are getting buried a little which I like the look of a
lot. The last thing I did was added a outer glow to them so you can see the letters a little better with a
PROBLEMS WITH THE EXPERIMENTS
I have done a few experiments to see if there were any problems I need to practice or if there were any general problems
when I was on the software. So finding the tutorials I was interested in, there were no problems to that which was good. The
tutorials I picked, some of them were a little confusing as I had to keep going back to see what they did/say as they were
either too fast or wasn’t very clear when following so I struggled with that but that’s not a problem with anything to do with
the computer or anything that’s more me and the people I was watching. However there’s no problem going back to the
steps as I can see what I might of missed or could perfect a little more. When I was making the photoshops I kept forgetting
to save as I’m too focused on making them so when it came to finishing my work then saving it, I realised I haven’t been
saving and it took a lot longer to save which made me worry that it had frozen loading to save. Luckily it saved and its not
frozen anymore but it has reminded myself to keep saving thought the work. To remind myself as well if it do keep
forgetting I will set reminders on my phone every 10 minutes so I don’t lose any work especially when its my final project so
I need to make sure its saved as it will be annoying to go back and redo it when im on a time balance.

More Related Content

What's hot

Schedule and resources
Schedule and resourcesSchedule and resources
Schedule and resourcesOliviaBolt
 
What I Have Learnt About The Use Of Technologies & How Have I Used Them
What I Have Learnt About The Use Of Technologies & How Have I Used ThemWhat I Have Learnt About The Use Of Technologies & How Have I Used Them
What I Have Learnt About The Use Of Technologies & How Have I Used Themvcongram
 
Evaluation 6. pp
Evaluation 6. ppEvaluation 6. pp
Evaluation 6. ppUche365
 
My evaluationghngednh
My evaluationghngednhMy evaluationghngednh
My evaluationghngednhsrethah
 
Evaluation Question 6
Evaluation Question 6 Evaluation Question 6
Evaluation Question 6 Liam Kelly
 
Question Six Evaluation.
Question Six Evaluation.Question Six Evaluation.
Question Six Evaluation.bethanyfox95
 
production reflection
production reflectionproduction reflection
production reflectionTom Batty
 
What have you learnt about technologies from the process of making this product?
What have you learnt about technologies from the process of making this product?What have you learnt about technologies from the process of making this product?
What have you learnt about technologies from the process of making this product?Paigiee
 
Problem solving ( part of college project)
Problem solving ( part of college project)Problem solving ( part of college project)
Problem solving ( part of college project)Ben Harris
 
What have you learnt about technologies from the process of constructing this...
What have you learnt about technologies from the process of constructing this...What have you learnt about technologies from the process of constructing this...
What have you learnt about technologies from the process of constructing this...cheekymonkey51511
 
Media question 2
Media question 2Media question 2
Media question 2asmediac15
 

What's hot (17)

Schedule and resources
Schedule and resourcesSchedule and resources
Schedule and resources
 
What I Have Learnt About The Use Of Technologies & How Have I Used Them
What I Have Learnt About The Use Of Technologies & How Have I Used ThemWhat I Have Learnt About The Use Of Technologies & How Have I Used Them
What I Have Learnt About The Use Of Technologies & How Have I Used Them
 
Evaluation 6. pp
Evaluation 6. ppEvaluation 6. pp
Evaluation 6. pp
 
My evaluationghngednh
My evaluationghngednhMy evaluationghngednh
My evaluationghngednh
 
Evaluation Question 6
Evaluation Question 6 Evaluation Question 6
Evaluation Question 6
 
Question Six Evaluation.
Question Six Evaluation.Question Six Evaluation.
Question Six Evaluation.
 
Problem Solving
Problem SolvingProblem Solving
Problem Solving
 
production reflection
production reflectionproduction reflection
production reflection
 
What have you learnt about technologies from the process of making this product?
What have you learnt about technologies from the process of making this product?What have you learnt about technologies from the process of making this product?
What have you learnt about technologies from the process of making this product?
 
Problem solving ( part of college project)
Problem solving ( part of college project)Problem solving ( part of college project)
Problem solving ( part of college project)
 
Question 6.
Question 6.Question 6.
Question 6.
 
What have you learnt about technologies from the process of constructing this...
What have you learnt about technologies from the process of constructing this...What have you learnt about technologies from the process of constructing this...
What have you learnt about technologies from the process of constructing this...
 
Personal skill audit
Personal skill auditPersonal skill audit
Personal skill audit
 
Media question 2
Media question 2Media question 2
Media question 2
 
Question 4
Question 4Question 4
Question 4
 
5. problem solving
5. problem solving5. problem solving
5. problem solving
 
Problem solving
Problem solvingProblem solving
Problem solving
 

Similar to Problem Solving (20)

Problem solving
Problem solvingProblem solving
Problem solving
 
Problem solving 2
 Problem solving 2 Problem solving 2
Problem solving 2
 
Problem solving
Problem solvingProblem solving
Problem solving
 
Problem solving
Problem solvingProblem solving
Problem solving
 
Problem solving
Problem solvingProblem solving
Problem solving
 
Problem Solving
Problem Solving Problem Solving
Problem Solving
 
Problem solving
Problem solvingProblem solving
Problem solving
 
Problem Solving
Problem SolvingProblem Solving
Problem Solving
 
5. pre production
5. pre production5. pre production
5. pre production
 
Problem Solving.pptx
Problem Solving.pptxProblem Solving.pptx
Problem Solving.pptx
 
Problem Solving.pptx
Problem Solving.pptxProblem Solving.pptx
Problem Solving.pptx
 
Problem solving
Problem solvingProblem solving
Problem solving
 
Problem solving
Problem solving Problem solving
Problem solving
 
Problem Solving
Problem SolvingProblem Solving
Problem Solving
 
Problem Solving.pptx
Problem Solving.pptxProblem Solving.pptx
Problem Solving.pptx
 
Problem Solving.pptx
Problem Solving.pptxProblem Solving.pptx
Problem Solving.pptx
 
3. Problem Solvingand Experiments.pptx
3. Problem Solvingand Experiments.pptx3. Problem Solvingand Experiments.pptx
3. Problem Solvingand Experiments.pptx
 
Problem solving
Problem solvingProblem solving
Problem solving
 
Problem solving (Updated)
Problem solving (Updated)Problem solving (Updated)
Problem solving (Updated)
 
Problem solving (final)
Problem solving (final)Problem solving (final)
Problem solving (final)
 

More from Imogen Minto (20)

Research
Research Research
Research
 
Diary Week
Diary Week Diary Week
Diary Week
 
Research
Research Research
Research
 
Diary Week
Diary Week Diary Week
Diary Week
 
2nd Year Prep
2nd Year Prep2nd Year Prep
2nd Year Prep
 
Pre Production
Pre ProductionPre Production
Pre Production
 
Diary week
Diary week Diary week
Diary week
 
2nd year prep
2nd year prep2nd year prep
2nd year prep
 
Research
Research Research
Research
 
Research
Research Research
Research
 
Research
Research Research
Research
 
Fmp Proposal
Fmp ProposalFmp Proposal
Fmp Proposal
 
Fmp Theory
Fmp Theory Fmp Theory
Fmp Theory
 
Grade Response
Grade ResponseGrade Response
Grade Response
 
2nd year prep
2nd year prep2nd year prep
2nd year prep
 
Evaluation
EvaluationEvaluation
Evaluation
 
Print Pro Forma
Print Pro FormaPrint Pro Forma
Print Pro Forma
 
Production Reflection
Production ReflectionProduction Reflection
Production Reflection
 
Research
ResearchResearch
Research
 
Production Reflection
Production ReflectionProduction Reflection
Production Reflection
 

Recently uploaded

microwave assisted reaction. General introduction
microwave assisted reaction. General introductionmicrowave assisted reaction. General introduction
microwave assisted reaction. General introductionMaksud Ahmed
 
Software Engineering Methodologies (overview)
Software Engineering Methodologies (overview)Software Engineering Methodologies (overview)
Software Engineering Methodologies (overview)eniolaolutunde
 
Alper Gobel In Media Res Media Component
Alper Gobel In Media Res Media ComponentAlper Gobel In Media Res Media Component
Alper Gobel In Media Res Media ComponentInMediaRes1
 
URLs and Routing in the Odoo 17 Website App
URLs and Routing in the Odoo 17 Website AppURLs and Routing in the Odoo 17 Website App
URLs and Routing in the Odoo 17 Website AppCeline George
 
How to Configure Email Server in Odoo 17
How to Configure Email Server in Odoo 17How to Configure Email Server in Odoo 17
How to Configure Email Server in Odoo 17Celine George
 
MENTAL STATUS EXAMINATION format.docx
MENTAL     STATUS EXAMINATION format.docxMENTAL     STATUS EXAMINATION format.docx
MENTAL STATUS EXAMINATION format.docxPoojaSen20
 
18-04-UA_REPORT_MEDIALITERAСY_INDEX-DM_23-1-final-eng.pdf
18-04-UA_REPORT_MEDIALITERAСY_INDEX-DM_23-1-final-eng.pdf18-04-UA_REPORT_MEDIALITERAСY_INDEX-DM_23-1-final-eng.pdf
18-04-UA_REPORT_MEDIALITERAСY_INDEX-DM_23-1-final-eng.pdfssuser54595a
 
Solving Puzzles Benefits Everyone (English).pptx
Solving Puzzles Benefits Everyone (English).pptxSolving Puzzles Benefits Everyone (English).pptx
Solving Puzzles Benefits Everyone (English).pptxOH TEIK BIN
 
CARE OF CHILD IN INCUBATOR..........pptx
CARE OF CHILD IN INCUBATOR..........pptxCARE OF CHILD IN INCUBATOR..........pptx
CARE OF CHILD IN INCUBATOR..........pptxGaneshChakor2
 
Sanyam Choudhary Chemistry practical.pdf
Sanyam Choudhary Chemistry practical.pdfSanyam Choudhary Chemistry practical.pdf
Sanyam Choudhary Chemistry practical.pdfsanyamsingh5019
 
Incoming and Outgoing Shipments in 1 STEP Using Odoo 17
Incoming and Outgoing Shipments in 1 STEP Using Odoo 17Incoming and Outgoing Shipments in 1 STEP Using Odoo 17
Incoming and Outgoing Shipments in 1 STEP Using Odoo 17Celine George
 
Class 11 Legal Studies Ch-1 Concept of State .pdf
Class 11 Legal Studies Ch-1 Concept of State .pdfClass 11 Legal Studies Ch-1 Concept of State .pdf
Class 11 Legal Studies Ch-1 Concept of State .pdfakmcokerachita
 
Presentation by Andreas Schleicher Tackling the School Absenteeism Crisis 30 ...
Presentation by Andreas Schleicher Tackling the School Absenteeism Crisis 30 ...Presentation by Andreas Schleicher Tackling the School Absenteeism Crisis 30 ...
Presentation by Andreas Schleicher Tackling the School Absenteeism Crisis 30 ...EduSkills OECD
 
Accessible design: Minimum effort, maximum impact
Accessible design: Minimum effort, maximum impactAccessible design: Minimum effort, maximum impact
Accessible design: Minimum effort, maximum impactdawncurless
 
Enzyme, Pharmaceutical Aids, Miscellaneous Last Part of Chapter no 5th.pdf
Enzyme, Pharmaceutical Aids, Miscellaneous Last Part of Chapter no 5th.pdfEnzyme, Pharmaceutical Aids, Miscellaneous Last Part of Chapter no 5th.pdf
Enzyme, Pharmaceutical Aids, Miscellaneous Last Part of Chapter no 5th.pdfSumit Tiwari
 
The basics of sentences session 2pptx copy.pptx
The basics of sentences session 2pptx copy.pptxThe basics of sentences session 2pptx copy.pptx
The basics of sentences session 2pptx copy.pptxheathfieldcps1
 
Contemporary philippine arts from the regions_PPT_Module_12 [Autosaved] (1).pptx
Contemporary philippine arts from the regions_PPT_Module_12 [Autosaved] (1).pptxContemporary philippine arts from the regions_PPT_Module_12 [Autosaved] (1).pptx
Contemporary philippine arts from the regions_PPT_Module_12 [Autosaved] (1).pptxRoyAbrique
 

Recently uploaded (20)

microwave assisted reaction. General introduction
microwave assisted reaction. General introductionmicrowave assisted reaction. General introduction
microwave assisted reaction. General introduction
 
Software Engineering Methodologies (overview)
Software Engineering Methodologies (overview)Software Engineering Methodologies (overview)
Software Engineering Methodologies (overview)
 
Alper Gobel In Media Res Media Component
Alper Gobel In Media Res Media ComponentAlper Gobel In Media Res Media Component
Alper Gobel In Media Res Media Component
 
URLs and Routing in the Odoo 17 Website App
URLs and Routing in the Odoo 17 Website AppURLs and Routing in the Odoo 17 Website App
URLs and Routing in the Odoo 17 Website App
 
How to Configure Email Server in Odoo 17
How to Configure Email Server in Odoo 17How to Configure Email Server in Odoo 17
How to Configure Email Server in Odoo 17
 
MENTAL STATUS EXAMINATION format.docx
MENTAL     STATUS EXAMINATION format.docxMENTAL     STATUS EXAMINATION format.docx
MENTAL STATUS EXAMINATION format.docx
 
Código Creativo y Arte de Software | Unidad 1
Código Creativo y Arte de Software | Unidad 1Código Creativo y Arte de Software | Unidad 1
Código Creativo y Arte de Software | Unidad 1
 
18-04-UA_REPORT_MEDIALITERAСY_INDEX-DM_23-1-final-eng.pdf
18-04-UA_REPORT_MEDIALITERAСY_INDEX-DM_23-1-final-eng.pdf18-04-UA_REPORT_MEDIALITERAСY_INDEX-DM_23-1-final-eng.pdf
18-04-UA_REPORT_MEDIALITERAСY_INDEX-DM_23-1-final-eng.pdf
 
Solving Puzzles Benefits Everyone (English).pptx
Solving Puzzles Benefits Everyone (English).pptxSolving Puzzles Benefits Everyone (English).pptx
Solving Puzzles Benefits Everyone (English).pptx
 
CARE OF CHILD IN INCUBATOR..........pptx
CARE OF CHILD IN INCUBATOR..........pptxCARE OF CHILD IN INCUBATOR..........pptx
CARE OF CHILD IN INCUBATOR..........pptx
 
9953330565 Low Rate Call Girls In Rohini Delhi NCR
9953330565 Low Rate Call Girls In Rohini  Delhi NCR9953330565 Low Rate Call Girls In Rohini  Delhi NCR
9953330565 Low Rate Call Girls In Rohini Delhi NCR
 
Sanyam Choudhary Chemistry practical.pdf
Sanyam Choudhary Chemistry practical.pdfSanyam Choudhary Chemistry practical.pdf
Sanyam Choudhary Chemistry practical.pdf
 
Incoming and Outgoing Shipments in 1 STEP Using Odoo 17
Incoming and Outgoing Shipments in 1 STEP Using Odoo 17Incoming and Outgoing Shipments in 1 STEP Using Odoo 17
Incoming and Outgoing Shipments in 1 STEP Using Odoo 17
 
Class 11 Legal Studies Ch-1 Concept of State .pdf
Class 11 Legal Studies Ch-1 Concept of State .pdfClass 11 Legal Studies Ch-1 Concept of State .pdf
Class 11 Legal Studies Ch-1 Concept of State .pdf
 
Presentation by Andreas Schleicher Tackling the School Absenteeism Crisis 30 ...
Presentation by Andreas Schleicher Tackling the School Absenteeism Crisis 30 ...Presentation by Andreas Schleicher Tackling the School Absenteeism Crisis 30 ...
Presentation by Andreas Schleicher Tackling the School Absenteeism Crisis 30 ...
 
Model Call Girl in Tilak Nagar Delhi reach out to us at 🔝9953056974🔝
Model Call Girl in Tilak Nagar Delhi reach out to us at 🔝9953056974🔝Model Call Girl in Tilak Nagar Delhi reach out to us at 🔝9953056974🔝
Model Call Girl in Tilak Nagar Delhi reach out to us at 🔝9953056974🔝
 
Accessible design: Minimum effort, maximum impact
Accessible design: Minimum effort, maximum impactAccessible design: Minimum effort, maximum impact
Accessible design: Minimum effort, maximum impact
 
Enzyme, Pharmaceutical Aids, Miscellaneous Last Part of Chapter no 5th.pdf
Enzyme, Pharmaceutical Aids, Miscellaneous Last Part of Chapter no 5th.pdfEnzyme, Pharmaceutical Aids, Miscellaneous Last Part of Chapter no 5th.pdf
Enzyme, Pharmaceutical Aids, Miscellaneous Last Part of Chapter no 5th.pdf
 
The basics of sentences session 2pptx copy.pptx
The basics of sentences session 2pptx copy.pptxThe basics of sentences session 2pptx copy.pptx
The basics of sentences session 2pptx copy.pptx
 
Contemporary philippine arts from the regions_PPT_Module_12 [Autosaved] (1).pptx
Contemporary philippine arts from the regions_PPT_Module_12 [Autosaved] (1).pptxContemporary philippine arts from the regions_PPT_Module_12 [Autosaved] (1).pptx
Contemporary philippine arts from the regions_PPT_Module_12 [Autosaved] (1).pptx
 

Problem Solving

  • 2. PRACTICAL AND TECHNICAL PROBLEMS Backing up: Whilst doing my FMP I don’t want to lose any work during it as it will slow me down, when I wanting to make sure im up to date just incase I want to go back when I think of new things. So by updating my work and saving it throughout my work will stop this from happening. I will save it to the computer, emails and memory stick. Working from home: If I fall behind at college I will make sure I will complete it to keep up to date. I don’t have PowerPoint downloaded on my computer or have photoshop so I have to do my writing work on notes and then email it to myself. To fix this problem I will make sure I really get my work completed so I don’t have to do it at home or if that doesn’t work out then I will see if I can try and download PowerPoint. However it didn’t work when I tired last year. Software: At college I use Microsoft PowerPoint, all my products that I will be making will be created in photoshop. If the software that I want to use doesn’t work, I will try and restart the computer, if that doesn’t work I will try another computer. Storage: My memory stick has 2 years full of work and has recently become full. How I solved this problem was having to move some of my first years work to the documents folder on finder so I still have my first years work but its not taking up anymore of my storage on my memory stick. Power: If the computer I’m using shuts off or crashes on me as I have mentioned in the other situations that might happen, I will hopefully be remembering to save my work regularly so if the power cuts off or the computer crashes I will hopefully won’t lose too much, even if I don’t save my work that I started on the day of the computer crashing I won’t be too far behind as I will still remember what I was talking about and it will only lose a day which is better than anything longer. If the computer freezes then in the mean time I could think about what im going to do next on some paper so im prepared with the next step im wanting to do so im not losing anymore time. Equipment: I will be taking some photography of a few people so I will use a college camera, I will take an extra memory card. if something goes wrong with the camera I could use my phone or someone else’s phone depending whose camera is better.
  • 3. BACKING UP Backing up is the most important when doing a big project especially this one. If my computer decided to crash or files come corrupted which thankfully hasn’t happened to me before so im hoping it doesn’t this time as it would be a pain to restart everything again. I can imagine it would take days to redo everything from the beginning and remembering where you got information as its in the slides of the work. When I find information that will help me a lot I like to make sure I put a lot of text with it to explain why I’ve got this information and how it will help me in my project so having that lost will be really annoying to restart it all. If I lost my work at the production part, near the end I wont have enough time to restart from the beginning as that would have been 3 months lost and wont be able to do that in a week or 2 to prevent this from happening, every day I will save my work to my memory stick, computer and email it to myself. If anything des happen I will obviously try my hardest to get it back to where it was however there might not even work and I will end up with my work not being what I wanting it to be like. EQUIPMENT The equipment that I will be using will be a camera, studio lights, tripod and a computer which I can get from college as they have a large amount of equipment to use. If anything happens to where I cant get the equipment Im wanting to use I could use my phone or another camera from someone else. Lights I could use the daylight as I will be also doing some photos outside depending how that turns out I could continue that if the lights aren’t working. Then with the tripod if I cant get one of them I still think my images will turn out fine with myself just holding it, just taking my time taking them so im not shaking or anything that can cause the image to look blurry or anything. I will also take another memory card and a battery with the camera, if anything happens to the camera with the memory card storage gets full and the battery if the camera is getting a low battery I will have a back up which won’t waste time having to find another one or get another camera which might not be available.
  • 4. POWER Having a problem with the power hasn’t never happened to me before thankfully but it could happen and im not sure how to solve it. Having a power problem could be anything to the computer crashing or there being a power cut. The first thing I would do is to save my work regularly so if these situations do happen then at least it wont be all gone I would just lose a little which will hopefully be fine to catch up with. I will try to remember to save my work either every hour or every 20 minutes, could also do after every slide depending how long it takes for each slide but then I know as soon as I finish a slide I know it will be saved as I will be saving a lot during and after finishing it. If the computer crashes which could potential happen I will have saved my work so I won’t have to stress about it too much. If this does happen I wont waste time complaining about it I will get on with it and just try as hard to get to where it was before as I will be wasting more time it will have a negative effect to my work. Again if this does happen then I could do things by hand planning what im wanting to do next so I’m not wasting anymore time. WORKING FROM HOME with working from home I have come across with some problems lie I have said before I haven’t got PowerPoint or photoshop anything like that, that I would use at college at home. So when it comes to finishing off a PowerPoint I have to write it on notes or on another type of software and then email it to my student email and then transfer it over to the PowerPoint which is annoying but if im running behind that’s the only way I can do it which is fine but takes more time when I have to copy it out when im back at college. When it comes to production I have to do it at college I don’t have photoshop at home and that’s what I use, so there's no way of me really doing it at home so I try my best to get to a good point of my production to the point where I don’t have to continue it at home. I am going to try and see if there is a way to fix the problem of PowerPoint on my computer to see if it would let me download it as it wouldn’t let me last time as it will make it a lot easier for myself, as it will save a lo of time writing it back out on the actual place its meant to be. It waste a bit of time but at least its got to do with my work but I could move on to another part of my work without doing the copying part.
  • 5. THEORETICAL PROBLEMS Weather/location: With the weather situation im wanting it to be a nice day so no wind or rain, blue skies so when I take the picture the lighting is bright so its easy to see the images. That would be the best weather for me as it’ll just make it look clearer to look at and just nice to look at. Having nice weather just makes things look nicer and happier where if the weather was bad it’ll look dark, very depressing looking. If this does happen with the horrible weather it might still work as my work isn’t really based on one thing, how im wanting to do graphic design effects so if it is dark and depressing outside I might be able to change that style of image into something cool looking so it might not be a bad thing but id rather have a nicer day as I will have a wider range of things to do to it. The location part to my work is anywhere really, if im doing more of a close up of someone then I will want it to be in the studio at college as you can choose a white/black background which is helpful. If I want to do a photo outside to create a cool effect which I have gotten a few ideas from when I was doing my research, so either in a town or woods depending what I'm trying to make. Production time: The deadline with the FMP is very important to stick to as it will help if anything happens to your work or you become ill or anything you will be able to have time to go and fix it or to catch up you won’t be missing too much work as you have stuck to the deadline. I want to make sure that all the writing work is completed before I do my production work as I want to really focus on that part the most. I also think with the time management altogether is important because its important to get all your work done to its best standards before moving on to do something different as it will get confusing when going back especially when doing this project. Will help when it comes to missing days or something happens with your work then it won’t be too bad to get back to where you were as you’re up to date with everything. Models: Making sure I have enough models, male and females for my work and making sure that they know what to do and where to go and wear which is important for me as it will help me when it comes to taking my image I want everything to be sorted so im not having to change the dates to taking the images or not getting the image I want because they’re not wearing the create clothes I Imaginate when planning. Transport: When planning with my models to get a place to meet I want to make sure that it’s on a responsible day where transports are currently running and can get when we want to. I’ve experienced this before where someone train got canceled so we had to organize another day, as we wanted it at specific place, time and location. Refreshments: Making sure when I’m out getting my images with my models to have refreshments as we might not know how long we’re going to be out for, so need to make sure were all energized and hydrated which important as we’re going to be outside taking the photos.
  • 6. PRODUCTION TIME MODELS Deadlines for production is important as its really important that part as you’re showing what you have been talking about for months so making sure what you have spoken about in your other pieces of work look good and is going to look amazing, having to actual create that is important as you can now show what your ideas were come to life. I’m wanting to make sure that all my writing work is done before making the products, I want to just focus on my production and nothing else. I will have 7 weeks to finish my product I will want to make sure I have all my ideas for the amount of pages I wanting to do. Im hoping to get loads of graphic design details done during this time maybe make more than I was planning if I found I don’t have enough or I still have time and want to make more. If I don’t complete my production time, I will try my hardest to see if I can complete it before the invigilator come in to see our work. Im also not in on Mondays and Wednesdays so if I’m still behind then I can come in everyday to get it finished. This is a longer production time so I think I should be able to get it done so I think there will not be a problem with the production time. The worse thing that can happen is not making my product the best it can be. With my work I’m wanting models to create what im wanting to do. It’s not necessary as I could be the model myself as most of the ideas I would like to do can be created by myself so if there is a problem with getting models or the model not being able to get there or they cancel last minute I could replace them. I don’t usually like being a model for my work as I find it easier to have other people, plus im not a huge fan editing myself as I don’t like being in photos so its just better to have someone else I don’t feel uncomfortable editing my face. The problems to the models like I have mentioned they can either cancel or not turn up without letting me know, might not be able to get there which is linked with the transport part which I will talk about. I will have to make sure that there’s a date, time and place planned so everyone knows what’s happening. Will also have to make sure that I have said to them what I would like them to wear which again isn’t that important as most of my work will be edited into weird graphic design effects so it might not be a much of a problem.
  • 7. WEATHER/LOCATION TRANSPORT Weather is important in my case as I will want to take a few images outside as I have some things planned so the weather needs to be nice as it will look a lot better. If the weather is nice it will help a lot with the lighting as I will have to rely on the light to make sure the image is bright enough and it will just make the image a lot nicer as it will be bright ad bring out the colours rather it being dark and gloomy which will create a depressing look to it which Is not what were wanting. Obviously if the day we have picked turns out it’s going to be raining or look dark out then I might have to change the day we planned if I can, if that doesn’t turn out okay then I will have to change the idea I had and maybe do something in the studio. Location is important again as I have planned mine to be in a house, college studio and outside, so the house situation is my brothers so I will have to plan to see when I can go over and seeing if my model is available that day to come as well as he has a prop that I would like to use. College studio is more for a professional look, more for the front cover and then outside for some street effects so I think the locations will be fine and wont cause too much of a problem. Maybe my brothers house might be hard but I think then it still will be fine as the model im wanting to use is part of my family. The transport is again important when it comes to taking pictures as I will have to make sure myself and my models are all getting the correct bus and correct time, making sure we’re meeting at the same place and then can just start with taking the photos. Im hoping that the day is nice as well as it can become busier when its raining as people will want to go out and not get wet so they decide to drive or get the public bus. We will most likely be doing this on a weekend or on the days we’re off, I personally think the weekend will be really busy as its something to do on the weekends to go out, however if we did it on our days off so Mondays and Wednesdays it might be quieter as people will be at school and work so it might be better as it will be quieter.
  • 9. EXPERIMENTING WITH PHOTOSHOP/ STEP BY STEP How I did it; I first started with an image that was coloured and bright so I wanted to make it look dark so I could make the glasses glow with neon colour so I started with the brightness/contrast, I made it the image darker which made the background and the model a lot darker but still being able to still see a few features on the image. I then went on hue/saturation, hue made the image more blue toned as you can see when looking at the whole image it has a blue tone to it. The saturation has more red tone to it which made it a little more red, made it about 33% so not a lot as I want it to be more blue than red. I then moved onto levels which made it look even darker as I wanted the background to be darker and at this point you cant really see a lot of the model, which you can see in the imaged. If you don’t look at the glasses and the blue glow on the model you can see that everything else is dark. I copied the image that hasn’t been touched meaning the image that hasn’t got all the effects to it I made that layer move to the top so its above the edits I have made so far. I then clicked on pen tool and traced around the glasses. I then masked the step I did which made a new layer but it’s only the glasses on that layer so I started to edit it by clicking image, adjustments and invert which created a blue, glowy look to the glasses. Then again went on to image, adjustments and then hue/saturation, I made the hue around 186, the saturation at 77 and the lightness to -10 which created a even more glowy look to the glasses. I wanted it a little more glowy so I clicked on filter, blur and gaussian blur and made it 16.6%, I also changed the normal to screen which made it glow which you can see in the images. Next I made a new layer, got the paint brush and picked the colour of the glasses which is a blue colour and started to paint on her face. I chose the nose, cheek, jaw, hand and then jumper a little. You can see this on the first little image on the left, a not so intense effect so I thought I want to make it a little more intense as it will make the image pop a lot more than what it is now so I made a new layer after that making the normal to colour dodge and went over what I just did and made it lighter/brighter. I then got the blur tool and went over the edges of what I just did to make it look a little more subtle and blend into her face a little more.
  • 10. STEP BY STEP https://www.youtube.com/watch?v=27-XSSrj2rM How I did it; I started with the image which is the one on the left, I clicked on gradient map which brings up this bar which I clicked which then brought up all theses different colours that you could pick for you image to change to. I picked a colour that I liked the look of which is the blue colours. With image 3 you can see the blue colours so I went through them all to see which one I liked the most from what was there, as you can from image two the tones I went for. I then came of that and wanted to link the colour and the image together so I did this by holding down alt which brought up a arrow so I clicked that and that linked the two layers together. I then went back onto gradient map and went to the section which you can see by the image 4 which has the bar of the blue and then has 3 little boxes under it, I played around with all the colours to see which one looked the best with the image so o wanted the right colour to be the darkest as you can see it’s a very dark blue which you can see in the image 2 the dark colour is focused on the highlighted parts on the normal image and then the hair is then darkened by it too. Then the left side colour is a little lighter but still darker than the middle colour, so that colour is more on the rest of the image so its kind of everywhere. Then the last colour which is the middle colour that one is kind of in the background and the highlighted parts in the second image which in the first image is more focused on the shadows, its liked flipped when editing the second picture whatever was shadows in the original image have become highlights in the edited image and the same to the highlights to shadows on them images too. I liked the way it turned out, I'd say this is my favourite one out of the 4 I did which you can see in this image with all of them, doing the same steps as this 1 2 3 4
  • 11. STEP BY STEP How I did it; I did this by having the image I edited from before, its from the same tutorials from YouTube which the link is in the slide before , so with this one there isn’t a lot to do to get the result I got so I started of with the edited image I did which is the blue one, I then wanted a circle over her face but only half her face so you can still see the edited image before. So I made a new layer and clicked on the shape tool and selected the circle one which is called ‘ellipse tool’ I created the size I wanted the circle to be and then positioned it to where I wanted it to be. I then wanted to change the colour of the circle so its brings more colour to the image so I chose a red, pink colour, I still wanted the the face to show through the image so I went to the opacity and turned it down to the point where you can still see the colour of the shape but can see the models face through it. I then got a new layer again and did the exact same steps with the yellow shape at the bottom, obviously made it yellow to bring more colours to the image and placed it in a different place which is at the bottom and a little overlapping the pink shape which creates a darker a light orange colour which again adds more colours which I like.
  • 12. STEP BY STEP https://www.youtube.com/watch?v=5ogHpgHyHnI 1 2 3 4 5 6 7 8 First step I did was get an image of some flowers I wanted and started to edit the background to it as it had a background colour I didn’t like and I just wanted the flowers on their own so I used the polygonal tool which I wasn't sure if that was the right tool to use but it worked for me so I stuck with that. When I had the flowers by themselves I then wanted to add a background colour which I chose a orange colour as you can see, I feel that it gives a really nice contrast with the rest of the colours of the flowers so I stuck with that one. I then got the shape tool which was the rectangle shape and made the shape to go over the flowers to see what size I wanted it to be, I went onto properties and I got rid of the inside of theshape and then chose the colour for the boarder of the shape which I chose a yellow colour again to add more colours to the image, I found that the thickness of the boarder wasn’t thick enough so I made it bigger so you could se it better which you can see in image 3. I then clicked on the rectangle layer and made a mask icon so I can then give the illustration that some of the flowers are on top of the boarder. I did this by getting the rubber tool and removed a bit of the boarder where I wanted a bit of the flower/plant to look like its on top. I then used the paint brush so if I removed either too much or it was messy looking I used the paint tool to add the boarder back to make it look like the plant is coming above the boarder. I did this on each side of the boarder too but in different places to it looks nicer as you can see in image 3 again you can see that it looks like the flowers are above the boarder. Before moving on, away from the flowers I wanted to add some drop shadows to make the flowers look like they’re coming out of the page to make it look like it has a 3D effect, I did this by double clicking on the layer and went to drop shadow and messed around to see where I wanted the shadows to come from and then went into outer glow to create more effects which you ca see from image 2. I then added text to it by clicking the tool T and types out the letters the person was typing out on the tutorial I was watching which you can see on image 7 and placed them in the same order the person did. I did the exact same as the boarder but on the letters and made some of the plants to overlap on the letters to make it look like the letters are getting buried a little which I like the look of a lot. The last thing I did was added a outer glow to them so you can see the letters a little better with a
  • 13. PROBLEMS WITH THE EXPERIMENTS I have done a few experiments to see if there were any problems I need to practice or if there were any general problems when I was on the software. So finding the tutorials I was interested in, there were no problems to that which was good. The tutorials I picked, some of them were a little confusing as I had to keep going back to see what they did/say as they were either too fast or wasn’t very clear when following so I struggled with that but that’s not a problem with anything to do with the computer or anything that’s more me and the people I was watching. However there’s no problem going back to the steps as I can see what I might of missed or could perfect a little more. When I was making the photoshops I kept forgetting to save as I’m too focused on making them so when it came to finishing my work then saving it, I realised I haven’t been saving and it took a lot longer to save which made me worry that it had frozen loading to save. Luckily it saved and its not frozen anymore but it has reminded myself to keep saving thought the work. To remind myself as well if it do keep forgetting I will set reminders on my phone every 10 minutes so I don’t lose any work especially when its my final project so I need to make sure its saved as it will be annoying to go back and redo it when im on a time balance.