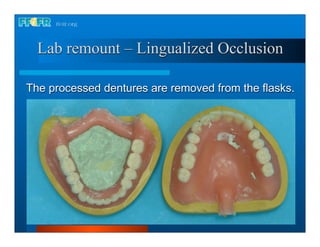
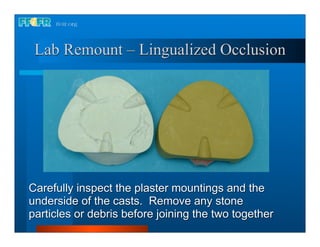
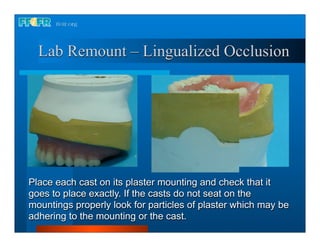
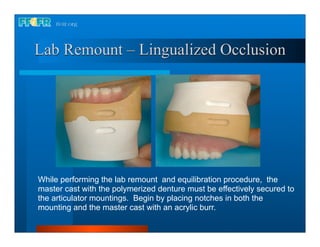
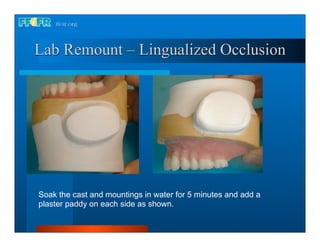
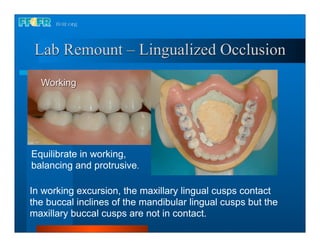
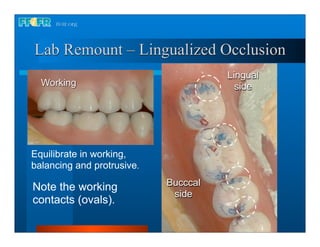
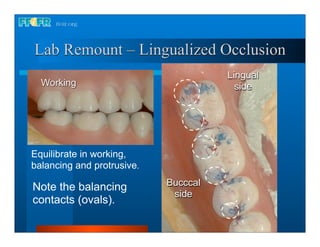
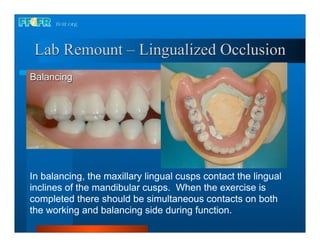
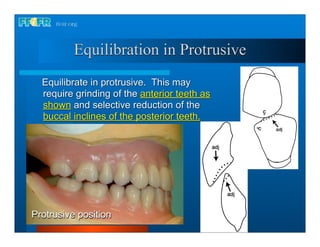
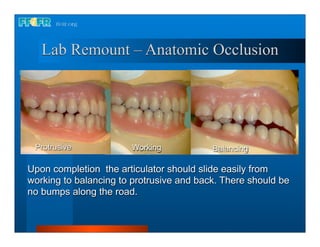
28. Laboratory Remount


This program of instruction is protected by copyright ©. No portion of
this program of instruction may be reproduced, recorded or transferred
by any means electronic, digital, photographic, mechanical etc., or by
any information storage or retrieval system, without prior permission.
18. Laboratory Remount

 Purpose:
 1. To correct errors in occlusion that
    have occurred during processing
 2. To return dentures to the correct
    vertical dimension of occlusion
 3. To restore centric and bilateral
    balanced occlusion
18. Laboratory Remount

 Purpose:
 1. To correct errors in occlusion that
    have occurred during processing
 2. To return dentures to the correct
    vertical dimension of occlusion
 3. To restore centric and bilateral
    balanced occlusion
Laboratory Remount

Instruments and Materials
    Processed dentures intact on master casts
    Articulator and plaster mountings
    Straight handpiece and acrylic burrs
    Quick setting plaster
    Plaster bowl and spatula
    Articulating paper
    Wax spatula
Lab remount – Lingualized Occlusion

The processed dentures are removed from the flasks.
Lab Remount – Lingualized Occlusion


Carefully inspect the plaster mountings and the
underside of the casts. Remove any stone
particles or debris before joining the two together
Lab Remount – Lingualized Occlusion


Place each cast on its plaster mounting and check that it
goes to place exactly. If the casts do not seat on the
mountings properly look for particles of plaster which may be
adhering to the mounting or the cast.
Lab Remount – Lingualized Occlusion


While performing the lab remount and equilibration procedure, the
master cast with the polymerized denture must be effectively secured to
the articulator mountings. Begin by placing notches in both the
mounting and the master cast with an acrylic burr.
Lab Remount – Lingualized Occlusion


Soak the cast and mountings in water for 5 minutes and add a
plaster paddy on each side as shown.
Lab Remount – Lingualized Occlusion
                                  Zero
                                 setting


                                    • Begin by locking the centric latches
                                    and make sure the pin is set at zero.


• Check the amount of pin opening that has
occurred secondary to processing. In this
case there was less than .1 mm of opening.
Lab Remount – Lingualized Occlusion


 Inspection reveals only minimal tooth movement. The
 pin opening following processing was less than .1 mm.
Lab Remount – Lingualized Occlusion

                   Begin equilibrating in centric
                   with the centric latches locked.
                   Tap the two members of the
                   articulator together with
                   articulating paper interposed
                   between.

                   The objective is to restore the
                   vertical dimension of occlusion to
                   the level achieved with the trial
                   denture and develop as many
                   occlusal contacts as possible in
                   centric.
Lab Remount – Lingualized Occlusion


Upon initial closure missing centric contacts were noted in
association with the first molars on the left and the second molars
on the right. Note the occlusal contact on the buccal incline of the
mesial buccal cusp of the left maxillary 2nd molar. This contact
should be eliminated.
Lab Remount – Lingualized Occlusion


 These contacts were restored with selective grinding. All
 of the grinding in this case was directed towards the
 central fossae of the mandibular posterior teeth.
Lab Remount – Lingualized Occlusion


Following adjustment to restore centric and the VDO, some contacts
on the buccal inclines of the upper posterior teeth may be noted
(arrows). These should be removed. Only the lingual cusp tips of the
maxillary posterior teeth should be in contact in centric.
Lab Remount – Lingualized Occlusion


When you have finished equilibrating in centric there
should be no contact associated with the buccal cusps
of either the mandibular or the maxillary teeth, and the
incisal guide pin should contact the incisal guide table.
Lab Remount – Lingualized Occlusion


With the incisal guide pin at zero and in contact with the incisal guide
table, the vertical dimension of occlusion has been restored.
Lab Remount – Lingualized Occlusion


When the VDO has been restored, the denture is
examined in working, balancing and protrusive.
Lab Remount – Lingualized Occlusion
  Working


Equilibrate in working,
balancing and protrusive.

In working excursion, the maxillary lingual cusps contact
the buccal inclines of the mandibular lingual cusps but the
maxillary buccal cusps are not in contact.
Lab Remount – Lingualized Occlusion
                                      Lingual
  Working                               side


Equilibrate in working,
balancing and protrusive.

Note the working            Bucccal
                             side
contacts (ovals).
Lab Remount – Lingualized Occlusion
                                      Lingual
  Working                               side


Equilibrate in working,
balancing and protrusive.

Note the balancing          Bucccal
                             side
contacts (ovals).
Lab Remount – Lingualized Occlusion
Balancing


In balancing, the maxillary lingual cusps contact the lingual
inclines of the mandibular cusps. When the exercise is
completed there should be simultaneous contacts on both
the working and balancing side during function.
Lab Remount – Lingualized Occlusion

 Protrusive


 Develop protrusive contacts as shown. Light contact of
 the anterior teeth in protrusion enhances stability. Note
 the contacts in the 2nd molar region.
Laboratory Remount – Monoplane Occlusion

                  Neutrocentric concept

                            The processed dentures are
                            removed from the flasks and secured to the
                            mountings as shown previously.


 We are now ready to begin the
 laboratory remount procedure.
 The purpose of the laboratory
 remount is to adjust the occlusion
 to account for distortions that
 occur during processing.
Laboratory Remount – Monoplane Occlusion

                      Neutrocentric concept
All of the teeth, with the
exception of the laterals
and the cuspids
(because of esthetic
considerations) should
be on the same plane
and there should be no
vertical overlap of the
anterior teeth.
Laboratory Remount – Monoplane Occlusion

              Neutrocentric concept


  Close examination reveals that there has been some
  movement of the denture teeth during processing. Not
  all the teeth are on the plane of occlusion.
Laboratory Remount – Monoplane Occlusion

                      Neutrocentric concept


With a piece of fine sand paper and a flat glass slab, sand the denture teeth so
that both the buccal and lingual surfaces of the posterior teeth and the incisal
edges of the central incisors touch the occlusal plane. In this setup note that the
cuspids and the laterals are slightly above the plane for esthetic purposes.
Laboratory Remount – Monoplane Occlusion

                 Neutrocentric concept


   After this step all of the cusp tips of the posterior teeth, plus the
   incisal surfaces of the central incisors are on the same plane.
Laboratory Remount – Monoplane Occlusion

            Neutrocentric concept
           Attach the maxillary cast and mounting to
           the articulator. Make sure the incisal guide
           pin is set at zero. Lock the condyles. Close
           the articulator and note how much vertical
           opening has occurred as a result of
           processing.

                                         Insert strips of articulating
                                         paper between the teeth and
                                         lightly tap them together in
                                         centric occlusion. Premature
                                         contacts will usually show up
                                         as dark areas with a light
                                         center.
Laboratory Remount – Monoplane Occlusion

                  Neutrocentric concept


When restoring the vertical dimension of occlusion of
dentures made with nonanatomic teeth make your
adjustments on the mandibular arch only. The heaviest
premature contacts show up as dark areas with light centers
(arrow). Grind on these areas first.
Restore the Vertical Dimension of Occlusion

                        Neutrocentric concept

 Continue with this
 procedure until the incisal
 guide pin comes in
 contact with the incisal
 guide table. You have
 now restored the vertical
 dimension of occlusion.


•Flatten the occlusal plane of the mandibular arch without disturbing centric
contacts so that the flat occlusal surfaces of the mandibular arch contact the
flat surfaces of the maxillary arch.
Laboratory Remount – Monoplane Occlusion

                       Neutrocentric concept
When the exercise is
completed, all of the
teeth, with the
exception of the
maxillary laterals and
perhaps the cuspids
(because of esthetic
considerations) will be
on the same plane and
there will be no vertical
overlap of the anterior
teeth.
Lab Remount – Monoplane Occlusion

       Bilateral balance with balancing ramps


With a piece of fine sand paper and a flat glass slab, sand the occlusal surfaces of
only the posterior teeth so that both the buccal and lingual surfaces of the posterior
teeth touch the occlusal plane. Note that the anterior teeth are not touched. To do
so would eliminate the vertical overlap and this must be maintained in order to
develop bilateral balance with the balancing ramps.
Lab Remount – Monoplane Occlusion

  Bilateral balance with balancing ramps


      When you are finished with this step, all the
      posterior teeth should be on the same plane.
Laboratory Remount – Monoplane Occlusion

      Bilateral balance with balancing ramps
          Attach the casts and mountings to the
          articulator. Make sure the incisal guide
          pin is set at zero. Lock the condyles.
          Close the articulator and note how much
          vertical opening has occurred as a result
          of processing. In this case there is
          almost no pin opening.

                                         Insert strips of articulating
                                         paper between the teeth and
                                         lightly tap them together in
                                         centric occlusion. Premature
                                         contacts will usually show up
                                         as dark areas with a light
                                         center.
Lab Remount – Monoplane Occlusion

  Bilateral balance with balancing ramps


  Equilibrate in centric first, as shown previously.
Lab Remount – Monoplane Occlusion
         Bilateral balance with balancing ramps
                     Equilibrate in excursions
                        • Begin by inserting the appropriate protrusive insert.
                        Loosen the condylar locks.
                        • Next, tract the articulator through working, balancing
                        and protrusive. This is the working position.


In the posterior region
premature contacts will may be
seen on the lingual cusps of
the mandibular teeth. These
contacts must be removed.
Lab Remount – Monoplane Occlusion

             Bilateral balance with balancing ramps
  A successful result creates a tripod during excursions and
  should result in maximum stabilization of the denture bases.


Protrusive                 Balancing               Working
Upon completion the articulator should slide easily from working to
balancing to protrusive and back. There should be no bumps along
the road. If the contacts on the balancing ramps are insufficient they
may be supplemented with autopolymerizing acrylic resin.
Lab Remount –Anatomic Occlusion

    Bilateral balance with balancing ramps


When the exercise is completed contacts will be seen on the anterior
teeth and the balancing ramps in lateral excursion.
Lab Remount –Anatomic Occlusion
Errors in Centric Occlusion and Their Correction
  a) Pairs of opposing teeth too long , holding remaining teeth out of
     occlusion. Solution: Fossae of the teeth in question are deepened .
     The cusp tips should not be shortened.

  b) The cusp tips of opposing teeth appear to be nearly tip to tip. Solution:
      Grind on the inclines so as to move the upper cusp inclines buccally
      and the lower cusp inclines lingually. In so doing the central fossae are
      made broader, the lingual cusp of the upper teeth narrowed, and the
      buccal cusp of the lower teeth are also narrowed. The cusp tips should
      not be shortened.

  c) Upper teeth too buccal in relation to the lower. Solution: Broaden the
      central fossae, and the buccal cusps of the lower teeth are moved
      buccally by broadening the central fossae. The cusp tips should not be
      shortened.
Lab Remount – Anatomic Occlusion

                             Restore the vertical
                             dimension of occlusion.


With an acrylic burr and a slow speed handpiece remove
the occlusal prematurities until the pin is closed against
the incisal guide table(arrow). In this case their was almost
no pin opening.
Lab Remount –Anatomic Occlusion
                       Equilibrating in centric


Initially most prematurities are found in the posterior region. Confine your
initial reductions to cusp inclines, central fossae and marginal ridges. Avoid
the upper lingual and lower buccal cusp tips unless absolutely required in
order to reduce the incisal pin opening to zero.
Lab Remount –Anatomic Occlusion
                    Equilibrating in centric


 Centric contacts are now appearing on most posterior teeth. If the
incisal guide pin is still open, you may need to grind on the cusp tips in
order to restore the vertical dimension of occlusion to the level
determined ideal for the patient during the trial denture appointment.
Equilibration in Centric
Equilibration in centric is
completed. The inicisal pin is
at zero and in contact with the
incisal guide table. The
vertical dimension has been
restored.

We are now ready to begin
equilibrating in working,
balancing and protrusive.
The first step is verify that
the appropriate protrusive
inserts have been placed.
Lab Remount –Anatomic Occlusion
                     Excursions


•Select and position the appropriate protrusive insert.
Lab Remount –Anatomic Occlusion
                           Equilibration in working
Most occlusal discrepancies found during
“working” and “balancing” can be
corrected by reducing premature contacts on
the buccal cusps of the maxillary teeth and
the lingual cusps of the mandibular
posterior teeth (non-centric holding cusps)
otherwise known as the rule of BULL
(buccals of the uppers and linguals of the
lowers).

a) Begin by the equilibrating the right working
side. Slide the articulator through right working with
articulating paper between the denture teeth. Begin
grinding by removing any contacts that are present
on the inclines of the lower right lingual cusps as
shown in the diagram (arrows).
Lab Remount –Anatomic Occlusion
     Equilibration in working
b) Check the contacts on the buccal inclines
of the upper buccal cusps. During working,
they should all be about equal. If not, make
the appropriate adjustments


In this case
working
contacts on
the 2nd molar
are too light           Working position
(red arrow).
Remount –Anatomic Occlusion
Equilibration in balancing
 c) Slide the articulator through working
 again and observe the contacts on the
 balancing side, the lingual inclines of
 the lower buccal cusps. Premature
 balancing side contacts are reduced by
 grinding on the lingual inclines of the
 lower buccal cusps. If there are no
 balancing side contacts, the working
 side contacts should be reduced until
 balancing side contacts appear.
 Continue until working and balancing
 contacts are about equal.


 d) Repeat the same sequence on the opposite side
Equilibration in Protrusive
  Equilibrate in protrusive. This may
  require grinding of the anterior teeth as
  shown and selective reduction of the
  buccal inclines of the posterior teeth.


Protrusive position
Lab Remount – Anatomic Occlusion


 Protrusive            Working            Balancing

Upon completion the articulator should slide easily from
working to balancing to protrusive and back. There should be
no bumps along the road.

28.laboratory remount

  • 1.
    28. Laboratory Remount Thisprogram of instruction is protected by copyright ©. No portion of this program of instruction may be reproduced, recorded or transferred by any means electronic, digital, photographic, mechanical etc., or by any information storage or retrieval system, without prior permission.
  • 2.
    18. Laboratory Remount Purpose: 1. To correct errors in occlusion that have occurred during processing 2. To return dentures to the correct vertical dimension of occlusion 3. To restore centric and bilateral balanced occlusion
  • 3.
    18. Laboratory Remount Purpose: 1. To correct errors in occlusion that have occurred during processing 2. To return dentures to the correct vertical dimension of occlusion 3. To restore centric and bilateral balanced occlusion
  • 4.
    Laboratory Remount Instruments andMaterials  Processed dentures intact on master casts  Articulator and plaster mountings  Straight handpiece and acrylic burrs  Quick setting plaster  Plaster bowl and spatula  Articulating paper  Wax spatula
  • 5.
    Lab remount –Lingualized Occlusion The processed dentures are removed from the flasks.
  • 6.
    Lab Remount –Lingualized Occlusion Carefully inspect the plaster mountings and the underside of the casts. Remove any stone particles or debris before joining the two together
  • 7.
    Lab Remount –Lingualized Occlusion Place each cast on its plaster mounting and check that it goes to place exactly. If the casts do not seat on the mountings properly look for particles of plaster which may be adhering to the mounting or the cast.
  • 8.
    Lab Remount –Lingualized Occlusion While performing the lab remount and equilibration procedure, the master cast with the polymerized denture must be effectively secured to the articulator mountings. Begin by placing notches in both the mounting and the master cast with an acrylic burr.
  • 9.
    Lab Remount –Lingualized Occlusion Soak the cast and mountings in water for 5 minutes and add a plaster paddy on each side as shown.
  • 10.
    Lab Remount –Lingualized Occlusion Zero setting • Begin by locking the centric latches and make sure the pin is set at zero. • Check the amount of pin opening that has occurred secondary to processing. In this case there was less than .1 mm of opening.
  • 11.
    Lab Remount –Lingualized Occlusion Inspection reveals only minimal tooth movement. The pin opening following processing was less than .1 mm.
  • 12.
    Lab Remount –Lingualized Occlusion Begin equilibrating in centric with the centric latches locked. Tap the two members of the articulator together with articulating paper interposed between. The objective is to restore the vertical dimension of occlusion to the level achieved with the trial denture and develop as many occlusal contacts as possible in centric.
  • 13.
    Lab Remount –Lingualized Occlusion Upon initial closure missing centric contacts were noted in association with the first molars on the left and the second molars on the right. Note the occlusal contact on the buccal incline of the mesial buccal cusp of the left maxillary 2nd molar. This contact should be eliminated.
  • 14.
    Lab Remount –Lingualized Occlusion These contacts were restored with selective grinding. All of the grinding in this case was directed towards the central fossae of the mandibular posterior teeth.
  • 15.
    Lab Remount –Lingualized Occlusion Following adjustment to restore centric and the VDO, some contacts on the buccal inclines of the upper posterior teeth may be noted (arrows). These should be removed. Only the lingual cusp tips of the maxillary posterior teeth should be in contact in centric.
  • 16.
    Lab Remount –Lingualized Occlusion When you have finished equilibrating in centric there should be no contact associated with the buccal cusps of either the mandibular or the maxillary teeth, and the incisal guide pin should contact the incisal guide table.
  • 17.
    Lab Remount –Lingualized Occlusion With the incisal guide pin at zero and in contact with the incisal guide table, the vertical dimension of occlusion has been restored.
  • 18.
    Lab Remount –Lingualized Occlusion When the VDO has been restored, the denture is examined in working, balancing and protrusive.
  • 19.
    Lab Remount –Lingualized Occlusion Working Equilibrate in working, balancing and protrusive. In working excursion, the maxillary lingual cusps contact the buccal inclines of the mandibular lingual cusps but the maxillary buccal cusps are not in contact.
  • 20.
    Lab Remount –Lingualized Occlusion Lingual Working side Equilibrate in working, balancing and protrusive. Note the working Bucccal side contacts (ovals).
  • 21.
    Lab Remount –Lingualized Occlusion Lingual Working side Equilibrate in working, balancing and protrusive. Note the balancing Bucccal side contacts (ovals).
  • 22.
    Lab Remount –Lingualized Occlusion Balancing In balancing, the maxillary lingual cusps contact the lingual inclines of the mandibular cusps. When the exercise is completed there should be simultaneous contacts on both the working and balancing side during function.
  • 23.
    Lab Remount –Lingualized Occlusion Protrusive Develop protrusive contacts as shown. Light contact of the anterior teeth in protrusion enhances stability. Note the contacts in the 2nd molar region.
  • 24.
    Laboratory Remount –Monoplane Occlusion Neutrocentric concept The processed dentures are removed from the flasks and secured to the mountings as shown previously. We are now ready to begin the laboratory remount procedure. The purpose of the laboratory remount is to adjust the occlusion to account for distortions that occur during processing.
  • 25.
    Laboratory Remount –Monoplane Occlusion Neutrocentric concept All of the teeth, with the exception of the laterals and the cuspids (because of esthetic considerations) should be on the same plane and there should be no vertical overlap of the anterior teeth.
  • 26.
    Laboratory Remount –Monoplane Occlusion Neutrocentric concept Close examination reveals that there has been some movement of the denture teeth during processing. Not all the teeth are on the plane of occlusion.
  • 27.
    Laboratory Remount –Monoplane Occlusion Neutrocentric concept With a piece of fine sand paper and a flat glass slab, sand the denture teeth so that both the buccal and lingual surfaces of the posterior teeth and the incisal edges of the central incisors touch the occlusal plane. In this setup note that the cuspids and the laterals are slightly above the plane for esthetic purposes.
  • 28.
    Laboratory Remount –Monoplane Occlusion Neutrocentric concept After this step all of the cusp tips of the posterior teeth, plus the incisal surfaces of the central incisors are on the same plane.
  • 29.
    Laboratory Remount –Monoplane Occlusion Neutrocentric concept Attach the maxillary cast and mounting to the articulator. Make sure the incisal guide pin is set at zero. Lock the condyles. Close the articulator and note how much vertical opening has occurred as a result of processing. Insert strips of articulating paper between the teeth and lightly tap them together in centric occlusion. Premature contacts will usually show up as dark areas with a light center.
  • 30.
    Laboratory Remount –Monoplane Occlusion Neutrocentric concept When restoring the vertical dimension of occlusion of dentures made with nonanatomic teeth make your adjustments on the mandibular arch only. The heaviest premature contacts show up as dark areas with light centers (arrow). Grind on these areas first.
  • 31.
    Restore the VerticalDimension of Occlusion Neutrocentric concept Continue with this procedure until the incisal guide pin comes in contact with the incisal guide table. You have now restored the vertical dimension of occlusion. •Flatten the occlusal plane of the mandibular arch without disturbing centric contacts so that the flat occlusal surfaces of the mandibular arch contact the flat surfaces of the maxillary arch.
  • 32.
    Laboratory Remount –Monoplane Occlusion Neutrocentric concept When the exercise is completed, all of the teeth, with the exception of the maxillary laterals and perhaps the cuspids (because of esthetic considerations) will be on the same plane and there will be no vertical overlap of the anterior teeth.
  • 33.
    Lab Remount –Monoplane Occlusion Bilateral balance with balancing ramps With a piece of fine sand paper and a flat glass slab, sand the occlusal surfaces of only the posterior teeth so that both the buccal and lingual surfaces of the posterior teeth touch the occlusal plane. Note that the anterior teeth are not touched. To do so would eliminate the vertical overlap and this must be maintained in order to develop bilateral balance with the balancing ramps.
  • 34.
    Lab Remount –Monoplane Occlusion Bilateral balance with balancing ramps When you are finished with this step, all the posterior teeth should be on the same plane.
  • 35.
    Laboratory Remount –Monoplane Occlusion Bilateral balance with balancing ramps Attach the casts and mountings to the articulator. Make sure the incisal guide pin is set at zero. Lock the condyles. Close the articulator and note how much vertical opening has occurred as a result of processing. In this case there is almost no pin opening. Insert strips of articulating paper between the teeth and lightly tap them together in centric occlusion. Premature contacts will usually show up as dark areas with a light center.
  • 36.
    Lab Remount –Monoplane Occlusion Bilateral balance with balancing ramps Equilibrate in centric first, as shown previously.
  • 37.
    Lab Remount –Monoplane Occlusion Bilateral balance with balancing ramps Equilibrate in excursions • Begin by inserting the appropriate protrusive insert. Loosen the condylar locks. • Next, tract the articulator through working, balancing and protrusive. This is the working position. In the posterior region premature contacts will may be seen on the lingual cusps of the mandibular teeth. These contacts must be removed.
  • 38.
    Lab Remount –Monoplane Occlusion Bilateral balance with balancing ramps A successful result creates a tripod during excursions and should result in maximum stabilization of the denture bases. Protrusive Balancing Working Upon completion the articulator should slide easily from working to balancing to protrusive and back. There should be no bumps along the road. If the contacts on the balancing ramps are insufficient they may be supplemented with autopolymerizing acrylic resin.
  • 39.
    Lab Remount –AnatomicOcclusion Bilateral balance with balancing ramps When the exercise is completed contacts will be seen on the anterior teeth and the balancing ramps in lateral excursion.
  • 40.
    Lab Remount –AnatomicOcclusion Errors in Centric Occlusion and Their Correction a) Pairs of opposing teeth too long , holding remaining teeth out of occlusion. Solution: Fossae of the teeth in question are deepened . The cusp tips should not be shortened. b) The cusp tips of opposing teeth appear to be nearly tip to tip. Solution: Grind on the inclines so as to move the upper cusp inclines buccally and the lower cusp inclines lingually. In so doing the central fossae are made broader, the lingual cusp of the upper teeth narrowed, and the buccal cusp of the lower teeth are also narrowed. The cusp tips should not be shortened. c) Upper teeth too buccal in relation to the lower. Solution: Broaden the central fossae, and the buccal cusps of the lower teeth are moved buccally by broadening the central fossae. The cusp tips should not be shortened.
  • 41.
    Lab Remount –Anatomic Occlusion Restore the vertical dimension of occlusion. With an acrylic burr and a slow speed handpiece remove the occlusal prematurities until the pin is closed against the incisal guide table(arrow). In this case their was almost no pin opening.
  • 42.
    Lab Remount –AnatomicOcclusion Equilibrating in centric Initially most prematurities are found in the posterior region. Confine your initial reductions to cusp inclines, central fossae and marginal ridges. Avoid the upper lingual and lower buccal cusp tips unless absolutely required in order to reduce the incisal pin opening to zero.
  • 43.
    Lab Remount –AnatomicOcclusion Equilibrating in centric Centric contacts are now appearing on most posterior teeth. If the incisal guide pin is still open, you may need to grind on the cusp tips in order to restore the vertical dimension of occlusion to the level determined ideal for the patient during the trial denture appointment.
  • 44.
    Equilibration in Centric Equilibrationin centric is completed. The inicisal pin is at zero and in contact with the incisal guide table. The vertical dimension has been restored. We are now ready to begin equilibrating in working, balancing and protrusive. The first step is verify that the appropriate protrusive inserts have been placed.
  • 45.
    Lab Remount –AnatomicOcclusion Excursions •Select and position the appropriate protrusive insert.
  • 46.
    Lab Remount –AnatomicOcclusion Equilibration in working Most occlusal discrepancies found during “working” and “balancing” can be corrected by reducing premature contacts on the buccal cusps of the maxillary teeth and the lingual cusps of the mandibular posterior teeth (non-centric holding cusps) otherwise known as the rule of BULL (buccals of the uppers and linguals of the lowers). a) Begin by the equilibrating the right working side. Slide the articulator through right working with articulating paper between the denture teeth. Begin grinding by removing any contacts that are present on the inclines of the lower right lingual cusps as shown in the diagram (arrows).
  • 47.
    Lab Remount –AnatomicOcclusion Equilibration in working b) Check the contacts on the buccal inclines of the upper buccal cusps. During working, they should all be about equal. If not, make the appropriate adjustments In this case working contacts on the 2nd molar are too light Working position (red arrow).
  • 48.
    Remount –Anatomic Occlusion Equilibrationin balancing c) Slide the articulator through working again and observe the contacts on the balancing side, the lingual inclines of the lower buccal cusps. Premature balancing side contacts are reduced by grinding on the lingual inclines of the lower buccal cusps. If there are no balancing side contacts, the working side contacts should be reduced until balancing side contacts appear. Continue until working and balancing contacts are about equal. d) Repeat the same sequence on the opposite side
  • 49.
    Equilibration in Protrusive Equilibrate in protrusive. This may require grinding of the anterior teeth as shown and selective reduction of the buccal inclines of the posterior teeth. Protrusive position
  • 50.
    Lab Remount –Anatomic Occlusion Protrusive Working Balancing Upon completion the articulator should slide easily from working to balancing to protrusive and back. There should be no bumps along the road.