Editing updates
•Download as DOCX, PDF•
0 likes•157 views

Editing updates - Ain't No Sunshine

Recommended
More Related Content
What's hot
What's hot (20)
Viewers also liked
Similar to Editing updates
Similar to Editing updates (20)
More from Sam Benzie
More from Sam Benzie (20)
Recently uploaded
Recently uploaded (20)
Editing updates
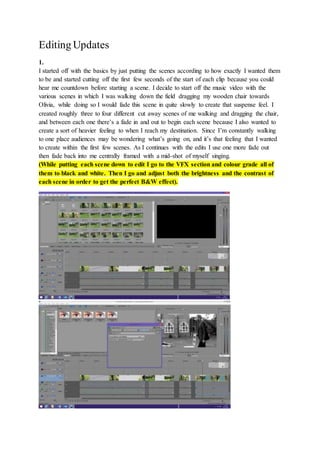
- 1. Editing Updates 1. I started off with the basics by just putting the scenes according to how exactly I wanted them to be and started cutting off the first few seconds of the start of each clip because you could hear me countdown before starting a scene. I decide to start off the music video with the various scenes in which I was walking down the field dragging my wooden chair towards Olivia, while doing so I would fade this scene in quite slowly to create that suspense feel. I created roughly three to four different cut away scenes of me walking and dragging the chair, and between each one there’s a fade in and out to begin each scene because I also wanted to create a sort of heavier feeling to when I reach my destination. Since I’m constantly walking to one place audiences may be wondering what’s going on, and it’s that feeling that I wanted to create within the first few scenes. As I continues with the edits I use one more fade out then fade back into me centrally framed with a mid-shot of myself singing. (While putting each scene down to edit I go to the VFX section and colour grade all of them to black and white. Then I go and adjust both the brightness and the contrast of each scene in order to get the perfect B&W effect).
- 2. 2. Afterwards, I realise that within certain scenes I wasn’t perfectly in time with the words. I came across this when I had to edit out the disappearing scene. What made it worse was that I found it very difficult cutting out the time taken from Olivia to leave her seat because even though it came out pretty well that resulted in me completely out of sync with the song. So I had to improvise and change it slightly to favour me. So what I did was I ended up not only slowing down the scene that I felt wasn’t in time with the song I also had to overlap the scenes that contained Oliva before and after she was in the chair to create the disappearing scene.
- 3. 3. Continuing from here, I use a lot more jump scenes to different areas since within the video there are quite a lot of memory scenes. Towards getting to the scene where I had to play various memory scenes in the background with a very long one-take scene was quite difficult. I had to firstly the main, one-take scene on the top layer and then the memory scene directly below it. While doing so I had to drop the opacity of the both scenes to make both of them visible while the video is being played – (that’s why the blue line on the pictures of the scenes are placed somewhere within the middle). I also had to make the contrast of the memory scenes a lot stronger to make it a lot easier to see while it’s playing in the background and to balance it out in the sense that you could tell which scenes were the memories and which weren’t.
- 4. 4. Apart from this editing technique I’ve just been using simple ones like fading to black and back into another scene. With such a short, simple song being used it’s expected for there to not be constant “fancy” edits. But I did go against this and added a disappearing trick towards the ending. What I did within this screen shot was I started off by duplicating that scene and put the duplicate on top of the bottom one, shortly afterwards I cut the some parts of the bottom one and slow down the one on top of it . Then to end it all I fade it to black. What I’ve done here is after duplicating the scene and putting one on top if I were to fade out the bottom layer only Olivia would go because I made it specifically clear that within that particular scene I wouldn’t move so that while trying to fading one layer out I would still be there since I didn’t move due to a top layer still having me in the scene. I purposely slowed the top layer down because to make it more dramatic and painful. 5. There’s still some scenes that aren’t within the music video that I do need to insert but overall those are the basic editing techniques that I would apply to most if not all the scenes that are within the music video and the extra ones to come.