1. Model’s Costume Plan
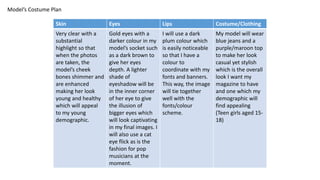
Skin Eyes Lips Costume/Clothing
Very clear with a
substantial
highlight so that
when the photos
are taken, the
model’s cheek
bones shimmer and
are enhanced
making her look
young and healthy
which will appeal
to my young
demographic.
Gold eyes with a
darker colour in my
model’s socket such
as a dark brown to
give her eyes
depth. A lighter
shade of
eyeshadow will be
in the inner corner
of her eye to give
the illusion of
bigger eyes which
will look captivating
in my final images. I
will also use a cat
eye flick as is the
fashion for pop
musicians at the
moment.
I will use a dark
plum colour which
is easily noticeable
so that I have a
colour to
coordinate with my
fonts and banners.
This way, the image
will tie together
well with the
fonts/colour
scheme.
My model will wear
blue jeans and a
purple/maroon top
to make her look
casual yet stylish
which is the overall
look I want my
magazine to have
and one which my
demographic will
find appealing
(Teen girls aged 15-
18)
2. Photoshoot Plan Cover
Model/Object Shot
type/angle
Lighting Editing Details Mise-en-scene Connotation
Poppy Casson Medium Shot Light box, side on High Contrast-
perhaps all black
and white except
makeup/ top
Poppy looking
over her shoulder
just off camera
sat on a bed with
dark background
of some sort.
Poppy is
glamourous pop
star who is also
very
friendly/likeable
(like Taylor Swift
3. Photo Selection
I discarded this photograph
because although I like that
you can see her eyeshadow,
I don’t feel like her
expression was very ‘pop’
and also I didn’t like how
you could see her hand at
the bottom of the photo.
I don’t like this photo
because you can’t see her
highlight and therefore she
looks quite dull and also the
lighting isn’t very good so
she doesn’t look captivating
at all
I chose not to use this
image for my front cover as
she is facing forward and so
she isn’t engaging with the
camera therefore people
wont be inclined to pick it
up.
I chose this photograph for my
cover because I like how happy
my model looks and feel that
she looks like a pop artist. I also
love how the lighting picked up
on her highlighter which makes
her look healthy and glowing
which is what my demographic
aspires to.
4. I have chosen to use red,
white and black as they
are edgy colours but also
quite elegant. I will use
white got the most
important elements of my
page such as my
masthead as it is the
brightest colour and
when its put over a black
and white image, it will
be really eye catching and
will draw the reader to
the magazine. I chose the
red because it will match
my model’s lipstick and
therefore will help to
create unity between the
text and the image. I have
chosen to use AR Bonnie
as it is bold but has
curves which is typical of
the Pop genre. I also want
to use Calibri as its a sans
serif font so its
contemporary looking but
its also easy to read and
therefore will work well
for smaller writing in my
magazine.
5. I used the spot
heal tool to get
rid of any
blemishes on
my model’s
skin. This helps
to give the
image a more
professional
look.
I then used
the burn tool
to define my
model’s
eyebrows
because I
wanted them
to remain
dark when its
black and
white.
I used the
convert to
black and
white tool on
a duplicated
layer and
played with
the contrast
until I was
happy with
how the
photo looked.
I then used
the eraser to
rub the black
and white
layer out on
her lips and
eyes so that
they stand out
from the
image.
6. I used the text
box tool to write
out my masthead
above my model’s
head
I then used the
quick select tool to
select the part of
my model’s head
which overlaps the
masthead, copied
it, created a new
layer and pasted it
to bring the part
forward.
I used the
brush tool to
put a barcode
on the left
hand side of
my page
9. Having been given my feedback, I have changed my colour scheme. I chose to use a bright blue and pink as they are both bright
and contrast each other and this is a technique often employed by Pop magazines such as ‘Top of the Pops’ to catch the eye of
readers and those colours work well next to my photos which are mostly purple toned.
I then went about looking for a new font to replace AR Bonnie and Orator Std. I looked through all of the fonts already on my
school and home computers but decided I’d be better off finding a new one online. I went onto Dafont.com and looked through
all of the possible fonts I could use before settling on GoBold. I downloaded and installed it to my home computer and used
Gobold itallic as well on my contents page to create some variation.
Font and Colour Scheme Changes
10. Having received feedback from my teachers and peers, I decided to
change my magazine to make it look more like a pop magazine. I
began this by changing my font. I used Gobold Italic for my Masthead,
article titles and date/issue number but later changed it to Gobold
Regular as the convention for Pop magazines such as ‘Top of the
Pops’ and ‘We Heart Pop’ is to have bold sans serif fonts to make it
look more modern. I also changed my colour scheme to be brighter
pink and blue as Pop magazines often use bold contrasting colours.
In order to make my image compliment my colour scheme I changed
the colour of my model’s lips to pink and made her eyes blue using the
brush tool on a low opacity. I also gave my masthead a shadow to make
it stand out more than the article titles. I added a barcode using the
brush tool to make my cover look more professional and used the text
box tool to add the price and website to the barcode banner.
11. I then used the shapes tool to insert
a plus sign, a competition banner
and a star to draw attention to
certain areas of my page. I also gave
my plus sign a shadow to make it
pop out of the page. I moved my
masthead to the left as was
suggested by my teacher and left it
in front of my model’s head.
I used the cookie cutter tool to create my top
banner for my additional coverline. This
makes my cover look more professional.
13. I removed my additional
cover line in favour of a
larger masthead to make
it stand out further and
moved the cover line to
the bottom of the page.
I made the barcode
smaller and put it at the
bottom of my page to
make it less invasive on
the image.
I also made the addition
sign smaller to make sure
that it doesn’t distract
from the photograph,
likewise with the button.
14. I used the blur tool to
make the cut out line from
where the photo overlaps
my masthead less harsh
and more natural looking
I used the pipette
tool to get the colour
similar to my chosen
font colour and the
brush tool to paint it
on in the correct
shape. This way I
could gradually
increase the opacity
of the colour until I
got the desired
effect.
I had a final meeting with my teachers who asked me to
make some small adjustments in order to reach my full
potential.