Downloaded 1,999 times


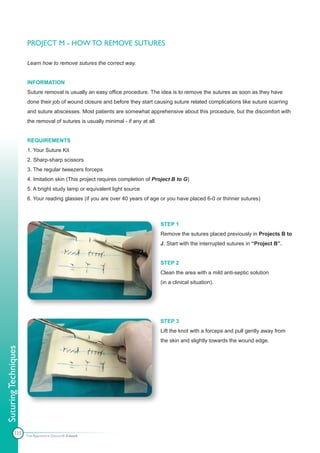
![REQUIREMENTS
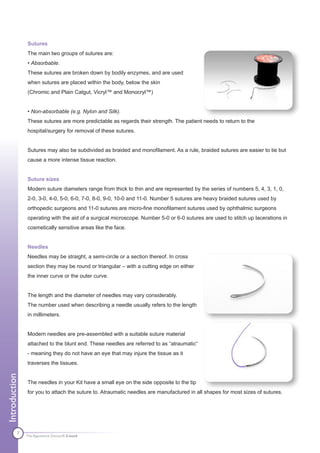
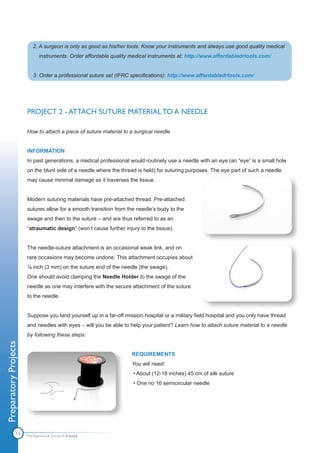
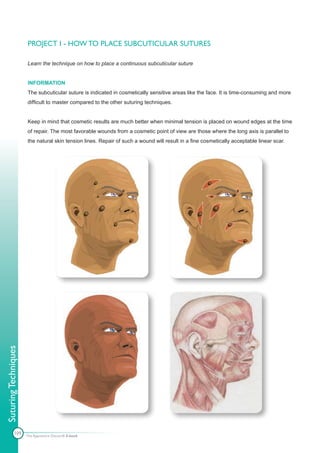
1. The Suture Kit
1.1. Tissue forceps
1.2. A suture needle with an eye
1.3. Suture thread
1.4. A needle holder
1.5. Imitation skin
2. A bright study lamp or equivalent light source
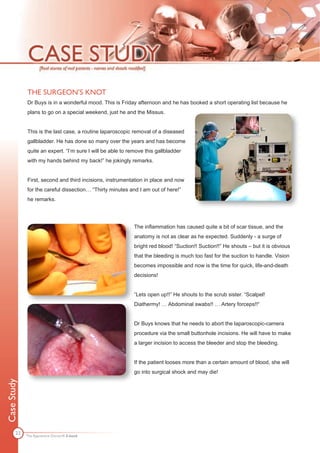
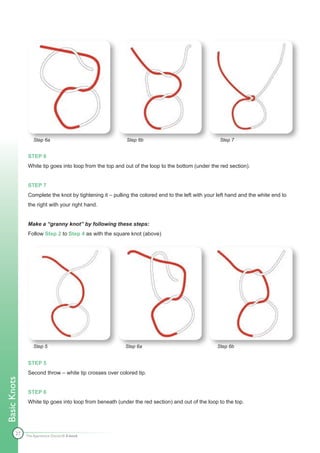
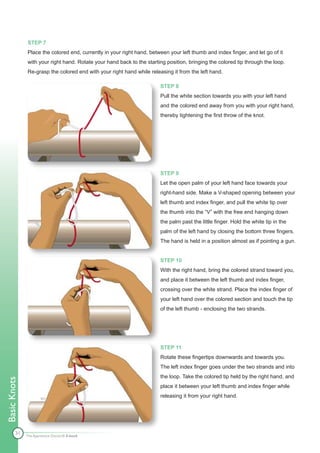
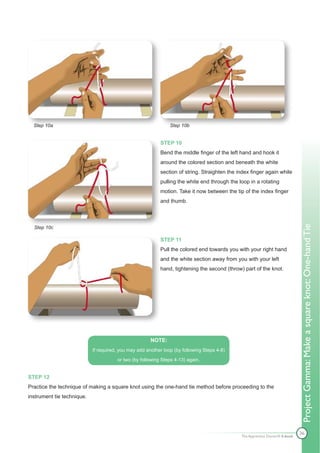
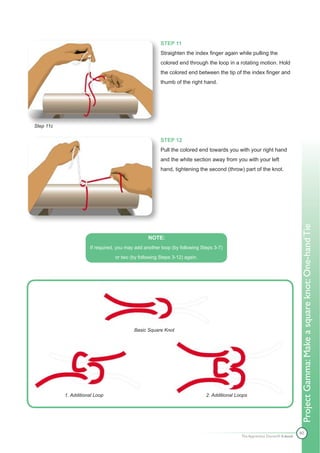
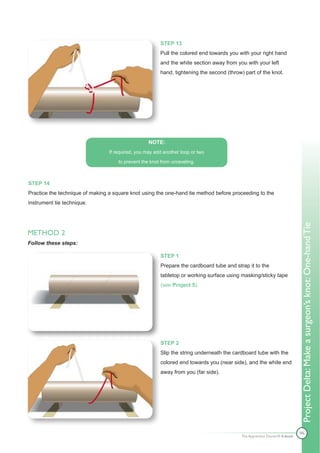
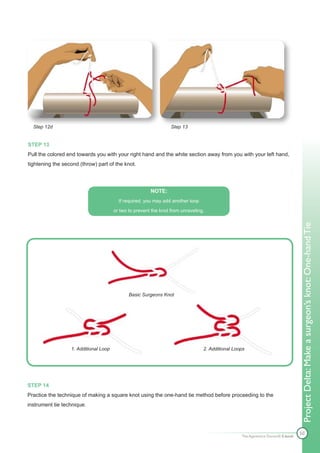
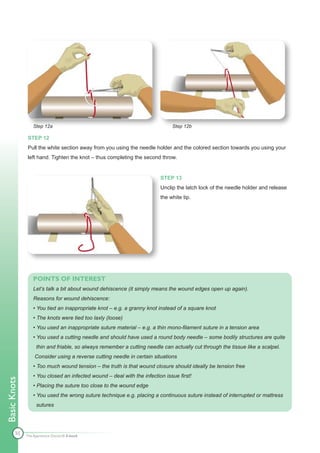
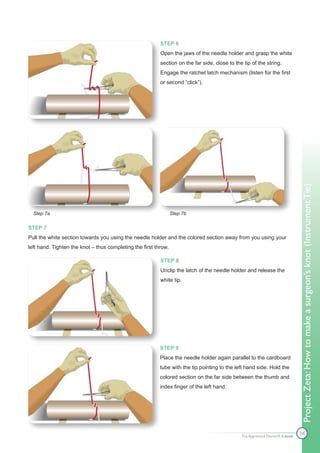
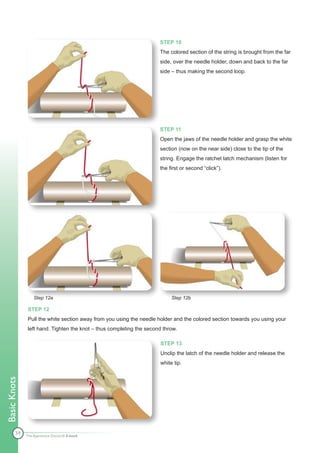
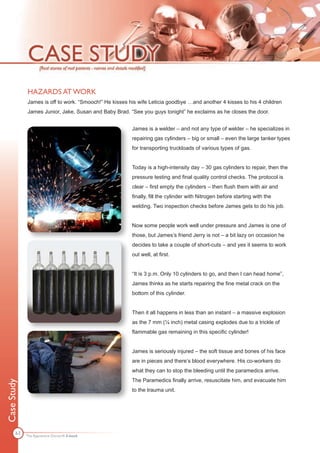
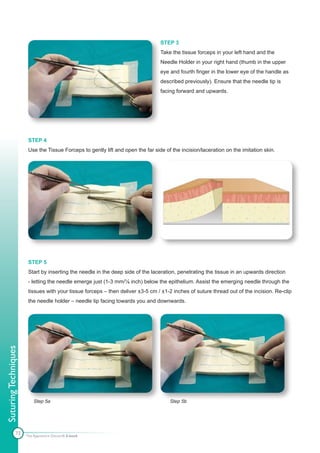
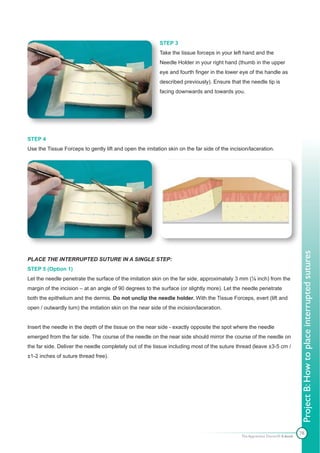
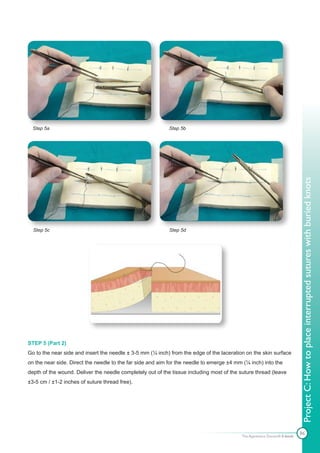
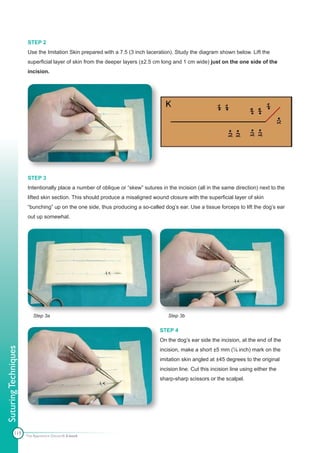
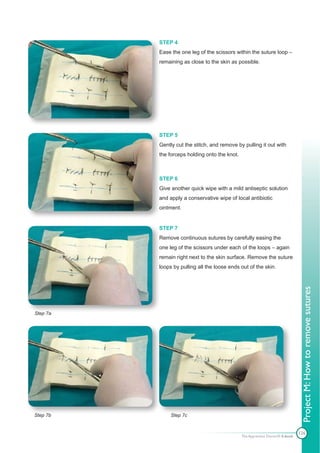
STEP 1
Use a needle with suture material attached, clipped to
a Needle Holder – see Project 2 and 3.
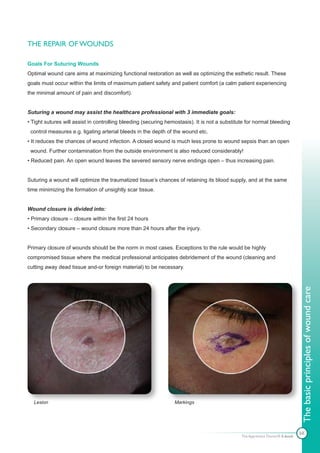
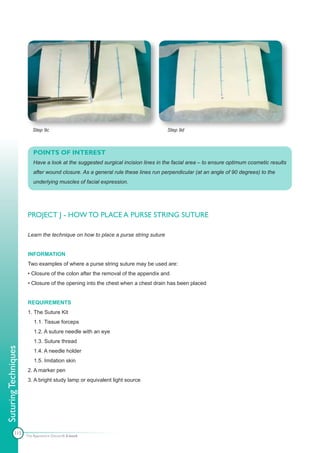
STEP 2
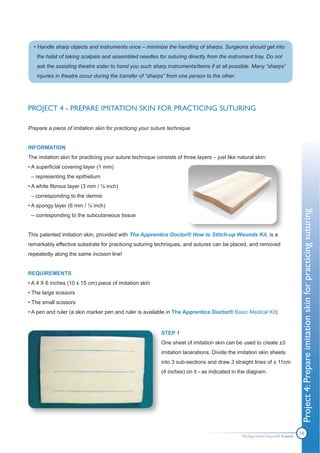
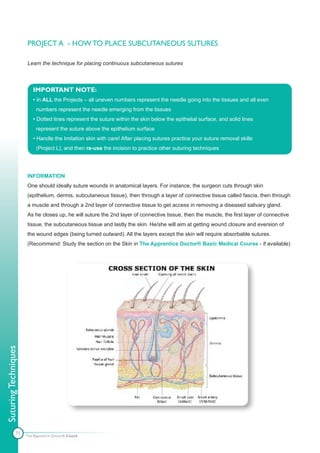
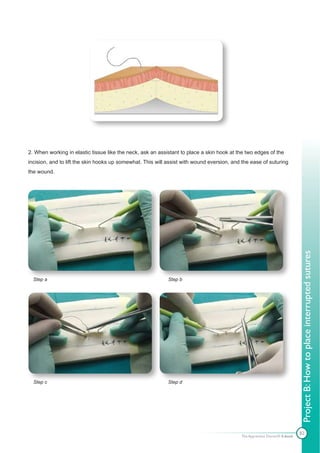
Place the imitation skin (with the prepared ±7 cm (2,5 inch) lacerations - see Project 4) - with the long axes
Project A: How to place subcutaneous sutures
horizontally positioned in front of you. For stability, secure the imitation skin to the table with surgical strapping/
sticky- or masking tape. (You may want to work on a piece of cardboard to protect the desk). These cuts in the
imitation skin represent surgical incisions or traumatic lacerations. Study the diagram [A] shown below.
72
The Apprentice Doctor® E-book](https://image.slidesharecdn.com/howtostitchupwounds-091108135631-phpapp02/85/How-To-Stitch-Up-Wounds-Course-77-320.jpg)
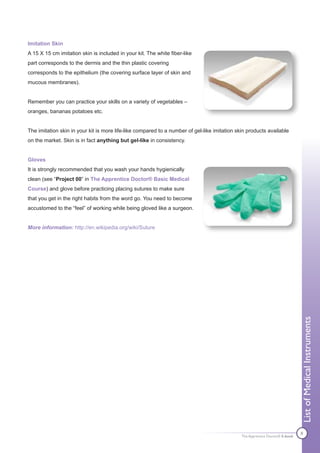
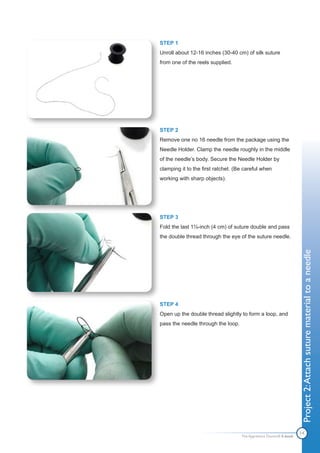
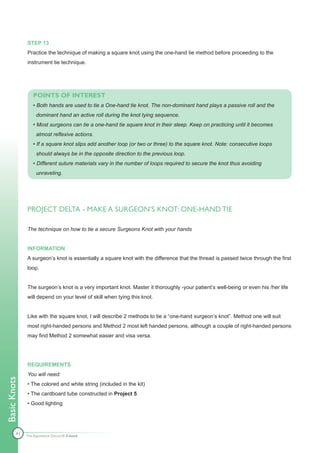
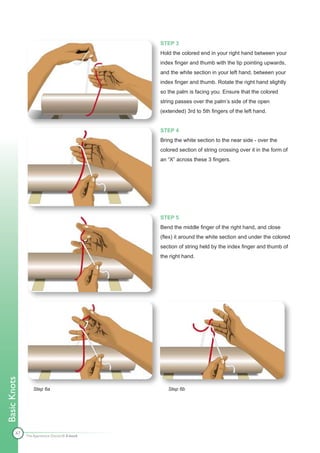
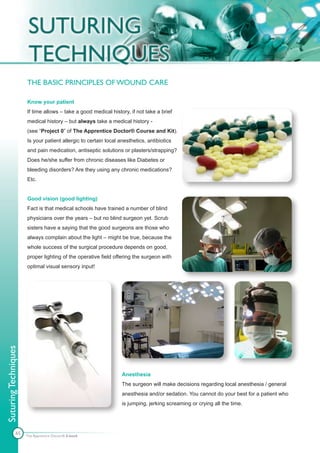
![PROJECT B - HOW TO PLACE INTERRUPTED SUTURES
Learn the technique on how to place Interrupted sutures
INFORMATION
The interrupted suture is by far the most common suture placed by medical professionals in a wide variety of
clinical situations. In general it is easy to place and with the prerequisite that the wound is not compromised,
and can be closed without tension, this knot gives predictable results.
REQUIREMENTS
1. The Suture Kit
1.1. Tissue forceps
1.2. A suture needle with an eye
1.3. Suture thread
1.4. A needle holder
1.5. Imitation skin
2. A bright study lamp or equivalent light source
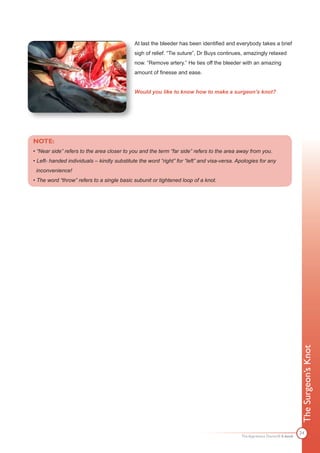
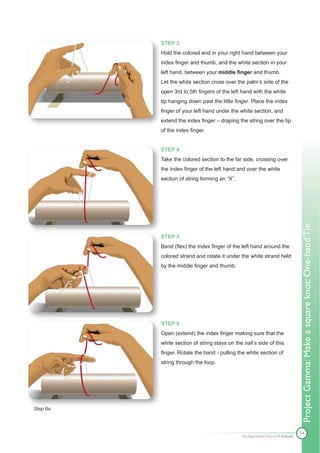
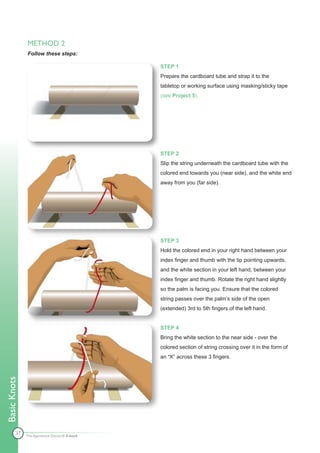
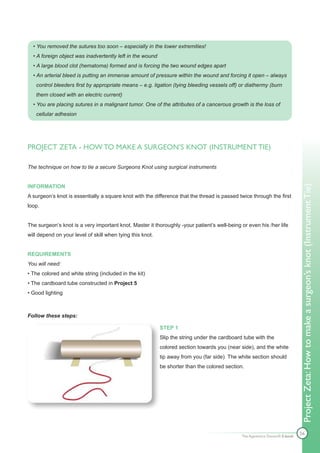
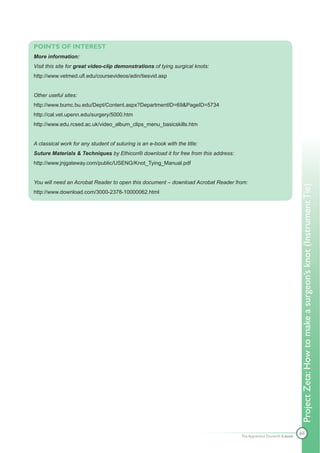
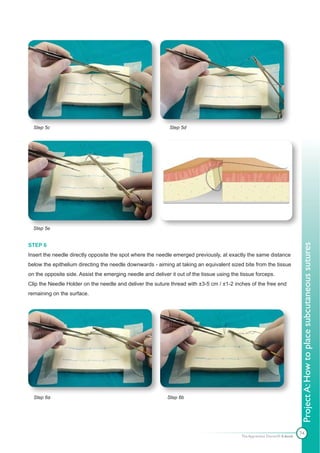
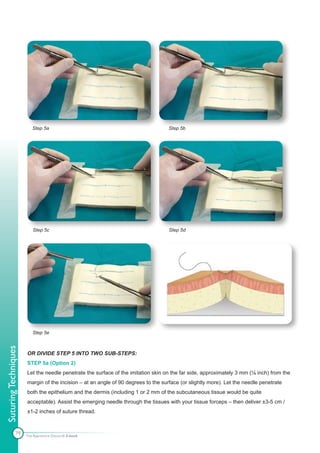
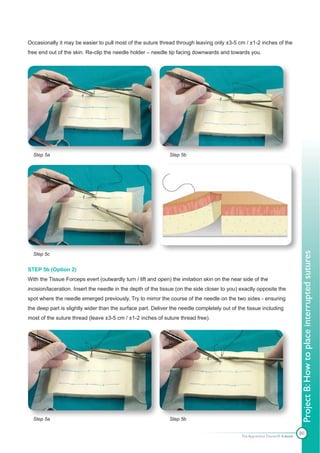
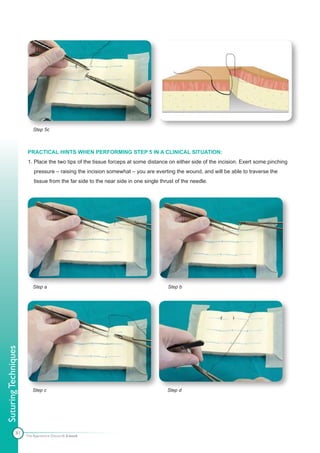
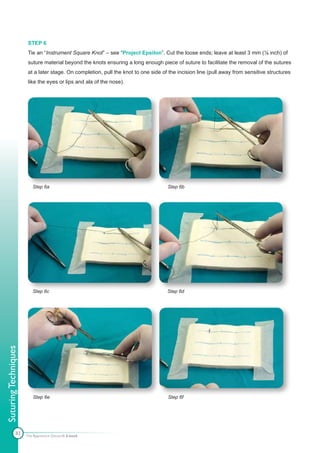
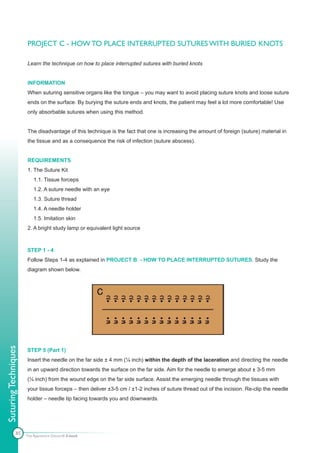
STEP 1
Use a needle with suture material attached, clipped to
a Needle Holder – see Project 2 and 3.
STEP 2
Use of the prepared imitation skin (see Project 4) with the ±7 cm (2.5 inch) cut representing a surgical incision
or a laceration in the skin. Study the diagram [B] shown on page 78.
Suturing Techniques
77 The Apprentice Doctor® E-book](https://image.slidesharecdn.com/howtostitchupwounds-091108135631-phpapp02/85/How-To-Stitch-Up-Wounds-Course-82-320.jpg)

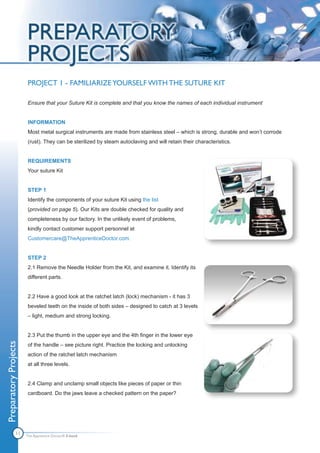
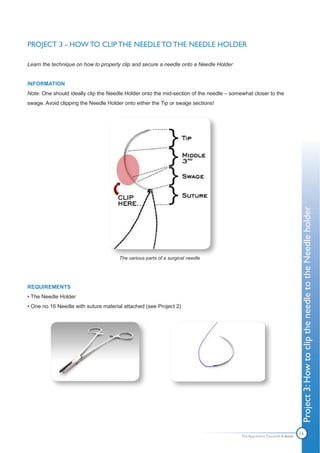
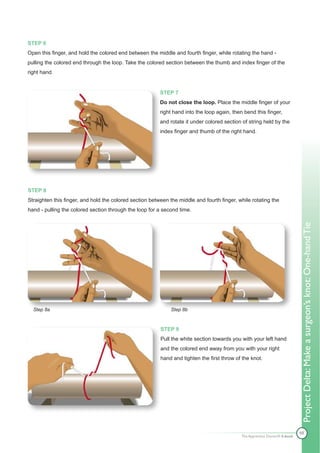
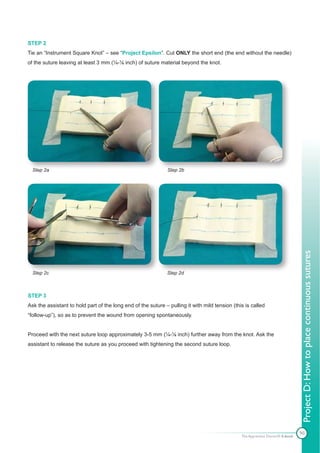
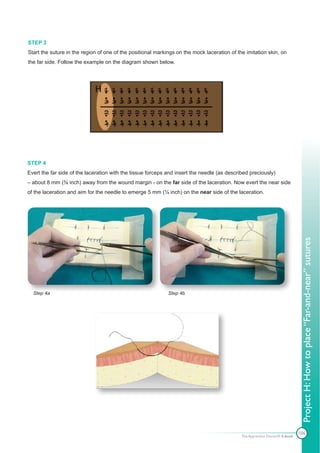
![PROJECT D - HOW TO PLACE CONTINUOUS SUTURES
Learn the technique on how to place continuous sutures
INFORMATION
The continuous suture is also known as “simple running sutures”. It basically is a continuous variant of the
Interrupted suture (Project B). Continuous sutures can be used to close long lacerations and surgical incisions
as well as to secure a split - or full-thickness skin grafts.
Scarring may be reduced with running sutures as compared to interrupted sutures as fewer knots are made
with continuous sutures. Continuous sutures are also indicated to quickly control bleeding in the absence of
other bleeding control measures e.g. a profusely
bleeding scalp wound.
REQUIREMENTS
1. The Suture Kit
1.1. Tissue forceps
1.2. A suture needle with an eye
1.3. Suture thread
1.4. A needle holder
1.5. Imitation skin
2. A bright study lamp or equivalent light source
3. An assistant
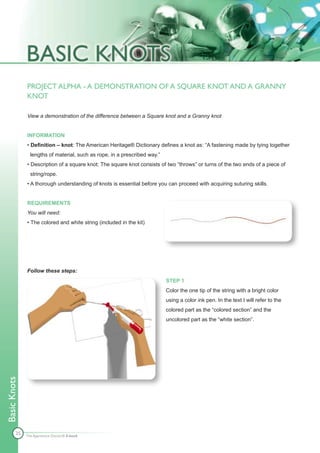
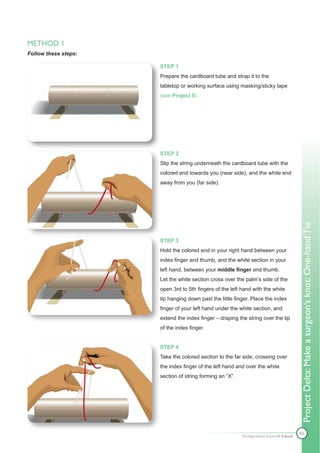
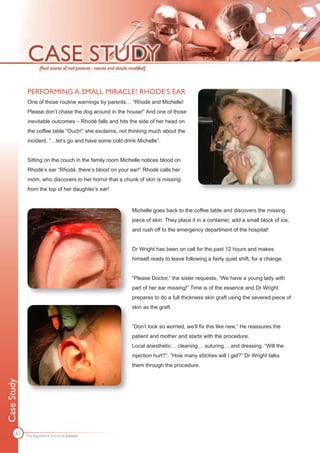
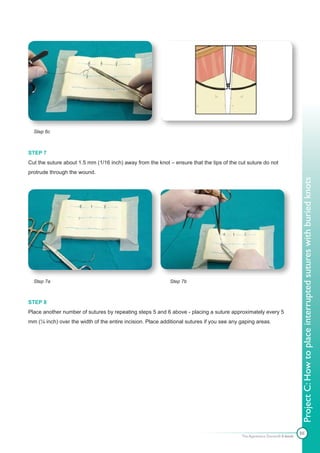
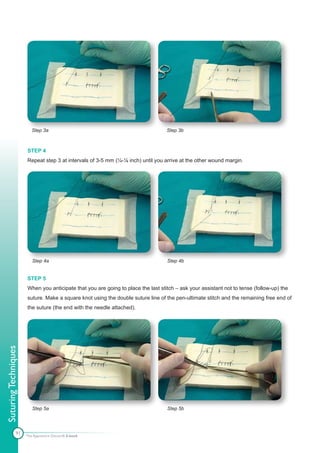
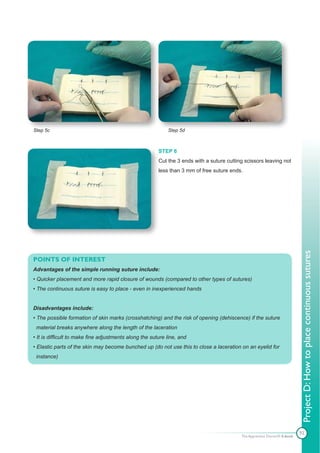
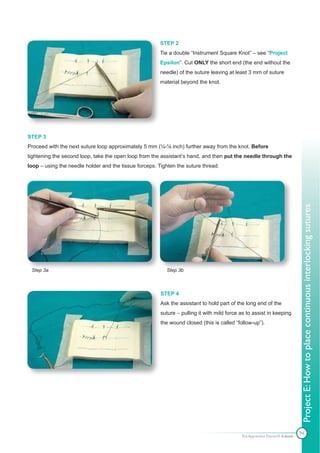
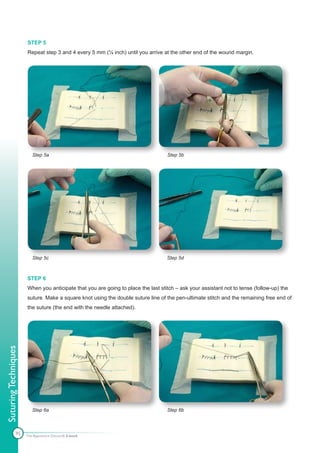
STEP 1
Start the suture 1-2 mm (⅛ inch) from the left hand edge of the prepared laceration (or at one of the positional
markings) on the imitation skin over the incision/laceration. Follow steps 1 to 5 as described in Project B to
place the first suture. Study the diagram [D] shown below.
Suturing Techniques
89 The Apprentice Doctor® E-book](https://image.slidesharecdn.com/howtostitchupwounds-091108135631-phpapp02/85/How-To-Stitch-Up-Wounds-Course-94-320.jpg)
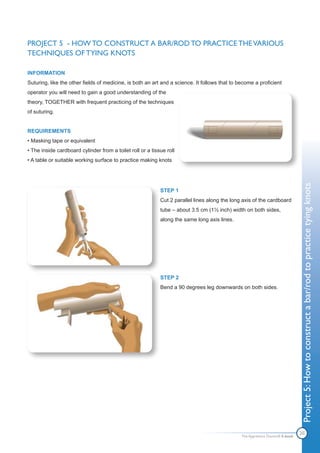
![PROJECT E - HOW TO PLACE CONTINUOUS INTERLOCKING SUTURES
Learn the technique on how to place continuous interlocking sutures
INFORMATION
The indications, advantages and disadvantages of the continuous interlocking suture are similar to that for the
continuous suture although the strength of the wound closure is somewhat enhanced as each suture sub-unit
gets locked in by the previous sub-unit.
REQUIREMENTS
1. The Suture Kit
1.1. Tissue forceps
1.2. A suture needle with an eye
1.3. Suture thread
1.4. A needle holder
1.5. Imitation skin
2. A bright study lamp or equivalent light source
3. An assistant
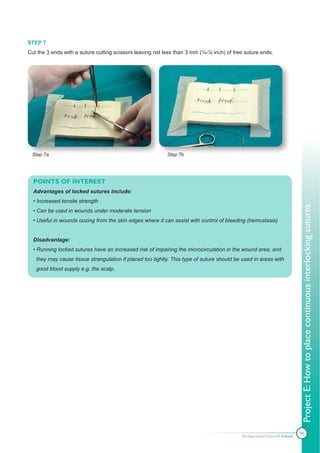
STEP 1
Start the suture 1-2 mm (⅛ inch) from the left hand edge of the prepared laceration (or at one of the positional
markings) on the imitation skin over the incision/laceration. Follow steps 1 to 5 as described in Project B to
place the first suture. Study the diagram [E] shown below.
Suturing Techniques
93 The Apprentice Doctor® E-book](https://image.slidesharecdn.com/howtostitchupwounds-091108135631-phpapp02/85/How-To-Stitch-Up-Wounds-Course-98-320.jpg)
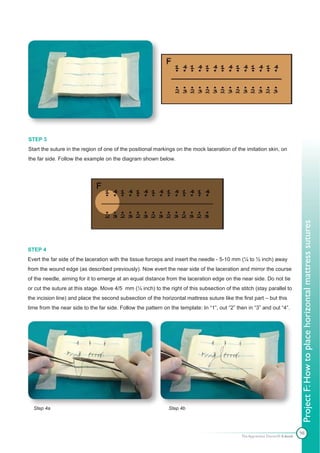
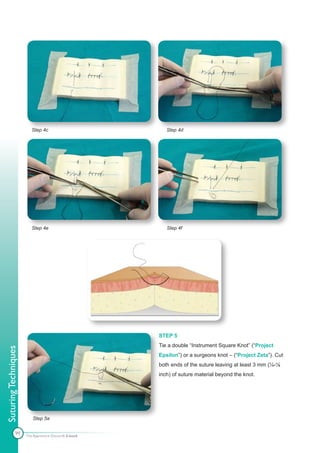
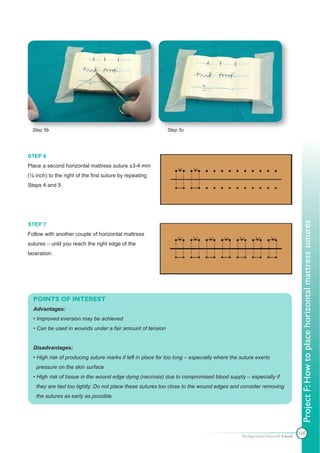
![PROJECT F - HOW TO PLACE HORIZONTAL MATTRESS SUTURES
Learn the technique on how to place horizontal mattress sutures
INFORMATION
Indications:
• Horizontal mattress sutures provide both strength and wound eversion, and are therefore useful with the
closure of wounds under tension
• Mattress sutures are also indicated when the operator wants to maximize the raw on raw surface area.
An example is the secure closure of an opening between 2 cavities e.g. the oral and nasal cavity
• These sutures may also be used temporarily as so-called “stay sutures” to approximate wound edges,
allowing placement of e.g. interrupted or subcuticular sutures. The temporary mattress sutures may then be
removed
• To assist with wound eversion – place alternating horizontal mattress and interrupted sutures
REQUIREMENTS
1. The Suture Kit
1.1. Tissue forceps
1.2. A suture needle with an eye
1.3. Suture thread
1.4. A needle holder
1.5. Imitation skin
2. A bright study lamp or equivalent light source
STEP 1
Use a needle with suture material attached, clipped to
a Needle Holder – see Project 2 and 3.
Suturing Techniques
STEP 2
Use of the prepared imitation skin (see Project 4) with the ±7 cm (2,5 inch) cut representing a surgical incision
or a laceration in the skin. Study the diagram [F] shown on page 98.
97 The Apprentice Doctor® E-book](https://image.slidesharecdn.com/howtostitchupwounds-091108135631-phpapp02/85/How-To-Stitch-Up-Wounds-Course-102-320.jpg)
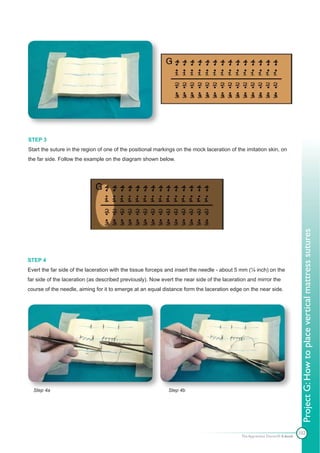
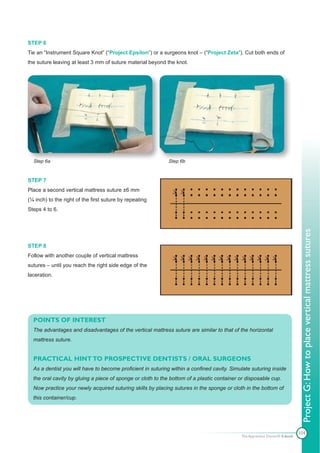
![PROJECT G - HOW TO PLACE VERTICAL MATTRESS SUTURES
Learn the technique on how to place vertical mattress sutures
INFORMATION
Just like the horizontal mattress suture, the vertical mattress suture excels with the closure of wounds under
tension. Since the suture bites can be placed quite a distance from the wound margin within healthy tissue,
these sutures are probably the best choice to help with the closure of a wound under tension. On the down side
are the increased risk of leaving suture marks – especially if they are left for too long in the tissues.
As a general rule, mattress sutures should be removed after 5 days – definitely not longer than 7 days. One
way of reducing the risk of leaving suture marks is the use of soft plastic rods placed between the skin and the
surface loop of the vertical mattress suture.
REQUIREMENTS
1. The Suture Kit
1.1. Tissue forceps
1.2. A suture needle with an eye
1.3. Suture thread
1.4. A needle holder
1.5. Imitation skin
2. A bright study lamp or equivalent light source
STEP 1
Use a needle with suture material attached, clipped to
a Needle Holder – see Project 2 and 3.
Suturing Techniques
STEP 2
Use of the prepared imitation skin (see Project 4) with the ±7 cm (2,5 inch) cut representing a surgical incision
or a laceration in the skin. Study the diagram [G] shown on page 102.
101 The Apprentice Doctor® E-book](https://image.slidesharecdn.com/howtostitchupwounds-091108135631-phpapp02/85/How-To-Stitch-Up-Wounds-Course-106-320.jpg)

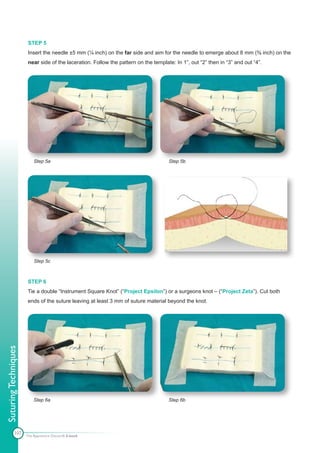
![PROJECT H - HOW TO PLACE “FAR-AND-NEAR” SUTURES
Learn the technique on how to place “far-and-near” sutures
INFORMATION
Mattress sutures – in the process of everting the wound may leave the wound edge slightly open at the end of
the day. “Far-near-near-far” sutures are great with eversion, are strong, so can be used in wounds under
tension. In addition they will assist in closing the wound margins as they cross over the wound margins twice.
REQUIREMENTS
1. The Suture Kit
1.1. Tissue forceps
1.2. A suture needle with an eye
1.3. Suture thread
1.4. A needle holder
1.5. Imitation skin
2. A bright study lamp or equivalent light source
STEP 1
Use a needle with suture material attached, clipped to
a Needle Holder – see Project 2 and 3.
STEP 2
Use of the prepared imitation skin (see Project 4) with the ±7 cm (2,5 inch) cut representing a surgical incision
or a laceration in the skin. Study the diagram [H] shown below.
Suturing Techniques
105 The Apprentice Doctor® E-book](https://image.slidesharecdn.com/howtostitchupwounds-091108135631-phpapp02/85/How-To-Stitch-Up-Wounds-Course-110-320.jpg)
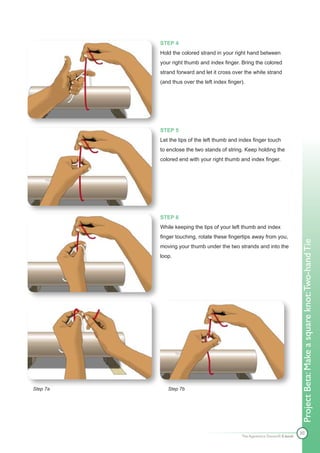
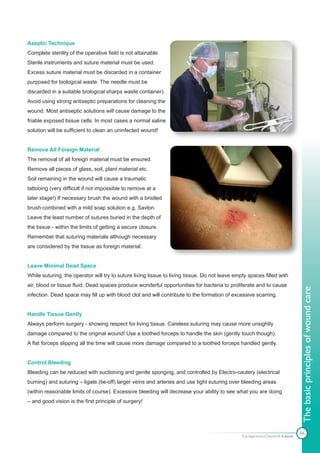
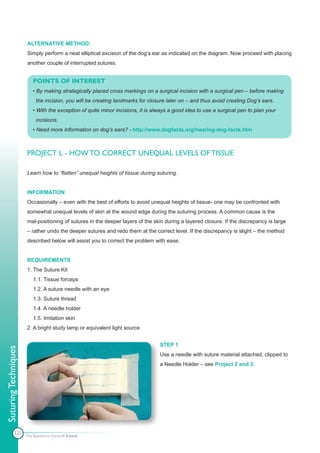
![REQUIREMENTS
1. The Suture Kit
1.1. Tissue forceps
1.2. A suture needle with an eye
1.3. Suture thread
1.4. A needle holder
1.5. Imitation skin
2. A bright study lamp or equivalent light source
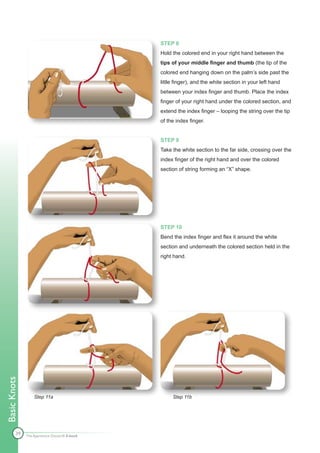
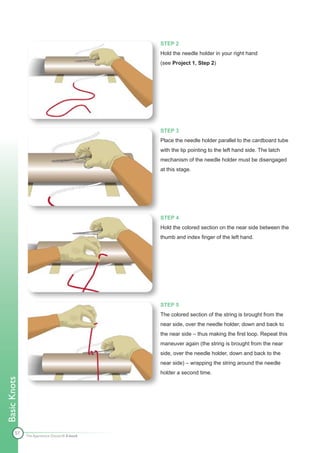
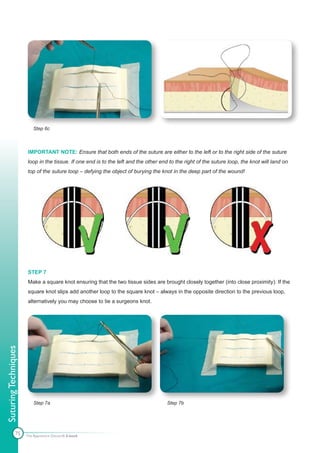
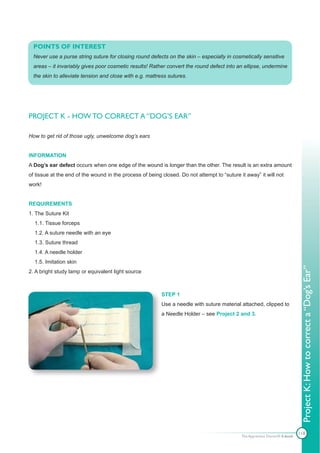
STEP 1
Use a needle with suture material attached, clipped to
a Needle Holder – see Project 2 and 3.
STEP 2
Use of the prepared imitation skin (see Project 4) with the ±7 cm (2,5 inch) cut representing a surgical incision
or a laceration in the skin. Study the diagram [I] shown below.
Project I: How to place subcuticular sutures
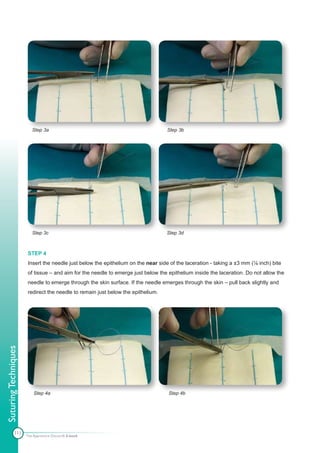
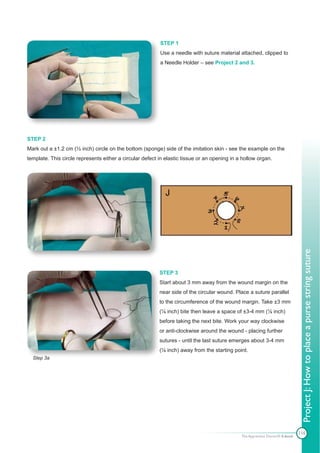
STEP 3
Insert the needle about 3 mm (⅛ inch) to the left of the left corner of the laceration (and in line with the long
axis of the laceration) – aiming for the needle to emerge just below the epithelium on the inside of the
laceration.
110
The Apprentice Doctor® E-book](https://image.slidesharecdn.com/howtostitchupwounds-091108135631-phpapp02/85/How-To-Stitch-Up-Wounds-Course-115-320.jpg)

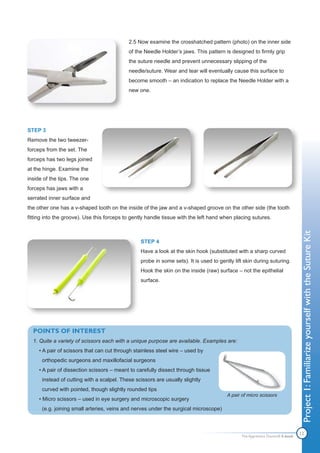
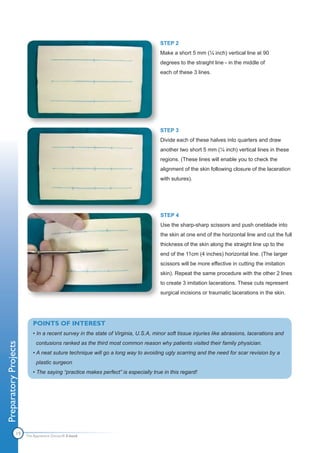
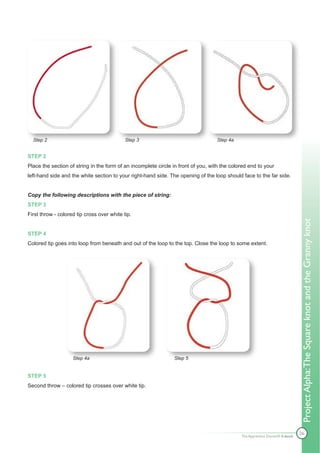
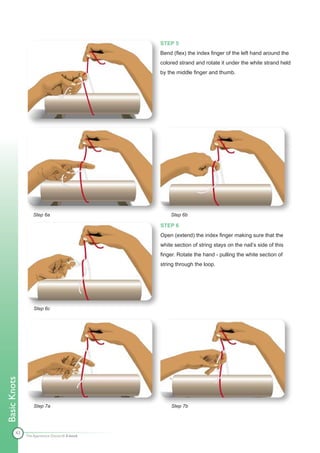
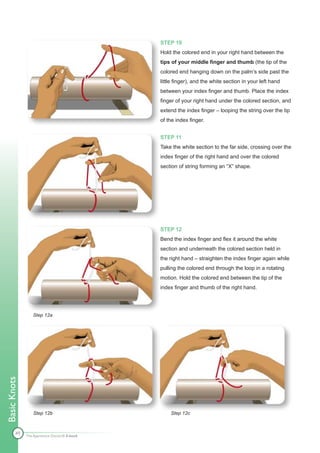
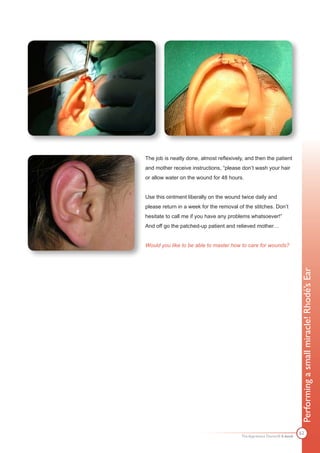
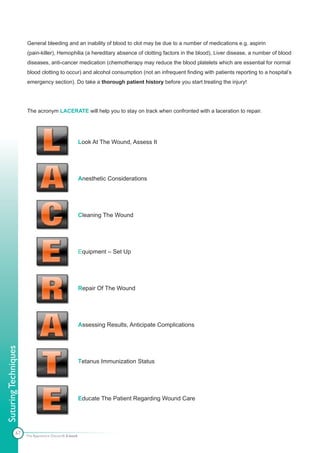
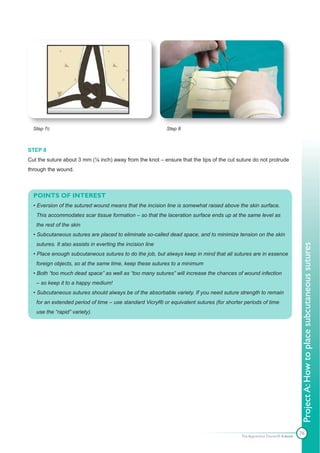
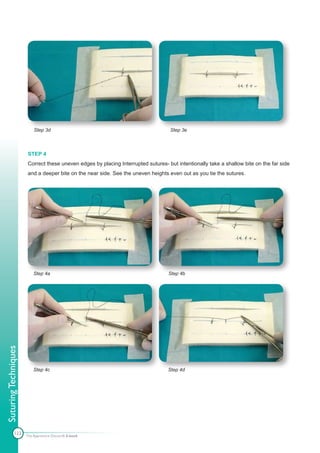
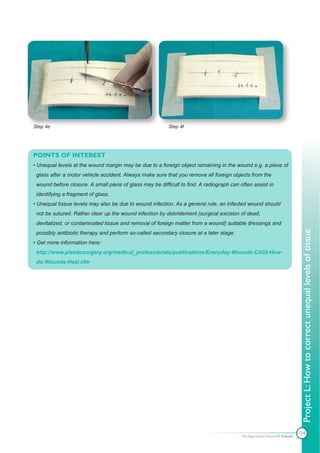
![STEP 2
Use of the prepared imitation skin (see Project 4) with the ±7 cm (2,5 inch) cut representing a surgical incision
or a laceration in the skin. Study the diagram [L] shown below.
STEP 3
Intentionally place two “uneven” sutures at a distance of
± 2.5 cm (1 inch) apart from each other by taking a deep
bite of tissue on the far side and a shallow bite on the
near side of the incision – tie a square knot or surgeons
knot. You have produced a misaligned wound with the
far wound edge higher and the near one lower.
Project L: How to correct unequal levels of tissue
Step 3a
Step 3b Step 3c
122
The Apprentice Doctor® E-book](https://image.slidesharecdn.com/howtostitchupwounds-091108135631-phpapp02/85/How-To-Stitch-Up-Wounds-Course-127-320.jpg)


The document details an illustrated hands-on suturing course that provides an 18-piece kit designed for practicing suturing techniques and wound care, aimed primarily at students and non-professionals interested in learning basic surgical skills. The course covers the use of various medical instruments, knot-tying techniques, and different suturing methods, emphasizing the educational purpose and safety warnings for users. Additionally, it includes contact information for inquiries and outlines conditions for the reproduction of course materials and a reimbursement policy.


![Sharp Injuries Prevention[compatibility mode]](https://cdn.slidesharecdn.com/ss_thumbnails/sharpinjuriespreventioncompatibilitymode-131231014416-phpapp02-thumbnail.jpg?width=640&height=640&fit=bounds)


