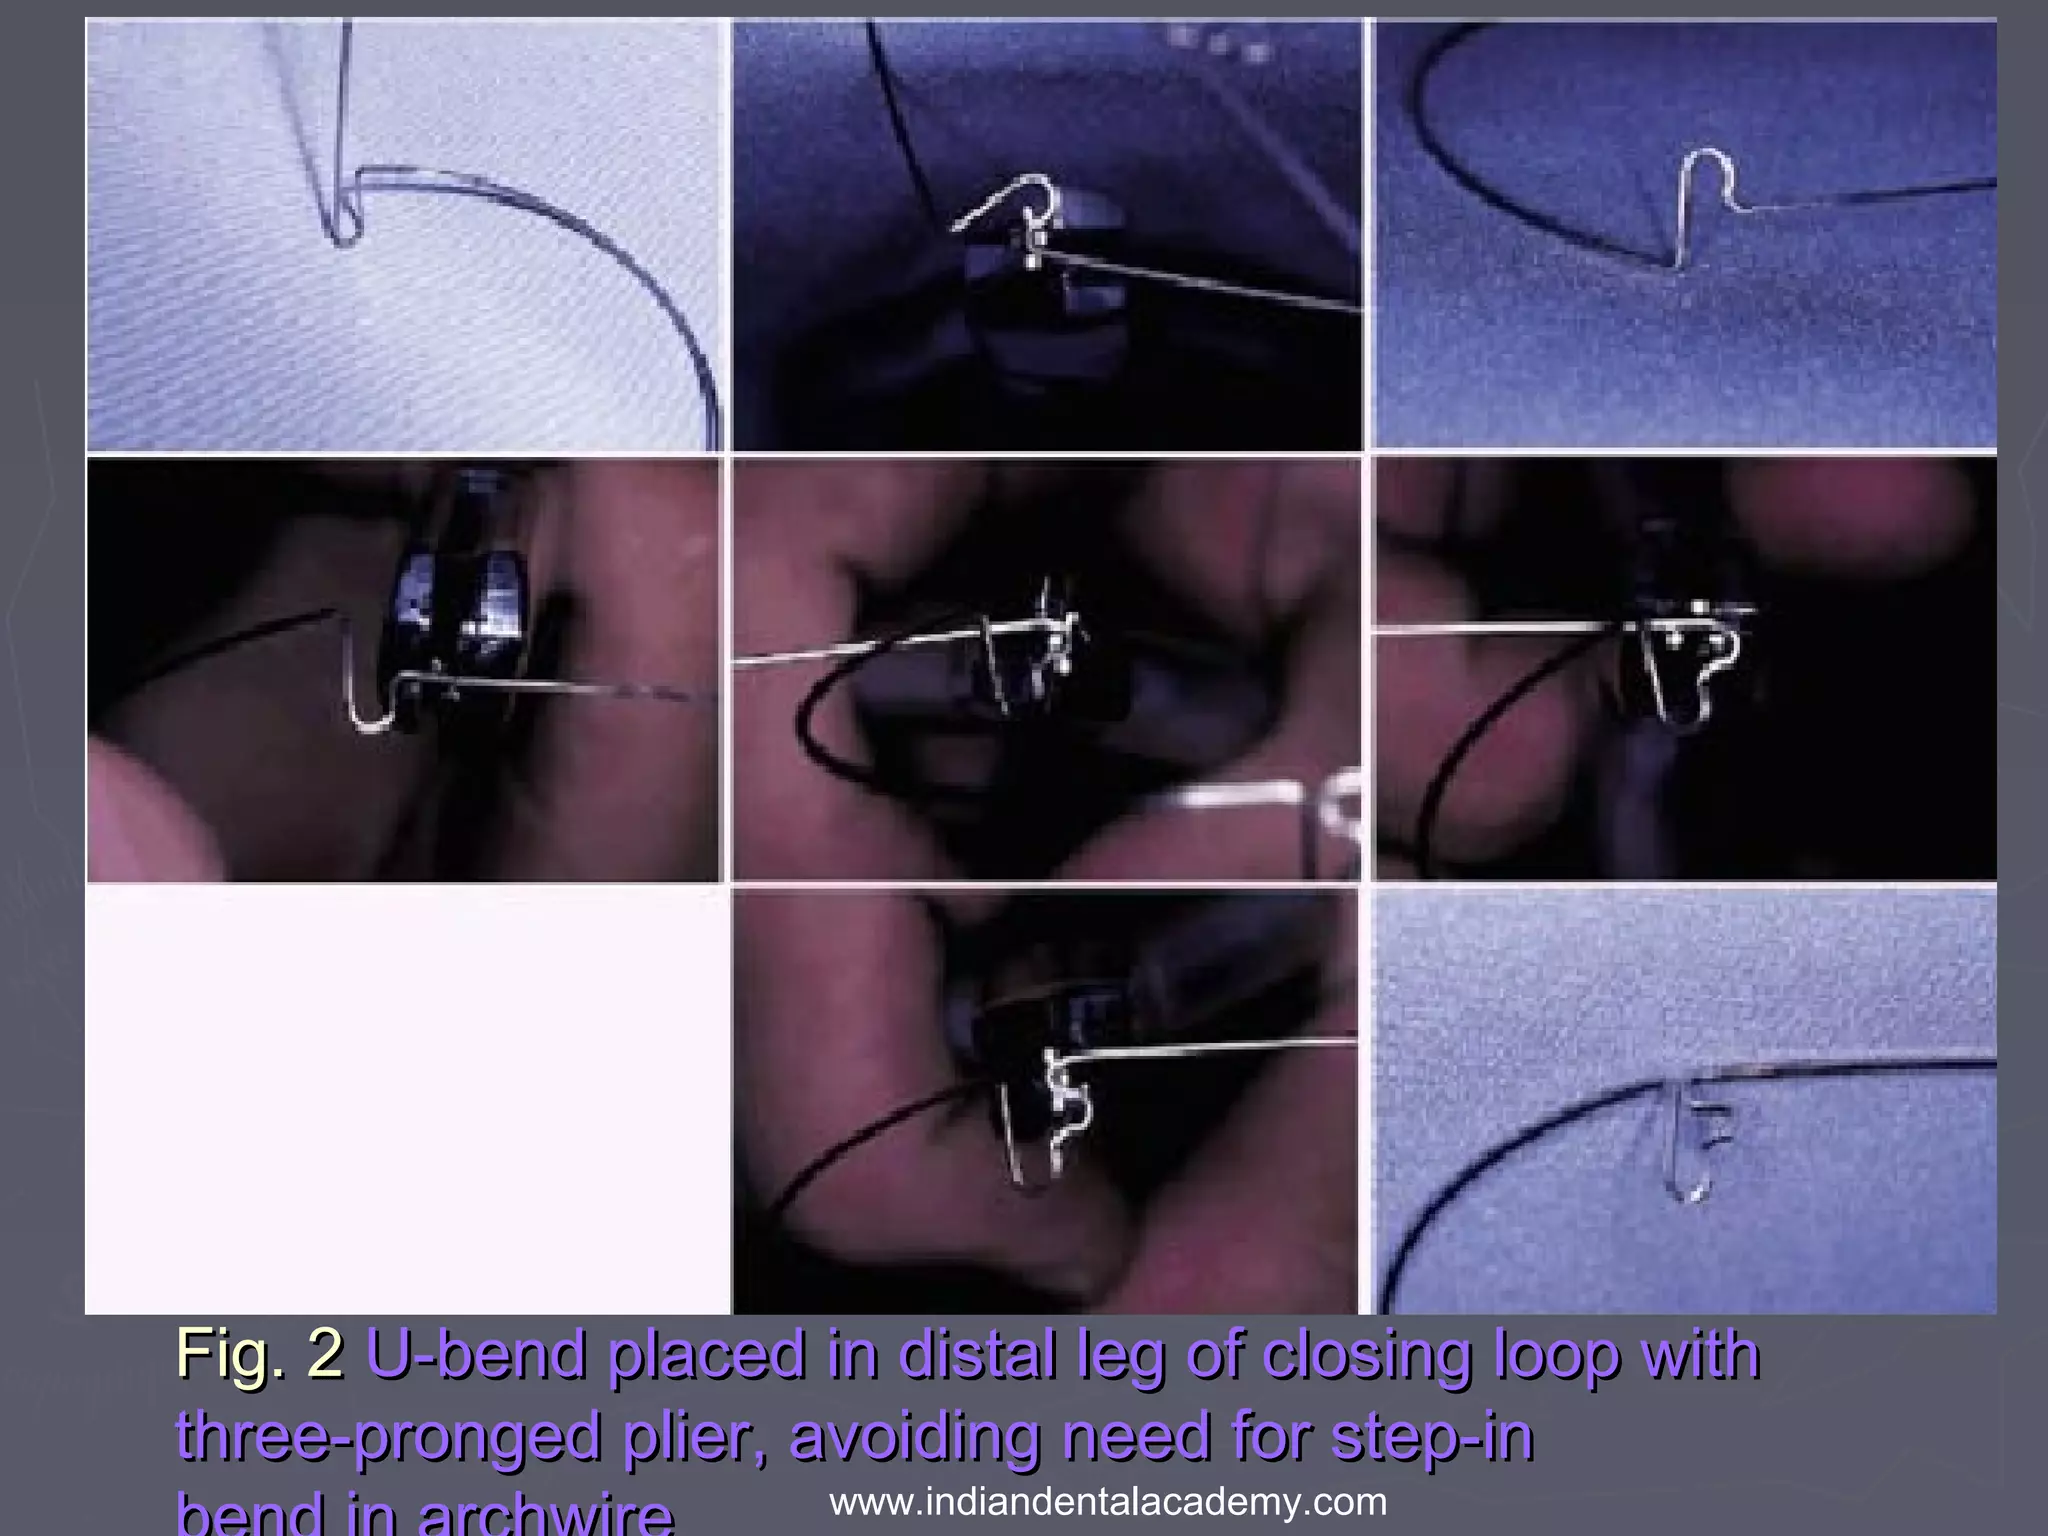
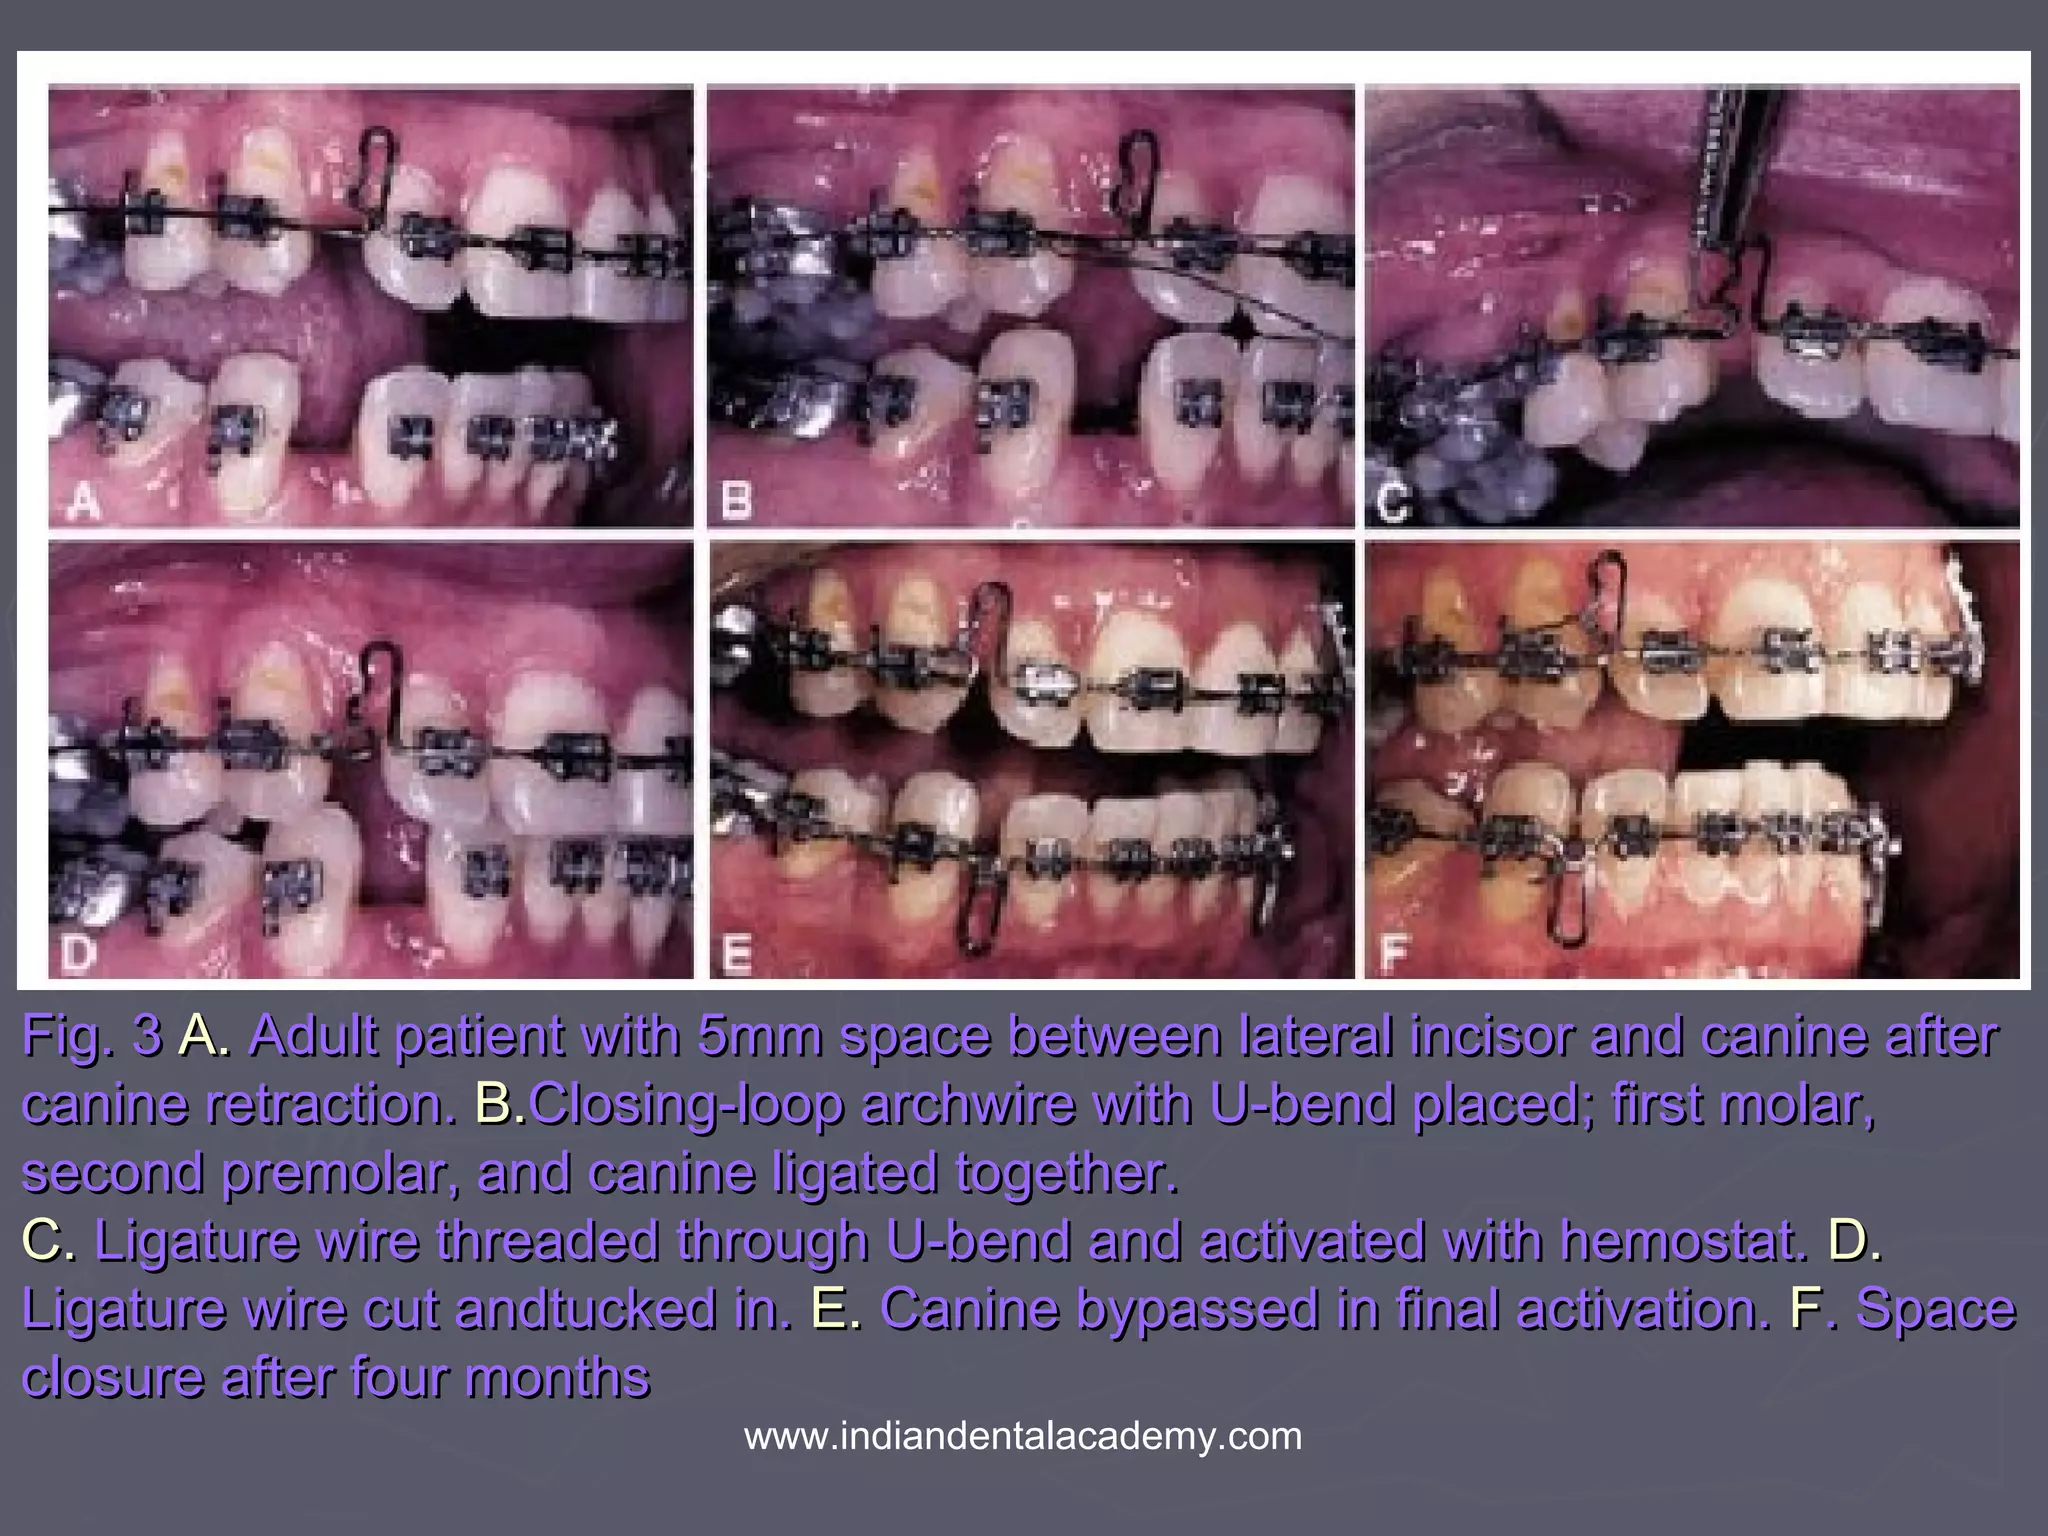
Simplified ActivationSimplified Activation
of Closing Loopsof Closing Loops
www.indiandentalacademy.com
Simplified Activation of Closing Loops
► There are two basic force systems that can be used forThere are two basic force systems that can be used for
space closure.space closure.
► 1. Friction less1. Friction less
► 2. Friction mechanics2. Friction mechanics
► (1) Provides more precise anchorage control, but it carries(1) Provides more precise anchorage control, but it carries
the problem of activation and reactivation of the closingthe problem of activation and reactivation of the closing
loop.loop.
► Some clinicians bend omega loops mesial to the terminalSome clinicians bend omega loops mesial to the terminal
bands and activate the closing loops by tying ligature wiresbands and activate the closing loops by tying ligature wires
from the loops to the bands.from the loops to the bands.
www.indiandentalacademy.com
Simplified Activation of Closing Loops
► Requires considerable chairtime for marking the archwireRequires considerable chairtime for marking the archwire
in the mouthin the mouth
► Bending the omega loop or soldering the hook. tying theBending the omega loop or soldering the hook. tying the
ligature wire can be difficult - terminal tooth is a secondligature wire can be difficult - terminal tooth is a second
molar.molar.
► If the loop or hook becomes flush to the mesial surface ofIf the loop or hook becomes flush to the mesial surface of
the bandthe band
► Before the space closed- archwire removed and rebent, orBefore the space closed- archwire removed and rebent, or
the hook must be removed and repositioned.the hook must be removed and repositioned.
www.indiandentalacademy.com
Simplified Activation of Closing Loops
► common technique for activating a closing loop - bend thecommon technique for activating a closing loop - bend the
archwire distal to terminal molar band.archwire distal to terminal molar band.
This method has manyThis method has many disadvantagesdisadvantages::
1.1. It is difficult to activate the loop accurately.It is difficult to activate the loop accurately.
2.2. The distal end of the wire is hard to grasp and bend.The distal end of the wire is hard to grasp and bend.
Excessive force can cause patient discomfort or dislodgeExcessive force can cause patient discomfort or dislodge
the molar band.the molar band.
3.3. A protruding distal end can irritate the soft tissues.A protruding distal end can irritate the soft tissues.
4.4. If the loop is overactivated, the wire must be unbent andIf the loop is overactivated, the wire must be unbent and
slid through the molar tube before a new bend can beslid through the molar tube before a new bend can be
made distal to it.made distal to it.
www.indiandentalacademy.com
Simplified Activation of Closing Loops
5.5. The same problem applies if the archwire has toThe same problem applies if the archwire has to
be removed before complete space closure duebe removed before complete space closure due
to appliance breakage.to appliance breakage.
6.6. Sometimes the archwire has to be cut mesiallySometimes the archwire has to be cut mesially
andand
then passed distally through the molar tube.then passed distally through the molar tube.
7.7. Reactivation of the archwire a millimeter or twoReactivation of the archwire a millimeter or two
from the previous bend is extremely difficult.from the previous bend is extremely difficult.
► Alternative TechniquesAlternative Techniques
► Modifying the distal leg of the closing loop allowsModifying the distal leg of the closing loop allows
simple and accurate multiple activations.simple and accurate multiple activations.
www.indiandentalacademy.com
Simplified Activation of Closing Loops
► One design incorporates a small loop bent in a mesialOne design incorporates a small loop bent in a mesial
direction (Fig. 1A).direction (Fig. 1A).
► A step-in bend is required distalA step-in bend is required distal
to the loop to maintain continuous archform (Fig. 1B).to the loop to maintain continuous archform (Fig. 1B).
once the archwire is in place, the teeth distal to the spaceonce the archwire is in place, the teeth distal to the space
are ligated together (Fig. 1C).are ligated together (Fig. 1C).
► The end of the ligature wire is then threaded through theThe end of the ligature wire is then threaded through the
small loop and tightened to activate the closing loop (Fig.small loop and tightened to activate the closing loop (Fig.
1D). The tail of the ligature wire is tucked in, and the end of1D). The tail of the ligature wire is tucked in, and the end of
the archwire is cut flush to the distal of the terminal molarthe archwire is cut flush to the distal of the terminal molar
band (Fig. 1E).band (Fig. 1E).
www.indiandentalacademy.com
Fig. 1Fig. 1 AA. Small loop bent mesially in distal leg of closing loop.. Small loop bent mesially in distal leg of closing loop. BB. Step-. Step-
in bend placed distal to loop to maintain continuous archform.in bend placed distal to loop to maintain continuous archform. C.C. WithWith
archwire in place, teeth distal to space ligated together.archwire in place, teeth distal to space ligated together. DD. End of. End of
ligature wire threaded through small loop and tightened. .ligature wire threaded through small loop and tightened. . EE Tail ofTail of
ligature wire tucked in. F.Space closure after one monthligature wire tucked in. F.Space closure after one month
www.indiandentalacademy.com
Simplified Activation of Closing Loops
►After space closure, the loop becomesAfter space closure, the loop becomes
passive (Fig. 1F).passive (Fig. 1F).
►A similar design uses a U-bend instead of aA similar design uses a U-bend instead of a
small loop, allowing activation of the wiresmall loop, allowing activation of the wire
without a step-in bend.without a step-in bend.
► A three-pronged plier is used to bend thisA three-pronged plier is used to bend this
closing loop (Fig. 2).closing loop (Fig. 2).
www.indiandentalacademy.com
Fig. 2Fig. 2 U-bend placed in distal leg of closing loop withU-bend placed in distal leg of closing loop with
three-pronged plier, avoiding need for step-inthree-pronged plier, avoiding need for step-in
www.indiandentalacademy.com
Simplified Activation of Closing Loops
► Case ReportCase Report
► An adult patient presented with four bicuspids previouslyAn adult patient presented with four bicuspids previously
extracted. After canine retraction, a 5mmextracted. After canine retraction, a 5mm
space remained on each side between the lateral incisorspace remained on each side between the lateral incisor
and the canine (Fig. 3A).and the canine (Fig. 3A).
► A closing-loop archwire with a U-bend was inserted, andA closing-loop archwire with a U-bend was inserted, and
the first molars, second premolars, and canines werethe first molars, second premolars, and canines were
ligated together (Fig. 3B). The ligature wire was broughtligated together (Fig. 3B). The ligature wire was brought
through the U-bend and activated with a hemostat (Fig.through the U-bend and activated with a hemostat (Fig.
3C).3C).
► The ligature wire was then cut and tucked in, and the distalThe ligature wire was then cut and tucked in, and the distal
end of the archwire was cut flush with the molar band (Fig.end of the archwire was cut flush with the molar band (Fig.
3D).3D).
www.indiandentalacademy.com
Fig. 3Fig. 3 A.A. Adult patient with 5mm space between lateral incisor and canine afterAdult patient with 5mm space between lateral incisor and canine after
canine retraction.canine retraction. B.B.Closing-loop archwire with U-bend placed; first molar,Closing-loop archwire with U-bend placed; first molar,
second premolar, and canine ligated together.second premolar, and canine ligated together.
C.C. Ligature wire threaded through U-bend and activated with hemostat.Ligature wire threaded through U-bend and activated with hemostat. D.D.
Ligature wire cut andtucked in.Ligature wire cut andtucked in. E.E. Canine bypassed in final activation.Canine bypassed in final activation. FF. Space. Space
closure after four monthsclosure after four months
www.indiandentalacademy.com
Simplified Activation of Closing Loops
►This procedure was repeated monthly forThis procedure was repeated monthly for
three appointments.three appointments.
►On the fourth visit, the canine wasOn the fourth visit, the canine was
bypassed for the final activation (Fig. 3E).bypassed for the final activation (Fig. 3E).
One month later,One month later,
►space was completely closed, and thespace was completely closed, and the
maxillary arch was ready for a continuousmaxillary arch was ready for a continuous
archwire (Fig. 3F).archwire (Fig. 3F).
www.indiandentalacademy.com
Simplified Activation of Closing Loops
ConclusionConclusion
►This article does not address theThis article does not address the
biomechanics of loop design; the examplesbiomechanics of loop design; the examples
shown are simple vertical loops.shown are simple vertical loops.
►The distal legs of other types of loops canThe distal legs of other types of loops can
be similarly modified, however,be similarly modified, however,
►To allow easy activation and reactivation.To allow easy activation and reactivation.
www.indiandentalacademy.com

Activation of loop

  • 1.
    Simplified ActivationSimplified Activation ofClosing Loopsof Closing Loops www.indiandentalacademy.com
  • 2.
    Simplified Activation ofClosing Loops ► There are two basic force systems that can be used forThere are two basic force systems that can be used for space closure.space closure. ► 1. Friction less1. Friction less ► 2. Friction mechanics2. Friction mechanics ► (1) Provides more precise anchorage control, but it carries(1) Provides more precise anchorage control, but it carries the problem of activation and reactivation of the closingthe problem of activation and reactivation of the closing loop.loop. ► Some clinicians bend omega loops mesial to the terminalSome clinicians bend omega loops mesial to the terminal bands and activate the closing loops by tying ligature wiresbands and activate the closing loops by tying ligature wires from the loops to the bands.from the loops to the bands. www.indiandentalacademy.com
  • 3.
    Simplified Activation ofClosing Loops ► Requires considerable chairtime for marking the archwireRequires considerable chairtime for marking the archwire in the mouthin the mouth ► Bending the omega loop or soldering the hook. tying theBending the omega loop or soldering the hook. tying the ligature wire can be difficult - terminal tooth is a secondligature wire can be difficult - terminal tooth is a second molar.molar. ► If the loop or hook becomes flush to the mesial surface ofIf the loop or hook becomes flush to the mesial surface of the bandthe band ► Before the space closed- archwire removed and rebent, orBefore the space closed- archwire removed and rebent, or the hook must be removed and repositioned.the hook must be removed and repositioned. www.indiandentalacademy.com
  • 4.
    Simplified Activation ofClosing Loops ► common technique for activating a closing loop - bend thecommon technique for activating a closing loop - bend the archwire distal to terminal molar band.archwire distal to terminal molar band. This method has manyThis method has many disadvantagesdisadvantages:: 1.1. It is difficult to activate the loop accurately.It is difficult to activate the loop accurately. 2.2. The distal end of the wire is hard to grasp and bend.The distal end of the wire is hard to grasp and bend. Excessive force can cause patient discomfort or dislodgeExcessive force can cause patient discomfort or dislodge the molar band.the molar band. 3.3. A protruding distal end can irritate the soft tissues.A protruding distal end can irritate the soft tissues. 4.4. If the loop is overactivated, the wire must be unbent andIf the loop is overactivated, the wire must be unbent and slid through the molar tube before a new bend can beslid through the molar tube before a new bend can be made distal to it.made distal to it. www.indiandentalacademy.com
  • 5.
    Simplified Activation ofClosing Loops 5.5. The same problem applies if the archwire has toThe same problem applies if the archwire has to be removed before complete space closure duebe removed before complete space closure due to appliance breakage.to appliance breakage. 6.6. Sometimes the archwire has to be cut mesiallySometimes the archwire has to be cut mesially andand then passed distally through the molar tube.then passed distally through the molar tube. 7.7. Reactivation of the archwire a millimeter or twoReactivation of the archwire a millimeter or two from the previous bend is extremely difficult.from the previous bend is extremely difficult. ► Alternative TechniquesAlternative Techniques ► Modifying the distal leg of the closing loop allowsModifying the distal leg of the closing loop allows simple and accurate multiple activations.simple and accurate multiple activations. www.indiandentalacademy.com
  • 6.
    Simplified Activation ofClosing Loops ► One design incorporates a small loop bent in a mesialOne design incorporates a small loop bent in a mesial direction (Fig. 1A).direction (Fig. 1A). ► A step-in bend is required distalA step-in bend is required distal to the loop to maintain continuous archform (Fig. 1B).to the loop to maintain continuous archform (Fig. 1B). once the archwire is in place, the teeth distal to the spaceonce the archwire is in place, the teeth distal to the space are ligated together (Fig. 1C).are ligated together (Fig. 1C). ► The end of the ligature wire is then threaded through theThe end of the ligature wire is then threaded through the small loop and tightened to activate the closing loop (Fig.small loop and tightened to activate the closing loop (Fig. 1D). The tail of the ligature wire is tucked in, and the end of1D). The tail of the ligature wire is tucked in, and the end of the archwire is cut flush to the distal of the terminal molarthe archwire is cut flush to the distal of the terminal molar band (Fig. 1E).band (Fig. 1E). www.indiandentalacademy.com
  • 7.
    Fig. 1Fig. 1AA. Small loop bent mesially in distal leg of closing loop.. Small loop bent mesially in distal leg of closing loop. BB. Step-. Step- in bend placed distal to loop to maintain continuous archform.in bend placed distal to loop to maintain continuous archform. C.C. WithWith archwire in place, teeth distal to space ligated together.archwire in place, teeth distal to space ligated together. DD. End of. End of ligature wire threaded through small loop and tightened. .ligature wire threaded through small loop and tightened. . EE Tail ofTail of ligature wire tucked in. F.Space closure after one monthligature wire tucked in. F.Space closure after one month www.indiandentalacademy.com
  • 8.
    Simplified Activation ofClosing Loops ►After space closure, the loop becomesAfter space closure, the loop becomes passive (Fig. 1F).passive (Fig. 1F). ►A similar design uses a U-bend instead of aA similar design uses a U-bend instead of a small loop, allowing activation of the wiresmall loop, allowing activation of the wire without a step-in bend.without a step-in bend. ► A three-pronged plier is used to bend thisA three-pronged plier is used to bend this closing loop (Fig. 2).closing loop (Fig. 2). www.indiandentalacademy.com
  • 9.
    Fig. 2Fig. 2U-bend placed in distal leg of closing loop withU-bend placed in distal leg of closing loop with three-pronged plier, avoiding need for step-inthree-pronged plier, avoiding need for step-in www.indiandentalacademy.com
  • 10.
    Simplified Activation ofClosing Loops ► Case ReportCase Report ► An adult patient presented with four bicuspids previouslyAn adult patient presented with four bicuspids previously extracted. After canine retraction, a 5mmextracted. After canine retraction, a 5mm space remained on each side between the lateral incisorspace remained on each side between the lateral incisor and the canine (Fig. 3A).and the canine (Fig. 3A). ► A closing-loop archwire with a U-bend was inserted, andA closing-loop archwire with a U-bend was inserted, and the first molars, second premolars, and canines werethe first molars, second premolars, and canines were ligated together (Fig. 3B). The ligature wire was broughtligated together (Fig. 3B). The ligature wire was brought through the U-bend and activated with a hemostat (Fig.through the U-bend and activated with a hemostat (Fig. 3C).3C). ► The ligature wire was then cut and tucked in, and the distalThe ligature wire was then cut and tucked in, and the distal end of the archwire was cut flush with the molar band (Fig.end of the archwire was cut flush with the molar band (Fig. 3D).3D). www.indiandentalacademy.com
  • 11.
    Fig. 3Fig. 3A.A. Adult patient with 5mm space between lateral incisor and canine afterAdult patient with 5mm space between lateral incisor and canine after canine retraction.canine retraction. B.B.Closing-loop archwire with U-bend placed; first molar,Closing-loop archwire with U-bend placed; first molar, second premolar, and canine ligated together.second premolar, and canine ligated together. C.C. Ligature wire threaded through U-bend and activated with hemostat.Ligature wire threaded through U-bend and activated with hemostat. D.D. Ligature wire cut andtucked in.Ligature wire cut andtucked in. E.E. Canine bypassed in final activation.Canine bypassed in final activation. FF. Space. Space closure after four monthsclosure after four months www.indiandentalacademy.com
  • 12.
    Simplified Activation ofClosing Loops ►This procedure was repeated monthly forThis procedure was repeated monthly for three appointments.three appointments. ►On the fourth visit, the canine wasOn the fourth visit, the canine was bypassed for the final activation (Fig. 3E).bypassed for the final activation (Fig. 3E). One month later,One month later, ►space was completely closed, and thespace was completely closed, and the maxillary arch was ready for a continuousmaxillary arch was ready for a continuous archwire (Fig. 3F).archwire (Fig. 3F). www.indiandentalacademy.com
  • 13.
    Simplified Activation ofClosing Loops ConclusionConclusion ►This article does not address theThis article does not address the biomechanics of loop design; the examplesbiomechanics of loop design; the examples shown are simple vertical loops.shown are simple vertical loops. ►The distal legs of other types of loops canThe distal legs of other types of loops can be similarly modified, however,be similarly modified, however, ►To allow easy activation and reactivation.To allow easy activation and reactivation. www.indiandentalacademy.com
  • 14.