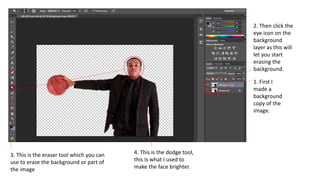
1. 1. First I
made a
background
copy of the
image.
2. Then click the
eye icon on the
background
layer as this will
let you start
erasing the
background.
3. This is the eraser tool which you can
use to erase the background or part of
the image
4. This is the dodge tool,
this Is what I used to
make the face brighter.
2. This is a tool I used to
brighten parts of the image
which makes the image
look more like a cartoon.
This tool is used to
darken parts of the
image, I used this to
darken the clothes.
These are edits
that I played
around with to see
what fitted best.
Change saturation,
hue, brightness
etc.
3. To get the basketball to be in color, I had to create a
background copy and keep that in color and erase the
rest of the image. This kept one part black and white
and the copy of the image that is left, in color .
These show the
edits I have made in
my Image and what
edits I have made,
such as hue and
saturation.
4. In this image I used
black and white effect
and played around with
the adjustable settings
and seen what fitted
better with the style of
magazine I am doing.
I also used the dodge tool to get rid of
some graffiti on the backboard. The dodge
tool makes things brighter but I used it to
erase graffiti by brightening it a lot.
5. In this image I made a
background copy again so I
could erase the background
so I can now use whatever
background I choose.
I used the dodger tool again
to brighten the face also the
burn tool to make the
clothing darker.