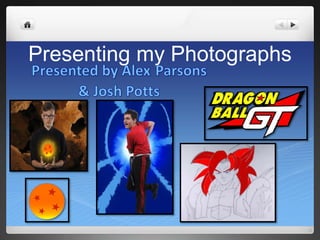
2. 1st Edit.
To edit this image in photoshop I have used the
magic wand tool to cut around the body and
the chair. I then used the eraser to neatly cut
out parts that could not get fully erased by the
magic wand. I then erased the white stripe and
Adidas logo off the trousers to make the image
look neat. I used the clamp tool to smudge the
hair line to suit the image we were
interpreting. After cutting out the entire image
I created another layer for a blue background. I
then created another layer to start adding
special effects to interpretate the image we
were using. I used the paint brush to create a
formal shape behind the image before using
the stamp to blur the colour to bring out the
edges. I then used the oval shape to create a
spherical shape around the side of the image. I
then used the stamp to blur out the oval shape
to create an identical theme to the image we
were interpretating.
3. 2nd Edit.
I used the magic wand tool to cut out
the ball and separate it from the
background in order to edit and add
special effects to it. I used the colour
menu on the right side of photoshop
with the preset option to add the
solid orange colour at the top and
slightly fade it out at the bottom into
a lighter orange and then yellow. I
then used the shape tool to easily
insert a star onto the image and then
used the preset colour option again to
make the star a solid red colour.
4. 3rd Edit.
I used the magic wand tool to cut
out the main image in order to put
it up against different
backgrounds with separate layers
in photshop. I then inserted the
‘Dragon Ball’ image that we
created and lined it up with the
hands to interpretate the image
we were using. I then used the
stamp tool to create the same
blurred effect on the Dragon Ball
to interpretate the image we were
using as much as we could. I then
searched for an image which
would suit the background of the
image we were interpretating to
suit the image we had edited and
make is as accurate as possible.
5. 4th Edit.
I used the background eraser
tool to cut the image away
from the background in order
to get the title by itself. When I
had cut the image out I could
use it on any
surface/background and it
would be just the logo without
a white background or box.
6. 5th Edit
I have cropped the original
image down and added colour
by using the bucket tool which
will fills large areas in the
correct colour as long as there
are no gaps in the lines.