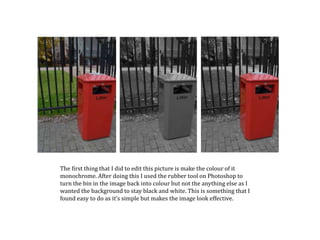
1. The first thing that I did to edit this picture is make the colour of it
monochrome. After doing this I used the rubber tool on Photoshop to
turn the bin in the image back into colour but not the anything else as I
wanted the background to stay black and white. This is something that I
found easy to do as it’s simple but makes the image look effective.
2. I started off by selecting the whole of the
image and then I began to use the quick
selecting tool to select just the person in the
image. By doing this it then meant I could
change the colour of the background to black
but keep the part of the image with the
person in just as it was.
3. I decided that the first thing I would do is
change the background of the image but keep
the part of the picture with the person in how it
was. I did this with the select tool and changed
the background colour to black. I then added a
glare in the top corner to make it stand out
more and look less boring.
4. I made the image look like there was a sun glare in it by
adding a glare to the top right corner. I did this because I
thought that the image looked a bit dull and needed to look
like there was more light. I then made the image into a
monochrome colour and adjusted the brightness of it to
make it look darker.