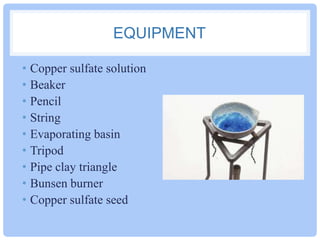
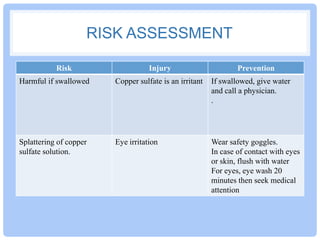
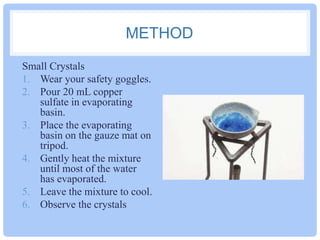
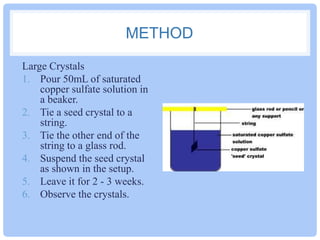
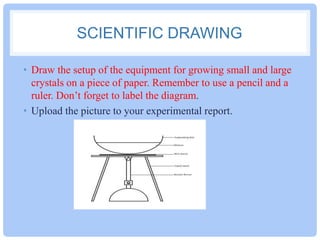
CRYSTALLISATION
YEAR 7 – SCIENCE OF MIXTURES

By G.Ajetrao
AIM
Aim: To grow copper
sulfate crystals.
BACKGROUND INFORMATION
Crystallisation is a separation technique that is
used to separate a solid that has dissolved in a
liquid. The solution is warmed in an open
container, allowing the solvent to
evaporate, leaving a saturated solution.
As the saturated solution is allowed to cool, the
solid will separate out of the solution and
crystals will start to grow. The crystals can be
collected and allowed to dry.
BACKGROUND INFORMATION
The size of the crystals depends on the rate of
cooling.
Fast cooling crystals will result in a large
number of small crystals.
Slow cooling will result in a smaller number of
large crystals
EQUIPMENT
• Copper sulfate solution
• Beaker
• Pencil
• String
• Evaporating basin
• Tripod
• Pipe clay triangle
• Bunsen burner
• Copper sulfate seed
RISK ASSESSMENT
Risk

Injury

Prevention

Harmful if swallowed

Copper sulfate is an irritant

If swallowed, give water
and call a physician.
.

Splattering of copper
sulfate solution.

Eye irritation

Wear safety goggles.
In case of contact with eyes
or skin, flush with water
For eyes, eye wash 20
minutes then seek medical
attention
METHOD
Small Crystals
1. Wear your safety goggles.
2. Pour 20 mL copper
sulfate in evaporating
basin.
3. Place the evaporating
basin on the gauze mat on
tripod.
4. Gently heat the mixture
until most of the water
has evaporated.
5. Leave the mixture to cool.
6. Observe the crystals
METHOD
Large Crystals
1. Pour 50mL of saturated
copper sulfate solution in
a beaker.
2. Tie a seed crystal to a
string.
3. Tie the other end of the
string to a glass rod.
4. Suspend the seed crystal
as shown in the setup.
5. Leave it for 2 - 3 weeks.
6. Observe the crystals.
SCIENTIFIC DRAWING
• Draw the setup of the equipment for growing small and large
crystals on a piece of paper. Remember to use a pencil and a
ruler. Don’t forget to label the diagram.
• Upload the picture to your experimental report.
RESULTS
• Upload the pictures of your small and large crystals onto your
google doc
DISCUSSION
• Write a discussion.
CONCLUSION
• Write an appropriate conclusion for the experiment.

Crystallisation

  • 1.
    CRYSTALLISATION YEAR 7 –SCIENCE OF MIXTURES By G.Ajetrao
  • 2.
    AIM Aim: To growcopper sulfate crystals.
  • 3.
    BACKGROUND INFORMATION Crystallisation isa separation technique that is used to separate a solid that has dissolved in a liquid. The solution is warmed in an open container, allowing the solvent to evaporate, leaving a saturated solution. As the saturated solution is allowed to cool, the solid will separate out of the solution and crystals will start to grow. The crystals can be collected and allowed to dry.
  • 4.
    BACKGROUND INFORMATION The sizeof the crystals depends on the rate of cooling. Fast cooling crystals will result in a large number of small crystals. Slow cooling will result in a smaller number of large crystals
  • 5.
    EQUIPMENT • Copper sulfatesolution • Beaker • Pencil • String • Evaporating basin • Tripod • Pipe clay triangle • Bunsen burner • Copper sulfate seed
  • 6.
    RISK ASSESSMENT Risk Injury Prevention Harmful ifswallowed Copper sulfate is an irritant If swallowed, give water and call a physician. . Splattering of copper sulfate solution. Eye irritation Wear safety goggles. In case of contact with eyes or skin, flush with water For eyes, eye wash 20 minutes then seek medical attention
  • 7.
    METHOD Small Crystals 1. Wearyour safety goggles. 2. Pour 20 mL copper sulfate in evaporating basin. 3. Place the evaporating basin on the gauze mat on tripod. 4. Gently heat the mixture until most of the water has evaporated. 5. Leave the mixture to cool. 6. Observe the crystals
  • 8.
    METHOD Large Crystals 1. Pour50mL of saturated copper sulfate solution in a beaker. 2. Tie a seed crystal to a string. 3. Tie the other end of the string to a glass rod. 4. Suspend the seed crystal as shown in the setup. 5. Leave it for 2 - 3 weeks. 6. Observe the crystals.
  • 9.
    SCIENTIFIC DRAWING • Drawthe setup of the equipment for growing small and large crystals on a piece of paper. Remember to use a pencil and a ruler. Don’t forget to label the diagram. • Upload the picture to your experimental report.
  • 10.
    RESULTS • Upload thepictures of your small and large crystals onto your google doc
  • 11.
  • 12.
    CONCLUSION • Write anappropriate conclusion for the experiment.