HMCS Max Bernays Pre-Deployment Brief (May 2024).pptx
Photo-shoot
1. Photo-shoot
During the production of my photo-shot for my rock magazine, I had some issues
with the final product of the images looking blurry due to the fact that I took the
pictures to fast, however I also had some pictures that came out according to my
plan. Another way in which my photo-shoot went according to plan was that my
models had the correct clothes that is appropriate for the genre of my magazine,
they didn’t wear a loth of colour on there clothes as most the vibrancy within the
magazine comes from the colours used for the text and the use of Photoshop to
make the face glow even more.
I took more than 50 pictures for my photo-shoot and I cautiously decided on which
pictures I should use, depending on there presence and where or not it loots
suitable to be on the front cover, double page spread and contents page. By carefully
deducting my images it left me with 12 pictures. The reason for deducting my
images is that within a rock magazine there are only one main image within the
front cove, double page spread and contents page meaning that I would only have 3
main images and some advertising images of what would be consist within the
magazine on the for cover leading me to have about 4 pictures within my magazine.
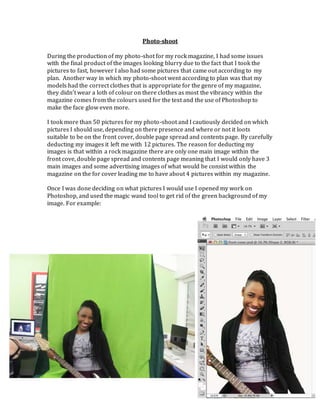
Once I was done deciding on what pictures I would use I opened my work on
Photoshop, and used the magic wand tool to get rid of the green background of my
image. For example:
2. This image clearly shows parts of the classroom, leading me to crop out those pars
to make it be simpler for the process of editing out the green screen. I did this same
process within the other pictures, which I had decided on using that also show parts
of the classroom.
Over all the process of removing the green screen was simple and easy as I made the
models be positioned in the center of the green screen, making it easy for me to edit
around it.
Front Cover
For my front cover I decided to have the model Ramot to be the main image on it.
The reason for this was because of her look and the clothes she was wearing, as dark
colours such as black is an assocciated style amound rock music.
While deciding on what I wanted the main image to look like, I talked about it being
a midshot of the artist allawing the audience to see her clearly. Also the reason for
this is because it allows the model to look directly at the camera, allowing the
audience to feel more connected to her when looking at the magazine as they feel as
if she is looking directly at her.
3. Above, is my initial plan for my fron cover, from this you can see that the image
wouls ve taking up a large perpotion of the left hand side of the magazine, however
I decided not to follow this format as my model would be sitting down so I wanted
to place her in the center of the magazine to make it seem more appeling to the
audience.
Front Cover Tests
I decided not to have the image over lapping the masthead making it be beneath the
image as I wanted the name of the magazine to be clear to the audience, making
4. them know what the magazine is and making it be more noticebale to them. In the
image I decided on usinging I croped out part of the electric guiter because when
taking the picture that part of the guiter was out of the green screne which was
making it hardere for me to edit out as the coulers where interlinked with the gutier,
so when using the magic wand tool to remove the classroom it was doing the same
to the guiter. I decided to not to had draw out the parts to edit out as it would of
made my picture look less profesional as it wouldn’t be as defines when using the
magic tool it would also have some cover s to it making it also look less profecional.
For my masthead I decided to use a font similer to Kerrang magazine to follow the
conventions of a real media product, and to also create a rock vibe to it.