
Recommended
More Related Content
What's hot
What's hot (20)
Viewers also liked
Viewers also liked (20)
Similar to Alterations
Similar to Alterations (20)
More from geetag
More from geetag (20)
Recently uploaded
Recently uploaded (20)
Alterations
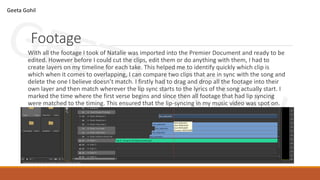
- 1. Footage With all the footage I took of Natalie was imported into the Premier Document and ready to be edited. However before I could cut the clips, edit them or do anything with them, I had to create layers on my timeline for each take. This helped me to identify quickly which clip is which when it comes to overlapping, I can compare two clips that are in sync with the song and delete the one I believe doesn’t match. I firstly had to drag and drop all the footage into their own layer and then match wherever the lip sync starts to the lyrics of the song actually start. I marked the time where the first verse begins and since then all footage that had lip syncing were matched to the timing. This ensured that the lip-syncing in my music video was spot on. Geeta Gohil
- 2. Beginning to Section/Cut the clips Once all clips were lip-synced, I began to watch clips one by one and use the razor tool to cut the clip in half. The strategy I used was to cut the clip when the verse ended and the chorus begun, when the chorus ended and a new verse began. Once this process was completed, I deleted parts which I felt didn’t really fit in with the certain part of the song. Once few clips were deleted. I played the whole timeline. My music video was slowly constructing well with a variety of shots and angles used. The screenshot shows the footage has ben cut in their sections. In addition, I created extra layers for footage that hasn’t got the performer lip syncing. It made the process of editing easier as I can easily identify clips via looking at the layers. Layers Footage that has been put in the timeline and in their own layers. Geeta Gohil
- 3. Deleting unwanted footage Once the long process of cutting clips was done, the process of deletion unwanted footage which didn’t match with the audio began. This was the first step into properly editing and creating the music video. Looking at the image of the timeline, there was a stage where I was deleting some clips at some parts I decided to create another layer for all the definite and final clips I like to go into that layer. Geeta Gohil
- 4. Adding Effects to footage The effects I used throughout my music video are listed below. These have helped me to achieve something different. The warp stabiliser has enabled to adjust the ‘shaken’ parts of a clip and to be smoothen out. This is a great effect to have to make the clip look like it’s been shot very well and give it a good final finish. Many shots I have taken outdoor has not been the best video I've captured however with warp stabiliser, it has enhanced the quality of the video alongside the look of it, and not being shaky. The three colour way is more related to the colour grading, this is one effect used in colour grading where you can adjust 3 tones of colour together by selecting the Master tool or without it. Furthermore, the input and the output levels adjust the colours on how much of black/grey/white will be in the clip. Throughout the music video, there are two – three filters given to the clip, for the ballet performance, there is a slight sepia tone to them, alongside the outdoor have some darker shadows and a light sepia tone to them. For the black studio shoot, there is blue/purple shadow given to give it more of a cooler atmosphere and create this mystery. The cross dissolve gives a narrative aesthetic to the music video. It makes it look very ‘dramatic’ and which can appeal to the audience to make them feel part of it. As I have a slow start to the chosen song, so it would be great to use cross dissolve in the beginning of my music video as it can match the pace of the song and create a professional finish to the performance. Geeta Gohil
- 5. Motion and Time Remapping Motion was added to few clips to add slight ‘pan’ or ‘zoom’ that has been created in Premier rather than the coming from the original footage. The motion is added by key frame by key frame. Time remapping allows to edit footage to create a slow motion in only certain parts of the clip, these are measured in the frames. The advantage of time remapping is that it creates a professional look of slow motion rather than the whole clip’s speed duration decreasing. Geeta Gohil