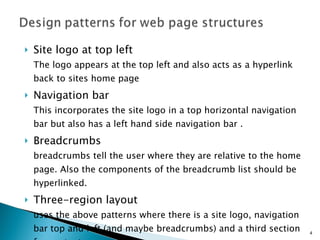
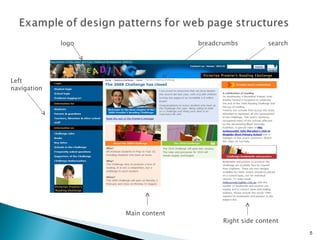
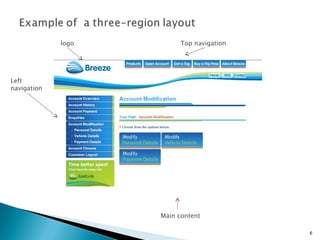
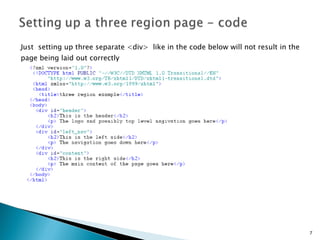
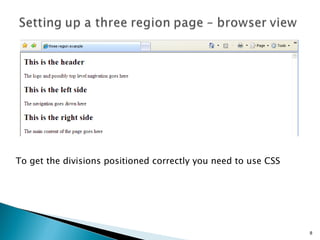
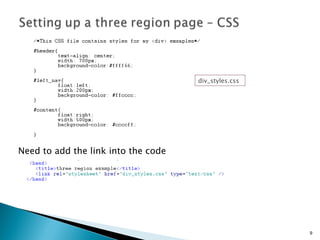
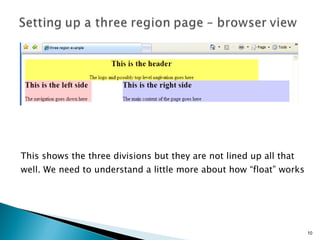
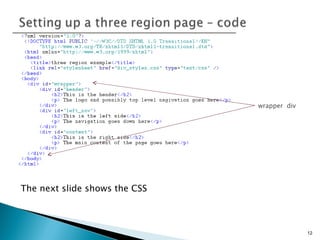
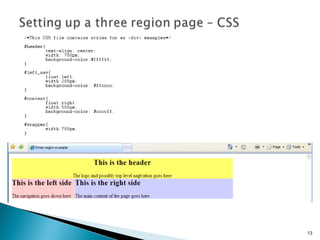
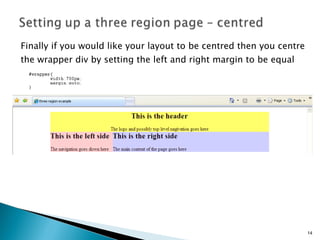
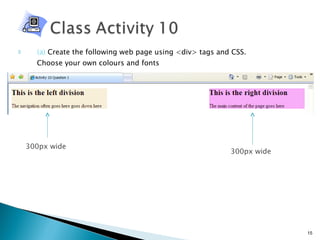
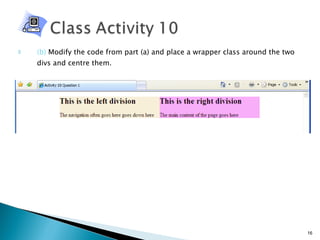
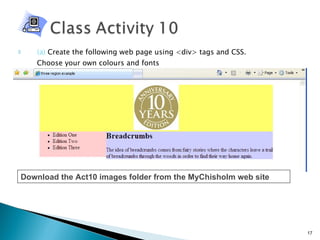
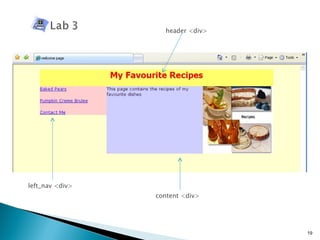
Using CSS and <div> tags  for page layout
In Lab1 we used tables to define how the page layout will look. Works fine but if asked to redesign it is difficult to modify. A <div> tag combined with CSS will create a page that is easy to manage and manipulate later. A <div> tag defines a division or section in a HTML document It is often used to group block elements to format them with styles. The <div> tag is supported in all major browsers
The <div> tag is a block level element The <div> tag can contain nearly any other tag The <div> tag cannot be inside <p> tags  The <div> tag is not a replacement <p> tag The <p> tag is for paragraphs only while <div> tag defines more general divisions within a document Don’t replace <p> tags with <div> tags Good idea to label your <div> tags as you place them in the document Also good idea to close your <div> tags as soon as you open them, then place the contents within the element
Site logo at top left The logo appears at the top left and also acts as a hyperlink back to sites home page Navigation bar This incorporates the site logo in a top horizontal navigation bar but also has a left hand side navigation bar . Breadcrumbs breadcrumbs tell the user where they are relative to the home page. Also the components of the breadcrumb list should be hyperlinked. Three-region layout uses the above patterns where there is a site logo, navigation bar top and left (and maybe breadcrumbs) and a third section for content
breadcrumbs Left navigation logo search Main content Right side content
Left navigation logo Main content Top navigation
Just  setting up three separate <div>  like in the code below will not result in the page being laid out correctly
To get the divisions positioned correctly you need to use CSS
Need to add the link into the code div_styles.css
This shows the three divisions but they are not lined up all that well. We need to understand a little more about how “float” works
float property allows you to position your web page designs Can only float block-level elements  eg <img />, <p> </p>, <ul> </ul>, and  <div> </div> Can float to either the left or right. Any element that follows the floated element will flow around the floated element on the other side. Should always define the width of a floated element A floated element will move as far to the left or right of the container element as it can. If the container element is the <body> tag the floated div will sit on the margin on the page If the container element itself is contained by something else the floated div will sit on the margin of the container We are going to add a “wrapper” div to our previous eg.
The next slide shows the CSS wrapper  div
Finally if you would like your layout to be centred then you centre the wrapper div by setting the left and right margin to be equal
(a)  Create the following web page using <div> tags and CSS.  Choose your own colours and fonts  300px wide 300px wide
(b)  Modify the code from part (a) and place a wrapper class around the two divs and centre them.
(a)  Create the following web page using <div> tags and CSS.  Choose your own colours and fonts  Download the Act10 images folder from the MyChisholm web site
You are going to change the way Lab2 is set up and now use <div> tags and CSS  (rather than a table) to layout your page. This means your XHTML and your CSS file will both need to be modified  Reminder: The site consists of four pages: welcome.html baked_pears.html pumpkin_creme_brulee.html contact_me.html These pages are shown over the next four slides
header <div> left_nav <div> content <div>
In this section you learnt how to use <div> tags and  CSS to layout a  web page. Covered: <div> tags float property CSS Design patterns The next section looks at how to make your page more interactive by adding javaScript to your page

Page Layout 2010

  • 1.
    Using CSS and<div> tags for page layout
  • 2.
    In Lab1 weused tables to define how the page layout will look. Works fine but if asked to redesign it is difficult to modify. A <div> tag combined with CSS will create a page that is easy to manage and manipulate later. A <div> tag defines a division or section in a HTML document It is often used to group block elements to format them with styles. The <div> tag is supported in all major browsers
  • 3.
    The <div> tagis a block level element The <div> tag can contain nearly any other tag The <div> tag cannot be inside <p> tags The <div> tag is not a replacement <p> tag The <p> tag is for paragraphs only while <div> tag defines more general divisions within a document Don’t replace <p> tags with <div> tags Good idea to label your <div> tags as you place them in the document Also good idea to close your <div> tags as soon as you open them, then place the contents within the element
  • 4.
    Site logo attop left The logo appears at the top left and also acts as a hyperlink back to sites home page Navigation bar This incorporates the site logo in a top horizontal navigation bar but also has a left hand side navigation bar . Breadcrumbs breadcrumbs tell the user where they are relative to the home page. Also the components of the breadcrumb list should be hyperlinked. Three-region layout uses the above patterns where there is a site logo, navigation bar top and left (and maybe breadcrumbs) and a third section for content
  • 5.
    breadcrumbs Left navigationlogo search Main content Right side content
  • 6.
    Left navigation logoMain content Top navigation
  • 7.
    Just settingup three separate <div> like in the code below will not result in the page being laid out correctly
  • 8.
    To get thedivisions positioned correctly you need to use CSS
  • 9.
    Need to addthe link into the code div_styles.css
  • 10.
    This shows thethree divisions but they are not lined up all that well. We need to understand a little more about how “float” works
  • 11.
    float property allowsyou to position your web page designs Can only float block-level elements eg <img />, <p> </p>, <ul> </ul>, and <div> </div> Can float to either the left or right. Any element that follows the floated element will flow around the floated element on the other side. Should always define the width of a floated element A floated element will move as far to the left or right of the container element as it can. If the container element is the <body> tag the floated div will sit on the margin on the page If the container element itself is contained by something else the floated div will sit on the margin of the container We are going to add a “wrapper” div to our previous eg.
  • 12.
    The next slideshows the CSS wrapper div
  • 14.
    Finally if youwould like your layout to be centred then you centre the wrapper div by setting the left and right margin to be equal
  • 15.
    (a) Createthe following web page using <div> tags and CSS. Choose your own colours and fonts 300px wide 300px wide
  • 16.
    (b) Modifythe code from part (a) and place a wrapper class around the two divs and centre them.
  • 17.
    (a) Createthe following web page using <div> tags and CSS. Choose your own colours and fonts Download the Act10 images folder from the MyChisholm web site
  • 18.
    You are goingto change the way Lab2 is set up and now use <div> tags and CSS (rather than a table) to layout your page. This means your XHTML and your CSS file will both need to be modified Reminder: The site consists of four pages: welcome.html baked_pears.html pumpkin_creme_brulee.html contact_me.html These pages are shown over the next four slides
  • 19.
    header <div> left_nav<div> content <div>
  • 23.
    In this sectionyou learnt how to use <div> tags and CSS to layout a web page. Covered: <div> tags float property CSS Design patterns The next section looks at how to make your page more interactive by adding javaScript to your page