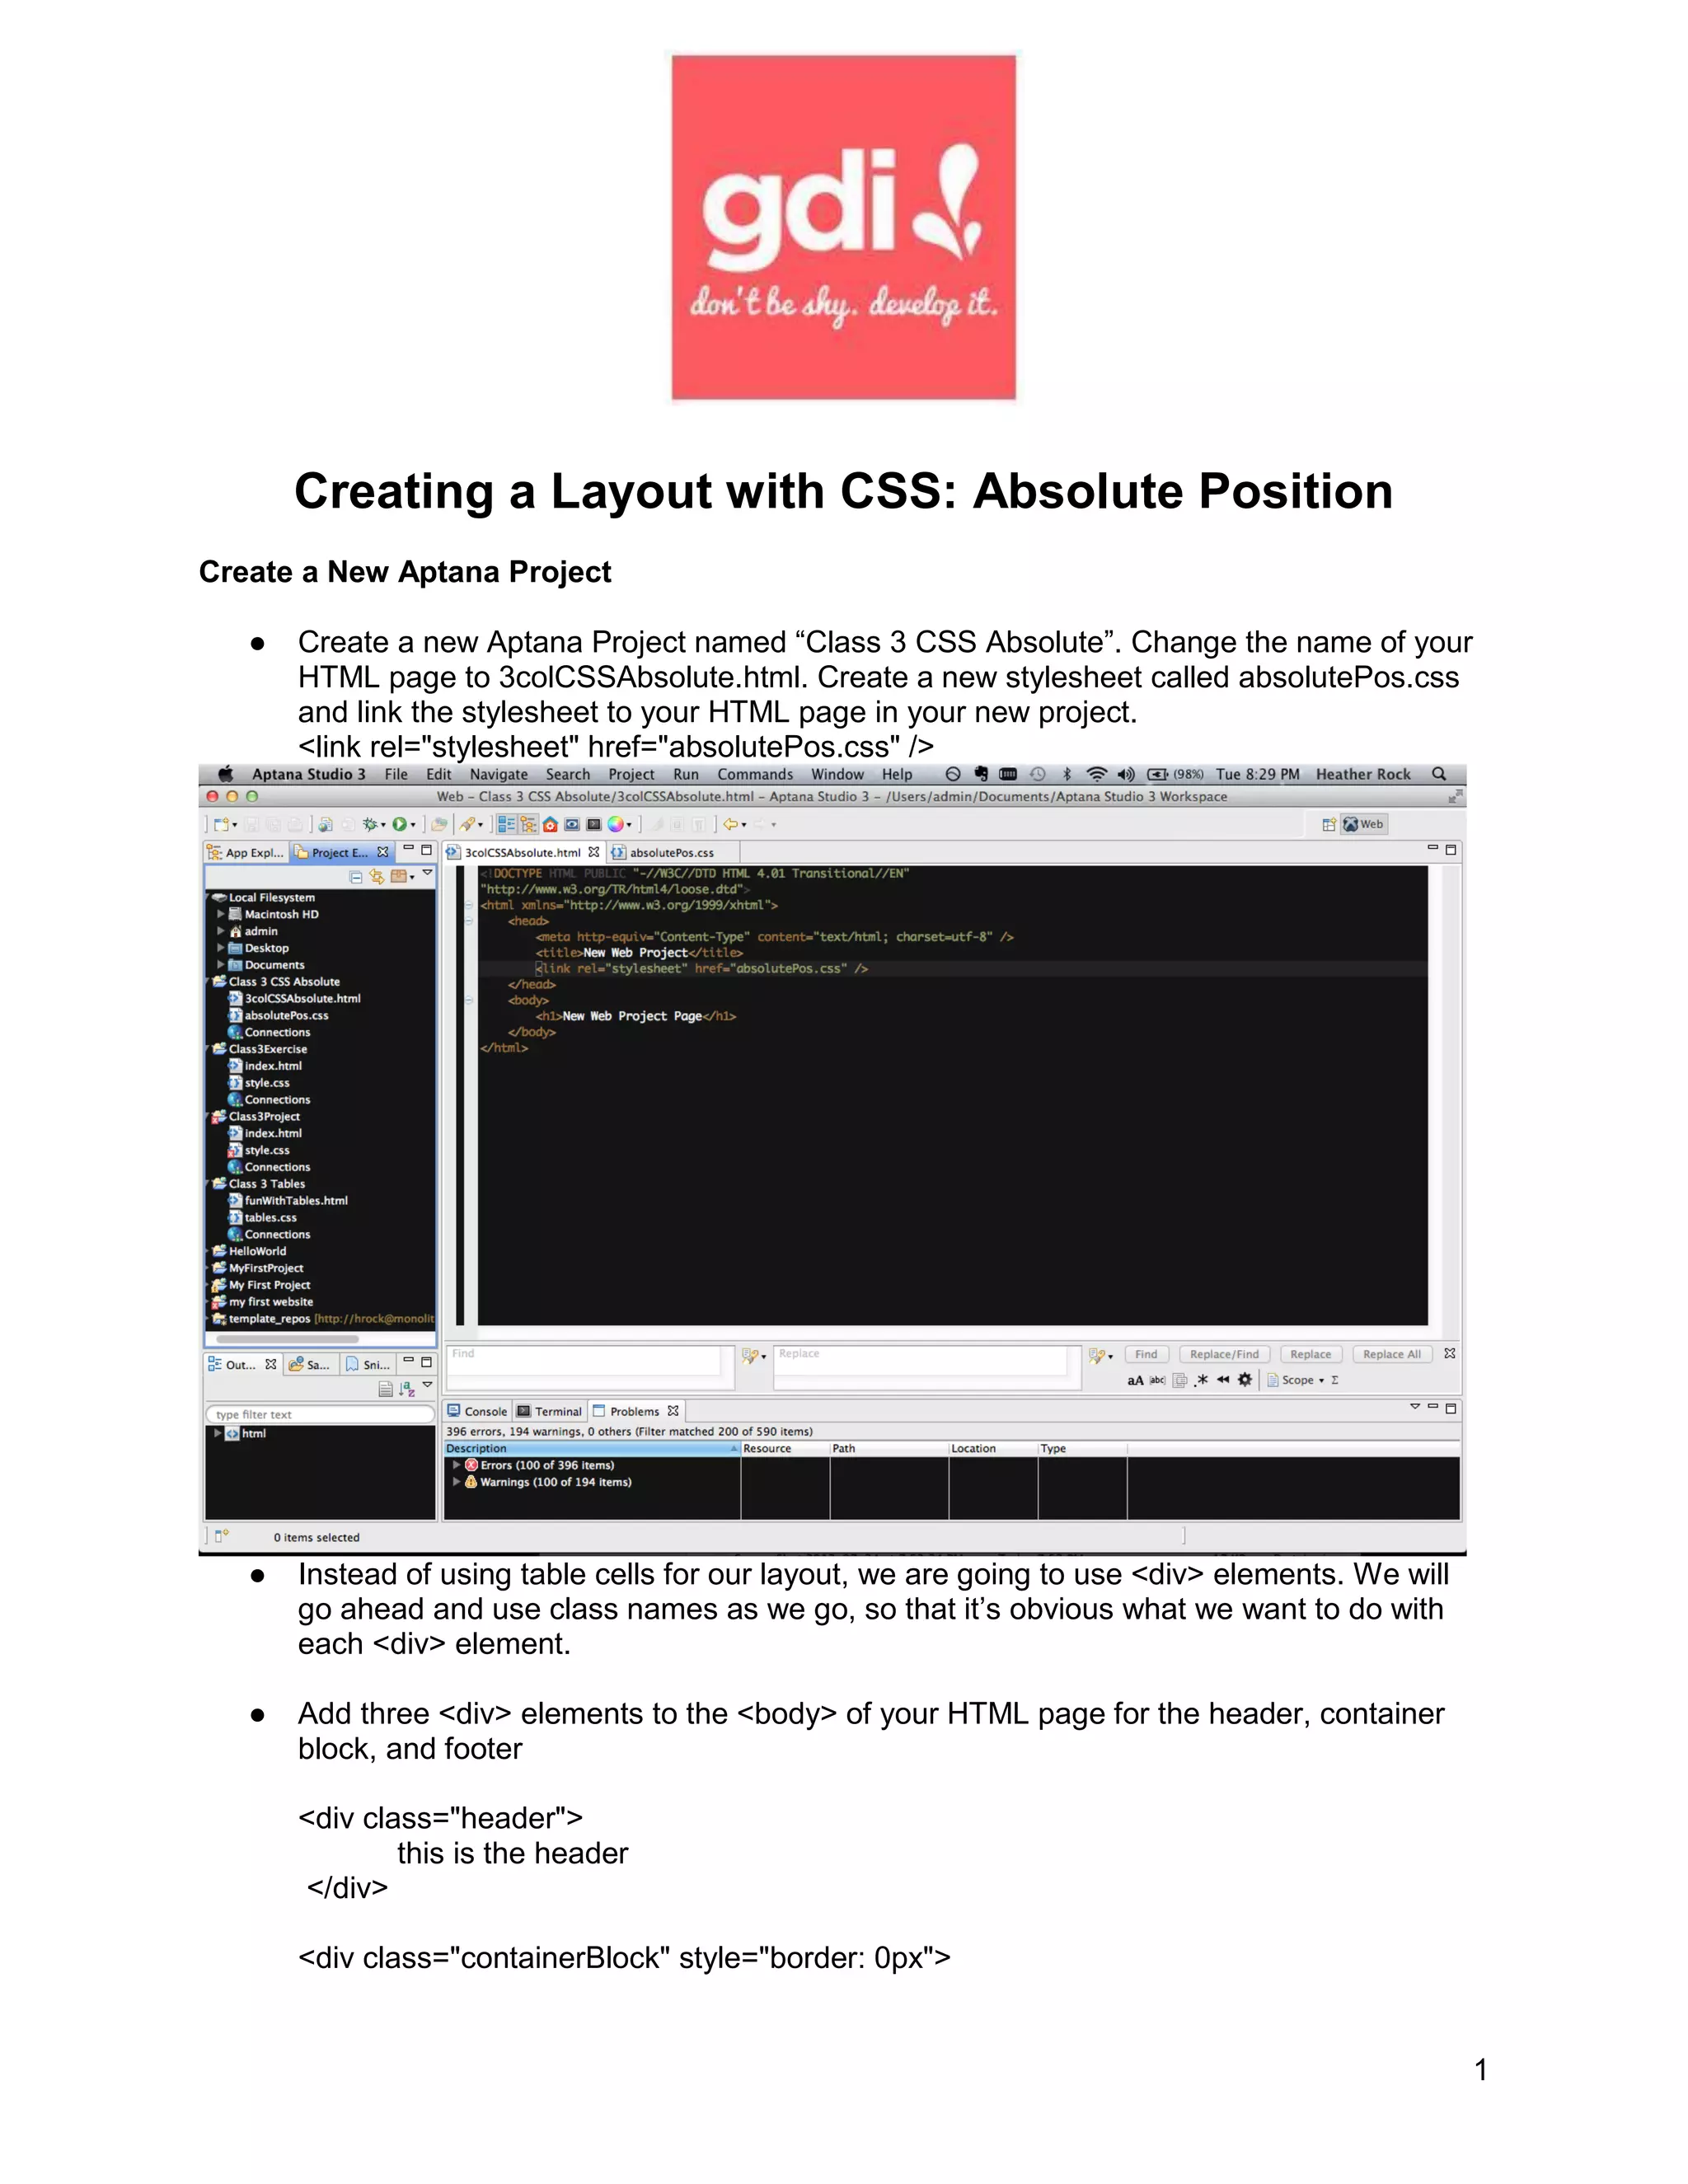
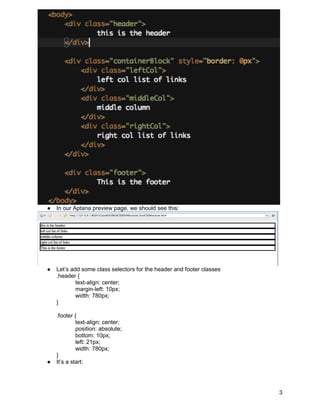
Creating a Layout with CSS: Absolute Position
Create a New Aptana Project

   ●   Create a new Aptana Project named “Class 3 CSS Absolute”. Change the name of your
       HTML page to 3colCSSAbsolute.html. Create a new stylesheet called absolutePos.css
       and link the stylesheet to your HTML page in your new project.
       <link rel="stylesheet" href="absolutePos.css" />


   ●   Instead of using table cells for our layout, we are going to use <div> elements. We will
       go ahead and use class names as we go, so that it’s obvious what we want to do with
       each <div> element.

   ●   Add three <div> elements to the <body> of your HTML page for the header, container
       block, and footer

       <div class="header">
               this is the header
       </div>

       <div class="containerBlock" style="border: 0px">


                                                                                                  1
</div>

    <div class="footer">
            This is the footer
    </div>


●   And our preview page looks like this:


●   Let’s add a black border to our <div> elements by adding a div element selector to our
    absolutePos.css file
    div {
            border: 3px solid black;
    }


●   We need to add three more <div> elements to our containerBlock div in order to achieve
    the 3 column layout


                                                                                             2
●   In our Aptana preview page, we should see this:


●   Let’s add some class selectors for the header and footer classes
    .header {
            text-align: center;
            margin-left: 10px;
            width: 780px;
    }

    .footer {
             text-align: center;
             position: absolute;
             bottom: 10px;
             left: 21px;
             width: 780px;
    }
●   It’s a start:


                                                                       3
●   Now let’s add some class selectors and declarations for our containerBlock and three
    column classes
    .containerBlock {
            position: absolute;
    }

    .leftCol {
             width: 200px;
             background-color: purple;
             color: white;
              padding: 10px;
             text-align: left;
             vertical-align: top;
             position: absolute;
             left: 10px;
             top: 5px;
             height: 400px;
    }

    .middleCol {
           padding: 10px;
           height: 400px;
           width: 300px;
           vertical-align:top;
           position: absolute;
           left: 240px;
           top: 5px;
    }

    .rightCol {
            width: 200px;
            background-color: purple;
            color: white;
            padding: 10px;
            text-align: right;
            vertical-align: top;


                                                                                           4
position: absolute;
           left: 570px;
           height: 400px;
           top: 5px;
    }


●   Add an unordered list to the left column and a list of links
    <ul>
         <li>
            <a href="moreCompleteTableLayout.html">Home</a>
         </li>
         <li>
            <a href="http://news.google.com">News</a>
         </li>
         <li>
            <a href="mailto:thisisafakeemail@fakeemail.com">Email me</a>
         </li>
         <li>
            <a href="http://www.twitter.com/girldevelopit">GDI on Twitter</a>
         </li>
      </ul>


                                                                                5
●   We will also add some ul and li selectors to our CSS
    ul {
           list-style-type: none;
           margin: 0;
           padding: 0;
    }

    li {
           padding: 0 0 5px 0;
    }
●   Preview in Aptana:


●   Now let’s use what we have learned about pseudo-classes to style our links:
    a:link {


                                                                                  6
color: #00CCFF;
           text-decoration: none;
    }

    a:visited, a:hover {
            color: #6666CC;
            text-decoration: none;
    }

    a:active {
            color: #CCFF99;
            text-decoration: none;
    }


●   Now let’s add some links to our right column <div>
    <ul>
         <li>
            <a href="moreCompleteTableLayout.html">Home</a>
         </li>
         <li>
            <a href="http://news.google.com">News</a>
         </li>
         <li>
            <a href="mailto:thisisafakeemail@fakeemail.com">Email me</a>
         </li>
         <li>
            <a href="http://www.twitter.com/girldevelopit">GDI on Twitter</a>
         </li>
      </ul>


                                                                                7
8

Class 3 create an absolute layout with css abs position (aptana)

  • 1.
    Creating a Layoutwith CSS: Absolute Position Create a New Aptana Project ● Create a new Aptana Project named “Class 3 CSS Absolute”. Change the name of your HTML page to 3colCSSAbsolute.html. Create a new stylesheet called absolutePos.css and link the stylesheet to your HTML page in your new project. <link rel="stylesheet" href="absolutePos.css" /> ● Instead of using table cells for our layout, we are going to use <div> elements. We will go ahead and use class names as we go, so that it’s obvious what we want to do with each <div> element. ● Add three <div> elements to the <body> of your HTML page for the header, container block, and footer <div class="header"> this is the header </div> <div class="containerBlock" style="border: 0px"> 1
  • 2.
    </div> <div class="footer"> This is the footer </div> ● And our preview page looks like this: ● Let’s add a black border to our <div> elements by adding a div element selector to our absolutePos.css file div { border: 3px solid black; } ● We need to add three more <div> elements to our containerBlock div in order to achieve the 3 column layout 2
  • 3.
    In our Aptana preview page, we should see this: ● Let’s add some class selectors for the header and footer classes .header { text-align: center; margin-left: 10px; width: 780px; } .footer { text-align: center; position: absolute; bottom: 10px; left: 21px; width: 780px; } ● It’s a start: 3
  • 4.
    Now let’s add some class selectors and declarations for our containerBlock and three column classes .containerBlock { position: absolute; } .leftCol { width: 200px; background-color: purple; color: white; padding: 10px; text-align: left; vertical-align: top; position: absolute; left: 10px; top: 5px; height: 400px; } .middleCol { padding: 10px; height: 400px; width: 300px; vertical-align:top; position: absolute; left: 240px; top: 5px; } .rightCol { width: 200px; background-color: purple; color: white; padding: 10px; text-align: right; vertical-align: top; 4
  • 5.
    position: absolute; left: 570px; height: 400px; top: 5px; } ● Add an unordered list to the left column and a list of links <ul> <li> <a href="moreCompleteTableLayout.html">Home</a> </li> <li> <a href="http://news.google.com">News</a> </li> <li> <a href="mailto:thisisafakeemail@fakeemail.com">Email me</a> </li> <li> <a href="http://www.twitter.com/girldevelopit">GDI on Twitter</a> </li> </ul> 5
  • 6.
    We will also add some ul and li selectors to our CSS ul { list-style-type: none; margin: 0; padding: 0; } li { padding: 0 0 5px 0; } ● Preview in Aptana: ● Now let’s use what we have learned about pseudo-classes to style our links: a:link { 6
  • 7.
    color: #00CCFF; text-decoration: none; } a:visited, a:hover { color: #6666CC; text-decoration: none; } a:active { color: #CCFF99; text-decoration: none; } ● Now let’s add some links to our right column <div> <ul> <li> <a href="moreCompleteTableLayout.html">Home</a> </li> <li> <a href="http://news.google.com">News</a> </li> <li> <a href="mailto:thisisafakeemail@fakeemail.com">Email me</a> </li> <li> <a href="http://www.twitter.com/girldevelopit">GDI on Twitter</a> </li> </ul> 7
  • 8.