
Recommended
More Related Content
What's hot
What's hot (20)
Similar to Unit Builder guide
Similar to Unit Builder guide (20)
More from taskstream
More from taskstream (20)
Recently uploaded
Recently uploaded (20)
Unit Builder guide
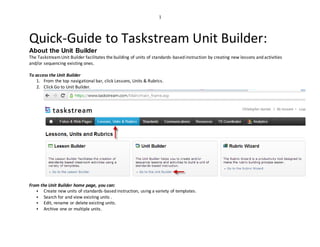
- 1. 1 Quick-Guide to Taskstream Unit Builder: About the Unit Builder The TaskstreamUnit Builder facilitates the building of units of standards-based instruction by creating new lessons and activities and/or sequencing existing ones. To access the Unit Builder 1. From the top navigational bar, click Lessons, Units & Rubrics. 2. Click Go to Unit Builder. From the Unit Builder home page, you can: Create new units of standards-based instruction, using a variety of templates. Search for and view existing units . Edit, rename or delete existing units. Archive one or multiple units.
- 2. 2 When you access the Unit Builder home page, you are navigated to a filtered list of all your existing units. The contents of the Unit Builder home page reflect your most recent filter choice. You can change your filter at any time.
- 3. 3 Each unit is described by name. Lessons display in alphabetical order (or, if grouped by unit, by alphabetical order within each unit).There is also a Legend at the bottom of the page indicating its usage. Creating a New Unit From the Unit Builder home page, you can create new unit from scratch or you can select an existing unit to copy and adapt (together with any associated lessons) fornew purposes. To create a new unit from scratch 1. Enter a new Unit Title 2. Select a starting template for your unit plan from the Choose a Format pull-down list. 3. (Optional) If you have created custom folders to organize your work in Taskstream, you can choose to file your new unit in one of these folders by selecting from the Add to Folder pull-down list. 4. Click the Create New button. You are navigated to the Build Unit tab to enter unit information, using the template you selected. Once you have created and saved your unit, you can request comments and/or share it with others in a number of ways. You can also schedule your units by adding them to the TaskstreamCalendar shared by your organization.
- 4. 4 Build a Unit Whether you're creating a new unit from scratch or adapting a copy of an existing unit, the details of the plan are developed on the Build Unit page of the Unit Builder. The name of your selected unit is displayed below the page title. The header area of the Build Unit page displays the creation and (when applicable) modification dates of your unit plan, together with the format used. If your unit was based on a unit created by someone else (e.g. a unit copied from the Cybrary or from an email link), the original author attribution is also displayed.
- 5. 5 Add Content to Elements The left panel of the Build Unit page displays the format template. Each element of the unit plan is identified by a button with a descriptive name. As you add and save information for an element, the area to the right of the button is filled with a read-only version of that content. To add/edit information about a unit element 1. Click the element button. 2. A new window displays, in which to describe that element of the unit plan.
- 6. 6 *Somewindowsincludemultiple tabs,enablingyoutoprovideinformationinseveral ways.Forexample,the Assessment/Rubrics descriptionhas tabsthatenable youtoinclude text,an attachedTaskstreamrubric,and/oravarietyof uploadedfilesor weblinks thatsupportorillustrate the method of Assessment.
- 7. 7 *When adding text,notethatthe maximumnumberof charactersallowedwill vary basedonelement.If youhaveenabledtheHTML toolbar,it will be availableformany (butnotall) textfields. *Somemay include a combinationof textandselection fields. *If the elementyouselected includes an Attachments tab,youcan uploadandattachfiles to yourunitplan. *If the elementyouselected includes a Web Linkstab,youcan addweblinks to yourunit plan. 3. Use the Learning Activities element to attach lessons to this unit. 4. After you have entered information for an element, click Save & Close Window. You are navigated back to the main Build Unit page. Add/Manage Lessons in a Unit The unit template includes a specific element to attach lessons to the unit and manage them. All lessons currently attached to the unit are listed within this element. If an annotation has been added for the lesson that text appears below the lesson name. Click any lesson name (link) in that element to display a print view of that lesson.
- 8. 8 To add or manage lessons to your unit (created via Lesson Builder) 1. Click Learning Activities (or similarly named element). 2. You are navigated to an Included Lessons page, which lists the various lessons currently associated with this unit. From this page,youcan: Click the nameof any attachedlessontosee it in Print View(andoptionally sendtoyourprinter) Reorderthe list of attachedlessons Attachingexistinglessons(created in LessonBuilder) to this unit Accessthe LessonBuilder to create newlessons(whichwill immediately attachto this unit) Edit Lesson in theLessonBuilder. Clicking this buttonnavigatesyoutothe Build Lesson page,whereyoucanedit oradd informationtoany element. Addanannotationtoalessonlisting. The informationyouentervia the Add Annotation buttononly appliestothisunit.This annotationwillnot appearforotherunitswith whichthe lessonmay be associated. Removea lessonfromthe unit.This doesNOT delete the lessonfromTaskstream.Thelessonremainsavailablefromthe Lesson Builder. 3. When you have completed adding or managing attached lessons, click the Accept & Return to Unit button to return to the main Build Unit page.