
Recommended
More Related Content
What's hot
What's hot (19)
Viewers also liked
Viewers also liked (11)
Similar to Creating your DRF program
Similar to Creating your DRF program (20)
More from taskstream
More from taskstream (16)
Recently uploaded
Recently uploaded (20)
Creating your DRF program
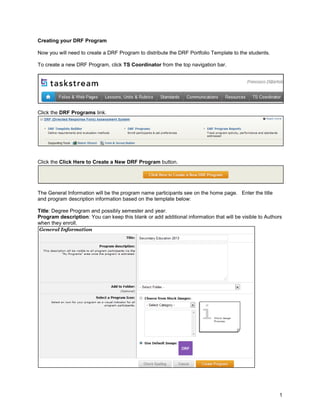
- 1. 1 Creating your DRF Program Now you will need to create a DRF Program to distribute the DRF Portfolio Template to the students. To create a new DRF Program, click TS Coordinator from the top navigation bar. Click the DRF Programs link. Click the Click Here to Create a New DRF Program button. The General Information will be the program name participants see on the home page. Enter the title and program description information based on the template below: Title: Degree Program and possibly semester and year. Program description: You can keep this blank or add additional information that will be visible to Authors when they enroll.
- 2. 2 After you have entered your course information, click the Create Program button. From the Setup tab, you will see an explanation of the different roles in the DRF Program. Role Definitions: Author: The student(s) who will be submitting work in your course. Reviewer: Individual(s) who can provide narrative feedback on assignments prior to submission. (Advisors, Student Peer Reviewers, Faculty, etc.) Evaluator: Individual(s) who will be scoring work. Evaluator Manager: As the program creator, you are automatically a Report Manager. Selecting Program Options: Please select the following Program Options listed below: For Reviewer Options, select the appropriate radio button. Note: This is not a requirement, but students will have the option to request feedback from you, their peers. If you select that Reviewers are not necessary, you can always change this option, if needed. For Evaluator Permissions, check the boxes: “Can release evaluations and scores to authors,” “Can send work back for revision to authors,” “Can evaluate one author's work submission multiple times” and “Can Enable QuickScore”. Leave Author Anonymity and Originality Detection unchecked. For Versioning of Author Work, select: “Enable: Evaluators will be given the option to create snapshots of work submissions for individual authors when work is sent back for revision” and “Allow Evaluators to view ALL snapshots of work submissions.”
- 3. 3 Next, you will have to set your permissions in the program. Note: Additional permissions can be added, if needed. Setting Your Program Permissions: For Select the roles you will have in this program, select: Evaluator. Once you have made the above selections, click the Save button to continue. Click the DRF Template tab select your course template that will be distributed to Authors and Reviewers. From the DRF Template tab, you can select the template you have started, by using the drop-down menu to select the category, ‘My DRF Templates’ and click Go. Note: You may complete the step prior to finishing your DRF Template customizations. Click the Select This Template button that corresponds with the appropriate template to make your selection. Once you have selected a template, you will also indicate whether multiple Evaluators are needed or not needed. This refers to whether Author submissions require more than one evaluation before receiving a final score. In this case, select: Multiple evaluators NOT needed and click the Continue button. Next, you will see the DRF Template with the project names and categories appear. If you wish, you may click the Edit button next to the corresponding assignments to enter specific Due Dates. If you have any questions about this feature, please contact Mentoring Services.
- 4. 4 Click the Enrollment tab to enroll participants into the program. From the Enrollment tab, you can enroll authors, reviewers and evaluators into your course. Authors (students) will be given a self-enrollment code. Reviewers and Evaluators are manually enrolled into programs. To create a self-enrollment code, click the Change button next to Allow Authors to Self Enroll. Select the radio button to change the status to ‘Self enrollment is ON’. Enter a self enrollment code or click Generate a Code. When finished, click the Apply Changes button. On the following screen, you will be able to access a Word document with instructions for using the code to self-enroll. This document can be distributed to Authors (students) who will be using the code to self- enroll. You can save a copy of this document to your computer. To manually enroll a Reviewer or Evaluator for example, click the appropriate button.
- 5. 5 This will open the Member Locator window. You can enter an individual name in the Member Search field, or use the Basic Search area to find multiple names within the registration folders of your learning community. Check the boxes to select the appropriate individuals whom you wish to enroll, and click the Save and Close button. Additionally, you can add a role to any program participant by clicking the appropriate letter next to the participant’s name. Once the letter is highlighted, the role is enabled for the program participant. For example, click the ‘R’ icon next to the name of an enrolled participant, to add the Reviewer role to that participant. Click the Grouping tab, to determine how Authors will interact with Reviewers (If Applicable) and Evaluators. For both Reviewers (if enabled) select No Grouping Needed for DRF and for Evaluators, select No Manual Grouping, but Require Authors to Select Evaluator, then click Apply Changes button.
- 6. 6 From the Resources tab, you have the option of attaching a web folio or web page you have created as a resource for program participants. You can click to create a new web page or web folio, or select one you have already created from the appropriate pull-down menu, and click the Select button. Program resources are optional. Note: This feature is optional. From the Status tab, you can see any area of your setup that is incomplete. Remember that program resources are optional. If you are ready to make your program active, click the Change Status to Active button. 'The program will now appear on the home page for all enrolled program participants. For a detailed discussion about the program options, please schedule a call with an Implementation Specialist in Mentoring Services. We can be reached at 800-311-5656 or help@taskstream.com.