Workflow Process
•
0 likes•911 views

This presentation presents a workflow process to use when readying digital images for publication during post processing.

Recommended
More Related Content
What's hot
What's hot (19)
Similar to Workflow Process
Similar to Workflow Process (20)
Recently uploaded
Recently uploaded (20)
Workflow Process
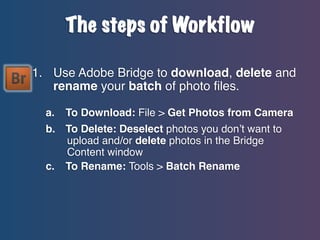
- 1. The steps of Workflow 1. Use Adobe Bridge to download, delete and rename your batch of photo files. a. To Download: File > Get Photos from Camera b. To Delete: Deselect photos you don’t want to upload and/or delete photos in the Bridge Content window To Rename: Tools > Batch Rename c.
- 2. 2. Fill in photo metadata. a. Metadata > IPTC Core You can highlight more than one photo and fill out the metadata for your photo session, particularly “Creator” and “Keywords.”
- 3. 3. Level, rotate and crop images in Adobe Photoshop. a. Level , Rotate & Crop with the Ruler tool:
- 4. 4. Set image size for end use. a. Measure the area that you intend to place your image, noting width (W) and height (H) • 8” x 12” or 8” x 10” for portfolios • 8.5” x 5” (W x H) for PowerPoints b. Image > Image Size c. Resolution • Web page: 72 p/i • Output device (printer): 300 p/i • Publication: 160 p/i (newsprint); 300 p/i (yearbook) 266-
- 5. 5. Correct brightness, contrast and color balance using Levels. a. Image > Adjustments > Levels Notice where the indicators are for the shadows and highlight sliders—they should line up with the edges of the “mountain” on the histogram.
- 6. 6. Perform all other clean-up (dust and scratches, red eye, dodging and burning, shadows and highlights). a. Filter > Noise > Dust & Scratches b. Red Eye tool: c. Dodge tool: • Exposure – 10% • Soft Edge Brush • You want to look like you haven’t done anything d. Burn tool: e. Image > Adjustments > Shadows & Highlights • (Same notes as above) Shadows: Amount – 20% Play with Tonal Width and Radius
- 7. 7. Use unsharp mask/smart sharpen. a. Filter > Sharpen > Unsharp Mask • b. Amount: 50-70% (70+ for inkjet printing) Filter > Sharpen > Smart Sharpen • Amount (same as above) c. The purpose is to not reveal that you’ve used it
- 8. 8. Decide mode: RGB, CMKY or grayscale. a. Image > Mode > RGB • Yearbook companies want RGB • RGB = Red Green Blue b. Image > Mode > CMYK c. Newspaper printers use CMKY • CMYK = Cyan Magenta Yellow Black d. Grayscale is different • Go to the Channel Palette and click off the eye icon • Choose between Red Green Blue channels – Red – Green: Will use about 80% of the time – Blue: Contains the most noise • Trash the channels you don’t use • Image > Mode > Grayscale
- 9. 9. Saving your work (as .psd, .jpg, .tif or .png). a. • • b. • • c. • • d. • • File > Save As > .psd Great for InDesign cutouts Supports separate layers File > Save As > .jpg Compression format Only save as .jpg once (Quality: 12) File > Save As > .tif Contains most image data Supports separate layers File > Save As > .png Web format Supports transparency Source: wikipedia.com