SlideShare a Scribd company logo
Wonderware Tutorial
Creating Basic Shapes in Wonderware
Select Start/Programs/Intouch For Windows/Intouch. When the Intouch dialog box appears, select
Create Directory. Name the directory C:Intouch.16ENT311. Press OK.
Select Window Maker (this is the icon with the pencil on it). When WindowMaker loads, select
File/NewWindow. Enter the following information in the dialog box:
Next select Rounded Rectangle from the Toolbox. Move the cursor to position 40, 110 and hold down the
left mouse button. Drag the mouse to position 250, 20 and release the left mouse button.
Now select Polygon from the Toolbox. Move the mouse to position 30, 90 and click (don’t hold) the left
mouse button. Move the mouse to position 50, 90 and click the left mouse button. Finally move the mouse
to position 40, 110. At this position double click the left mouse button. This will close the polygon and fill
it with a white color.
Creating a Tagname
A tagname is similar to a variable in a programming language. It is used to store information to be shared
by various components of Wonderware. Select Special/Tagname Dictionary. Click NEW on the dialog
box and fill in the information shown below:
Be sure to enable Data Logging. Click Done when finished.
Animating Basic Objects
Now that the tagname has been created, we can use it to animate some basic shapes. Double click on the
triangular shape you created earlier. Press the Horizontal Slider button. Enter the data shown below in the
dialog box:
Double click on the Rounded Rectangle. Select Percent Fill/Horizontal. Enter slider as the Tagname.
Press Done.
Now press Runtime! Move the polygon left and right with the mouse. The polygon serves as a slider and
the rectangle fills with a color as the polygon is moved. The tagname in the rectangle dialog box could
easily be changed to, say, the timer on a programmable controller to represent the current timer state.
Placing Animated Text on the Screen
The value of tagname slider can be shown on the screen with Text. Select Text from the Toolbox and place
it at 100, 170. Enter:
Slider = ####.##
The # indicator will be replaced with the value of a tagname at runtime. Now double click on the text.
Select Value Display/Analog. Enter slider for the Expression, then press Done.
Press Runtime! The ####.## in the text area is replaced by the slider value. Move the slider left and right
and observe the effect on the text. Press Development! When finished.
Creating a Bottle Fill Operation
Draw a rounded rectangle near the center of the screen. Next draw a polygon or top of the rectangle as
shown below:
Next draw a polygon on top of the rectangle as shown below. Try to match your polygon as close as
possible to the one shown below.
Double click on the last endpoint to ensure closure. Click on the polygon to select it and press Duplicate
Selection from the Toolbox. Immediately after press Flip Horizontal. Move the inverted polygon next to
the original until the overall shape resembles a bottle, as shown below:
The bottle contains three shapes, a rounded rectangle and two polygons. These three shapes can be made
into one object with the Make Symbol button in the Toolbox. Select the three objects with the mouse and
press the Make Symbol button.
Next double click on the bottle and select Percent/Vertical. Enter slider as the Expression. Change the
background color by selecting Background Color. Press Done when finished. Now change the bottle fill
color by clicking on the bottle, pressing Fill (on the Toolbox), and selecting a color.
Select Runtime! and observe the bottle fill operation. Press Development! when finished.
Controlling Visible Lines
Note the bottle has lines from the polygons and rectangle. Delete these lines by selecting Lines from the
top menu and No Lines. Press Runtime! and observe the results.
Selecting Text Fonts
The text font for Slider = ####.## can be changed by selecting the Font button on the Toolbox. Change the
font to Times New Roman, size 20.
Creating New Tagnames
Enter WindowMaker. Create a new tagname with the following parameters:
Name:bottle
Type: Memory Real
Minimum Value: 0
Maximum Value: 500
Log Data: Enabled
Log Events: Disabled
Controlling the Bottle Motion
Double click on the bottle. Press the Location/Horizontal button. Enter the following
data:
Expression:bottle
Value Horizontal Movement
Left End 0 Left 0
Right End 400 Right 400
Click OK. Next click on the Object Size/Height button. Enter the following data:
Value at Max Height: 320 Max % Height: 70
Value at Min Height: 0 Mm % Height: 100
Middle
Click on the Object Size/Width button. Enter the following data:
Value at Max Height: 320 Max % Height: 70
Value at Min Height: 0 Min % Height: 100
Center
Select Special/Scripts/Window Scripts from the top menu. Enter the following script file in the While
Showing screen:
bottle = bottle+ 10;
IF bottle == 100 THEN
IF slider< 100 THEN
slider=slider+l;
bottle=90;
ENDIF;
ENDIF;
IF bottle> 320 THEN
bottle=0;
slider=0;
END IF;
Note: You can use the buttons on the bottom of the screen to help enter the commands. Next select On
Show from the Window Scripts menu. Enter the following data:
bottle=0;
slider=0;
Select Runtime! The bottle should now appear to move along the conveyor, and stop to be filled at the fill
station. Select Development! when finished.
Creating an Alarm Condition
An alarm occurs when something out of the ordinary happens to the physical process. Wonderware
provides for monitoring and acknowledging alarms. The alarm for this process will occur when the
conveyor is not running. Create a new tagname called ConvStop. It should be type Memory Discrete, with
Log Events Enabled. Click on the Alarms box and set Alarm State On.
Now click on the Wizard button on the Toolbox. Select Switches and On/Off Rocker Discrete Switch.
Place this switch on the screen to the left of the conveyor. Double click on the switch and set the Tagname
to ConvStop.
Again select Wizards and Lights/Tube Lights. Place the Tube Light on the screen just below the switch.
Double click on the light and name the Expression ConvStop.Alarm.
Next revise the Scripts/Window Scripts/While Showing script as shown below:
bottle = bottle+ 10;
IF ConvStop == 1 THEN
bottle = bottle - 10;
ENDIF;
IF bottle == 100 THEN
IF slider<100 THEN
slider=slider+1
Bottle = 90;
ENDIF;
ENDIF;
IF bottle > 320 THEN
Bottle = 0;
Slider = 0;
ENDIF;
Select Runtime! and observe the movement of the bottle.
Creating an Alarm Panel
Create a new window by selecting File/New Window. Press Yes when asked “Copy Window Scripts?”.
Name the window Alarm, and keep the size the same as the Bottle window.
Select Wizards from the Toolbox menu. Next select Alarm Display/Std. Alarm Display. Using the left
mouse button, size the alarm display on the screen so that 10 entries (rows) are shown.
Double click on the alarm display. We do not wish to create priorities, so click on Format Alarm Message
and unselect Priority. Also select Alarm History on the screen. Press OK.
From the top menu, select Special/Configure/Alarm Logging/Logging Enabled. Press OK twice.
Now that the Alarm screen has been created, there must be a way to go back and forth between the Alarm
and Bottle screen. Open the Bottle screen (you will either have to use File/Open Window or Windows
from the top menu). Select Button from the Toolbox. Select Special/Substitute Strings from the top
menu. Enter Alarm for the string. Double click on the button and select Show Window. Select Alarm
(only Alarm should be highlighted). Now open the Alarm Window. Repeat the process above, this time
naming the button Bottle. Double click on the button and select Show Window. Select Bottle (only Bottle
should be highlighted).
Press Runtime! It should now be possible to go back and forth between each screen by pressing the
appropriate button. As conditions change on the Bottle screen, the appropriate alarms should be displayed.
Select Development! when finished.
Alarm Acknowledging
Alarms can be acknowledged. Any alarm that has been acknowledged is recorded on the alarm display
screen. To acknowledge an alarm, first draw a button. Using Special/Substitute Strings, rename the button
Alarm Acknowledge. Double click on the button and select Touch Pushbuttons/Action. Enter Ack
ConvStop; in the white box. Run the program and test the Alarm Acknowledge by pressing it and viewing
the alarm screen.
Creating a Historical Trend
A historical trend chart records past events in the process. In this example both tagnames slider and bottle
are recorded. Use File/NewWindow to create a new window named History. In this window, select the
Wizard button on the toolbox and Trends/ Hist Trend w/Scooters and Scale. Place the trend chart on the
upper left of the screen. Next select Trend Zoom/Pan Panel (second from left) and place it on the screen
below the trend chart.
Double click on the chart and press Suggest and OK. Wonderware will create the appropriate tagnames for
you. Next select the Trend Zoom/Pan Panel and press Suggest and OK. Wonderware will link the Trend
Zoom/Pan Panel with the chart.
Now create buttons and use Show Window to have a method of going from the History to the Bottle
window and back. Run the program. Allow the bottle to fill a couple of times. Go to the history window
and press the right arrow key, as shown below:
Note: The Historical Trends chart will not update automatically. An event must occur, such as an arrow
button pressed. Press Development! when finished.
Zooming In on the Historical Trend Window
The Trend Zoom/Pan has a zoom feature on it. Adjust the sliders on the screen to select a small part of the
graph. Press Zoom In to zoom in on the window. Study the other buttons n the Trend Zoom/Pan Panel
until you understand the operation.
Configuring a Real Time Display
Besides a Historical Display, Wonderware can also display a Real Time Display. Select Real-Time Trend
from the Toolbox menu. Draw the chart on the upper right of the bottle window. Double click on the chart
and enter the slider and bottle in pens 1 and 2. Press OK. Run the program. You should see the tagnames
slider and bottle continually updated on the screen.
Saving Historical Data in a CSV File
A CSV file can be generated with the Wizards/Trends/HistData Wizard. Select the item and place it
below the Trend Zoom/Pan Panel. Double click on it and fill in the dialog box. Press OK. Run the
program. Click the button HISTDATA.EXE when prompted. After collecting some data, press the Save
button on the Historical Trend box. You can change the filename if you like. After saving the file, exit
Wonderware, load Excel and use File/Open. Change Files Type to .CSV files. Find the directory, select the
file, and open it. The recorded date, time, and tagnames will now appear in Excel. Graph the tagnames
using a scatter diagram.
DDE Data Transfer
Just like Visual Basic, Wonderware can transfer data to other programs through DDE. Wonderware
requires and Access Name, Application/Server Name, Topic name, and Item name. We will illustrate this
process with the following example.
Select Special/DDE Access Names. Select Add. Fill in the following data:
DDE Access Name DDELink
DDE Application/Server Name Excel
DDE Topic Name Sheet1
Leave everything else at the default values.
Select Special/Tagname Dictionary create bottlefill as a DDE Real. For the DDE Access Name choose
DDELink, and for the Item choose R1C1.
In the Special/Scripts/Window Scripts, enter bottlefill = slider; in the While Showing screen.
Start Excel and minimize it. Press Runtime! in Wonderware. As the bottle moves on the screen, Row1
Column1 of Excel should show the present value.
All of this should be fairly straight forward. You can get help in the Wonderware help menu. The DDE can
also transfer to another server. Suppose we wanted to transfer to another computer named ENT12. The
DDE Application/Server Name would change to //ENT12/Excel.
1

More Related Content

What's hot

Keyboard shortcuts
Keyboard shortcutsKeyboard shortcuts
Keyboard shortcuts
ShivaKumar1509
 
Excel 2007 shortcut and function keys
Excel 2007 shortcut and function keysExcel 2007 shortcut and function keys
Excel 2007 shortcut and function keys
Gopal Padamati
 
Windows key keyboard shortcuts
Windows key keyboard shortcutsWindows key keyboard shortcuts
Windows key keyboard shortcuts
ShivaKumar1509
 
Phim Tat Trong Excel
Phim Tat Trong ExcelPhim Tat Trong Excel
Phim Tat Trong Excel
guest3c41775
 
Windows 8-cheat-sheet
Windows 8-cheat-sheetWindows 8-cheat-sheet
Windows 8-cheat-sheet
SchoolVision Inc.
 
Windows 8 tips & tricks
Windows 8 tips & tricksWindows 8 tips & tricks
Windows 8 tips & tricks
Mukund Trivedi
 
Powerpoint class 4
Powerpoint class 4Powerpoint class 4
Powerpoint class 4
Nicholas Charles
 
Shortcut win7
Shortcut win7Shortcut win7
Shortcut win7
Bang Junaid
 
Ad.yieldmanager.com popp – remove ad.yieldmanager.com popup completely
Ad.yieldmanager.com popp – remove ad.yieldmanager.com popup completelyAd.yieldmanager.com popp – remove ad.yieldmanager.com popup completely
Ad.yieldmanager.com popp – remove ad.yieldmanager.com popup completely
Daniel Jones
 
Powerpoint class 3
Powerpoint class 3Powerpoint class 3
Powerpoint class 3
Nicholas Charles
 
Alok photoshop 2
Alok photoshop 2Alok photoshop 2
Alok photoshop 2
Kumesh Kumar
 
Power Point Project 5
Power Point Project 5Power Point Project 5
Power Point Project 5
lonetree
 
Powerpoint class 2
Powerpoint class 2Powerpoint class 2
Powerpoint class 2
Nicholas Charles
 
Keyboard Shortcuts - Windows
Keyboard Shortcuts - WindowsKeyboard Shortcuts - Windows
Keyboard Shortcuts - Windows
amimalia
 
Onscreen marking: getting the buttons onto the toolbar
Onscreen marking: getting the buttons onto the toolbarOnscreen marking: getting the buttons onto the toolbar
Onscreen marking: getting the buttons onto the toolbar
Marius Pienaar (Dr.)
 
Wonderware tutorial
Wonderware tutorialWonderware tutorial
Wonderware tutorial
Dian Herpadiana, S.T.
 
How to deliver specific content with radio buttons on Eloqua forms
How to deliver specific content with radio buttons on Eloqua formsHow to deliver specific content with radio buttons on Eloqua forms
How to deliver specific content with radio buttons on Eloqua forms
Catherine Funderburg, M.Ed.
 
100 keyboard shortcuts for windows 8
100 keyboard shortcuts for windows 8100 keyboard shortcuts for windows 8
100 keyboard shortcuts for windows 8
MINISTRY OF DEFENCE PAK
 
Onscreen marking: using the marking tool
Onscreen marking: using the marking toolOnscreen marking: using the marking tool
Onscreen marking: using the marking tool
Marius Pienaar (Dr.)
 

What's hot (19)

Keyboard shortcuts
Keyboard shortcutsKeyboard shortcuts
Keyboard shortcuts
 
Excel 2007 shortcut and function keys
Excel 2007 shortcut and function keysExcel 2007 shortcut and function keys
Excel 2007 shortcut and function keys
 
Windows key keyboard shortcuts
Windows key keyboard shortcutsWindows key keyboard shortcuts
Windows key keyboard shortcuts
 
Phim Tat Trong Excel
Phim Tat Trong ExcelPhim Tat Trong Excel
Phim Tat Trong Excel
 
Windows 8-cheat-sheet
Windows 8-cheat-sheetWindows 8-cheat-sheet
Windows 8-cheat-sheet
 
Windows 8 tips & tricks
Windows 8 tips & tricksWindows 8 tips & tricks
Windows 8 tips & tricks
 
Powerpoint class 4
Powerpoint class 4Powerpoint class 4
Powerpoint class 4
 
Shortcut win7
Shortcut win7Shortcut win7
Shortcut win7
 
Ad.yieldmanager.com popp – remove ad.yieldmanager.com popup completely
Ad.yieldmanager.com popp – remove ad.yieldmanager.com popup completelyAd.yieldmanager.com popp – remove ad.yieldmanager.com popup completely
Ad.yieldmanager.com popp – remove ad.yieldmanager.com popup completely
 
Powerpoint class 3
Powerpoint class 3Powerpoint class 3
Powerpoint class 3
 
Alok photoshop 2
Alok photoshop 2Alok photoshop 2
Alok photoshop 2
 
Power Point Project 5
Power Point Project 5Power Point Project 5
Power Point Project 5
 
Powerpoint class 2
Powerpoint class 2Powerpoint class 2
Powerpoint class 2
 
Keyboard Shortcuts - Windows
Keyboard Shortcuts - WindowsKeyboard Shortcuts - Windows
Keyboard Shortcuts - Windows
 
Onscreen marking: getting the buttons onto the toolbar
Onscreen marking: getting the buttons onto the toolbarOnscreen marking: getting the buttons onto the toolbar
Onscreen marking: getting the buttons onto the toolbar
 
Wonderware tutorial
Wonderware tutorialWonderware tutorial
Wonderware tutorial
 
How to deliver specific content with radio buttons on Eloqua forms
How to deliver specific content with radio buttons on Eloqua formsHow to deliver specific content with radio buttons on Eloqua forms
How to deliver specific content with radio buttons on Eloqua forms
 
100 keyboard shortcuts for windows 8
100 keyboard shortcuts for windows 8100 keyboard shortcuts for windows 8
100 keyboard shortcuts for windows 8
 
Onscreen marking: using the marking tool
Onscreen marking: using the marking toolOnscreen marking: using the marking tool
Onscreen marking: using the marking tool
 

Similar to Wonderwaretutorial 130730025747-phpapp02

Botones
BotonesBotones
Lesson5 Customizing windows
Lesson5  Customizing windowsLesson5  Customizing windows
Lesson5 Customizing windows
guevarra_2000
 
COMPUTER Tips ‘n’ Tricks
COMPUTER Tips ‘n’   TricksCOMPUTER Tips ‘n’   Tricks
COMPUTER Tips ‘n’ Tricks
argusacademy
 
Windows 8 Tutorial
Windows 8 TutorialWindows 8 Tutorial
Windows 8 Tutorial
Westerville Library
 
A Primavera Tutorial
A Primavera TutorialA Primavera Tutorial
A Primavera Tutorial
Aaron Anyaakuu
 
Power Point Project 4
Power Point Project 4Power Point Project 4
Power Point Project 4
lonetree
 
Primavera manual tutorial book
Primavera manual tutorial bookPrimavera manual tutorial book
Primavera manual tutorial book
Thomas Britto
 
Primavera manual tutorial book
Primavera manual tutorial bookPrimavera manual tutorial book
Primavera manual tutorial book
Thomas Britto
 
Step by Step guide for creating first ABAP report in SAP
Step by Step guide for creating first ABAP report in SAPStep by Step guide for creating first ABAP report in SAP
Step by Step guide for creating first ABAP report in SAP
nityaabap
 
[Made Easy] How to use Toggl - Tutorial
[Made Easy] How to use Toggl - Tutorial[Made Easy] How to use Toggl - Tutorial
[Made Easy] How to use Toggl - Tutorial
Edison Villareal
 
Windows operating system part 1 (Introduction to Computer)
Windows operating system part 1 (Introduction to Computer)Windows operating system part 1 (Introduction to Computer)
Windows operating system part 1 (Introduction to Computer)
Elijah Kplawore
 
Using Applications in Windows - R.D.Sivakumar
Using Applications in Windows - R.D.SivakumarUsing Applications in Windows - R.D.Sivakumar
Using Applications in Windows - R.D.Sivakumar
Sivakumar R D .
 
Windows Operating System
Windows Operating SystemWindows Operating System
Windows Operating System
Praveen Sudarsan
 
dr_4
dr_4dr_4
dr_4
dr_4dr_4
Lesson 4 moving and resizing windows
Lesson 4   moving and resizing windowsLesson 4   moving and resizing windows
Lesson 4 moving and resizing windows
guevarra_2000
 
Microsoft office powerpoint
Microsoft office powerpointMicrosoft office powerpoint
Microsoft office powerpoint
timbram
 
muna yuyu
muna yuyumuna yuyu
muna yuyu
Gifard Narut
 
Tutorials2
Tutorials2Tutorials2
Tutorials2
raja umair
 
Windows Operating System1
Windows Operating System1Windows Operating System1
Windows Operating System1
bill balina
 

Similar to Wonderwaretutorial 130730025747-phpapp02 (20)

Botones
BotonesBotones
Botones
 
Lesson5 Customizing windows
Lesson5  Customizing windowsLesson5  Customizing windows
Lesson5 Customizing windows
 
COMPUTER Tips ‘n’ Tricks
COMPUTER Tips ‘n’   TricksCOMPUTER Tips ‘n’   Tricks
COMPUTER Tips ‘n’ Tricks
 
Windows 8 Tutorial
Windows 8 TutorialWindows 8 Tutorial
Windows 8 Tutorial
 
A Primavera Tutorial
A Primavera TutorialA Primavera Tutorial
A Primavera Tutorial
 
Power Point Project 4
Power Point Project 4Power Point Project 4
Power Point Project 4
 
Primavera manual tutorial book
Primavera manual tutorial bookPrimavera manual tutorial book
Primavera manual tutorial book
 
Primavera manual tutorial book
Primavera manual tutorial bookPrimavera manual tutorial book
Primavera manual tutorial book
 
Step by Step guide for creating first ABAP report in SAP
Step by Step guide for creating first ABAP report in SAPStep by Step guide for creating first ABAP report in SAP
Step by Step guide for creating first ABAP report in SAP
 
[Made Easy] How to use Toggl - Tutorial
[Made Easy] How to use Toggl - Tutorial[Made Easy] How to use Toggl - Tutorial
[Made Easy] How to use Toggl - Tutorial
 
Windows operating system part 1 (Introduction to Computer)
Windows operating system part 1 (Introduction to Computer)Windows operating system part 1 (Introduction to Computer)
Windows operating system part 1 (Introduction to Computer)
 
Using Applications in Windows - R.D.Sivakumar
Using Applications in Windows - R.D.SivakumarUsing Applications in Windows - R.D.Sivakumar
Using Applications in Windows - R.D.Sivakumar
 
Windows Operating System
Windows Operating SystemWindows Operating System
Windows Operating System
 
dr_4
dr_4dr_4
dr_4
 
dr_4
dr_4dr_4
dr_4
 
Lesson 4 moving and resizing windows
Lesson 4   moving and resizing windowsLesson 4   moving and resizing windows
Lesson 4 moving and resizing windows
 
Microsoft office powerpoint
Microsoft office powerpointMicrosoft office powerpoint
Microsoft office powerpoint
 
muna yuyu
muna yuyumuna yuyu
muna yuyu
 
Tutorials2
Tutorials2Tutorials2
Tutorials2
 
Windows Operating System1
Windows Operating System1Windows Operating System1
Windows Operating System1
 

Recently uploaded

[OReilly Superstream] Occupy the Space: A grassroots guide to engineering (an...
[OReilly Superstream] Occupy the Space: A grassroots guide to engineering (an...[OReilly Superstream] Occupy the Space: A grassroots guide to engineering (an...
[OReilly Superstream] Occupy the Space: A grassroots guide to engineering (an...
Jason Yip
 
Freshworks Rethinks NoSQL for Rapid Scaling & Cost-Efficiency
Freshworks Rethinks NoSQL for Rapid Scaling & Cost-EfficiencyFreshworks Rethinks NoSQL for Rapid Scaling & Cost-Efficiency
Freshworks Rethinks NoSQL for Rapid Scaling & Cost-Efficiency
ScyllaDB
 
Christine's Product Research Presentation.pptx
Christine's Product Research Presentation.pptxChristine's Product Research Presentation.pptx
Christine's Product Research Presentation.pptx
christinelarrosa
 
inQuba Webinar Mastering Customer Journey Management with Dr Graham Hill
inQuba Webinar Mastering Customer Journey Management with Dr Graham HillinQuba Webinar Mastering Customer Journey Management with Dr Graham Hill
inQuba Webinar Mastering Customer Journey Management with Dr Graham Hill
LizaNolte
 
The Microsoft 365 Migration Tutorial For Beginner.pptx
The Microsoft 365 Migration Tutorial For Beginner.pptxThe Microsoft 365 Migration Tutorial For Beginner.pptx
The Microsoft 365 Migration Tutorial For Beginner.pptx
operationspcvita
 
Skybuffer SAM4U tool for SAP license adoption
Skybuffer SAM4U tool for SAP license adoptionSkybuffer SAM4U tool for SAP license adoption
Skybuffer SAM4U tool for SAP license adoption
Tatiana Kojar
 
Demystifying Knowledge Management through Storytelling
Demystifying Knowledge Management through StorytellingDemystifying Knowledge Management through Storytelling
Demystifying Knowledge Management through Storytelling
Enterprise Knowledge
 
Overcoming the PLG Trap: Lessons from Canva's Head of Sales & Head of EMEA Da...
Overcoming the PLG Trap: Lessons from Canva's Head of Sales & Head of EMEA Da...Overcoming the PLG Trap: Lessons from Canva's Head of Sales & Head of EMEA Da...
Overcoming the PLG Trap: Lessons from Canva's Head of Sales & Head of EMEA Da...
saastr
 
Monitoring and Managing Anomaly Detection on OpenShift.pdf
Monitoring and Managing Anomaly Detection on OpenShift.pdfMonitoring and Managing Anomaly Detection on OpenShift.pdf
Monitoring and Managing Anomaly Detection on OpenShift.pdf
Tosin Akinosho
 
Columbus Data & Analytics Wednesdays - June 2024
Columbus Data & Analytics Wednesdays - June 2024Columbus Data & Analytics Wednesdays - June 2024
Columbus Data & Analytics Wednesdays - June 2024
Jason Packer
 
Christine's Supplier Sourcing Presentaion.pptx
Christine's Supplier Sourcing Presentaion.pptxChristine's Supplier Sourcing Presentaion.pptx
Christine's Supplier Sourcing Presentaion.pptx
christinelarrosa
 
PRODUCT LISTING OPTIMIZATION PRESENTATION.pptx
PRODUCT LISTING OPTIMIZATION PRESENTATION.pptxPRODUCT LISTING OPTIMIZATION PRESENTATION.pptx
PRODUCT LISTING OPTIMIZATION PRESENTATION.pptx
christinelarrosa
 
Your One-Stop Shop for Python Success: Top 10 US Python Development Providers
Your One-Stop Shop for Python Success: Top 10 US Python Development ProvidersYour One-Stop Shop for Python Success: Top 10 US Python Development Providers
Your One-Stop Shop for Python Success: Top 10 US Python Development Providers
akankshawande
 
9 CEO's who hit $100m ARR Share Their Top Growth Tactics Nathan Latka, Founde...
9 CEO's who hit $100m ARR Share Their Top Growth Tactics Nathan Latka, Founde...9 CEO's who hit $100m ARR Share Their Top Growth Tactics Nathan Latka, Founde...
9 CEO's who hit $100m ARR Share Their Top Growth Tactics Nathan Latka, Founde...
saastr
 
Nordic Marketo Engage User Group_June 13_ 2024.pptx
Nordic Marketo Engage User Group_June 13_ 2024.pptxNordic Marketo Engage User Group_June 13_ 2024.pptx
Nordic Marketo Engage User Group_June 13_ 2024.pptx
MichaelKnudsen27
 
GraphRAG for LifeSciences Hands-On with the Clinical Knowledge Graph
GraphRAG for LifeSciences Hands-On with the Clinical Knowledge GraphGraphRAG for LifeSciences Hands-On with the Clinical Knowledge Graph
GraphRAG for LifeSciences Hands-On with the Clinical Knowledge Graph
Neo4j
 
"Frontline Battles with DDoS: Best practices and Lessons Learned", Igor Ivaniuk
"Frontline Battles with DDoS: Best practices and Lessons Learned",  Igor Ivaniuk"Frontline Battles with DDoS: Best practices and Lessons Learned",  Igor Ivaniuk
"Frontline Battles with DDoS: Best practices and Lessons Learned", Igor Ivaniuk
Fwdays
 
Choosing The Best AWS Service For Your Website + API.pptx
Choosing The Best AWS Service For Your Website + API.pptxChoosing The Best AWS Service For Your Website + API.pptx
Choosing The Best AWS Service For Your Website + API.pptx
Brandon Minnick, MBA
 
Apps Break Data
Apps Break DataApps Break Data
Apps Break Data
Ivo Velitchkov
 
Astute Business Solutions | Oracle Cloud Partner |
Astute Business Solutions | Oracle Cloud Partner |Astute Business Solutions | Oracle Cloud Partner |
Astute Business Solutions | Oracle Cloud Partner |
AstuteBusiness
 

Recently uploaded (20)

[OReilly Superstream] Occupy the Space: A grassroots guide to engineering (an...
[OReilly Superstream] Occupy the Space: A grassroots guide to engineering (an...[OReilly Superstream] Occupy the Space: A grassroots guide to engineering (an...
[OReilly Superstream] Occupy the Space: A grassroots guide to engineering (an...
 
Freshworks Rethinks NoSQL for Rapid Scaling & Cost-Efficiency
Freshworks Rethinks NoSQL for Rapid Scaling & Cost-EfficiencyFreshworks Rethinks NoSQL for Rapid Scaling & Cost-Efficiency
Freshworks Rethinks NoSQL for Rapid Scaling & Cost-Efficiency
 
Christine's Product Research Presentation.pptx
Christine's Product Research Presentation.pptxChristine's Product Research Presentation.pptx
Christine's Product Research Presentation.pptx
 
inQuba Webinar Mastering Customer Journey Management with Dr Graham Hill
inQuba Webinar Mastering Customer Journey Management with Dr Graham HillinQuba Webinar Mastering Customer Journey Management with Dr Graham Hill
inQuba Webinar Mastering Customer Journey Management with Dr Graham Hill
 
The Microsoft 365 Migration Tutorial For Beginner.pptx
The Microsoft 365 Migration Tutorial For Beginner.pptxThe Microsoft 365 Migration Tutorial For Beginner.pptx
The Microsoft 365 Migration Tutorial For Beginner.pptx
 
Skybuffer SAM4U tool for SAP license adoption
Skybuffer SAM4U tool for SAP license adoptionSkybuffer SAM4U tool for SAP license adoption
Skybuffer SAM4U tool for SAP license adoption
 
Demystifying Knowledge Management through Storytelling
Demystifying Knowledge Management through StorytellingDemystifying Knowledge Management through Storytelling
Demystifying Knowledge Management through Storytelling
 
Overcoming the PLG Trap: Lessons from Canva's Head of Sales & Head of EMEA Da...
Overcoming the PLG Trap: Lessons from Canva's Head of Sales & Head of EMEA Da...Overcoming the PLG Trap: Lessons from Canva's Head of Sales & Head of EMEA Da...
Overcoming the PLG Trap: Lessons from Canva's Head of Sales & Head of EMEA Da...
 
Monitoring and Managing Anomaly Detection on OpenShift.pdf
Monitoring and Managing Anomaly Detection on OpenShift.pdfMonitoring and Managing Anomaly Detection on OpenShift.pdf
Monitoring and Managing Anomaly Detection on OpenShift.pdf
 
Columbus Data & Analytics Wednesdays - June 2024
Columbus Data & Analytics Wednesdays - June 2024Columbus Data & Analytics Wednesdays - June 2024
Columbus Data & Analytics Wednesdays - June 2024
 
Christine's Supplier Sourcing Presentaion.pptx
Christine's Supplier Sourcing Presentaion.pptxChristine's Supplier Sourcing Presentaion.pptx
Christine's Supplier Sourcing Presentaion.pptx
 
PRODUCT LISTING OPTIMIZATION PRESENTATION.pptx
PRODUCT LISTING OPTIMIZATION PRESENTATION.pptxPRODUCT LISTING OPTIMIZATION PRESENTATION.pptx
PRODUCT LISTING OPTIMIZATION PRESENTATION.pptx
 
Your One-Stop Shop for Python Success: Top 10 US Python Development Providers
Your One-Stop Shop for Python Success: Top 10 US Python Development ProvidersYour One-Stop Shop for Python Success: Top 10 US Python Development Providers
Your One-Stop Shop for Python Success: Top 10 US Python Development Providers
 
9 CEO's who hit $100m ARR Share Their Top Growth Tactics Nathan Latka, Founde...
9 CEO's who hit $100m ARR Share Their Top Growth Tactics Nathan Latka, Founde...9 CEO's who hit $100m ARR Share Their Top Growth Tactics Nathan Latka, Founde...
9 CEO's who hit $100m ARR Share Their Top Growth Tactics Nathan Latka, Founde...
 
Nordic Marketo Engage User Group_June 13_ 2024.pptx
Nordic Marketo Engage User Group_June 13_ 2024.pptxNordic Marketo Engage User Group_June 13_ 2024.pptx
Nordic Marketo Engage User Group_June 13_ 2024.pptx
 
GraphRAG for LifeSciences Hands-On with the Clinical Knowledge Graph
GraphRAG for LifeSciences Hands-On with the Clinical Knowledge GraphGraphRAG for LifeSciences Hands-On with the Clinical Knowledge Graph
GraphRAG for LifeSciences Hands-On with the Clinical Knowledge Graph
 
"Frontline Battles with DDoS: Best practices and Lessons Learned", Igor Ivaniuk
"Frontline Battles with DDoS: Best practices and Lessons Learned",  Igor Ivaniuk"Frontline Battles with DDoS: Best practices and Lessons Learned",  Igor Ivaniuk
"Frontline Battles with DDoS: Best practices and Lessons Learned", Igor Ivaniuk
 
Choosing The Best AWS Service For Your Website + API.pptx
Choosing The Best AWS Service For Your Website + API.pptxChoosing The Best AWS Service For Your Website + API.pptx
Choosing The Best AWS Service For Your Website + API.pptx
 
Apps Break Data
Apps Break DataApps Break Data
Apps Break Data
 
Astute Business Solutions | Oracle Cloud Partner |
Astute Business Solutions | Oracle Cloud Partner |Astute Business Solutions | Oracle Cloud Partner |
Astute Business Solutions | Oracle Cloud Partner |
 

Wonderwaretutorial 130730025747-phpapp02

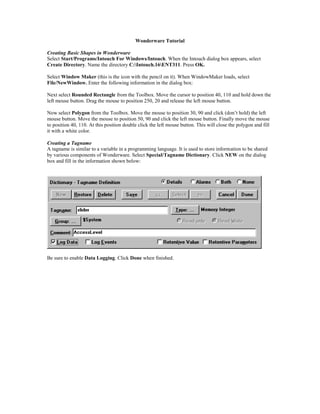
  • 1. Wonderware Tutorial Creating Basic Shapes in Wonderware Select Start/Programs/Intouch For Windows/Intouch. When the Intouch dialog box appears, select Create Directory. Name the directory C:Intouch.16ENT311. Press OK. Select Window Maker (this is the icon with the pencil on it). When WindowMaker loads, select File/NewWindow. Enter the following information in the dialog box: Next select Rounded Rectangle from the Toolbox. Move the cursor to position 40, 110 and hold down the left mouse button. Drag the mouse to position 250, 20 and release the left mouse button. Now select Polygon from the Toolbox. Move the mouse to position 30, 90 and click (don’t hold) the left mouse button. Move the mouse to position 50, 90 and click the left mouse button. Finally move the mouse to position 40, 110. At this position double click the left mouse button. This will close the polygon and fill it with a white color. Creating a Tagname A tagname is similar to a variable in a programming language. It is used to store information to be shared by various components of Wonderware. Select Special/Tagname Dictionary. Click NEW on the dialog box and fill in the information shown below: Be sure to enable Data Logging. Click Done when finished.
  • 2. Animating Basic Objects Now that the tagname has been created, we can use it to animate some basic shapes. Double click on the triangular shape you created earlier. Press the Horizontal Slider button. Enter the data shown below in the dialog box: Double click on the Rounded Rectangle. Select Percent Fill/Horizontal. Enter slider as the Tagname. Press Done. Now press Runtime! Move the polygon left and right with the mouse. The polygon serves as a slider and the rectangle fills with a color as the polygon is moved. The tagname in the rectangle dialog box could easily be changed to, say, the timer on a programmable controller to represent the current timer state. Placing Animated Text on the Screen The value of tagname slider can be shown on the screen with Text. Select Text from the Toolbox and place it at 100, 170. Enter: Slider = ####.## The # indicator will be replaced with the value of a tagname at runtime. Now double click on the text. Select Value Display/Analog. Enter slider for the Expression, then press Done. Press Runtime! The ####.## in the text area is replaced by the slider value. Move the slider left and right and observe the effect on the text. Press Development! When finished. Creating a Bottle Fill Operation Draw a rounded rectangle near the center of the screen. Next draw a polygon or top of the rectangle as shown below:
  • 3. Next draw a polygon on top of the rectangle as shown below. Try to match your polygon as close as possible to the one shown below. Double click on the last endpoint to ensure closure. Click on the polygon to select it and press Duplicate Selection from the Toolbox. Immediately after press Flip Horizontal. Move the inverted polygon next to the original until the overall shape resembles a bottle, as shown below: The bottle contains three shapes, a rounded rectangle and two polygons. These three shapes can be made into one object with the Make Symbol button in the Toolbox. Select the three objects with the mouse and press the Make Symbol button. Next double click on the bottle and select Percent/Vertical. Enter slider as the Expression. Change the background color by selecting Background Color. Press Done when finished. Now change the bottle fill color by clicking on the bottle, pressing Fill (on the Toolbox), and selecting a color. Select Runtime! and observe the bottle fill operation. Press Development! when finished. Controlling Visible Lines Note the bottle has lines from the polygons and rectangle. Delete these lines by selecting Lines from the top menu and No Lines. Press Runtime! and observe the results. Selecting Text Fonts The text font for Slider = ####.## can be changed by selecting the Font button on the Toolbox. Change the font to Times New Roman, size 20. Creating New Tagnames Enter WindowMaker. Create a new tagname with the following parameters: Name:bottle Type: Memory Real Minimum Value: 0 Maximum Value: 500 Log Data: Enabled Log Events: Disabled
  • 4. Controlling the Bottle Motion Double click on the bottle. Press the Location/Horizontal button. Enter the following data: Expression:bottle Value Horizontal Movement Left End 0 Left 0 Right End 400 Right 400 Click OK. Next click on the Object Size/Height button. Enter the following data: Value at Max Height: 320 Max % Height: 70 Value at Min Height: 0 Mm % Height: 100 Middle Click on the Object Size/Width button. Enter the following data: Value at Max Height: 320 Max % Height: 70 Value at Min Height: 0 Min % Height: 100 Center Select Special/Scripts/Window Scripts from the top menu. Enter the following script file in the While Showing screen: bottle = bottle+ 10; IF bottle == 100 THEN IF slider< 100 THEN slider=slider+l; bottle=90; ENDIF; ENDIF; IF bottle> 320 THEN bottle=0; slider=0; END IF; Note: You can use the buttons on the bottom of the screen to help enter the commands. Next select On Show from the Window Scripts menu. Enter the following data: bottle=0; slider=0; Select Runtime! The bottle should now appear to move along the conveyor, and stop to be filled at the fill station. Select Development! when finished. Creating an Alarm Condition An alarm occurs when something out of the ordinary happens to the physical process. Wonderware provides for monitoring and acknowledging alarms. The alarm for this process will occur when the conveyor is not running. Create a new tagname called ConvStop. It should be type Memory Discrete, with Log Events Enabled. Click on the Alarms box and set Alarm State On. Now click on the Wizard button on the Toolbox. Select Switches and On/Off Rocker Discrete Switch. Place this switch on the screen to the left of the conveyor. Double click on the switch and set the Tagname to ConvStop.
  • 5. Again select Wizards and Lights/Tube Lights. Place the Tube Light on the screen just below the switch. Double click on the light and name the Expression ConvStop.Alarm. Next revise the Scripts/Window Scripts/While Showing script as shown below: bottle = bottle+ 10; IF ConvStop == 1 THEN bottle = bottle - 10; ENDIF; IF bottle == 100 THEN IF slider<100 THEN slider=slider+1 Bottle = 90; ENDIF; ENDIF; IF bottle > 320 THEN Bottle = 0; Slider = 0; ENDIF; Select Runtime! and observe the movement of the bottle. Creating an Alarm Panel Create a new window by selecting File/New Window. Press Yes when asked “Copy Window Scripts?”. Name the window Alarm, and keep the size the same as the Bottle window. Select Wizards from the Toolbox menu. Next select Alarm Display/Std. Alarm Display. Using the left mouse button, size the alarm display on the screen so that 10 entries (rows) are shown. Double click on the alarm display. We do not wish to create priorities, so click on Format Alarm Message and unselect Priority. Also select Alarm History on the screen. Press OK. From the top menu, select Special/Configure/Alarm Logging/Logging Enabled. Press OK twice. Now that the Alarm screen has been created, there must be a way to go back and forth between the Alarm and Bottle screen. Open the Bottle screen (you will either have to use File/Open Window or Windows from the top menu). Select Button from the Toolbox. Select Special/Substitute Strings from the top menu. Enter Alarm for the string. Double click on the button and select Show Window. Select Alarm (only Alarm should be highlighted). Now open the Alarm Window. Repeat the process above, this time naming the button Bottle. Double click on the button and select Show Window. Select Bottle (only Bottle should be highlighted). Press Runtime! It should now be possible to go back and forth between each screen by pressing the appropriate button. As conditions change on the Bottle screen, the appropriate alarms should be displayed. Select Development! when finished. Alarm Acknowledging Alarms can be acknowledged. Any alarm that has been acknowledged is recorded on the alarm display screen. To acknowledge an alarm, first draw a button. Using Special/Substitute Strings, rename the button Alarm Acknowledge. Double click on the button and select Touch Pushbuttons/Action. Enter Ack ConvStop; in the white box. Run the program and test the Alarm Acknowledge by pressing it and viewing the alarm screen. Creating a Historical Trend A historical trend chart records past events in the process. In this example both tagnames slider and bottle
  • 6. are recorded. Use File/NewWindow to create a new window named History. In this window, select the Wizard button on the toolbox and Trends/ Hist Trend w/Scooters and Scale. Place the trend chart on the upper left of the screen. Next select Trend Zoom/Pan Panel (second from left) and place it on the screen below the trend chart. Double click on the chart and press Suggest and OK. Wonderware will create the appropriate tagnames for you. Next select the Trend Zoom/Pan Panel and press Suggest and OK. Wonderware will link the Trend Zoom/Pan Panel with the chart. Now create buttons and use Show Window to have a method of going from the History to the Bottle window and back. Run the program. Allow the bottle to fill a couple of times. Go to the history window and press the right arrow key, as shown below:
  • 7. Note: The Historical Trends chart will not update automatically. An event must occur, such as an arrow button pressed. Press Development! when finished. Zooming In on the Historical Trend Window The Trend Zoom/Pan has a zoom feature on it. Adjust the sliders on the screen to select a small part of the graph. Press Zoom In to zoom in on the window. Study the other buttons n the Trend Zoom/Pan Panel until you understand the operation. Configuring a Real Time Display Besides a Historical Display, Wonderware can also display a Real Time Display. Select Real-Time Trend from the Toolbox menu. Draw the chart on the upper right of the bottle window. Double click on the chart and enter the slider and bottle in pens 1 and 2. Press OK. Run the program. You should see the tagnames slider and bottle continually updated on the screen. Saving Historical Data in a CSV File A CSV file can be generated with the Wizards/Trends/HistData Wizard. Select the item and place it below the Trend Zoom/Pan Panel. Double click on it and fill in the dialog box. Press OK. Run the program. Click the button HISTDATA.EXE when prompted. After collecting some data, press the Save button on the Historical Trend box. You can change the filename if you like. After saving the file, exit Wonderware, load Excel and use File/Open. Change Files Type to .CSV files. Find the directory, select the file, and open it. The recorded date, time, and tagnames will now appear in Excel. Graph the tagnames using a scatter diagram. DDE Data Transfer Just like Visual Basic, Wonderware can transfer data to other programs through DDE. Wonderware requires and Access Name, Application/Server Name, Topic name, and Item name. We will illustrate this process with the following example. Select Special/DDE Access Names. Select Add. Fill in the following data: DDE Access Name DDELink DDE Application/Server Name Excel DDE Topic Name Sheet1 Leave everything else at the default values. Select Special/Tagname Dictionary create bottlefill as a DDE Real. For the DDE Access Name choose DDELink, and for the Item choose R1C1. In the Special/Scripts/Window Scripts, enter bottlefill = slider; in the While Showing screen.
  • 8. Start Excel and minimize it. Press Runtime! in Wonderware. As the bottle moves on the screen, Row1 Column1 of Excel should show the present value. All of this should be fairly straight forward. You can get help in the Wonderware help menu. The DDE can also transfer to another server. Suppose we wanted to transfer to another computer named ENT12. The DDE Application/Server Name would change to //ENT12/Excel. 1