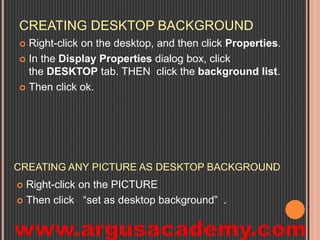
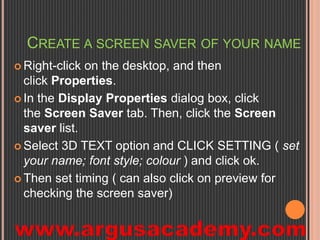
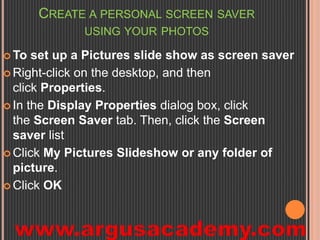
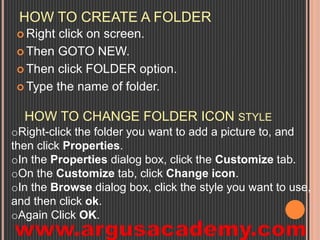
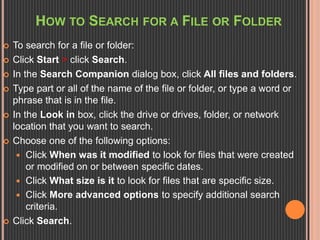
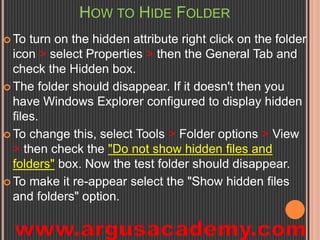
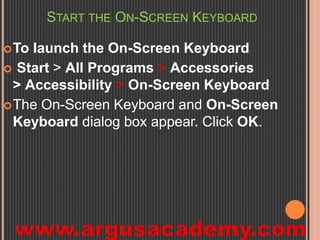
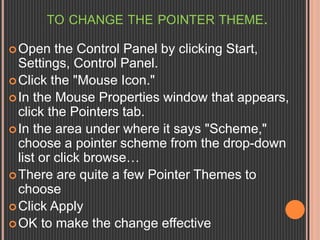
T 
TIPS ‘N’ RICKS FOR 
SOME USEFUL 
HARDWARE 
PRACTICE
CREATING DESKTOP BACKGROUND 
 Right-click on the desktop, and then click Properties. 
 In the Display Properties dialog box, click 
the DESKTOP tab. THEN click the background list. 
 Then click ok. 
CREATING ANY PICTURE AS DESKTOP BACKGROUND 
 Right-click on the PICTURE 
 Then click “set as desktop background” .
CREATE A SCREEN SAVER OF YOUR NAME 
 Right-click on the desktop, and then 
click Properties. 
 In the Display Properties dialog box, click 
the Screen Saver tab. Then, click the Screen 
saver list. 
 Select 3D TEXT option and CLICK SETTING ( set 
your name; font style; colour ) and click ok. 
 Then set timing ( can also click on preview for 
checking the screen saver)
CREATE A PERSONAL SCREEN SAVER 
USING YOUR PHOTOS 
To set up a Pictures slide show as screen saver 
 Right-click on the desktop, and then 
click Properties. 
 In the Display Properties dialog box, click 
the Screen Saver tab. Then, click the Screen 
saver list 
 Click My Pictures Slideshow or any folder of 
picture. 
 Click OK
HOW TO CREATE A FOLDER 
 Right click on screen. 
 Then GOTO NEW. 
 Then click FOLDER option. 
Type the name of folder. 
HOW TO CHANGE FOLDER ICON STYLE 
oRight-click the folder you want to add a picture to, and 
then click Properties. 
oIn the Properties dialog box, click the Customize tab. 
oOn the Customize tab, click Change icon. 
oIn the Browse dialog box, click the style you want to use, 
and then click ok. 
oAgain Click OK.
TO CREATE A KEYBOARD SHORTCUT TO OPEN 
FOLDER 
 Right-click the folder to which you want instant 
access >Then Click Send To Desktop. 
 On your desktop > right-click the new shortcut 
> Properties > short cut key box > type any 
letter which you set as short cut > note the 
combined shortcut prescribed by computer.
HOW TO SEARCH FOR A FILE OR FOLDER 
 To search for a file or folder: 
 Click Start > click Search. 
 In the Search Companion dialog box, click All files and folders. 
 Type part or all of the name of the file or folder, or type a word or 
phrase that is in the file. 
 In the Look in box, click the drive or drives, folder, or network 
location that you want to search. 
 Choose one of the following options: 
 Click When was it modified to look for files that were created 
or modified on or between specific dates. 
 Click What size is it to look for files that are specific size. 
 Click More advanced options to specify additional search 
criteria. 
 Click Search.
HOW TO HIDE FOLDER 
To turn on the hidden attribute right click on the folder 
icon > select Properties > then the General Tab and 
check the Hidden box. 
 The folder should disappear. If it doesn't then you 
have Windows Explorer configured to display hidden 
files. 
To change this, select Tools > Folder options > View 
> then check the "Do not show hidden files and 
folders" box. Now the test folder should disappear. 
To make it re-appear select the "Show hidden files 
and folders" option.
START THE ON-SCREEN KEYBOARD 
To launch the On-Screen Keyboard 
 Start > All Programs > Accessories 
> Accessibility > On-Screen Keyboard 
The On-Screen Keyboard and On-Screen 
Keyboard dialog box appear. Click OK.
TO CHANGE THE POINTER THEME. 
Open the Control Panel by clicking Start, 
Settings, Control Panel. 
Click the "Mouse Icon." 
In the Mouse Properties window that appears, 
click the Pointers tab. 
 In the area under where it says "Scheme," 
choose a pointer scheme from the drop-down 
list or click browse… 
There are quite a few Pointer Themes to 
choose 
Click Apply 
OK to make the change effective
HOW TO MOVE THE MOUSE CURSOR WITH THE 
KEYBOARD IN WINDOWS. 
 Click Start, Settings, Control Panel. 
 Within the Control Panel open Accessibility 
Options or Ease of Access 
 Click the Mouse tab. 
 Check the "Use Mouse Keys" check box. 
 If you wish to increase the speed or change any other 
settings, click on the Settings button. 
 Click Apply and then close out of the box. 
 After performing the above steps you will be able to used the 
numeric keypad as a mouse moving up, down, left, right, and 
all the diagonals. In addition, you may also use the center 
"5" key as a left click.
UNINSTALLING SOFTWARE 
 The best way to uninstall software is to go back to 
your Control Panel and to the Add/Remove 
Programs or Programs and Features (Windows 
Vista and 7) utility. 
 From here you can find the software you want to 
remove in the list and then click on the option you 
want such as Change, Uninstall, Remove or 
Repair. 
 Just make sure that you don't have the software 
running or it won’t let you uninstall it. 
(Continued)
HOW TO ROTATE THE SCREEN DISPLAY 
 Press "Ctrl-Alt" and an arrow key (left, right, up or 
down) to rotate the screen. 
HOW TO ROTATE THE SCREEN DISPLAY 
 Click “Start,” then “Control Panel,” then “Display,” then 
the “Settings” tab. Click the “Advanced” button. Check for an 
“Orientation” option. Select your desired orientation.
HOW TO CREATE AND CONFIGURE USER ACCOUNTS 
To Create a New User Account 
 Click Create a new account in the Pick a task 
list box. 
 Type the name that you want to use for the 
account, and then click Next. 
 Select the desired account type, and then click 
Create Account.
HOW TO CREATE AND CONFIGURE USER ACCOUNTS 
To Make Changes to an Account 
 Click Change an account in the Pick a task list box. 
 Click the account that you want to change. 
 Select the item that you would like to change: 
 Click Change the name to change the name that appears on the 
Welcome screen for the account. 
 Click Change the picture to change the picture that is used to 
represent the user account. You can use any image file on the 
computer for the user's picture. 
 Click Change the account type to change the account type to 
increase or decrease the user's rights on the computer. 
 Click Create/change the password to create or change the 
password for the user and create or change the password hint. 
 Click Delete the account to delete the user account from the 
computer. When you delete the account, you are given the option to 
save the user's files on the computer.

COMPUTER Tips ‘n’ Tricks

  • 1.
    T TIPS ‘N’RICKS FOR SOME USEFUL HARDWARE PRACTICE
  • 2.
    CREATING DESKTOP BACKGROUND  Right-click on the desktop, and then click Properties.  In the Display Properties dialog box, click the DESKTOP tab. THEN click the background list.  Then click ok. CREATING ANY PICTURE AS DESKTOP BACKGROUND  Right-click on the PICTURE  Then click “set as desktop background” .
  • 3.
    CREATE A SCREENSAVER OF YOUR NAME  Right-click on the desktop, and then click Properties.  In the Display Properties dialog box, click the Screen Saver tab. Then, click the Screen saver list.  Select 3D TEXT option and CLICK SETTING ( set your name; font style; colour ) and click ok.  Then set timing ( can also click on preview for checking the screen saver)
  • 4.
    CREATE A PERSONALSCREEN SAVER USING YOUR PHOTOS To set up a Pictures slide show as screen saver  Right-click on the desktop, and then click Properties.  In the Display Properties dialog box, click the Screen Saver tab. Then, click the Screen saver list  Click My Pictures Slideshow or any folder of picture.  Click OK
  • 5.
    HOW TO CREATEA FOLDER  Right click on screen.  Then GOTO NEW.  Then click FOLDER option. Type the name of folder. HOW TO CHANGE FOLDER ICON STYLE oRight-click the folder you want to add a picture to, and then click Properties. oIn the Properties dialog box, click the Customize tab. oOn the Customize tab, click Change icon. oIn the Browse dialog box, click the style you want to use, and then click ok. oAgain Click OK.
  • 6.
    TO CREATE AKEYBOARD SHORTCUT TO OPEN FOLDER  Right-click the folder to which you want instant access >Then Click Send To Desktop.  On your desktop > right-click the new shortcut > Properties > short cut key box > type any letter which you set as short cut > note the combined shortcut prescribed by computer.
  • 7.
    HOW TO SEARCHFOR A FILE OR FOLDER  To search for a file or folder:  Click Start > click Search.  In the Search Companion dialog box, click All files and folders.  Type part or all of the name of the file or folder, or type a word or phrase that is in the file.  In the Look in box, click the drive or drives, folder, or network location that you want to search.  Choose one of the following options:  Click When was it modified to look for files that were created or modified on or between specific dates.  Click What size is it to look for files that are specific size.  Click More advanced options to specify additional search criteria.  Click Search.
  • 8.
    HOW TO HIDEFOLDER To turn on the hidden attribute right click on the folder icon > select Properties > then the General Tab and check the Hidden box.  The folder should disappear. If it doesn't then you have Windows Explorer configured to display hidden files. To change this, select Tools > Folder options > View > then check the "Do not show hidden files and folders" box. Now the test folder should disappear. To make it re-appear select the "Show hidden files and folders" option.
  • 9.
    START THE ON-SCREENKEYBOARD To launch the On-Screen Keyboard  Start > All Programs > Accessories > Accessibility > On-Screen Keyboard The On-Screen Keyboard and On-Screen Keyboard dialog box appear. Click OK.
  • 10.
    TO CHANGE THEPOINTER THEME. Open the Control Panel by clicking Start, Settings, Control Panel. Click the "Mouse Icon." In the Mouse Properties window that appears, click the Pointers tab.  In the area under where it says "Scheme," choose a pointer scheme from the drop-down list or click browse… There are quite a few Pointer Themes to choose Click Apply OK to make the change effective
  • 11.
    HOW TO MOVETHE MOUSE CURSOR WITH THE KEYBOARD IN WINDOWS.  Click Start, Settings, Control Panel.  Within the Control Panel open Accessibility Options or Ease of Access  Click the Mouse tab.  Check the "Use Mouse Keys" check box.  If you wish to increase the speed or change any other settings, click on the Settings button.  Click Apply and then close out of the box.  After performing the above steps you will be able to used the numeric keypad as a mouse moving up, down, left, right, and all the diagonals. In addition, you may also use the center "5" key as a left click.
  • 12.
    UNINSTALLING SOFTWARE The best way to uninstall software is to go back to your Control Panel and to the Add/Remove Programs or Programs and Features (Windows Vista and 7) utility.  From here you can find the software you want to remove in the list and then click on the option you want such as Change, Uninstall, Remove or Repair.  Just make sure that you don't have the software running or it won’t let you uninstall it. (Continued)
  • 14.
    HOW TO ROTATETHE SCREEN DISPLAY  Press "Ctrl-Alt" and an arrow key (left, right, up or down) to rotate the screen. HOW TO ROTATE THE SCREEN DISPLAY  Click “Start,” then “Control Panel,” then “Display,” then the “Settings” tab. Click the “Advanced” button. Check for an “Orientation” option. Select your desired orientation.
  • 15.
    HOW TO CREATEAND CONFIGURE USER ACCOUNTS To Create a New User Account  Click Create a new account in the Pick a task list box.  Type the name that you want to use for the account, and then click Next.  Select the desired account type, and then click Create Account.
  • 16.
    HOW TO CREATEAND CONFIGURE USER ACCOUNTS To Make Changes to an Account  Click Change an account in the Pick a task list box.  Click the account that you want to change.  Select the item that you would like to change:  Click Change the name to change the name that appears on the Welcome screen for the account.  Click Change the picture to change the picture that is used to represent the user account. You can use any image file on the computer for the user's picture.  Click Change the account type to change the account type to increase or decrease the user's rights on the computer.  Click Create/change the password to create or change the password for the user and create or change the password hint.  Click Delete the account to delete the user account from the computer. When you delete the account, you are given the option to save the user's files on the computer.