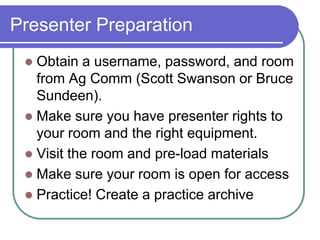
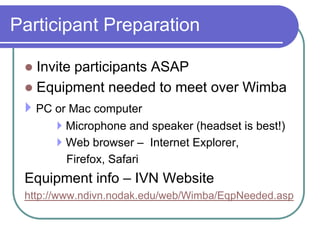
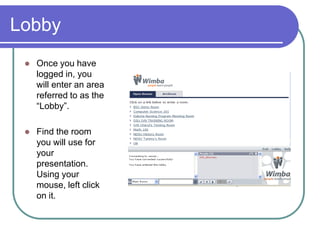
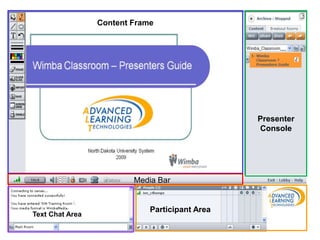
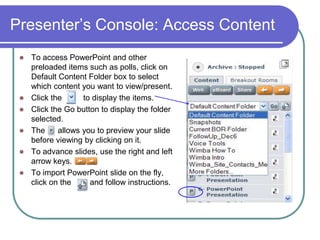
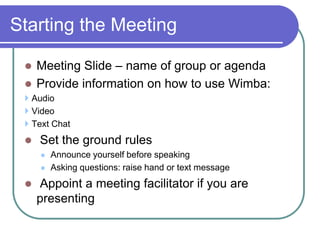
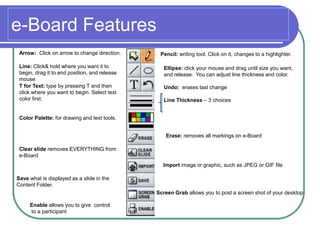
Wimba Presenters GuideExtension Spring Conference  2010
Presenter PreparationObtain a username, password, and room from Ag Comm (Scott Swanson or Bruce Sundeen).Make sure you have presenter rights to your room and the right equipment.Visit the room and pre-load materialsMake sure your room is open for access Practice! Create a practice archive
Participant PreparationInvite participants ASAP Equipment needed to meet over Wimba PC or Mac computer		 Microphone and speaker (headset is best!)		 Web browser –  Internet Explorer,             Firefox, Safari Equipment info – IVN Website http://www.ndivn.nodak.edu/web/Wimba/EqpNeeded.asp
Participant inviteMeeting invitation - provide information on testing the equipment prior to the meeting. Have them run the Wizard!“To ensure you can properly access and view the presentation, we recommend you run the Wimba Set-Up Wizard at least a day prior to the meeting.  You can find the Wizard at www.ndivnlc.wimba.com”Prior to testing, inform them to:Turn off Yahoo or Google Toolbars
Turn off pop-up blockers
Provide link on disabling pop-up blockers and other informationhttp://www.ag.ndsu.edu/wimba/quick_reference.html
How many participants?Wimba can handle up to 300 participantsOptimal up to 70 participants
Participant inviteSend clear directions:Website address for the meeting.Room ID or other access information. How to access the phone option.What do attendees need to prepare or bring to the meeting. Who to call prior to the meeting if there are any questions  - will it be you?Who to call during the meeting if there are problems – ALT Wimba Help Desk  1-866-940-0065
Presenter AccessNavigate your web browser to:http://www.ndivnlc. wimba.com/If you have not used Wimba before, click on Setup Wizard to ensure you have the necessary settings.
Presenter Access Login in with the User Name and Password you were provided as a presenter.
Lobby Once you have logged in, you will enter an area referred to as the “Lobby”.  Find the room you will use for your presentation. Using your mouse, left click on it.
Content Frame PresenterConsoleMedia BarParticipant Area Text Chat Area
Presenter’s Console: Access ContentTo access PowerPoint and other preloaded items such as polls, click on Default Content Folder box to select which content you want to view/present.Click the 	to display the items.Click the Go button to display the folder selected. The 	   allows you to preview your slide before viewing by clicking on it. To advance slides, use the right and left arrow keys. To import PowerPoint slide on the fly, click on the 	   and follow instructions.
Starting the Meeting Meeting Slide – name of group or agendaProvide information on how to use Wimba: Audio Video Text Chat Set the ground rulesAnnounce yourself before speakingAsking questions: raise hand or text message Appoint a meeting facilitator if you are presenting
e-Board FeaturesArrow:  Click on arrow to change direction.Pencil: writing tool. Click on it, changes to a highlighter. Line: Click& hold where you want it to begin, drag it to end position, and release mouse Ellipse: click your mouse and drag until size you want, and release.  You can adjust line thickness and color. Undo:  erases last changeLine Thickness – 3 choicesT for Text: type by pressing T and then click where you want to begin. Select text color first.Color Palette: for drawing and text tools. Erase: removes all markings on e-BoardClear slide removes EVERYTHING from e-BoardImport image or graphic, such as JPEG or GIF fileSave what is displayed as a slide in the Content Folder.Screen Grab allows you to post a screen shot of your desktop         Enable allows you to give  control           to a participant
Presenter’s Console: Application ShareApplication Share can be used for:Sharing a document or another software program.  Examples: Share a Word document or Excel spreadsheet Demonstrating actions by the presenter or student of their desktop.
Application Share: Content ViewIf you selected to view in Content Frame, you have 3 options:Window: allows you to show one 	window on your desktop.Screen Area: preferred. You will be 	able to set the size of your viewing area. 	A draw box will appear –  drag the lines 	around the area you wish to share. Full desktop: your entire desktop 	will be in viewSelect OK, when ready. TIPS:  Have the document you wish to share open on your desktop before beginning App Share.  Ask students if they can see the document.
Accessing Breakout RoomsMost Wimba rooms will have been created with at least 3 breakout rooms.Click on Breakout Rooms, in the Presenters Console,
Breakout Rooms: Distribute StudentsYou can distribute students in the breakout rooms either AUTOMATICALLY or MANUALLY.You can not archive in the breakout rooms.As an instructor/presenter, you can move yourself from one room to another.
Breakout Rooms:Automatic DistributionClick on AutomaticSelect the number of breakout rooms you wish to use, this will automatically move the students.Click on the MOVE button.
Breakout Rooms: Manual Select MANUALClick on student’s name and drag them to the breakout room.For a group of students – hold down CTRL key to select more than one.To move them back to the Main Room, click on each name and drag them to the Main Room.
Breakout Rooms:Showing PowerPoint Step 1: In the Main Room under Presenter’s Console, select your PowerPoint Slides in the drop down box and click on Go.Step 2. Click on the Preview button for the slide you wish to show
Breakout Rooms:Showing PowerPoint (cont.)Step 3: This box will pop up -  which will allow you to Push Slide to which room you want.  Select All Breakout Rooms or a specific breakout room. Step 4:  Click on Push Slide.  This will move the slide to the selected room
Enabling E-Board for StudentsSTEP 1:  From the Presenter’s Console, click on e-Board so the tools on the left show.STEP 2:Click on ENABLE in the e-Board tools.
Enabling E-board for Students (cont.)STEP 3: Click on name of individual to allow and click on Update OR if you want all students to have access, click Enable All.Name or Names will then be displayed in the Enabled box.
Disable E-board for StudentsTo Disable –Click on Student’s name and click on Update OR if more than one student, click Disable All
Uploading PowerPoint on the FlyIt is recommended that you load PowerPoints prior to class as it will take time to load if doing it on the fly.In the Presenter’s Console select the PowerPoint Upload icon
Uploading PowerPoint on the FlySTEP 1:  Click on Browse to locate the PowerPoint file on your computer.STEP 2: Select where you wish to display the PowerPoint. E-board is recommended so you can annotate the slide.STEP 3: Click on IMPORT
Accessing ArchiveTo make archives available to participants after the event, you will need to have Room Administrator Access to open the room. If you do, follow the steps in the next slides.If you do not have Room Administrator access your Wimba Campus Contact will need to enable the archive.
Accessing the Archive – Step 1To open an archive, you will need to enter the Administrative section.Go to:  www.ndivnlc.wimba.com/admin Login with your user name & password
Oops!What happens if you are presenter and you lose talk capabilities? Use text chat and let the room knowWhat happens if my computer goes down? Have a back up facilitator until you get back online
Ending the Meeting State when the meeting is officially over.Stop archive.Announce to attendees how archive will be made available.Announce how to exit meeting. Stay online for a few minutes after others have left to answer questions.
After the Meeting Reflect on your presentation  Review the archive and make sure it’s     open for access  Note all unexpected issues encountered and work with appropriate people  Ask for feedback from others to improve
Wimba ProntoAvailable through ALT by way of a Learning Management System such as Moodle or Blackboard.
Allows for instant access to a list of colleagues

Wimba Classroom Training for Presenters

  • 1.
    Wimba Presenters GuideExtensionSpring Conference 2010
  • 2.
    Presenter PreparationObtain ausername, password, and room from Ag Comm (Scott Swanson or Bruce Sundeen).Make sure you have presenter rights to your room and the right equipment.Visit the room and pre-load materialsMake sure your room is open for access Practice! Create a practice archive
  • 3.
    Participant PreparationInvite participantsASAP Equipment needed to meet over Wimba PC or Mac computer  Microphone and speaker (headset is best!)  Web browser – Internet Explorer, Firefox, Safari Equipment info – IVN Website http://www.ndivn.nodak.edu/web/Wimba/EqpNeeded.asp
  • 4.
    Participant inviteMeeting invitation- provide information on testing the equipment prior to the meeting. Have them run the Wizard!“To ensure you can properly access and view the presentation, we recommend you run the Wimba Set-Up Wizard at least a day prior to the meeting. You can find the Wizard at www.ndivnlc.wimba.com”Prior to testing, inform them to:Turn off Yahoo or Google Toolbars
  • 5.
  • 6.
    Provide link ondisabling pop-up blockers and other informationhttp://www.ag.ndsu.edu/wimba/quick_reference.html
  • 7.
    How many participants?Wimbacan handle up to 300 participantsOptimal up to 70 participants
  • 8.
    Participant inviteSend cleardirections:Website address for the meeting.Room ID or other access information. How to access the phone option.What do attendees need to prepare or bring to the meeting. Who to call prior to the meeting if there are any questions - will it be you?Who to call during the meeting if there are problems – ALT Wimba Help Desk 1-866-940-0065
  • 9.
    Presenter AccessNavigate yourweb browser to:http://www.ndivnlc. wimba.com/If you have not used Wimba before, click on Setup Wizard to ensure you have the necessary settings.
  • 10.
    Presenter Access Loginin with the User Name and Password you were provided as a presenter.
  • 11.
    Lobby Once youhave logged in, you will enter an area referred to as the “Lobby”. Find the room you will use for your presentation. Using your mouse, left click on it.
  • 12.
    Content Frame PresenterConsoleMediaBarParticipant Area Text Chat Area
  • 13.
    Presenter’s Console: AccessContentTo access PowerPoint and other preloaded items such as polls, click on Default Content Folder box to select which content you want to view/present.Click the to display the items.Click the Go button to display the folder selected. The allows you to preview your slide before viewing by clicking on it. To advance slides, use the right and left arrow keys. To import PowerPoint slide on the fly, click on the and follow instructions.
  • 14.
    Starting the MeetingMeeting Slide – name of group or agendaProvide information on how to use Wimba: Audio Video Text Chat Set the ground rulesAnnounce yourself before speakingAsking questions: raise hand or text message Appoint a meeting facilitator if you are presenting
  • 15.
    e-Board FeaturesArrow: Click on arrow to change direction.Pencil: writing tool. Click on it, changes to a highlighter. Line: Click& hold where you want it to begin, drag it to end position, and release mouse Ellipse: click your mouse and drag until size you want, and release. You can adjust line thickness and color. Undo: erases last changeLine Thickness – 3 choicesT for Text: type by pressing T and then click where you want to begin. Select text color first.Color Palette: for drawing and text tools. Erase: removes all markings on e-BoardClear slide removes EVERYTHING from e-BoardImport image or graphic, such as JPEG or GIF fileSave what is displayed as a slide in the Content Folder.Screen Grab allows you to post a screen shot of your desktop Enable allows you to give control to a participant
  • 16.
    Presenter’s Console: ApplicationShareApplication Share can be used for:Sharing a document or another software program. Examples: Share a Word document or Excel spreadsheet Demonstrating actions by the presenter or student of their desktop.
  • 17.
    Application Share: ContentViewIf you selected to view in Content Frame, you have 3 options:Window: allows you to show one window on your desktop.Screen Area: preferred. You will be able to set the size of your viewing area. A draw box will appear – drag the lines around the area you wish to share. Full desktop: your entire desktop will be in viewSelect OK, when ready. TIPS: Have the document you wish to share open on your desktop before beginning App Share. Ask students if they can see the document.
  • 18.
    Accessing Breakout RoomsMostWimba rooms will have been created with at least 3 breakout rooms.Click on Breakout Rooms, in the Presenters Console,
  • 19.
    Breakout Rooms: DistributeStudentsYou can distribute students in the breakout rooms either AUTOMATICALLY or MANUALLY.You can not archive in the breakout rooms.As an instructor/presenter, you can move yourself from one room to another.
  • 20.
    Breakout Rooms:Automatic DistributionClickon AutomaticSelect the number of breakout rooms you wish to use, this will automatically move the students.Click on the MOVE button.
  • 21.
    Breakout Rooms: ManualSelect MANUALClick on student’s name and drag them to the breakout room.For a group of students – hold down CTRL key to select more than one.To move them back to the Main Room, click on each name and drag them to the Main Room.
  • 22.
    Breakout Rooms:Showing PowerPointStep 1: In the Main Room under Presenter’s Console, select your PowerPoint Slides in the drop down box and click on Go.Step 2. Click on the Preview button for the slide you wish to show
  • 23.
    Breakout Rooms:Showing PowerPoint(cont.)Step 3: This box will pop up - which will allow you to Push Slide to which room you want. Select All Breakout Rooms or a specific breakout room. Step 4: Click on Push Slide. This will move the slide to the selected room
  • 24.
    Enabling E-Board forStudentsSTEP 1: From the Presenter’s Console, click on e-Board so the tools on the left show.STEP 2:Click on ENABLE in the e-Board tools.
  • 25.
    Enabling E-board forStudents (cont.)STEP 3: Click on name of individual to allow and click on Update OR if you want all students to have access, click Enable All.Name or Names will then be displayed in the Enabled box.
  • 26.
    Disable E-board forStudentsTo Disable –Click on Student’s name and click on Update OR if more than one student, click Disable All
  • 27.
    Uploading PowerPoint onthe FlyIt is recommended that you load PowerPoints prior to class as it will take time to load if doing it on the fly.In the Presenter’s Console select the PowerPoint Upload icon
  • 28.
    Uploading PowerPoint onthe FlySTEP 1: Click on Browse to locate the PowerPoint file on your computer.STEP 2: Select where you wish to display the PowerPoint. E-board is recommended so you can annotate the slide.STEP 3: Click on IMPORT
  • 29.
    Accessing ArchiveTo makearchives available to participants after the event, you will need to have Room Administrator Access to open the room. If you do, follow the steps in the next slides.If you do not have Room Administrator access your Wimba Campus Contact will need to enable the archive.
  • 30.
    Accessing the Archive– Step 1To open an archive, you will need to enter the Administrative section.Go to: www.ndivnlc.wimba.com/admin Login with your user name & password
  • 31.
    Oops!What happens ifyou are presenter and you lose talk capabilities? Use text chat and let the room knowWhat happens if my computer goes down? Have a back up facilitator until you get back online
  • 32.
    Ending the MeetingState when the meeting is officially over.Stop archive.Announce to attendees how archive will be made available.Announce how to exit meeting. Stay online for a few minutes after others have left to answer questions.
  • 33.
    After the MeetingReflect on your presentation Review the archive and make sure it’s open for access Note all unexpected issues encountered and work with appropriate people Ask for feedback from others to improve
  • 34.
    Wimba ProntoAvailable throughALT by way of a Learning Management System such as Moodle or Blackboard.
  • 35.
    Allows for instantaccess to a list of colleagues

Editor's Notes

  • #3 Obtain a username and password and room (room ID) from Ag CommPresenters need to be given the right to present from the Wimba Admin.Make sure you have the proper equipment:Microphones – headsets with built in microphones are preferred over built in microphones in the computer as they do not cause an echo problem. There are some hands free microphones from Polycom – the Polycom Communicator – that have echo cancellation and can work with the system If attendees do not have a microphone, they can phone in, but then they can always be heard!WEB BROWSER: What ever works. On a PC – Internet Explorer or Firefox. On a MAC – recent information suggests using Safari as there have been some problems reported with the latest release of Firefox
  • #4 CHERYL In your invitation, provide information for your attendees on what equipment to use for Wimba if they do not already have it. Make sure you emphasize that participants should access as participants. Some may have presenter rights to your room….too many presenters can cause problems.Internet Explorer 8 and Firefox 3 not compatible or not supportedUpdated page on websiteBruce – will share information on a Mac Microphones – headsets with built in microphones are preferred over built in microphones in the computer as they do not cause an echo problem. There are some hands free microphones from Polycom – the Polycom Communicator – that have echo cancellation and can work with the system If attendees do not have a microphone, they can phone in. WEB BROWSER: What ever works. On a PC – Internet Explorer or Firefox. On a MAC – recent information suggests using Safari as there have been some problems reported with the latest release of Firefox
  • #5 Make participants are testing the actual machine they will be using!
  • #7 Can you provide the phone number and PIN prior to the event – Phone number yes as it is set for your particular Wimba room. PIN – no as it assigned per computer. Global access PIN if they wish.
  • #13 Meeting Slide – name of group or agenda – Post your agenda on the screen with a PowerPoint:CHERYL – you can use the Wimba Intro Slide that you have for all meetings that is put up.Provide information on how to use Wimba: Audio – how to make audio adjustments – explain phone option – disconnect media option  Video – voice activated, turn on/off – Picture in Picture  Text Chat Set the ground rulesAnnounce yourself before speaking -not everyone will recognize your voice or have a web cam Asking questions – presenters preference show them how to raise hands in the Participant window, the Yes/No options. Appoint a meeting facilitator if you are presenting – this individual can watch the questions in the text chat area, watch the hands go up and mention it to the speaker.
  • #30 This slide is to have discussion on what to do if problems arise – technical difficulties