Downloaded 61 times
![II-1. Installing QGIS
Change the language setting/interface of QGIS
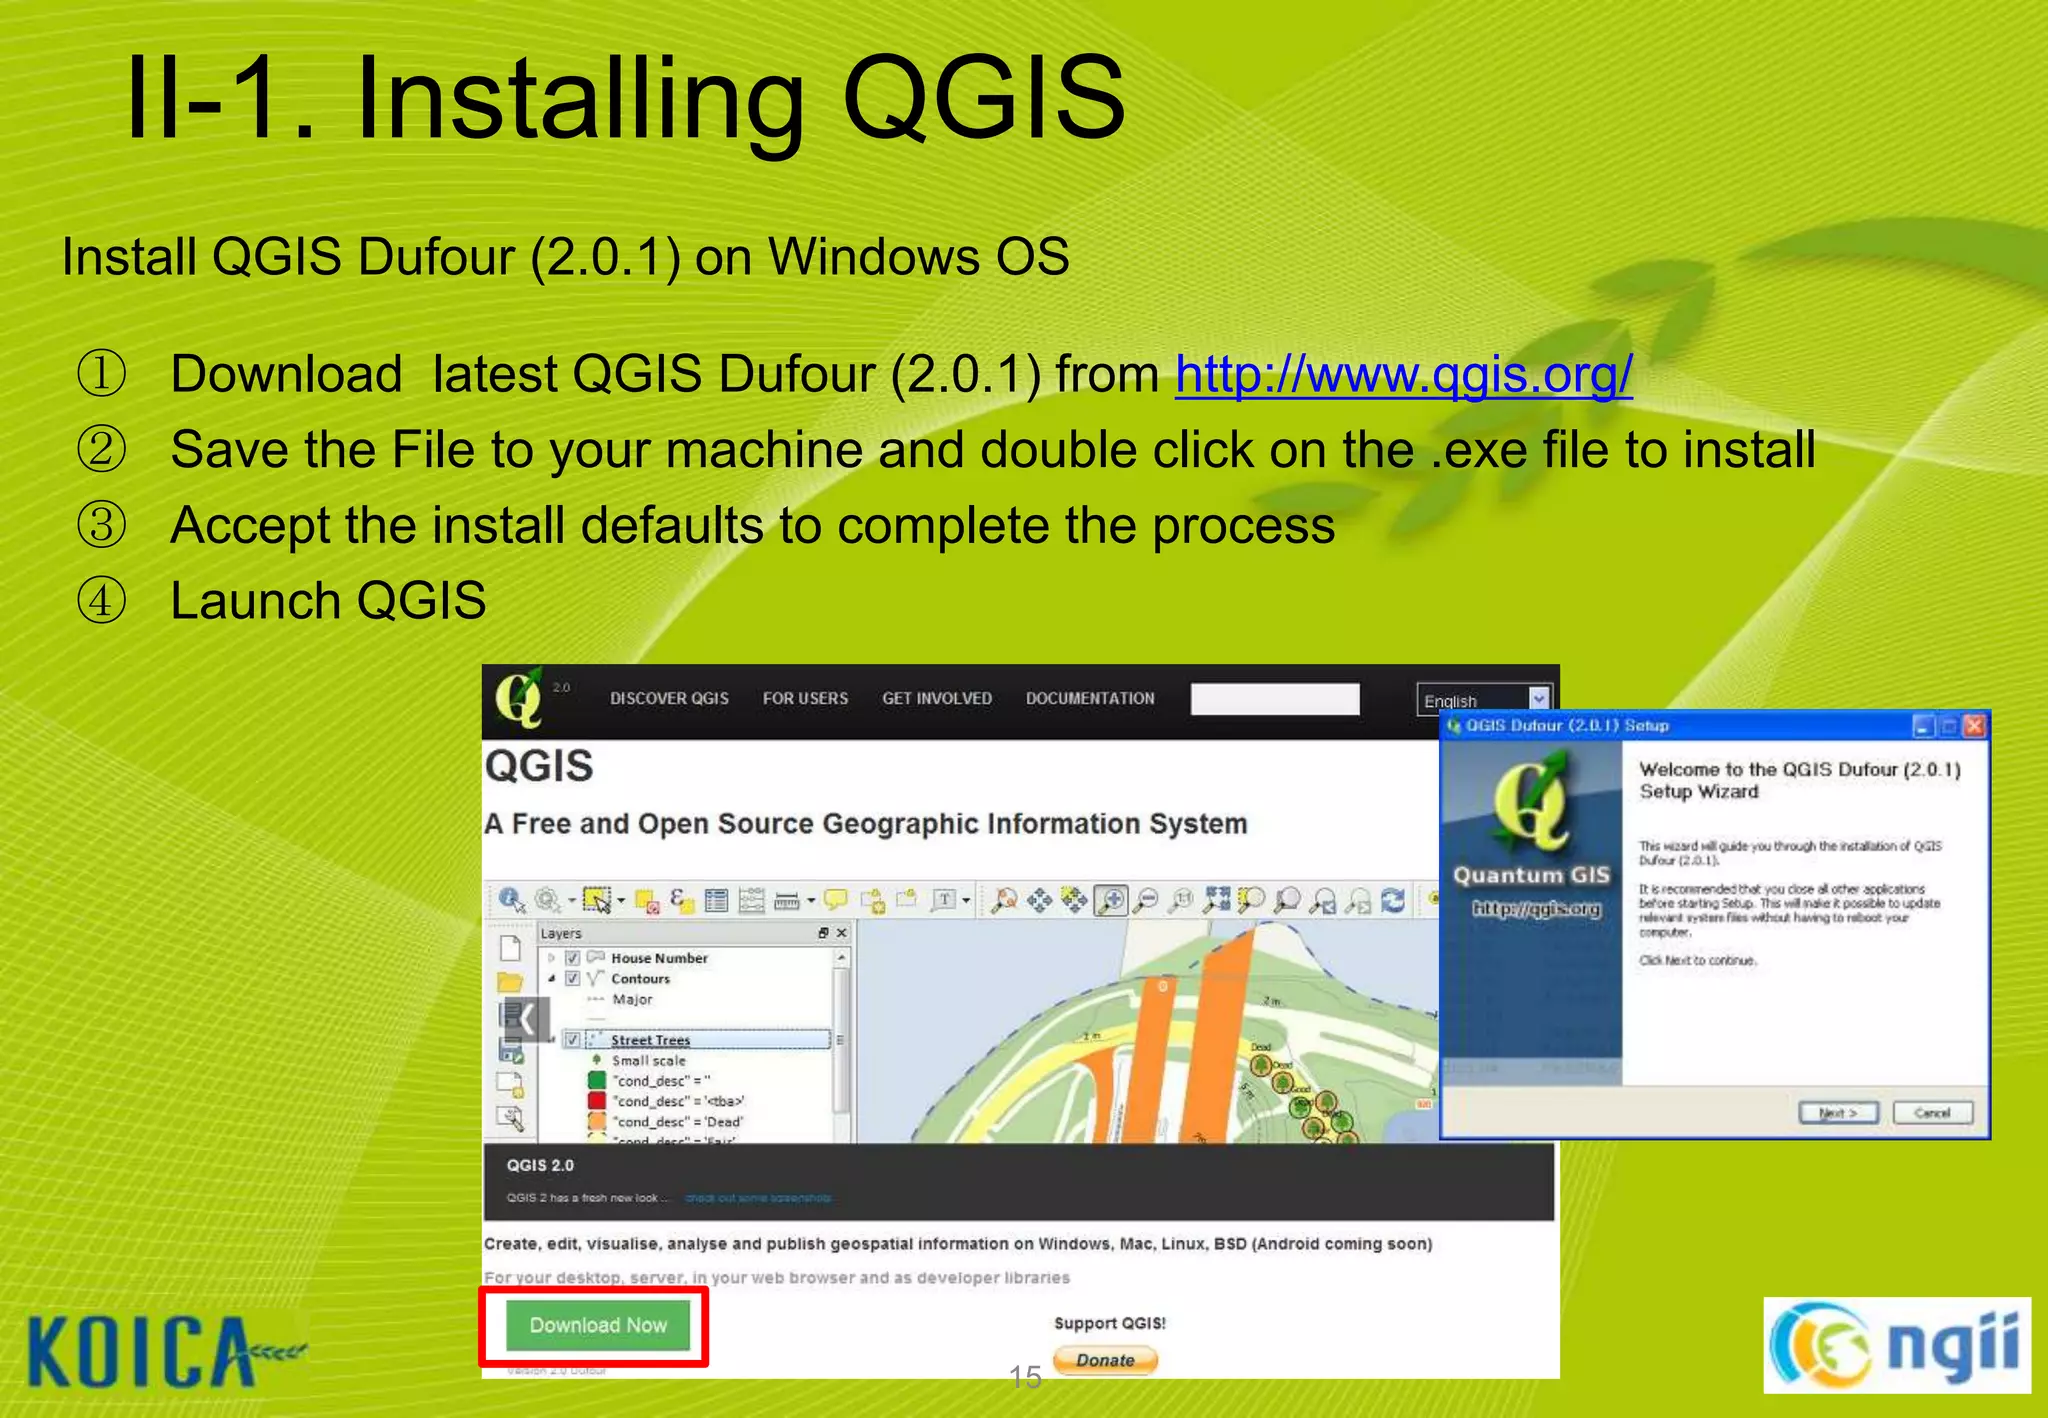
① Launch QGIS
② [설정] [옵션…] [언어설정] [U.S. English] [확인]
③ Select [Setting] [Options…] menu and Select [Locale] [U.S. English]
[OK]
④ Restart QGIS
16](https://image.slidesharecdn.com/koicaqgisglobalmap-131119000848-phpapp01/75/Using-QGIS-and-ISCGM-Global-Map-16-2048.jpg)
![II-2. Installing Google Earth
Change the language setting/interface of Google Earth
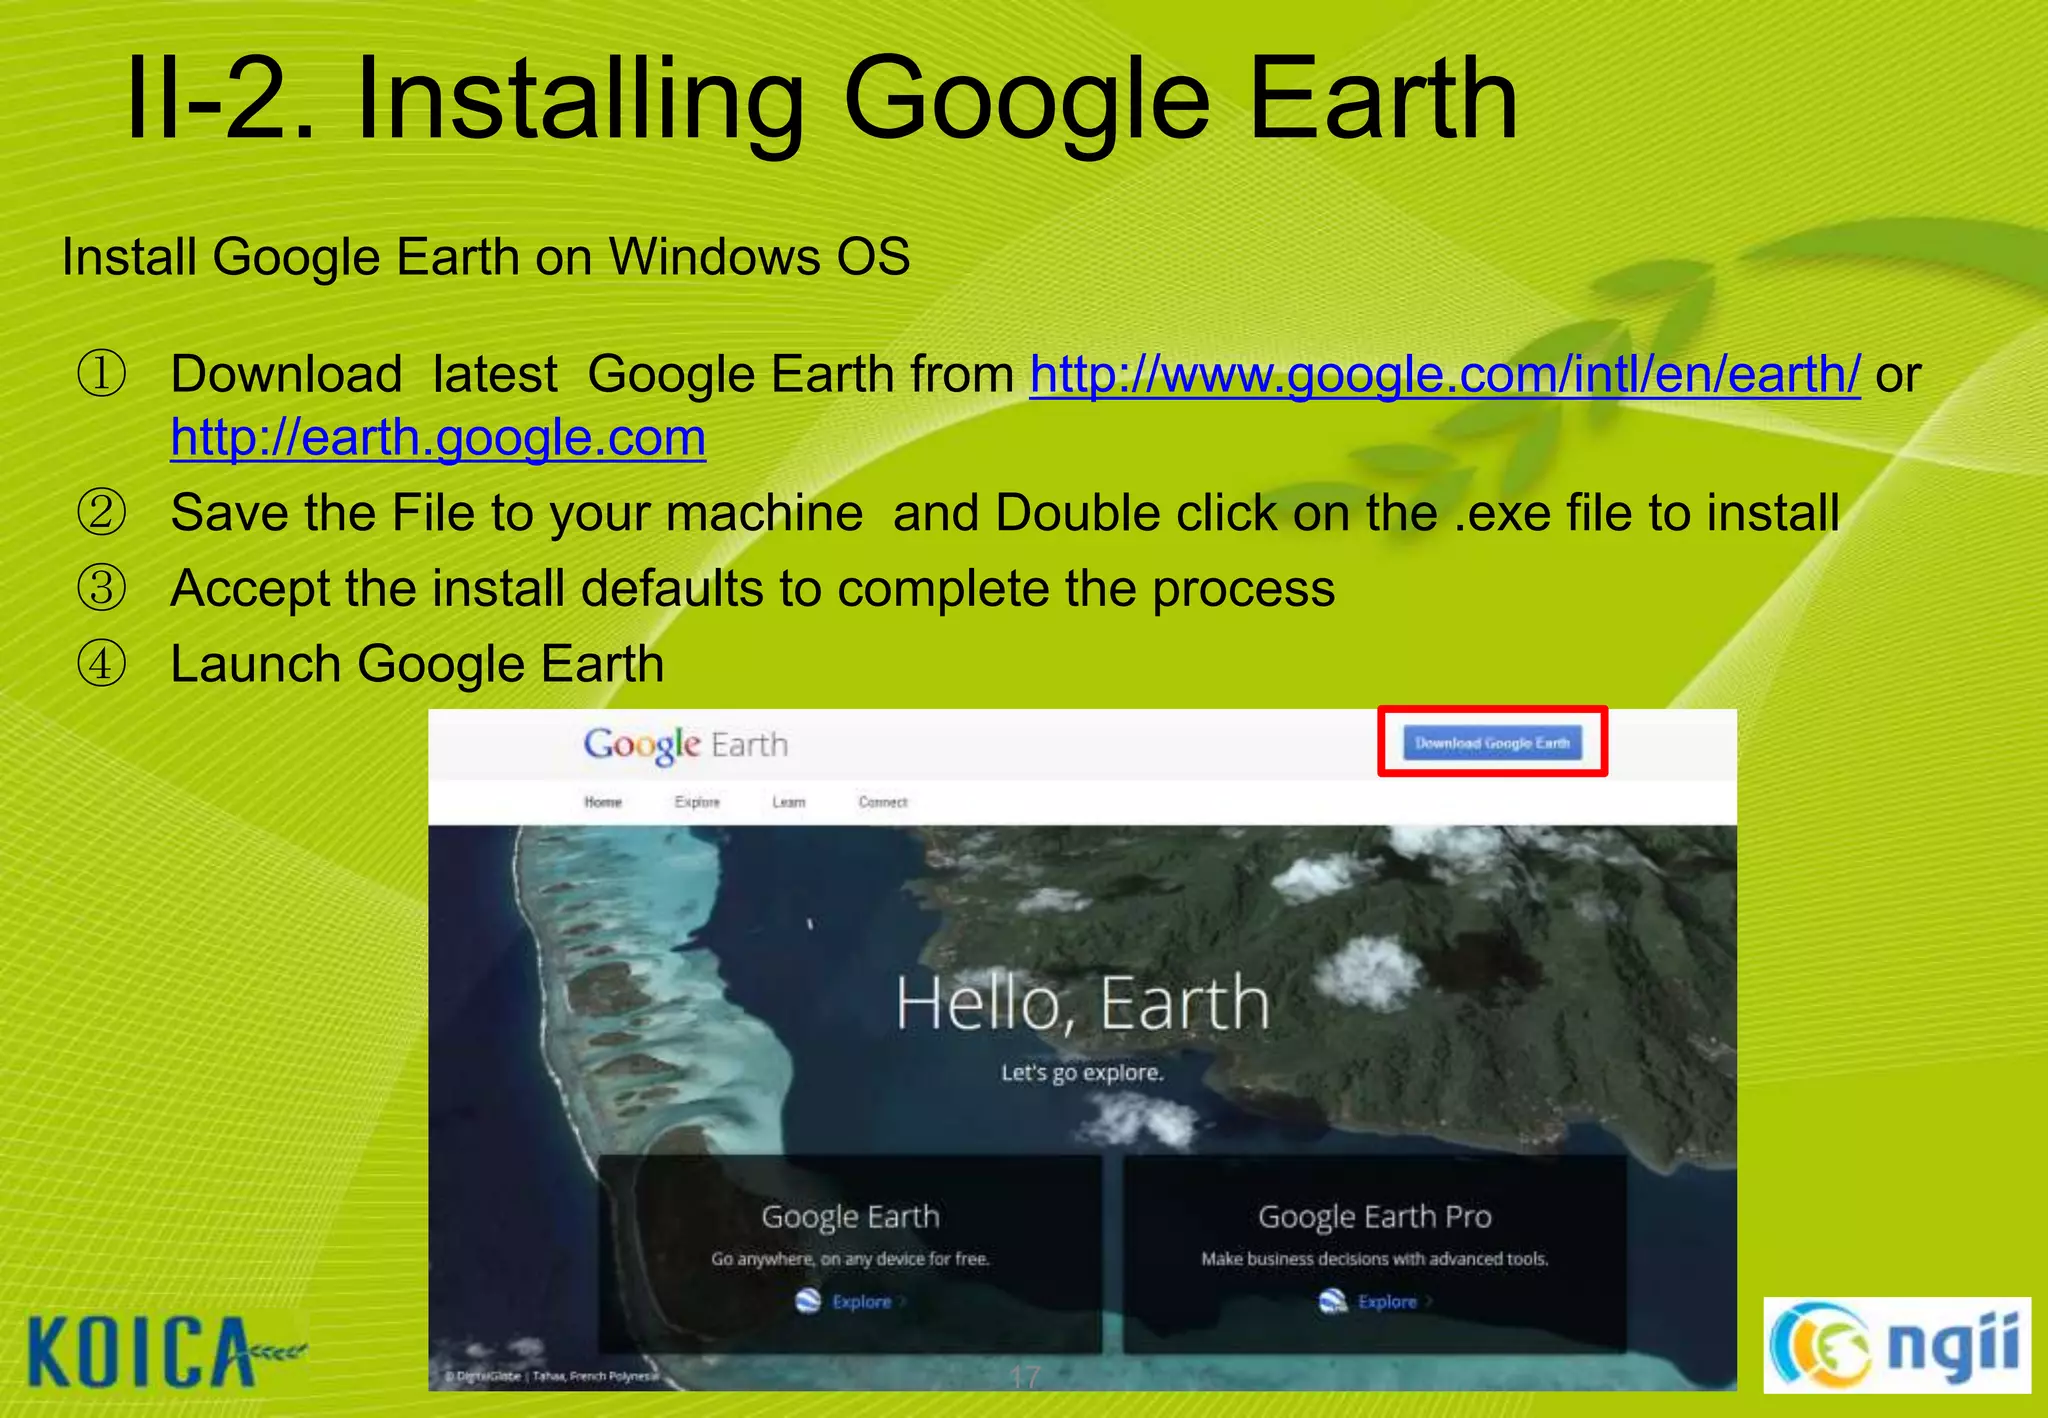
① Launch Google Earth
② [도구] [옵션…] [일반] [언어 설정] [English (US)] [확인]
③ Select [Tools] [Options…] [General] [Language settings] [ English
(US)] [OK]
④ Restart Google Earth
18](https://image.slidesharecdn.com/koicaqgisglobalmap-131119000848-phpapp01/75/Using-QGIS-and-ISCGM-Global-Map-18-2048.jpg)
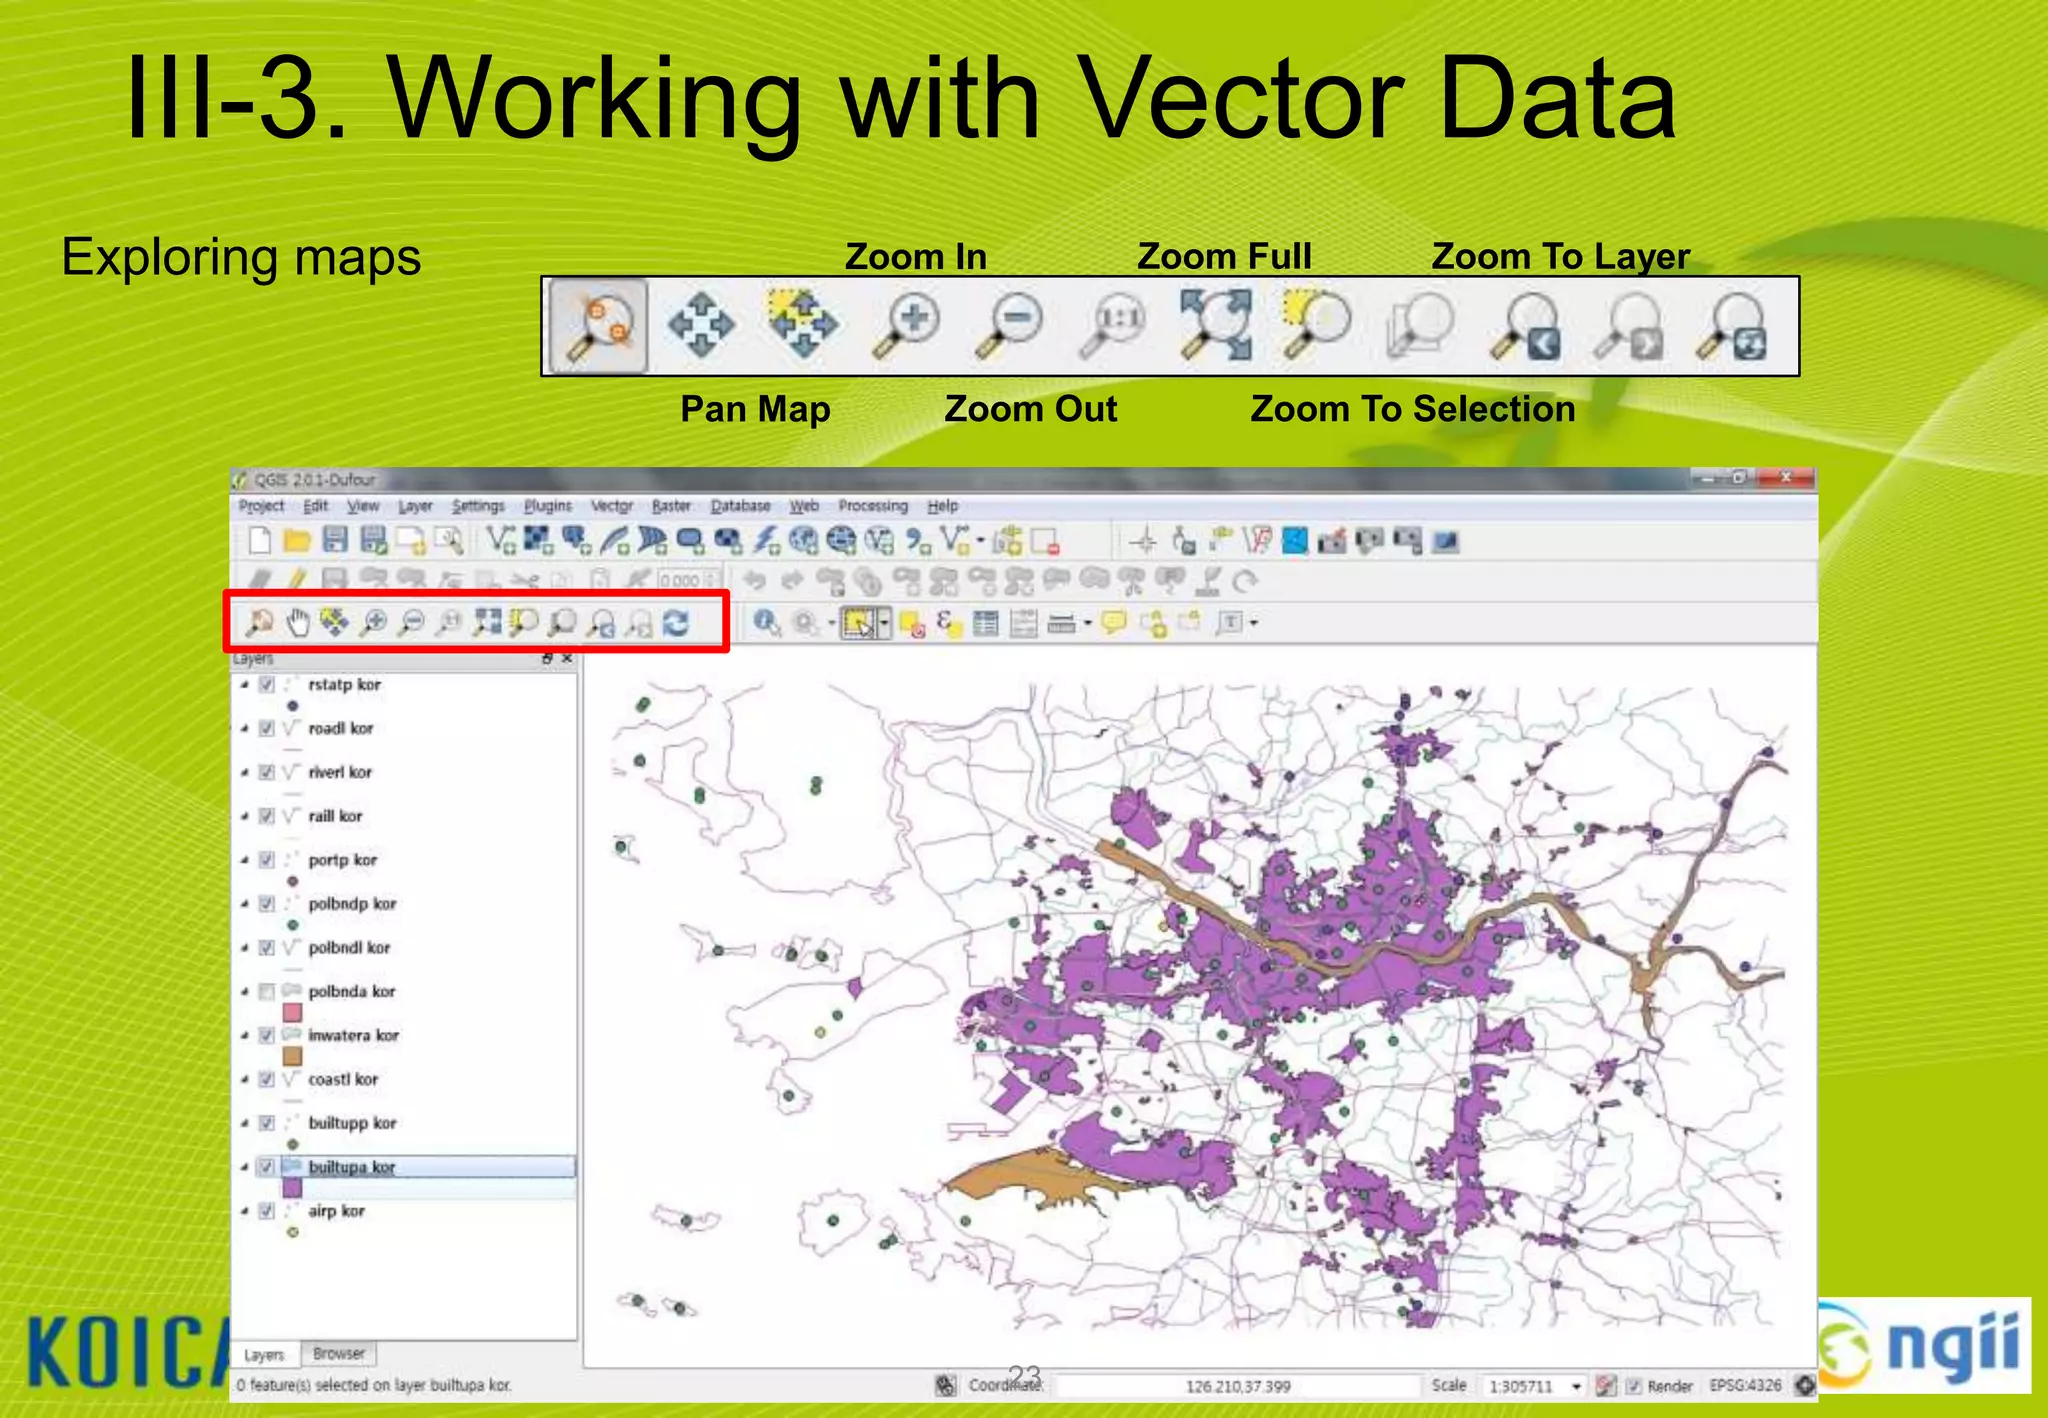
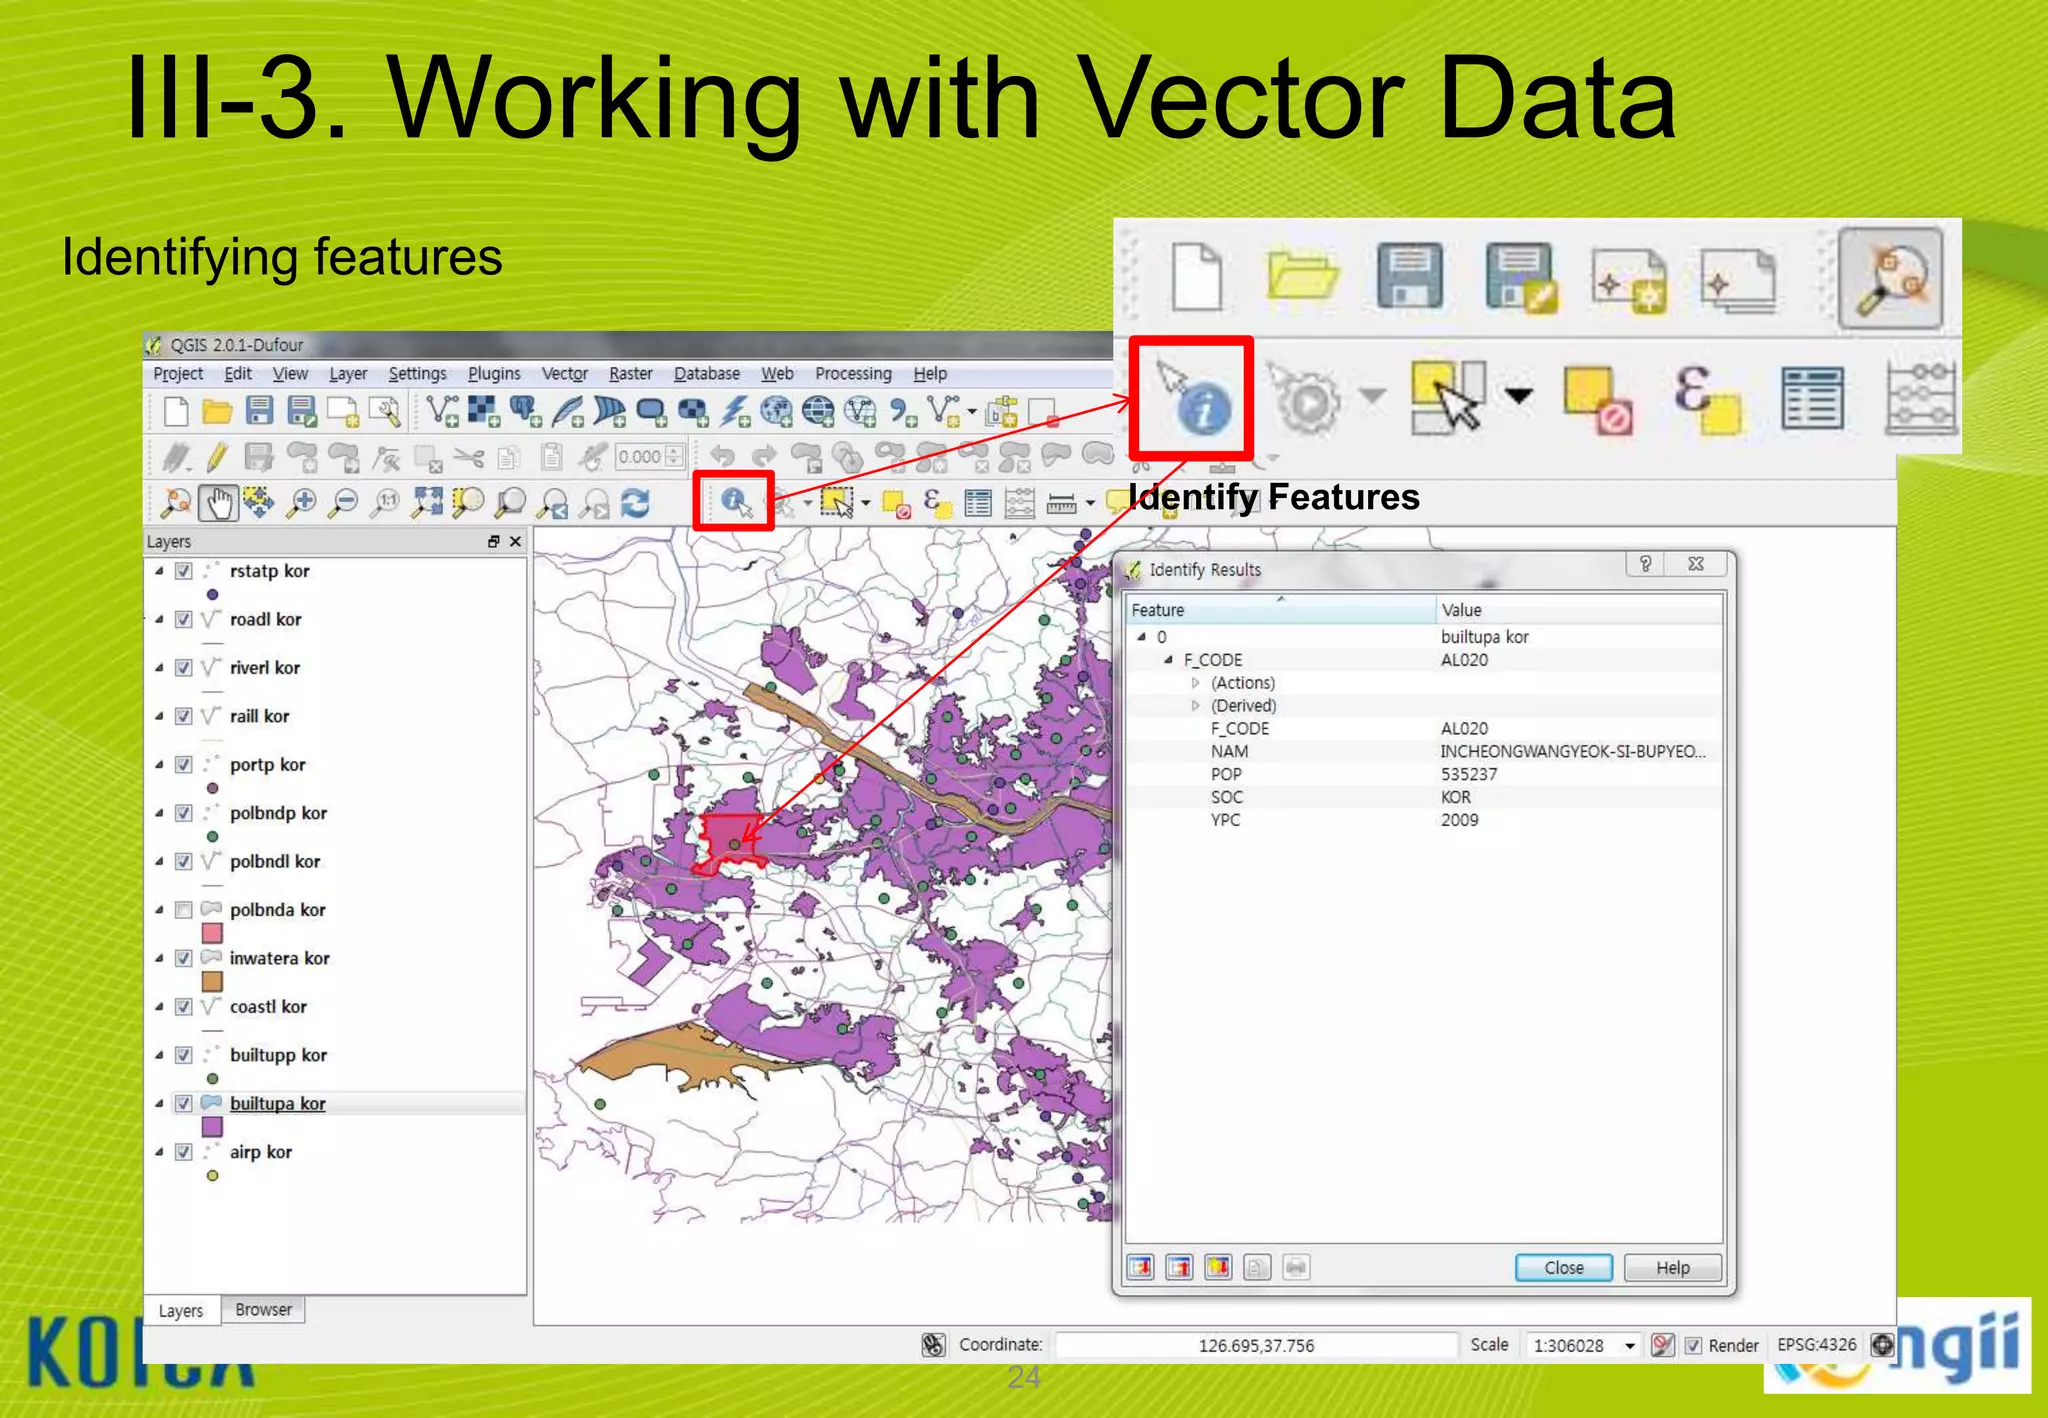
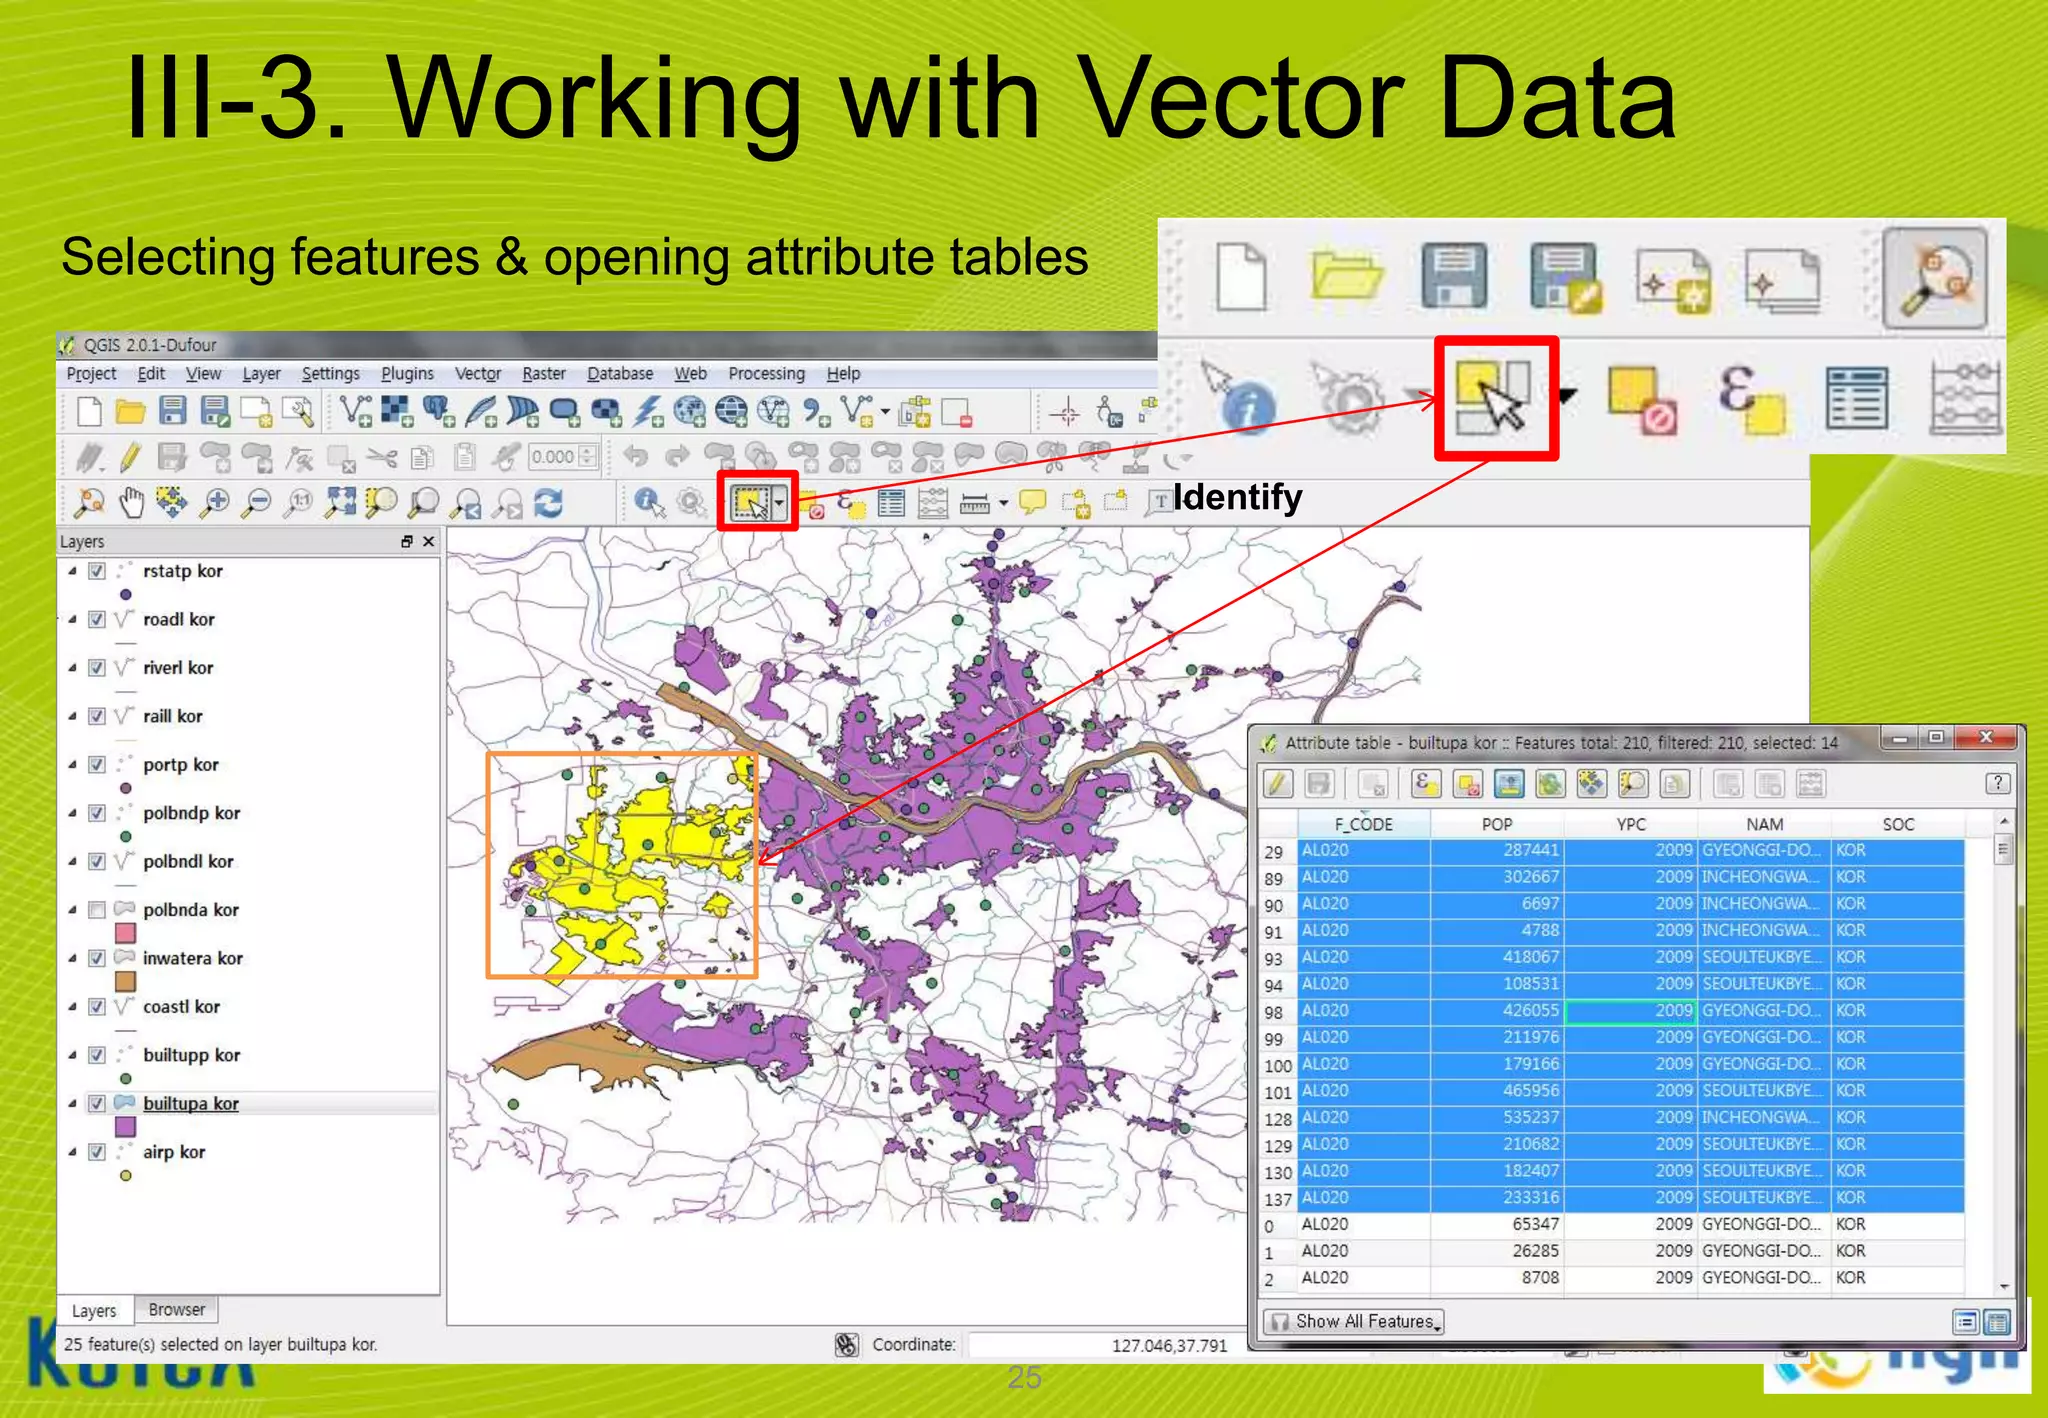
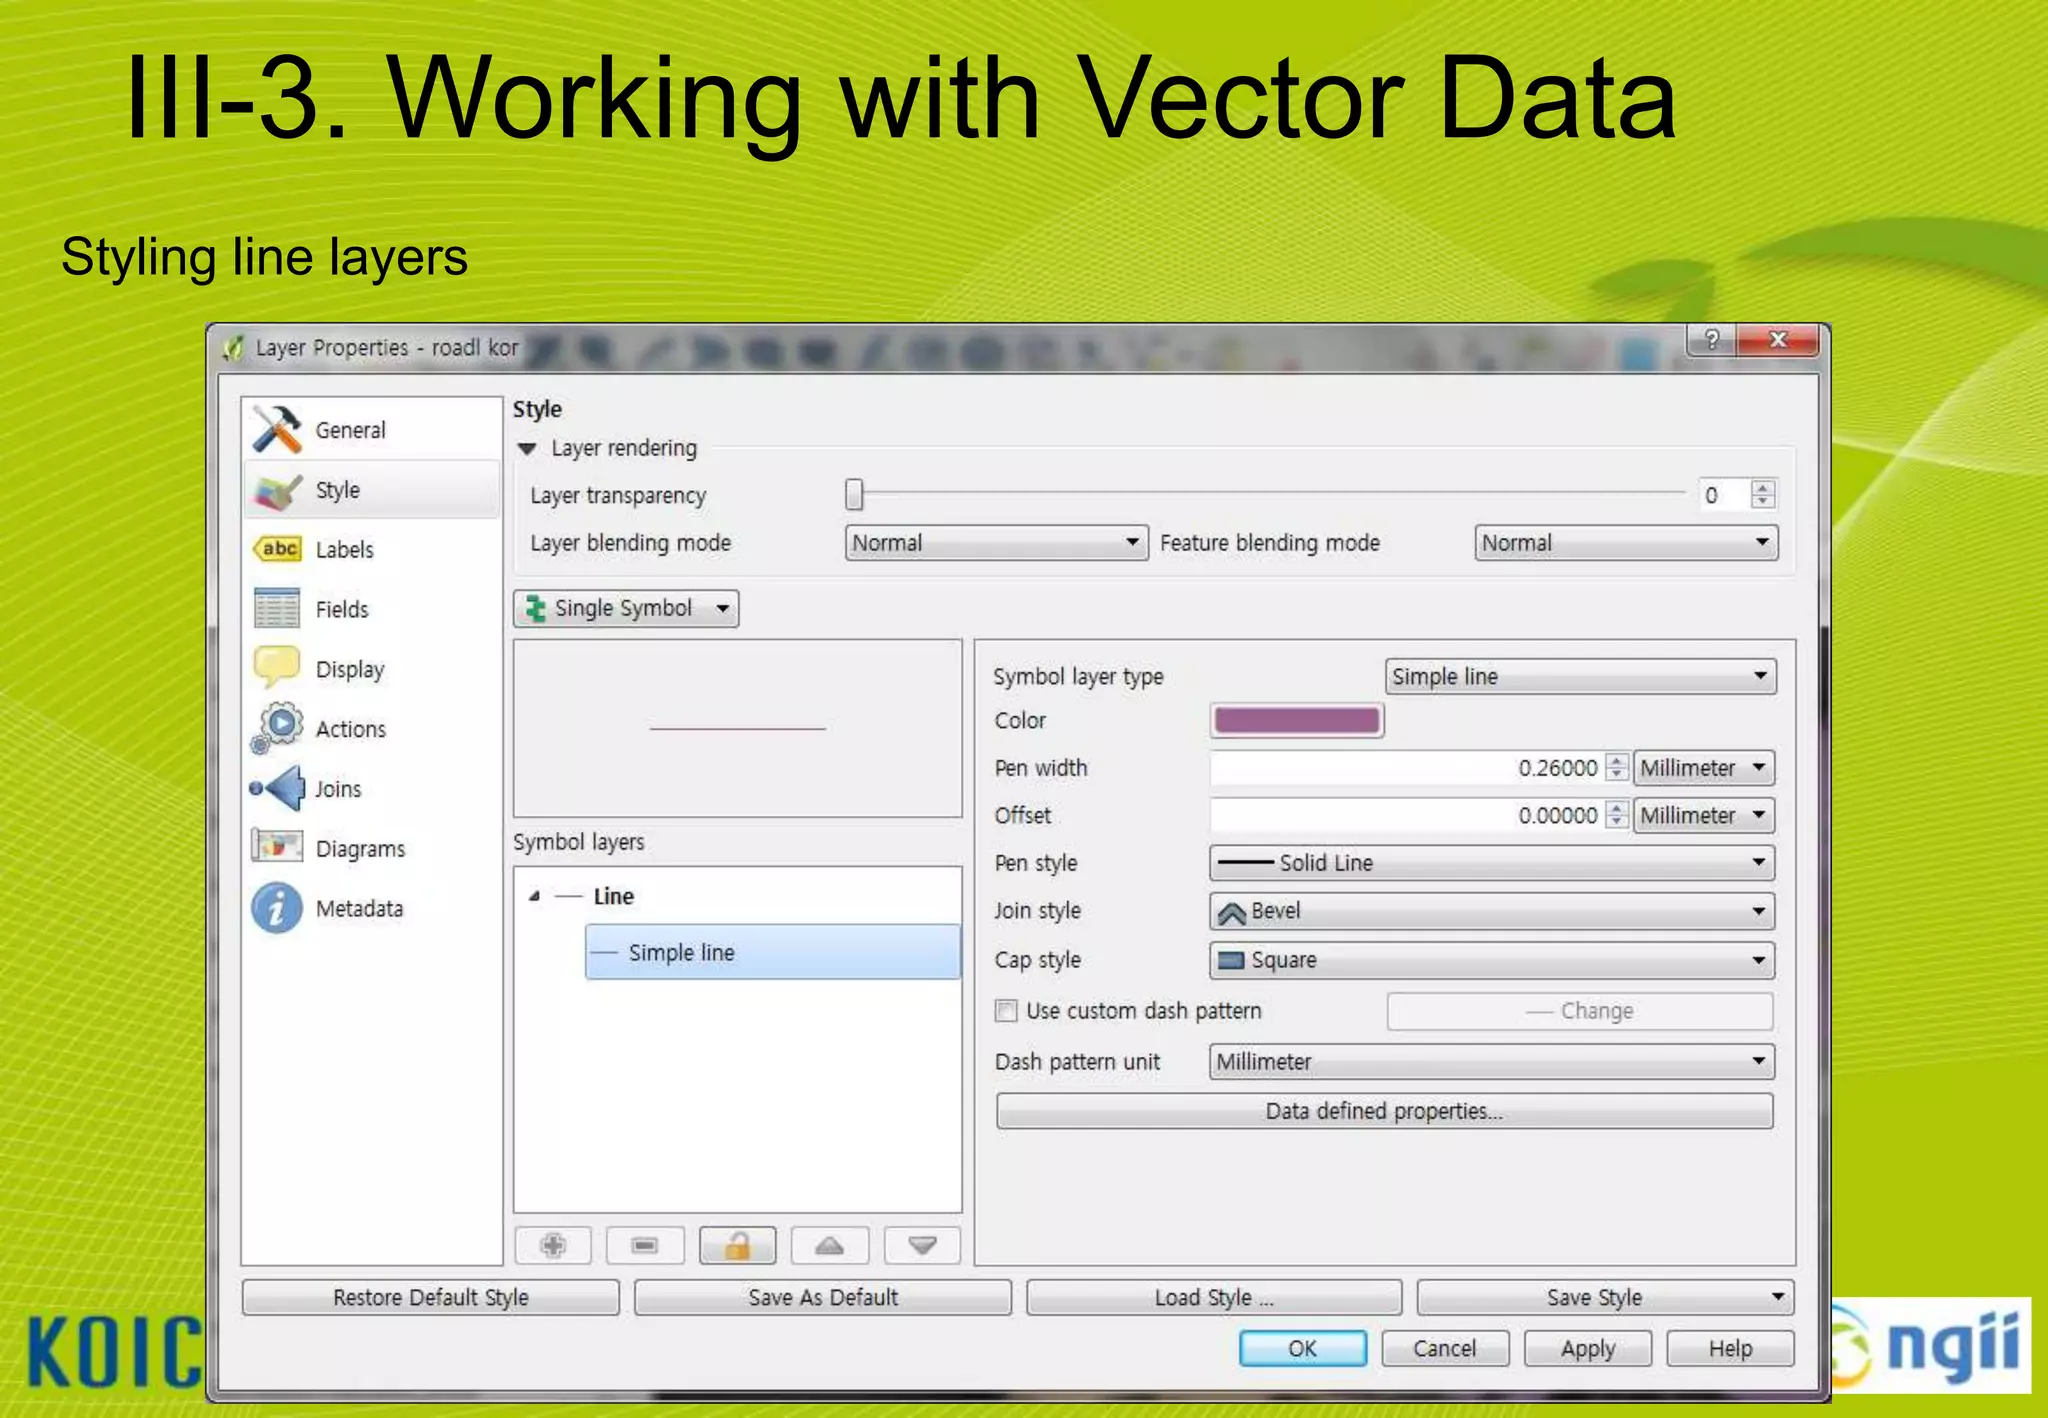
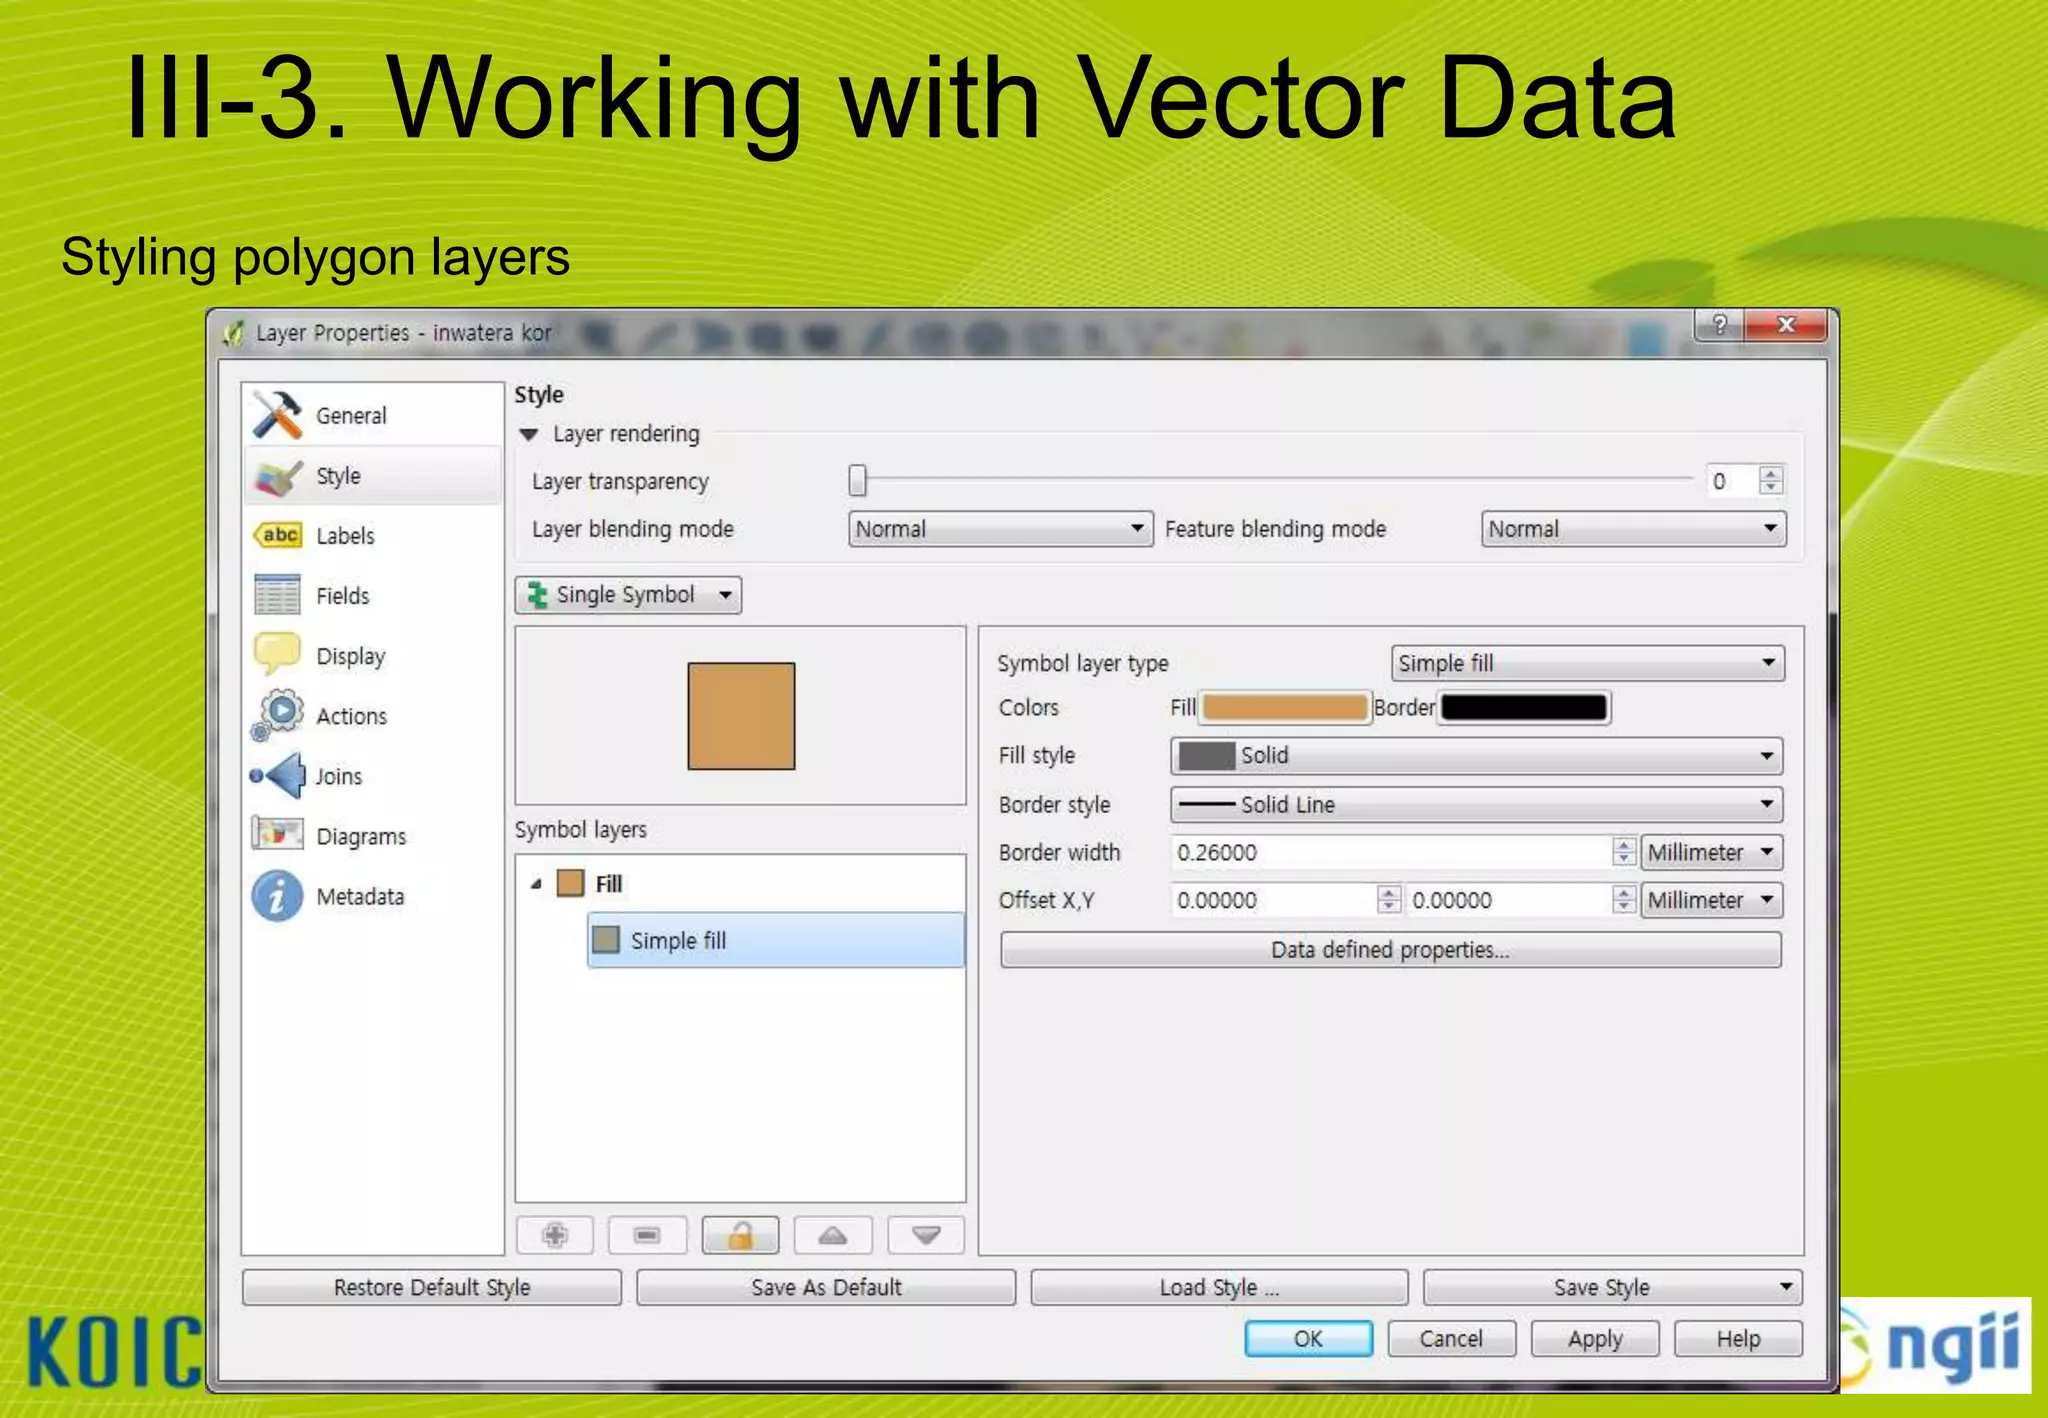
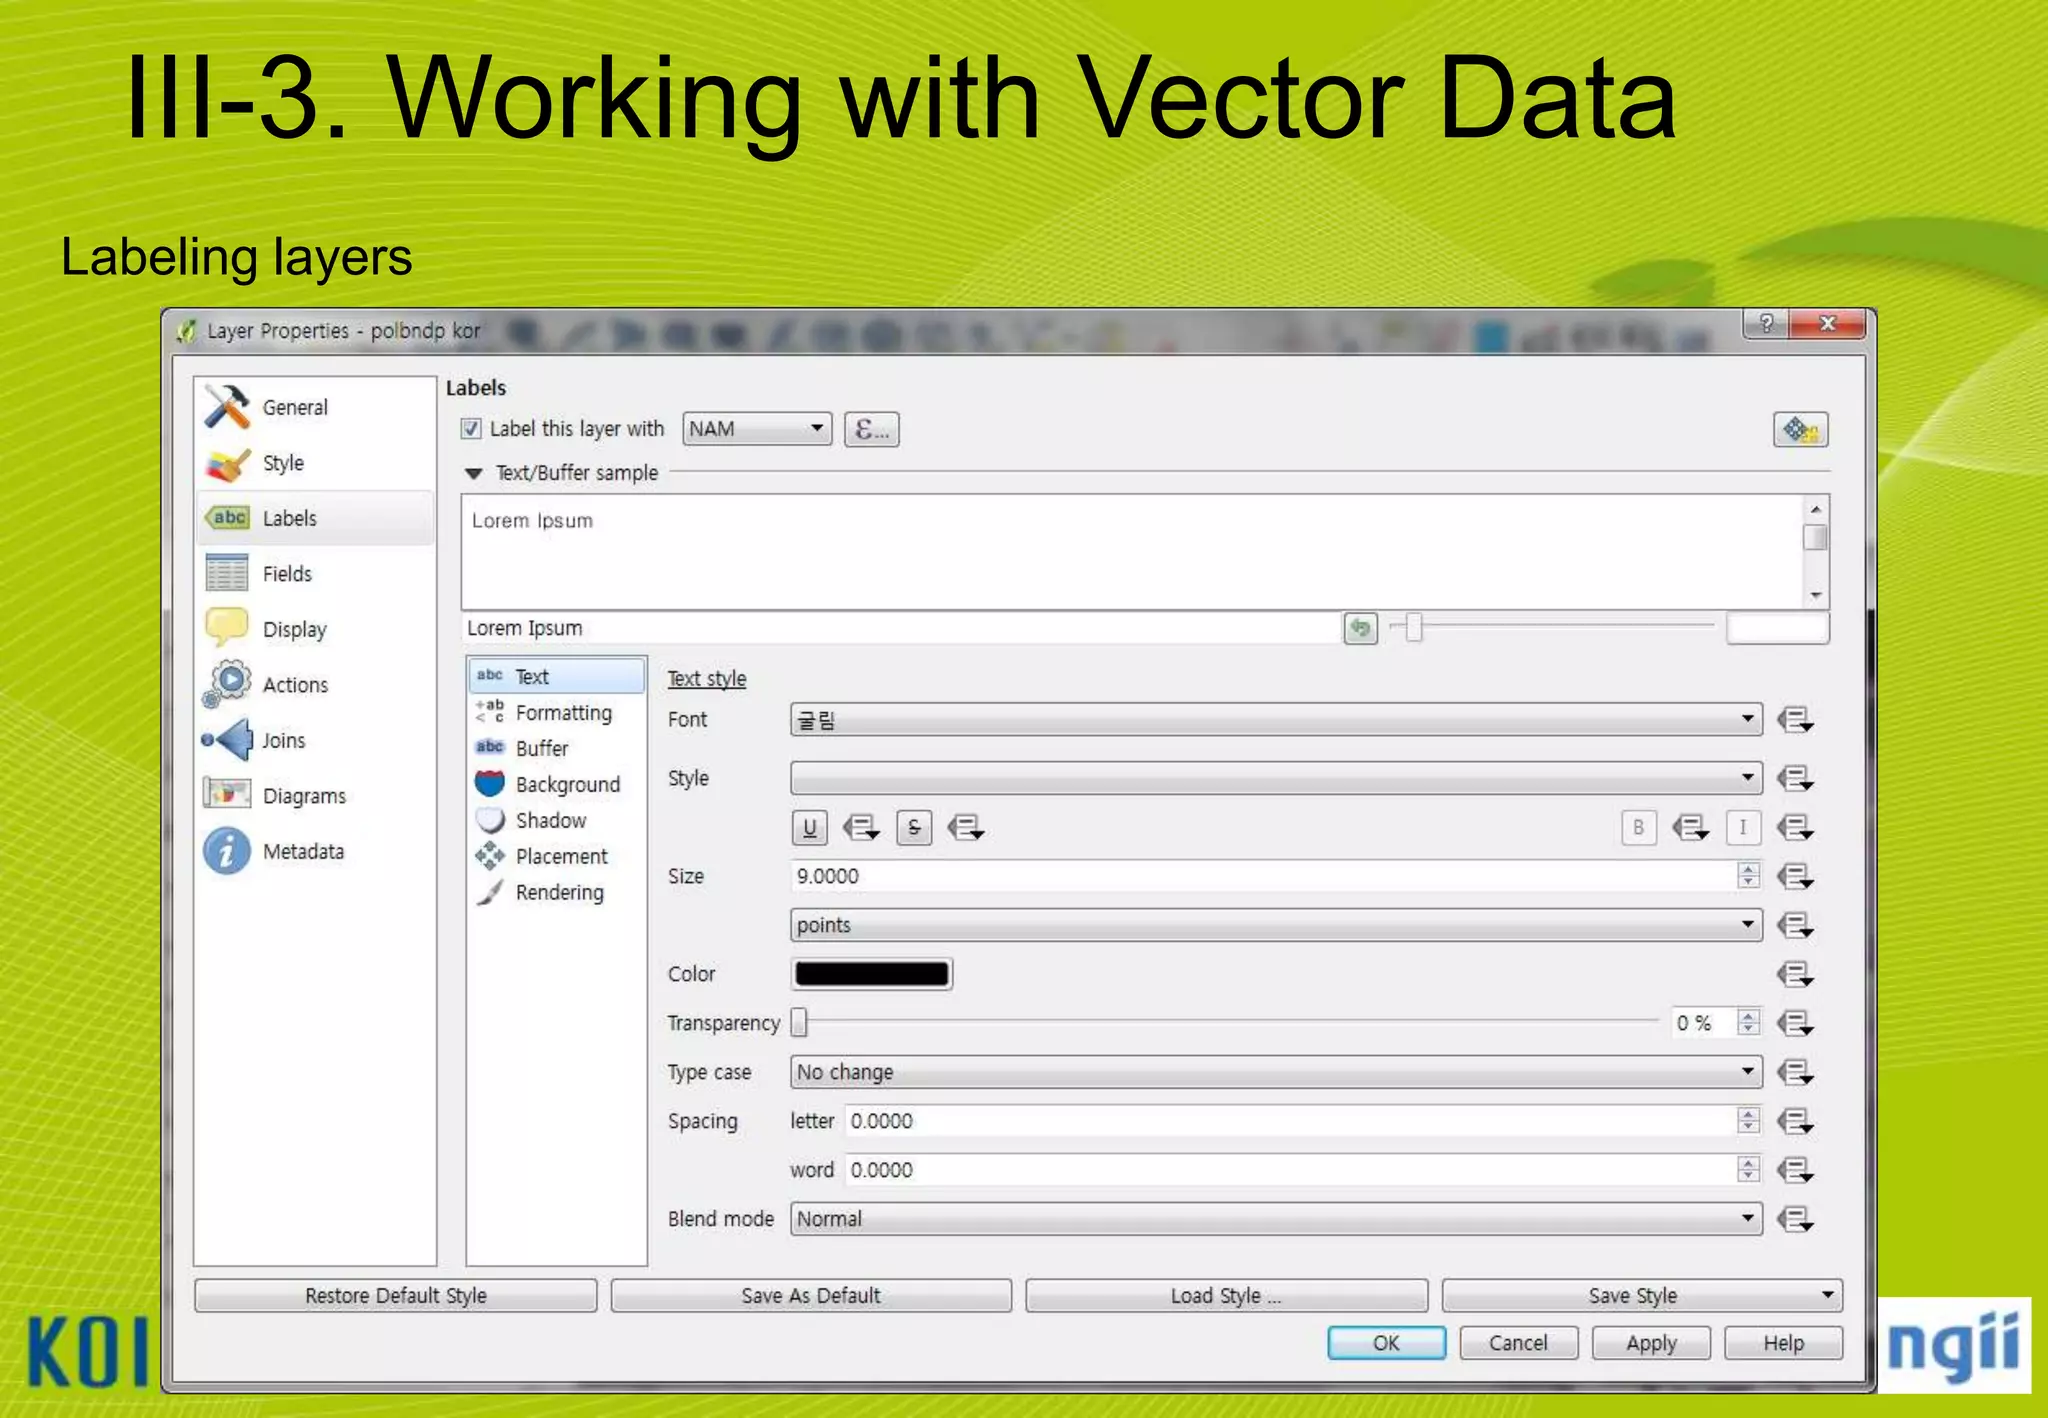
![III-3. Working with Vector Data
Adding vector data
• Click [Layer] [Add Vector Layer…]
• Browse to the “C:WorldMapvector” folder and select all files that ends “*.shp“
• Notice that the Source Type will default to SYSTEM encoding.
– QGIS is VERY good at handling various character set encodings (such as multi-byte Chinese
& Japanese, or UTF-8)!
• Click [open] button to add the selected layers to the current project.
22](https://image.slidesharecdn.com/koicaqgisglobalmap-131119000848-phpapp01/75/Using-QGIS-and-ISCGM-Global-Map-22-2048.jpg)

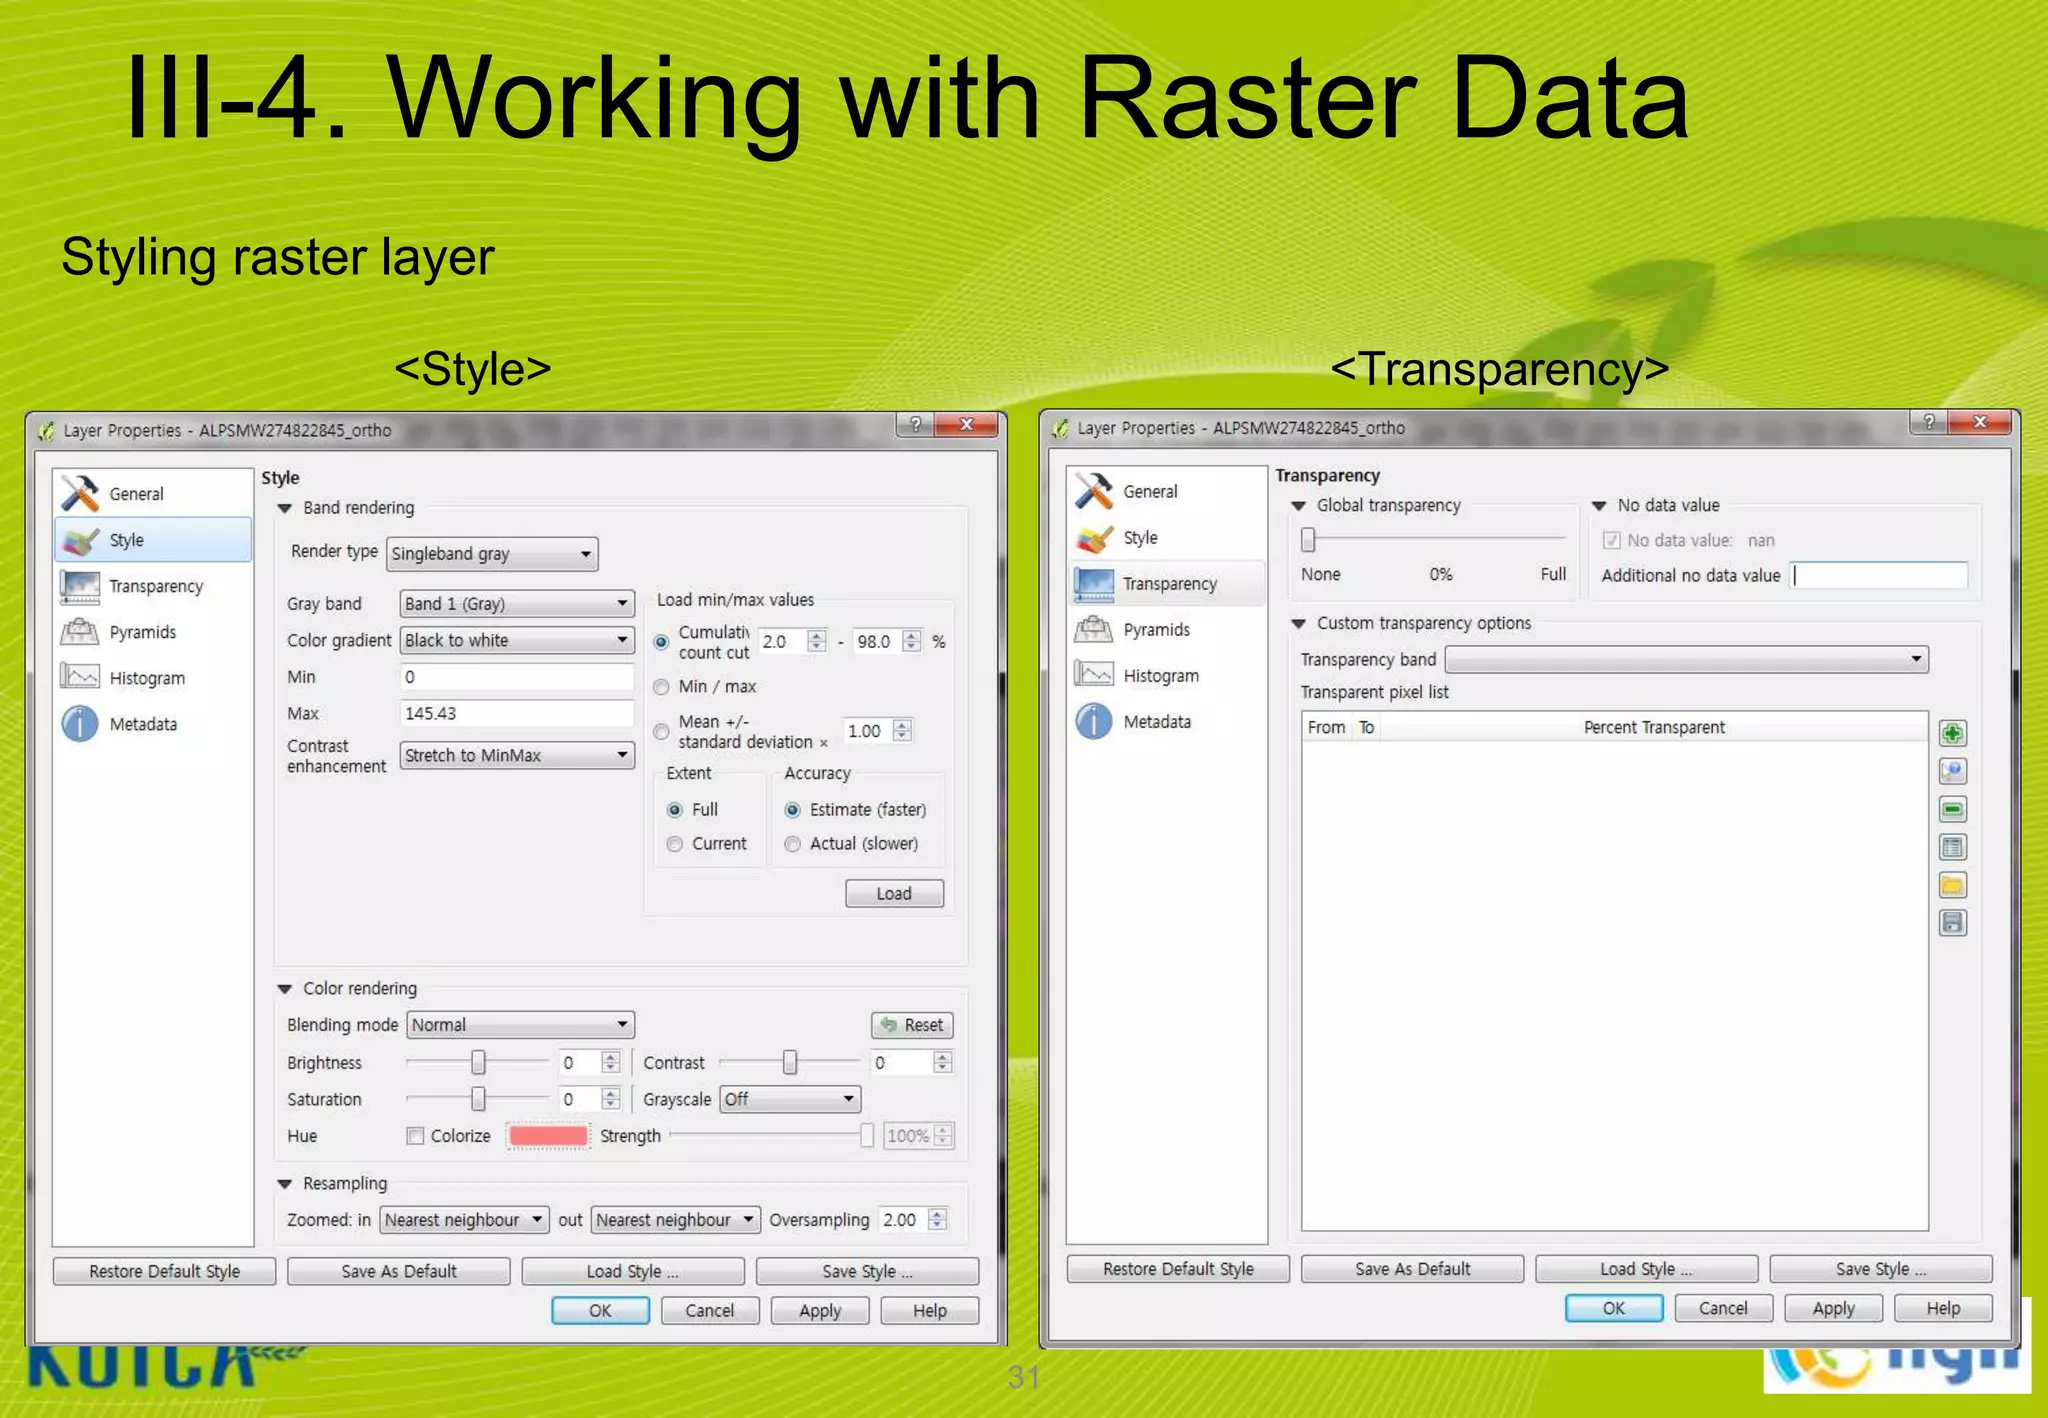
![III-4. Working with Raster Data
Adding raster data
• Click [Layer] [Add Raster Layer…]
• Browse to the “C:WorldMap” folder and select the filename that ends
“ALPSMW274822845_ortho.tif“
• Click [open] button to add the selected layers to the current project.
30](https://image.slidesharecdn.com/koicaqgisglobalmap-131119000848-phpapp01/75/Using-QGIS-and-ISCGM-Global-Map-30-2048.jpg)

![IV-1. QGIS Plugins
Installing QGIS plugins
① Click [Plugins] [Manage and Install Plugins…] menu
② Select [OpenLayers Plugin]
③ Click [Install] button
Manual Installation
① Copy [C:WorldMappluginopenlayers_plugin.zip] file to [C:Users[your login
name].qgis2pythonplugins] folder
② unzip files and restart QGIS
33](https://image.slidesharecdn.com/koicaqgisglobalmap-131119000848-phpapp01/75/Using-QGIS-and-ISCGM-Global-Map-33-2048.jpg)
![IV-1. QGIS Plugins
How to use OpenLayers Plugin
① Click [Plugins] [OpenLayers Plugin] menu
② Select [Add Google Satellite layer]
③ Select vector layer and click [Zoom to Layer Extent]
34](https://image.slidesharecdn.com/koicaqgisglobalmap-131119000848-phpapp01/75/Using-QGIS-and-ISCGM-Global-Map-34-2048.jpg)

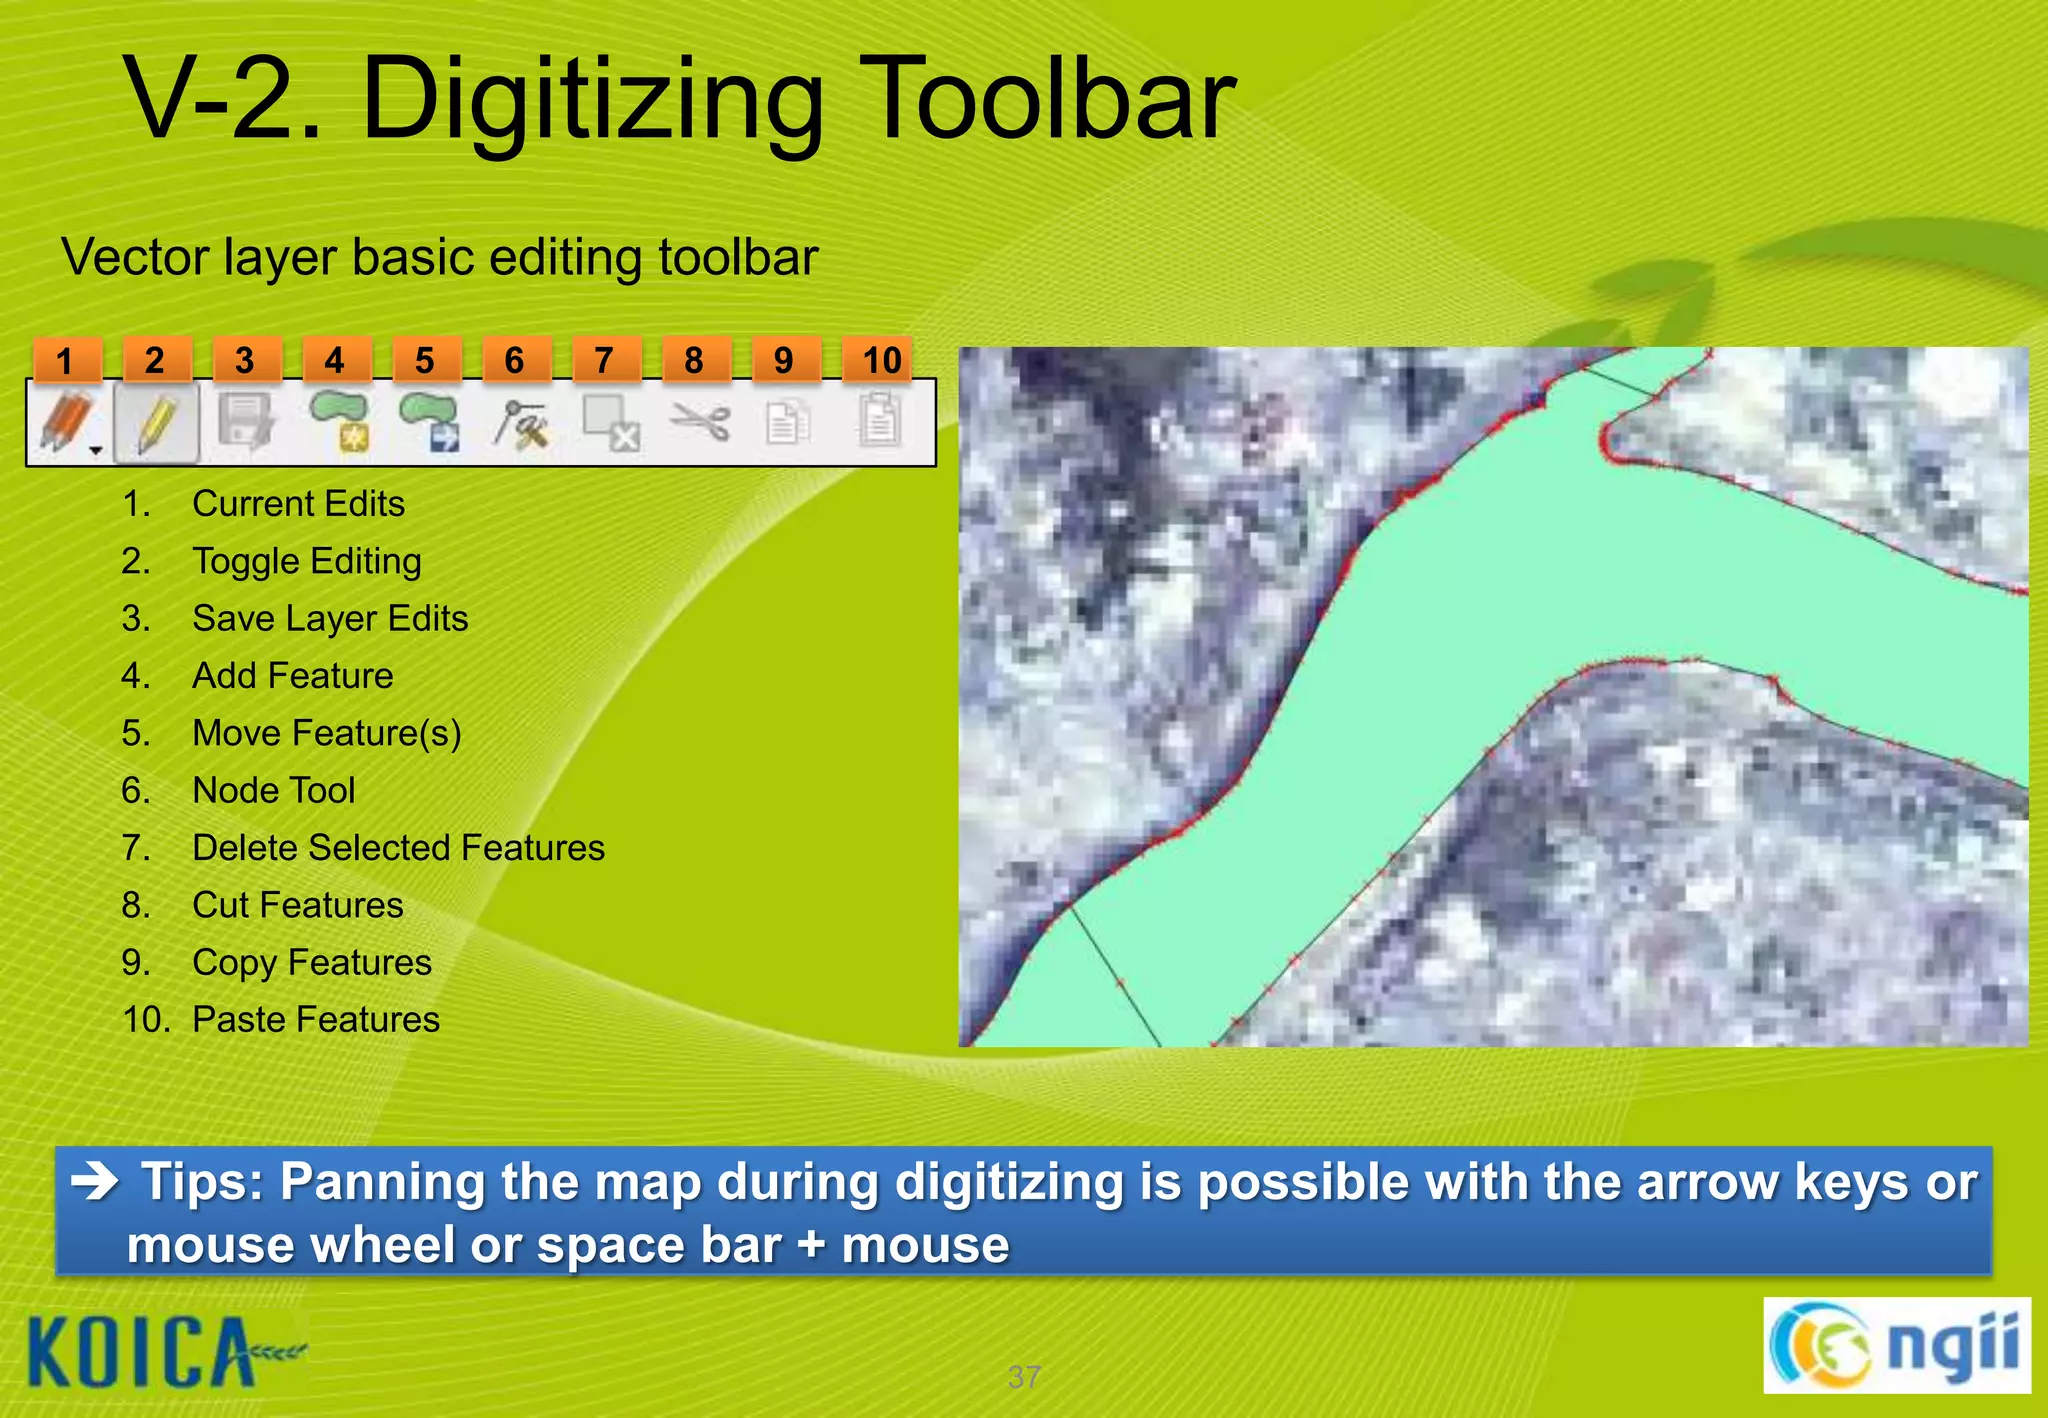
![V-1. Setting Environment
Setting the Snapping Tolerance and Search Radius
①
②
③
Click [Settings] [Options…] menu
Select Digitizing tab
Set snapping environment:
Default snap mode
Default snapping tolerance
To vertex and segment
10.0 pixels
Default radius for vertex edits
10.0 pixels
36](https://image.slidesharecdn.com/koicaqgisglobalmap-131119000848-phpapp01/75/Using-QGIS-and-ISCGM-Global-Map-36-2048.jpg)
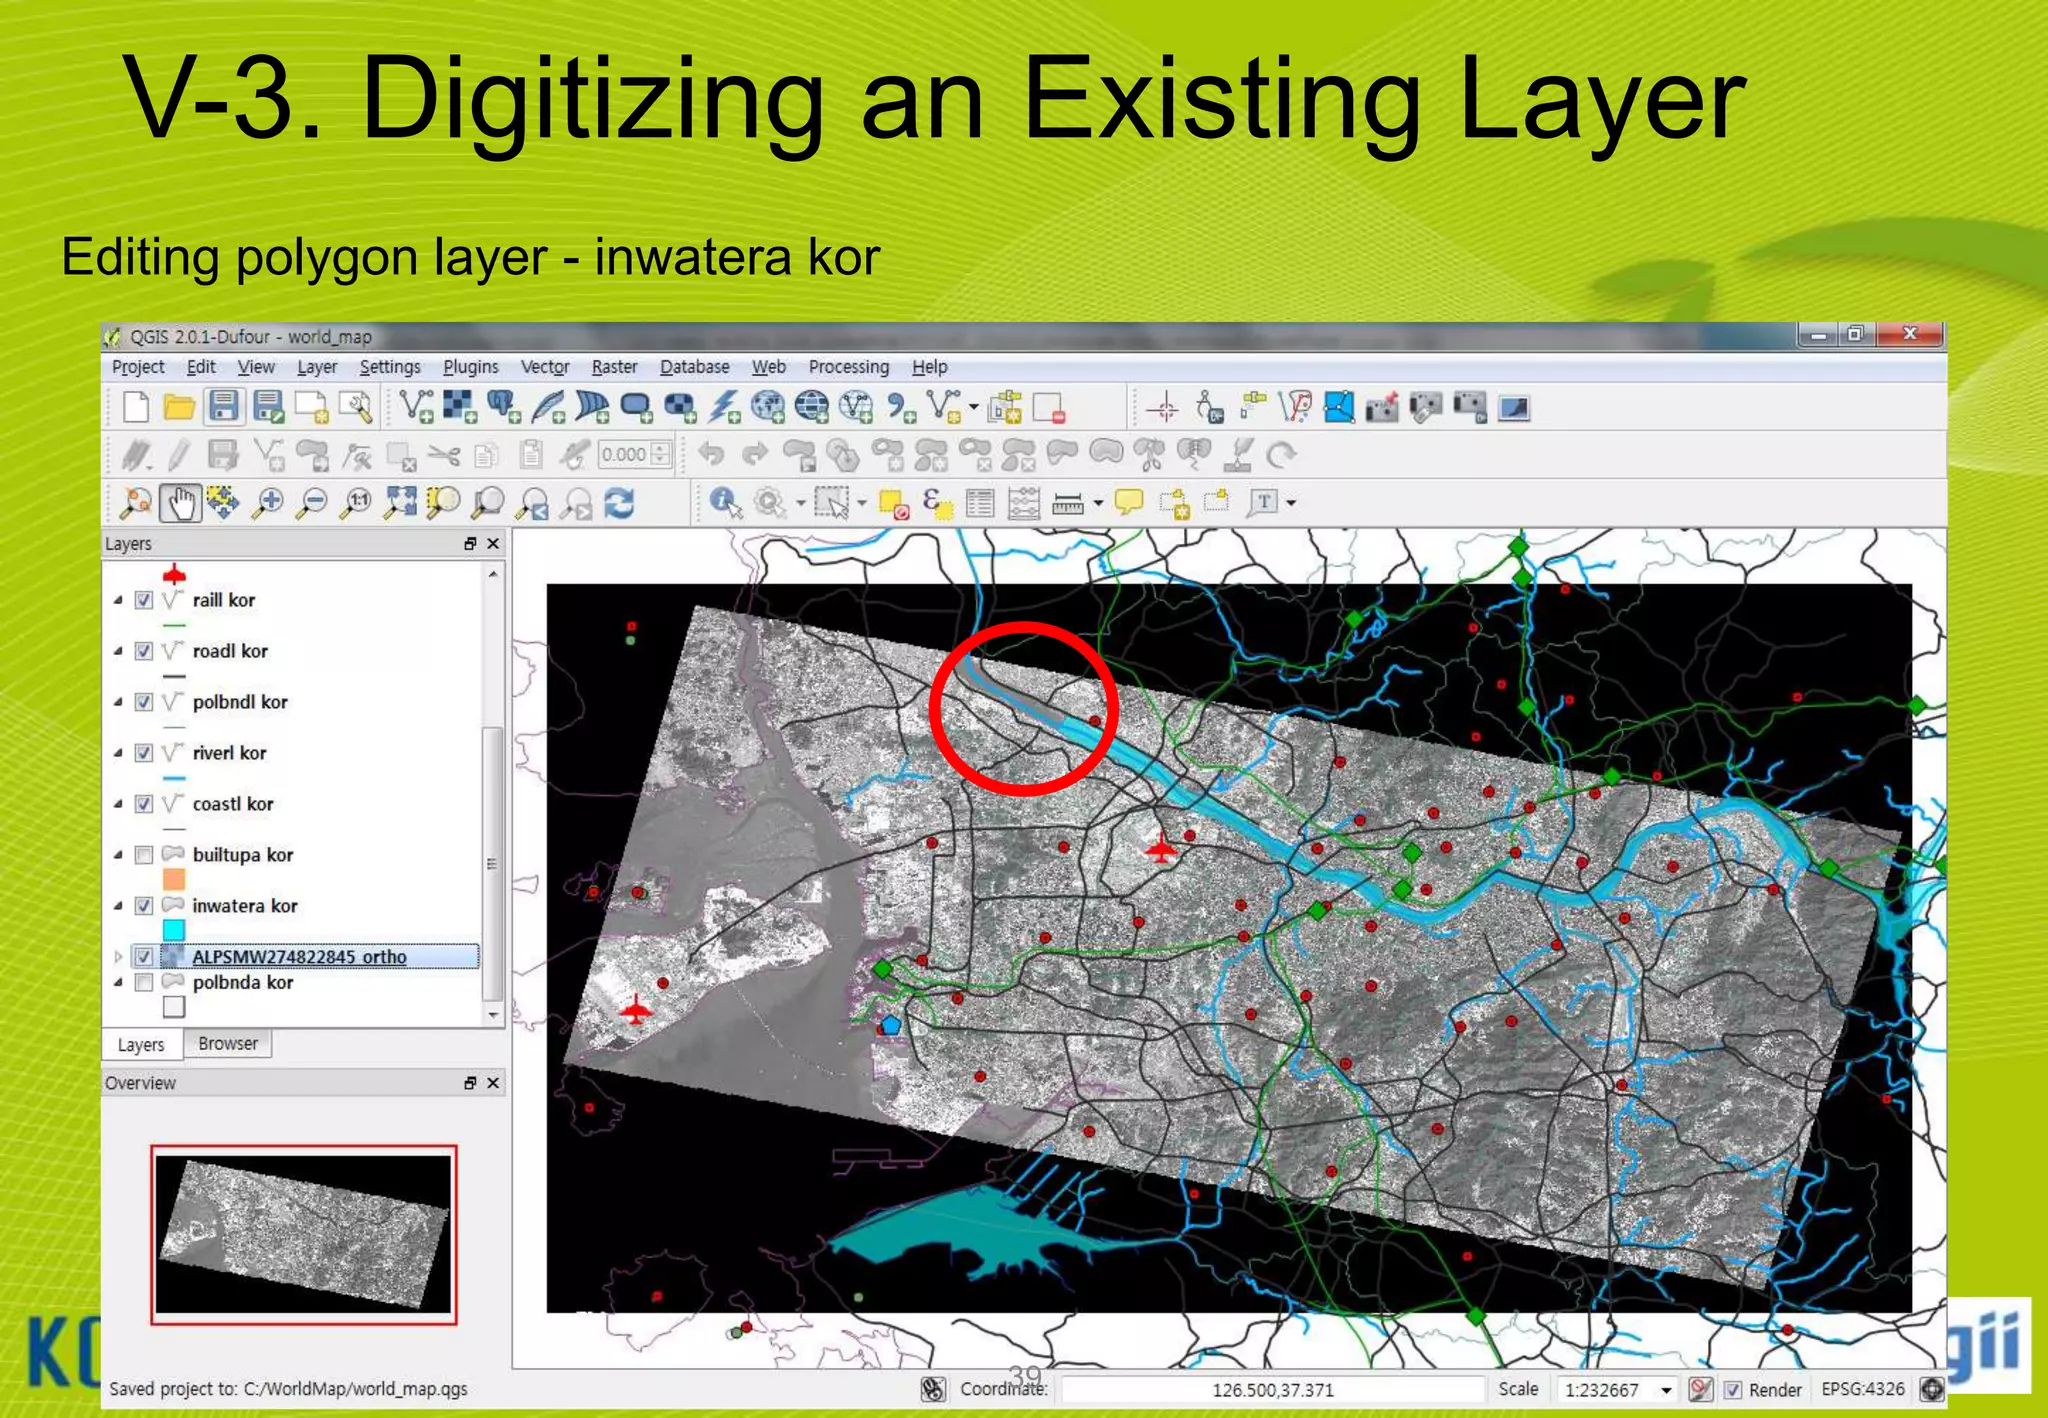
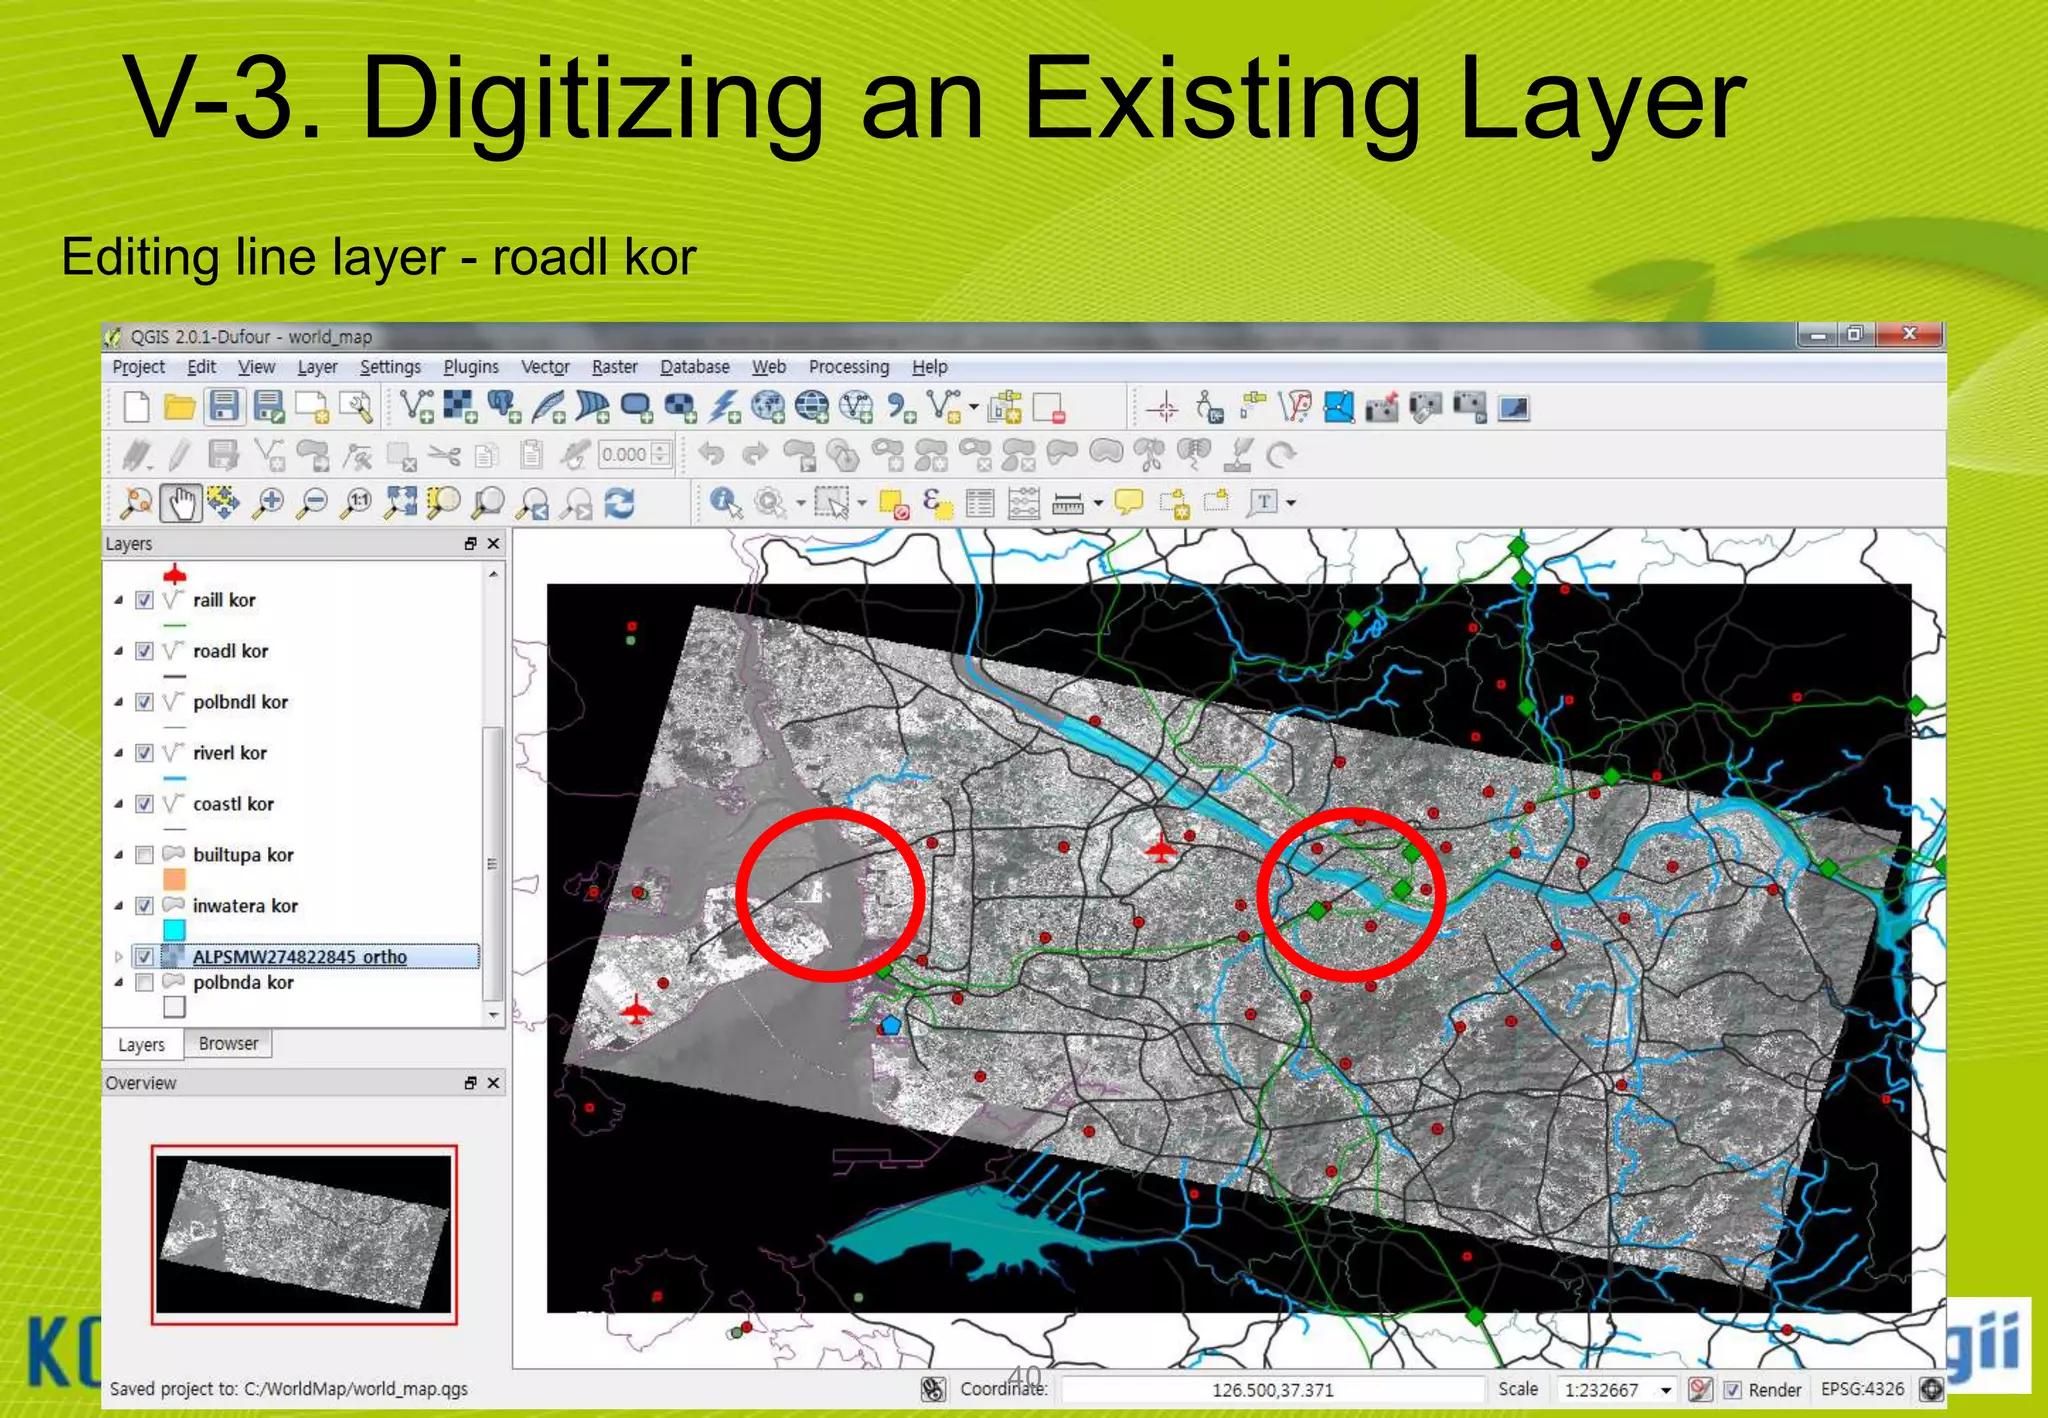
![V-4. Creating a New Layer
Creating and Editing Shapefiles
①
②
③
④
⑤
Click [Layer] [New] [New Shapefile Layer…] menu
Select Polygon Type and set WGS 84 CRS
Enter “Name” by manually typing in the Name textbox
Click [Add to attributes list] button
Click OK button and specify new layer name
41](https://image.slidesharecdn.com/koicaqgisglobalmap-131119000848-phpapp01/75/Using-QGIS-and-ISCGM-Global-Map-41-2048.jpg)

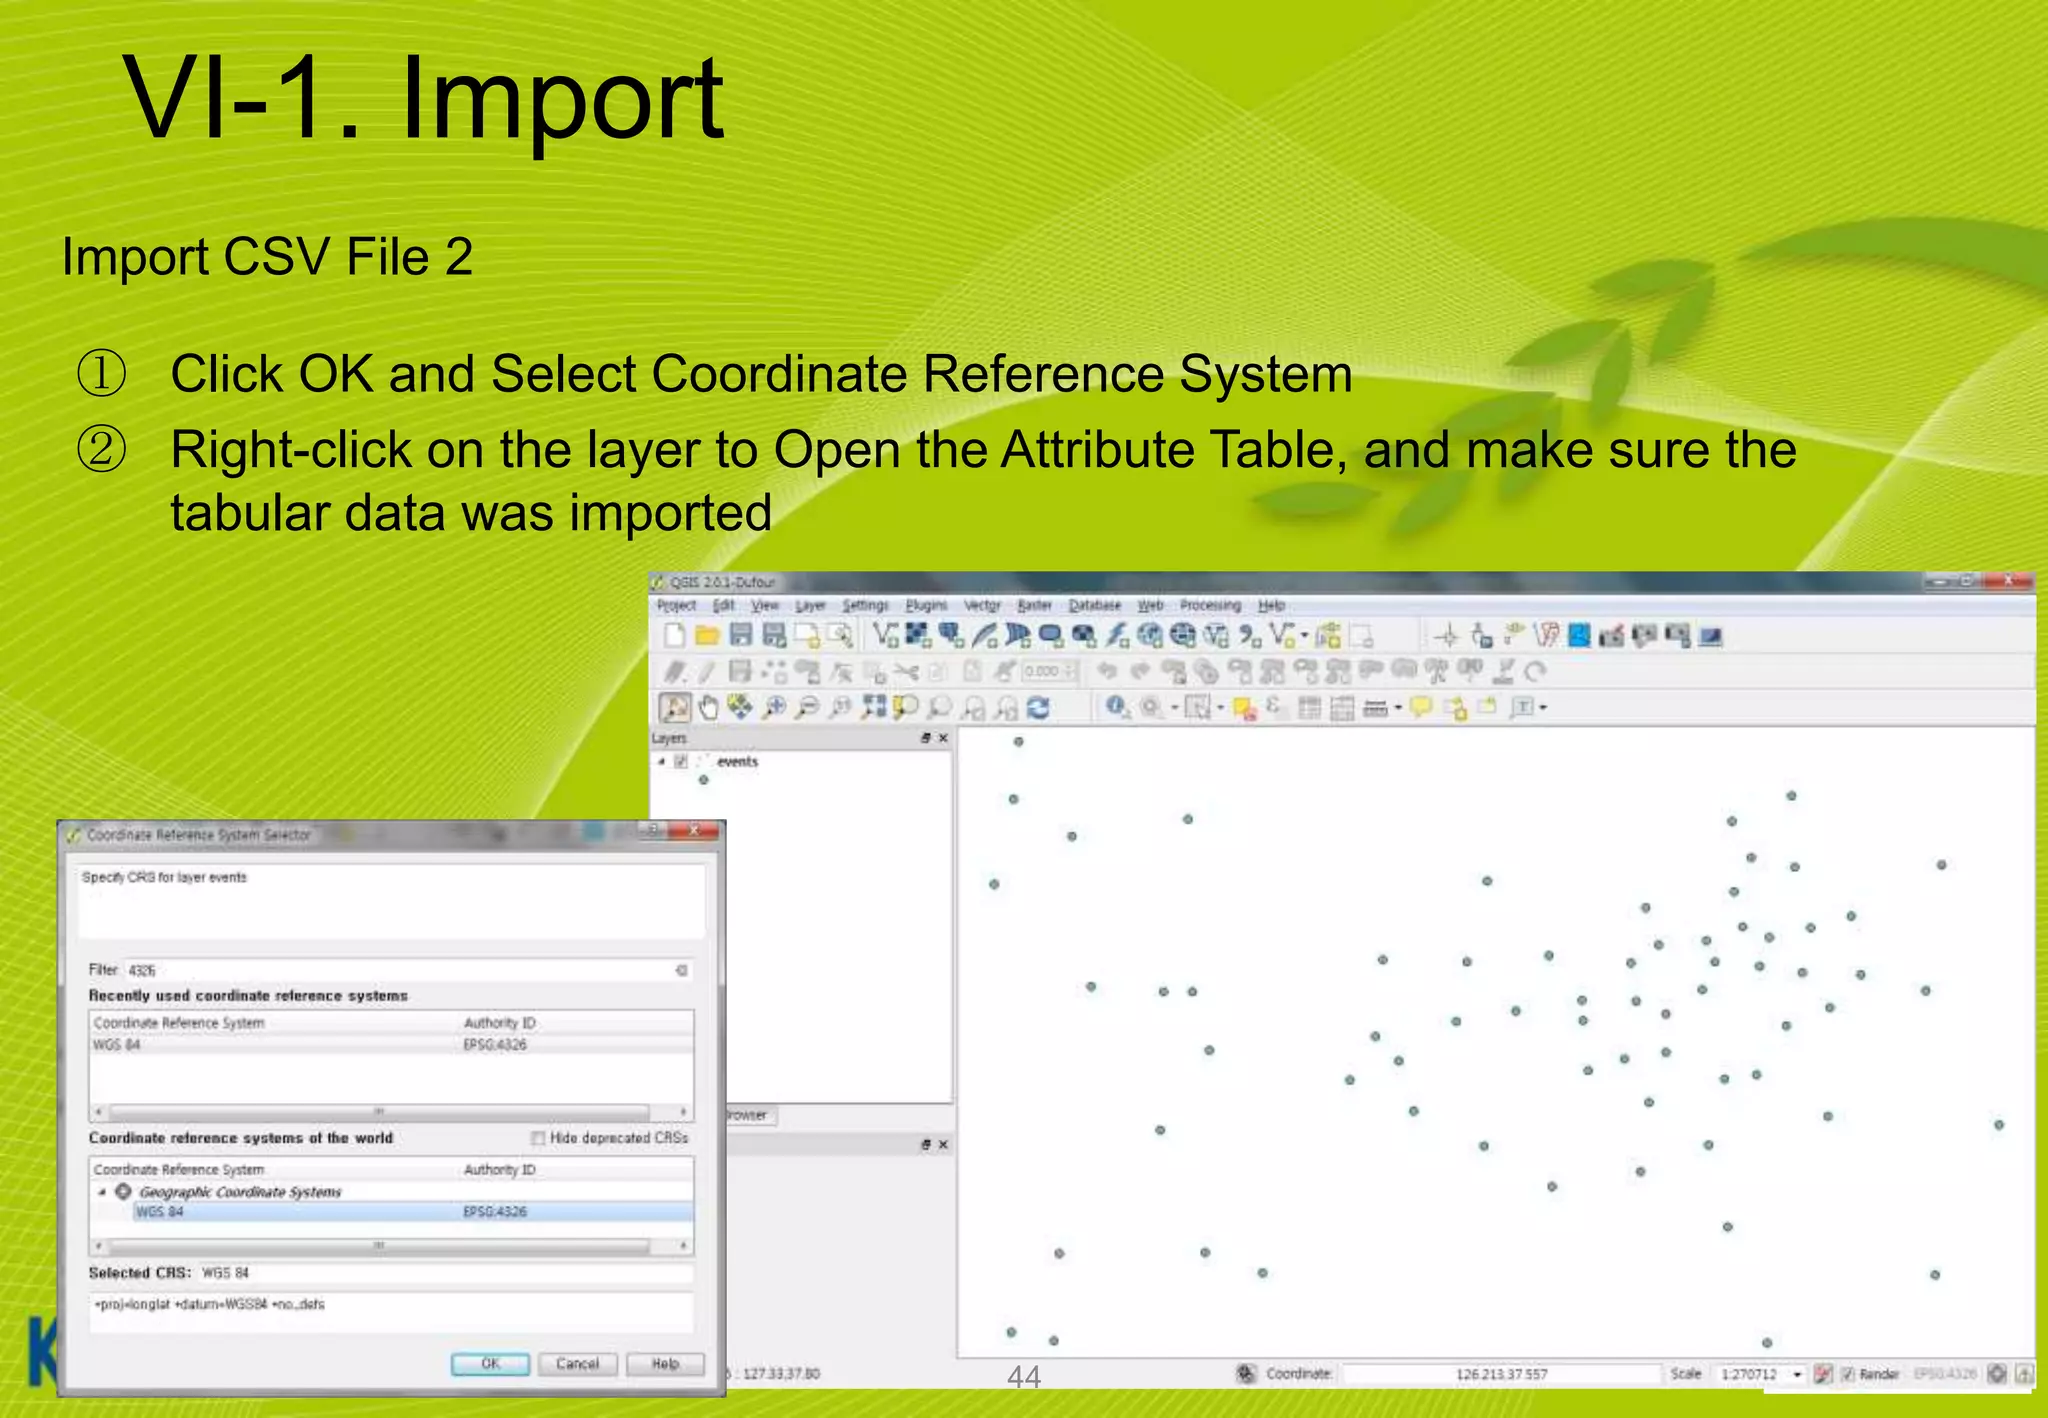
![VI-1. Import
Import CSV File 1
① Click [Layer] [Add Delimited Text Layer…]
② Select the CSV file from [C:WorldMap events.csv]
③ Check X, Y fields
X = LON
Y = LAT
43](https://image.slidesharecdn.com/koicaqgisglobalmap-131119000848-phpapp01/75/Using-QGIS-and-ISCGM-Global-Map-43-2048.jpg)
![VI-2. Export to Shapefile
Export to ESRI Shape file
① Select [events] layer
② Right-click and select [Save As…] menu
③ Options
CRS transformation
Encoding
④ Click OK
45](https://image.slidesharecdn.com/koicaqgisglobalmap-131119000848-phpapp01/75/Using-QGIS-and-ISCGM-Global-Map-45-2048.jpg)
![VI-2. Export to OGC GML format
OGC GML: XML grammar for expressing geographical features
① Add [roadl kor] layer from shapefiles and select layer
② Right-click and select [Save As…] menu
③ Select UTF-8 Encoding
Default xml encoding
④ Click OK
46](https://image.slidesharecdn.com/koicaqgisglobalmap-131119000848-phpapp01/75/Using-QGIS-and-ISCGM-Global-Map-46-2048.jpg)
![VI-2. Export to KML format
Export to Google Earth KML format
①
②
③
④
⑤
Add [roadl kor] layer from shapefiles and select layer
Right-click and select [Save As…] menu
Select WGS 84 CRS
Click OK
Go to [Windows Explorer] and double click kml file
47](https://image.slidesharecdn.com/koicaqgisglobalmap-131119000848-phpapp01/75/Using-QGIS-and-ISCGM-Global-Map-47-2048.jpg)


The document provides information about a lecture on using QGIS and the ISCGM Global Map 2013. It contains the following information: - The lecturer's name is Minpa Lee from Mango System inc. and their contact information is provided. - An overview of QGIS and the ISCGM Global Map is given. Details on installing QGIS and Google Earth are also outlined. - Instructions are provided on using QGIS including exploring the GUI, working with vector and raster data, and extending QGIS using plugins. - The document describes how to edit and work with the Global Map data in QGIS including setting the environment, using the digitizing toolbar, and importing/exporting data.

![[FOSS4G Seoul 2015] New Geoprocessing Toolbox in uDig Desktop GIS](https://cdn.slidesharecdn.com/ss_thumbnails/foss4g2015newgeoprocessingtoolboxinudigdesktopapplicationframework-150917042904-lva1-app6892-thumbnail.jpg?width=640&height=640&fit=bounds)


![[FOSS4G] uDig Desktop GIS](https://cdn.slidesharecdn.com/ss_thumbnails/foss4gudigdesktopgis-20171125-171211044659-thumbnail.jpg?width=640&height=640&fit=bounds)

![[QGIS] 수치지도를 이용한 DEM 생성과 지형분석](https://cdn.slidesharecdn.com/ss_thumbnails/osgeo-211122235838-thumbnail.jpg?width=640&height=640&fit=bounds)
![[FOSS4G Korea 2016] Workshop - Advanced GeoServer](https://cdn.slidesharecdn.com/ss_thumbnails/foss4gkorea2016workshop-geoserver-mapplus-20160902-160905154517-thumbnail.jpg?width=640&height=640&fit=bounds)


![[FOSS4G Korea 2017] uDig GIS 효율적으로 활용하기](https://cdn.slidesharecdn.com/ss_thumbnails/foss4gkorea2017udigdesktop-mapplus-black-201708-170831041409-thumbnail.jpg?width=640&height=640&fit=bounds)
![[FOSS4G Korea 2021]Workshop-QGIS-TIPS-20211028](https://cdn.slidesharecdn.com/ss_thumbnails/foss4gkorea2021workshop-qgis-mapplus-20211028-211031033351-thumbnail.jpg?width=640&height=640&fit=bounds)


![[EEENAR] OpenGXT 소개와 활용](https://cdn.slidesharecdn.com/ss_thumbnails/eeenaropengxt-20230623-230628014346-8241cb2a-thumbnail.jpg?width=640&height=640&fit=bounds)


![[제86회 Open Technet]OGC 표준 기반의 공간자료 분석과 시각화 기술 개발](https://cdn.slidesharecdn.com/ss_thumbnails/ogc-20161019-161020053210-thumbnail.jpg?width=640&height=640&fit=bounds)

![[FOSS4G Korea 2019] 오픈소스를 활용한 역학조사 분석도구 개발](https://cdn.slidesharecdn.com/ss_thumbnails/foss4gkorea2019ep-191015111615-thumbnail.jpg?width=640&height=640&fit=bounds)

![[FOSS4G Korea 2014] Making Base Maps with Open Data](https://cdn.slidesharecdn.com/ss_thumbnails/makingbasemapswithopendataminpalee20140827-140828022647-phpapp02-thumbnail.jpg?width=640&height=640&fit=bounds)


![Vibe Coding vs. Spec-Driven Development [Free Meetup]](https://cdn.slidesharecdn.com/ss_thumbnails/vibecodingvsspecdrivendevelopment-251209105622-43f455e7-thumbnail.jpg?width=640&height=640&fit=bounds)


