Download to read offline


![Programming and Development Tools Web Programming
Criterion Referenced Test
Instruction: Students must evaluate themselves to attain the list of
competencies to be achieved.
Name:
Subject: Programming and Development Tools
Unit: Images
Please tick [ √ ] the appropriate box when you have achieved the respective
competency.
Date Images
C1 C2 C3 C4 C5
Comment
Competency codes:
C1 = Add an Image to a Web page.
C2 = Change the size of the image.
C3 = Create an image hyperlink.
C4 = Create an image map.
C5 = Add image as a background of a Web page.
Images 2.7-20](https://image.slidesharecdn.com/m02un07sm-111008184601-phpapp02/85/Unit-2-7-Images-20-320.jpg)

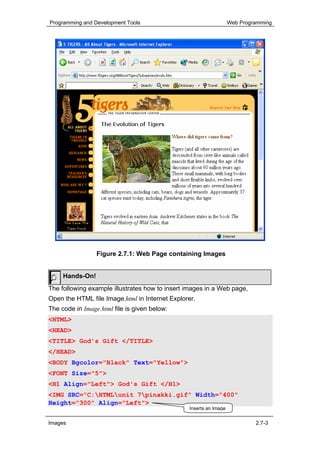
The document discusses adding images to web pages. It describes how to: - Insert images using the <IMG> tag and specify the image file path using the SRC attribute. - Format images by specifying attributes like ALIGN, WIDTH, HEIGHT to control positioning and size. - Make images into hyperlinks by placing the <IMG> tag inside an <A> tag and linking it to another page.


