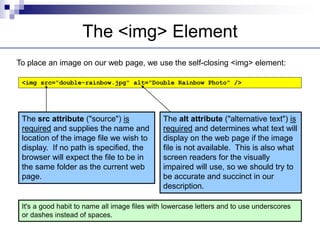
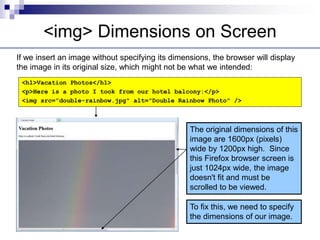
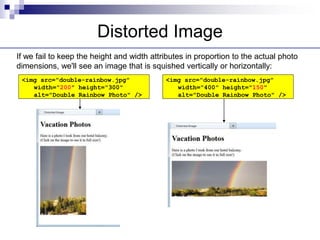
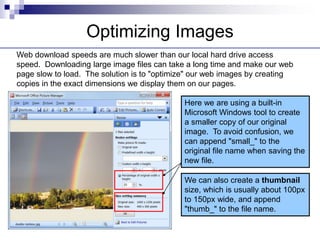
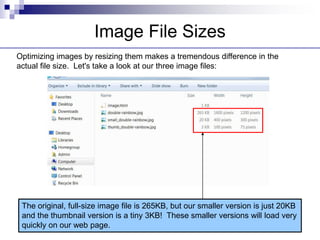
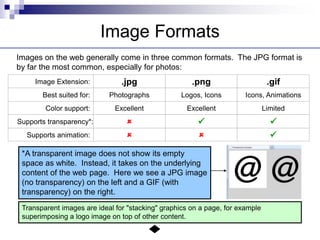
Images
The <img> Element
To place an image on our web page, we use the self-closing <img> element:
<img src="double-rainbow.jpg" alt="Double Rainbow Photo" />
The src attribute ("source") is
required and supplies the name and
location of the image file we wish to
display. If no path is specified, the
browser will expect the file to be in
the same folder as the current web
page.
The alt attribute ("alternative text") is
required and determines what text will
display on the web page if the image
file is not available. This is also what
screen readers for the visually
impaired will use, so we should try to
be accurate and succinct in our
description.
It's a good habit to name all image files with lowercase letters and to use underscores
or dashes instead of spaces.
<img> Dimensions on Screen
If we insert an image without specifying its dimensions, the browser will display
the image in its original size, which might not be what we intended:
<h1>Vacation Photos</h1>
<p>Here is a photo I took from our hotel balcony:</p>
<img src="double-rainbow.jpg" alt="Double Rainbow Photo" />
The original dimensions of this
image are 1600px (pixels)
wide by 1200px high. Since
this Firefox browser screen is
just 1024px wide, the image
doesn't fit and must be
scrolled to be viewed.
To fix this, we need to specify
the dimensions of our image.
Width and Height Attributes
By supplying values for the height and width attributes, we can instruct the
browser to display the image in exactly the size we wish:
<h1>Vacation Photos</h1>
<p>Here is a photo I took from our hotel balcony:</p>
<img src="double-rainbow.jpg" width="400" height="300" alt="Double Rainbow
Photo" />
We must reduce the width and
height in even proportions or
the image will appear distorted.
In this case, we reduced the
original 1600px by 1200x to
400px by 300px.
We can also make a smaller image
appear larger on the page, but this
isn't recommended, as the image
will look pixelated and of poor
quality.
Distorted Image
If we fail to keep the height and width attributes in proportion to the actual photo
dimensions, we'll see an image that is squished vertically or horizontally:
<img src="double-rainbow.jpg"
width="200" height="300"
alt="Double Rainbow Photo" />
<img src="double-rainbow.jpg"
width="400" height="150"
alt="Double Rainbow Photo" />
Optimizing Images
Web download speeds are much slower than our local hard drive access
speed. Downloading large image files can take a long time and make our web
page slow to load. The solution is to "optimize" our web images by creating
copies in the exact dimensions we display them on our pages.
Here we are using a built-in
Microsoft Windows tool to create
a smaller copy of our original
image. To avoid confusion, we
can append "small_" to the
original file name when saving the
new file.
We can also create a thumbnail
size, which is usually about 100px
to 150px wide, and append
"thumb_" to the file name.
Image File Sizes
Optimizing images by resizing them makes a tremendous difference in the
actual file size. Let's take a look at our three image files:
The original, full-size image file is 265KB, but our smaller version is just 20KB
and the thumbnail version is a tiny 3KB! These smaller versions will load very
quickly on our web page.
Images as Links
Earlier we learned how to create a text link. Turning an image into a link is
straightforward:
<a href="double-rainbow.html">
<img src="double-rainbow.jpg" width="400" height="300" alt="Double
Rainbow Photo" />
</a>
By moving the mouse over the
image, we see that the pointer
changes. The image is now a
live link and if clicked, the user
will go to the page indicated.
This technique could be used, for
example, to create a web photo
album, where the user could
browse a large number of thumbnail
photos and then click on any
individual thumbnail to see a page
with the full-size image.
Image Formats
Images on the web generally come in three common formats. The JPG format is
by far the most common, especially for photos:
Supports transparency*:
Supports animation:
Color support:
.jpg .png .gif
Excellent Excellent Limited
 

  
Best suited for:
Image Extension:
Photographs Logos, Icons Icons, Animations
Transparent images are ideal for "stacking" graphics on a page, for example
superimposing a logo image on top of other content.
*A transparent image does not show its empty
space as white. Instead, it takes on the underlying
content of the web page. Here we see a JPG image
(no transparency) on the left and a GIF (with
transparency) on the right.

lecture4.ppt

  • 1.
  • 2.
    The <img> Element Toplace an image on our web page, we use the self-closing <img> element: <img src="double-rainbow.jpg" alt="Double Rainbow Photo" /> The src attribute ("source") is required and supplies the name and location of the image file we wish to display. If no path is specified, the browser will expect the file to be in the same folder as the current web page. The alt attribute ("alternative text") is required and determines what text will display on the web page if the image file is not available. This is also what screen readers for the visually impaired will use, so we should try to be accurate and succinct in our description. It's a good habit to name all image files with lowercase letters and to use underscores or dashes instead of spaces.
  • 3.
    <img> Dimensions onScreen If we insert an image without specifying its dimensions, the browser will display the image in its original size, which might not be what we intended: <h1>Vacation Photos</h1> <p>Here is a photo I took from our hotel balcony:</p> <img src="double-rainbow.jpg" alt="Double Rainbow Photo" /> The original dimensions of this image are 1600px (pixels) wide by 1200px high. Since this Firefox browser screen is just 1024px wide, the image doesn't fit and must be scrolled to be viewed. To fix this, we need to specify the dimensions of our image.
  • 4.
    Width and HeightAttributes By supplying values for the height and width attributes, we can instruct the browser to display the image in exactly the size we wish: <h1>Vacation Photos</h1> <p>Here is a photo I took from our hotel balcony:</p> <img src="double-rainbow.jpg" width="400" height="300" alt="Double Rainbow Photo" /> We must reduce the width and height in even proportions or the image will appear distorted. In this case, we reduced the original 1600px by 1200x to 400px by 300px. We can also make a smaller image appear larger on the page, but this isn't recommended, as the image will look pixelated and of poor quality.
  • 5.
    Distorted Image If wefail to keep the height and width attributes in proportion to the actual photo dimensions, we'll see an image that is squished vertically or horizontally: <img src="double-rainbow.jpg" width="200" height="300" alt="Double Rainbow Photo" /> <img src="double-rainbow.jpg" width="400" height="150" alt="Double Rainbow Photo" />
  • 6.
    Optimizing Images Web downloadspeeds are much slower than our local hard drive access speed. Downloading large image files can take a long time and make our web page slow to load. The solution is to "optimize" our web images by creating copies in the exact dimensions we display them on our pages. Here we are using a built-in Microsoft Windows tool to create a smaller copy of our original image. To avoid confusion, we can append "small_" to the original file name when saving the new file. We can also create a thumbnail size, which is usually about 100px to 150px wide, and append "thumb_" to the file name.
  • 7.
    Image File Sizes Optimizingimages by resizing them makes a tremendous difference in the actual file size. Let's take a look at our three image files: The original, full-size image file is 265KB, but our smaller version is just 20KB and the thumbnail version is a tiny 3KB! These smaller versions will load very quickly on our web page.
  • 8.
    Images as Links Earlierwe learned how to create a text link. Turning an image into a link is straightforward: <a href="double-rainbow.html"> <img src="double-rainbow.jpg" width="400" height="300" alt="Double Rainbow Photo" /> </a> By moving the mouse over the image, we see that the pointer changes. The image is now a live link and if clicked, the user will go to the page indicated. This technique could be used, for example, to create a web photo album, where the user could browse a large number of thumbnail photos and then click on any individual thumbnail to see a page with the full-size image.
  • 9.
    Image Formats Images onthe web generally come in three common formats. The JPG format is by far the most common, especially for photos: Supports transparency*: Supports animation: Color support: .jpg .png .gif Excellent Excellent Limited       Best suited for: Image Extension: Photographs Logos, Icons Icons, Animations Transparent images are ideal for "stacking" graphics on a page, for example superimposing a logo image on top of other content. *A transparent image does not show its empty space as white. Instead, it takes on the underlying content of the web page. Here we see a JPG image (no transparency) on the left and a GIF (with transparency) on the right.