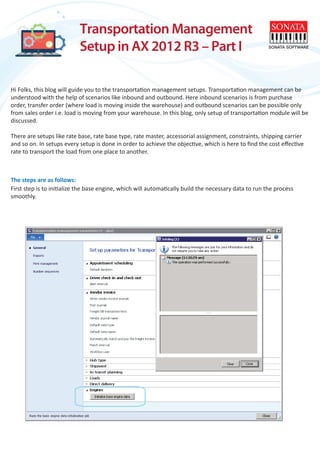
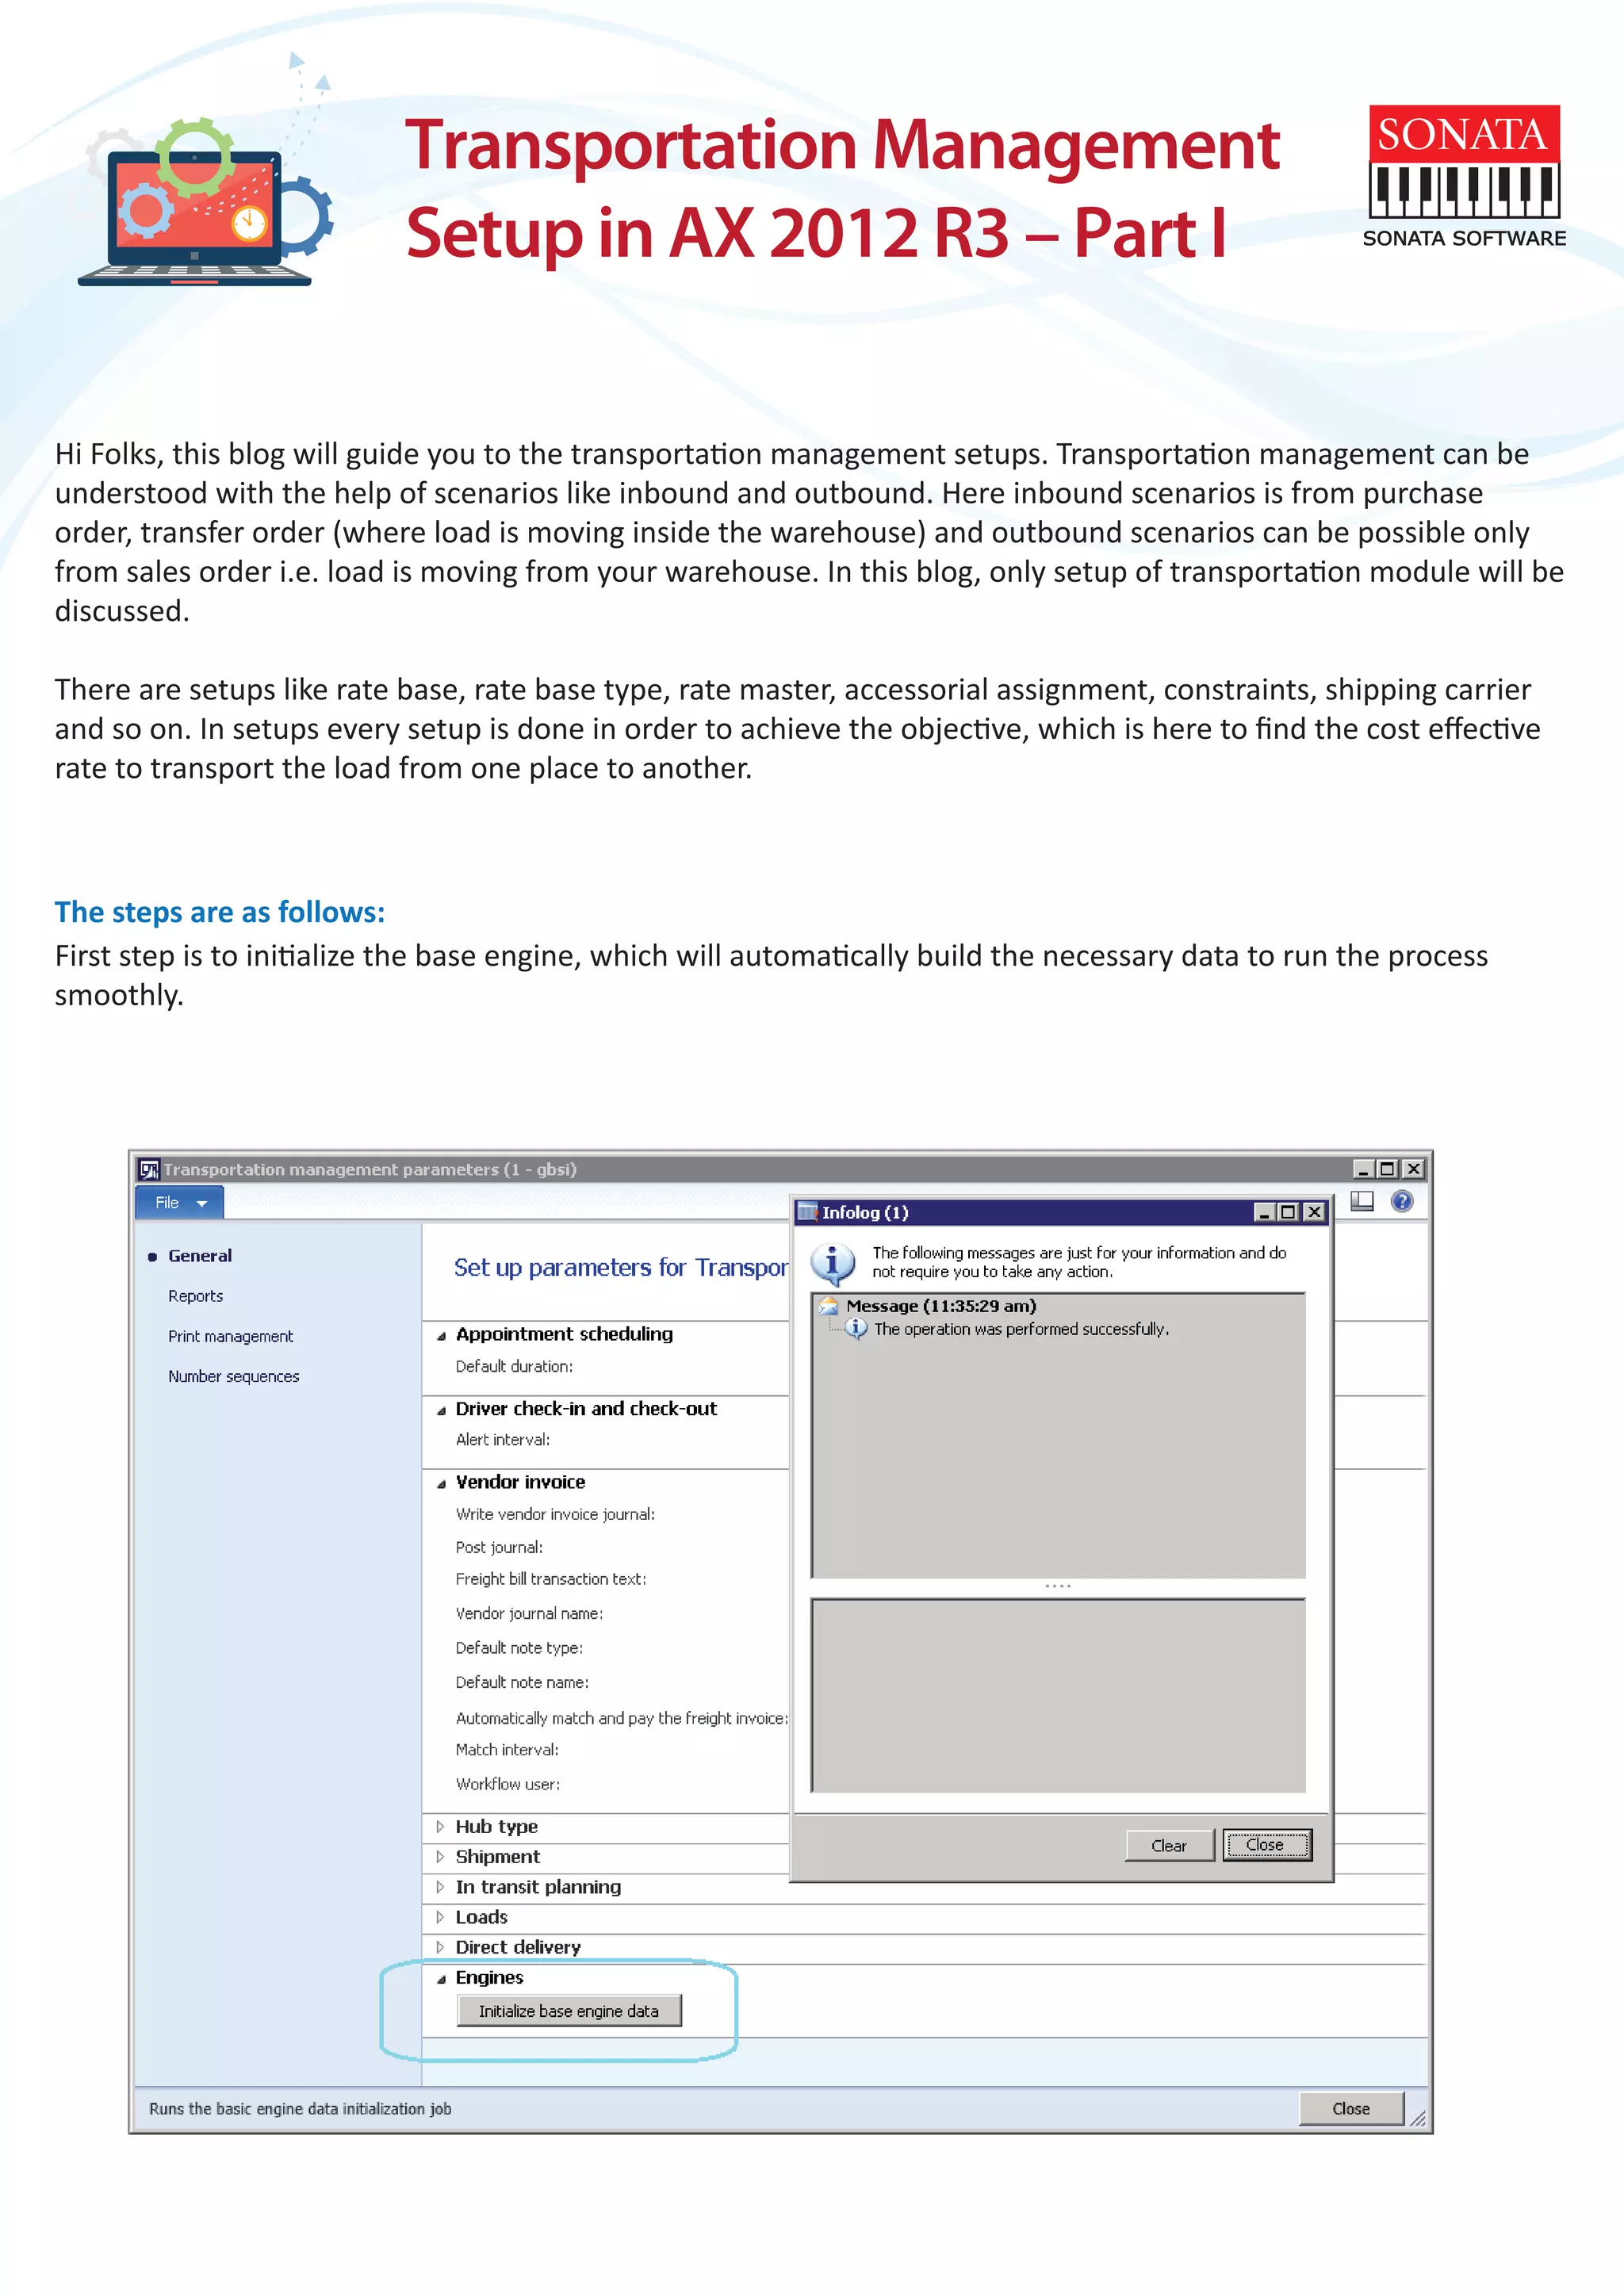
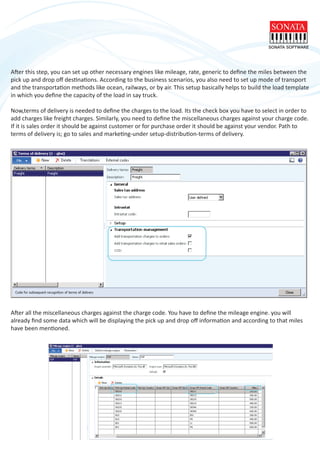
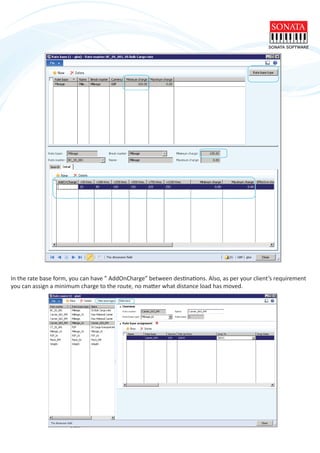
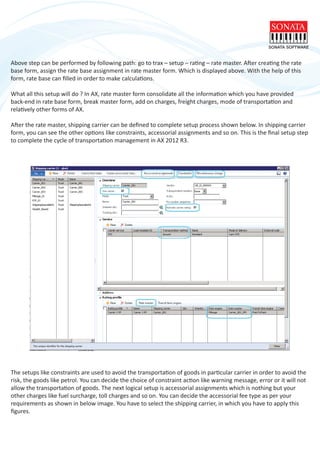
Transportation Management
Setup in AX 2012 R3 – Part I
Hi Folks, this blog will guide you to the transportation management setups. Transportation management can be
understood with the help of scenarios like inbound and outbound. Here inbound scenarios is from purchase
order, transfer order (where load is moving inside the warehouse) and outbound scenarios can be possible only
from sales order i.e. load is moving from your warehouse. In this blog, only setup of transportation module will be
discussed.
There are setups like rate base, rate base type, rate master, accessorial assignment, constraints, shipping carrier
and so on. In setups every setup is done in order to achieve the objective, which is here to find the cost effective
rate to transport the load from one place to another.
First step is to initialize the base engine, which will automatically build the necessary data to run the process
smoothly.
The steps are as follows:
After this step, you can set up other necessary engines like mileage, rate, generic to define the miles between the
pick up and drop off destinations. According to the business scenarios, you also need to set up mode of transport
and the transportation methods like ocean, railways, or by air. This setup basically helps to build the load template
in which you define the capacity of the load in say truck.
Now,terms of delivery is needed to define the charges to the load. Its the check box you have to select in order to
add charges like freight charges. Similarly, you need to define the miscellaneous charges against your charge code.
If it is sales order it should be against customer or for purchase order it should be against your vendor. Path to
terms of delivery is; go to sales and marketing-under setup-distribution-terms of delivery.
After all the miscellaneous charges against the charge code. You have to define the mileage engine. you will
already find some data which will be displaying the pick up and drop off information and according to that miles
have been mentioned.
As per the defined distance, you can calculate the rate also, you can define your own pick up and drop off destina-
tions. Also, you can calculate the rate on the basis of days with the help of transit time engine. Instead of miles, in
transit time engine you will see the days.
Now, one of the most important part in transportation management is define the rate according to miles, days as
per requirements. Which can be possible only through the rate master (combination of rate base and rate base
type), addition to the rate master you have to define the break master which will be providing the necessary
information in rate base form. Rate base form will help you to provide the rate information according to miles,
which you have defined in break master form. Below images, will give you an idea.
As you can see, according to mileage engine, I have defined the mileage with data type integer in break master
form. In break master form, random values have been taken in order to define the rate in rate base form.
As I said, the information provided in the break master form, will help you to fill the rate based on miles. As you
can see in below image, the rates as per miles have been filled. While creating the rate base you have to select the
break master which will fetch the information from break master form and will display in rate base form.
In the rate base form, you can have ” AddOnCharge” between destinations. Also, as per your client’s requirement
you can assign a minimum charge to the route, no matter what distance load has moved.
Above step can be performed by following path: go to trax – setup – rating – rate master. After creating the rate
base form, assign the rate base assignment in rate master form. Which is displayed above. With the help of this
form, rate base can filled in order to make calculations.
What all this setup will do ? In AX, rate master form consolidate all the information which you have provided
back-end in rate base form, break master form, add on charges, freight charges, mode of transportation and
relatively other forms of AX.
After the rate master, shipping carrier can be defined to complete setup process shown below. In shipping carrier
form, you can see the other options like constraints, accessorial assignments and so on. This is the final setup step
to complete the cycle of transportation management in AX 2012 R3.
The setups like constraints are used to avoid the transportation of goods in particular carrier in order to avoid the
risk, the goods like petrol. You can decide the choice of constraint action like warning message, error or it will not
allow the transportation of goods. The next logical setup is accessorial assignments which is nothing but your
other charges like fuel surcharge, toll charges and so on. You can decide the accessorial fee type as per your
requirements as shown in below image. You have to select the shipping carrier, in which you have to apply this
figures.
ABOUT AUTHOR
It has always been my will to be engaged in an activity which has a tangible output, something which I could see my work
making a difference. I have Masters in Finance and Bachelors in Mechanical Engineering. Both done with an impression to do
something that will make a difference. I have an experience of working for multiple companies in the manufacturing and
service sector for the past 3 years. This blog has my complete effort and detailing is to perfection because there is a lot of
energy that I have and with a few more years I can complete the dots of using my knowledge into strategizing better business.
Voila, setup of transportation is almost done!
Next part of transportation will be post soon, in which the transportation cycle will be discussed along with
functionalities. The next post will include the inbound and outbound scenarios of transportation management in
AX 2012 R3. Till then, have a nice time!
Sachin Agrawal

Transportation management setup in AX 2012 R3

  • 1.
    Transportation Management Setup inAX 2012 R3 – Part I Hi Folks, this blog will guide you to the transportation management setups. Transportation management can be understood with the help of scenarios like inbound and outbound. Here inbound scenarios is from purchase order, transfer order (where load is moving inside the warehouse) and outbound scenarios can be possible only from sales order i.e. load is moving from your warehouse. In this blog, only setup of transportation module will be discussed. There are setups like rate base, rate base type, rate master, accessorial assignment, constraints, shipping carrier and so on. In setups every setup is done in order to achieve the objective, which is here to find the cost effective rate to transport the load from one place to another. First step is to initialize the base engine, which will automatically build the necessary data to run the process smoothly. The steps are as follows:
  • 2.
    After this step,you can set up other necessary engines like mileage, rate, generic to define the miles between the pick up and drop off destinations. According to the business scenarios, you also need to set up mode of transport and the transportation methods like ocean, railways, or by air. This setup basically helps to build the load template in which you define the capacity of the load in say truck. Now,terms of delivery is needed to define the charges to the load. Its the check box you have to select in order to add charges like freight charges. Similarly, you need to define the miscellaneous charges against your charge code. If it is sales order it should be against customer or for purchase order it should be against your vendor. Path to terms of delivery is; go to sales and marketing-under setup-distribution-terms of delivery. After all the miscellaneous charges against the charge code. You have to define the mileage engine. you will already find some data which will be displaying the pick up and drop off information and according to that miles have been mentioned.
  • 3.
    As per thedefined distance, you can calculate the rate also, you can define your own pick up and drop off destina- tions. Also, you can calculate the rate on the basis of days with the help of transit time engine. Instead of miles, in transit time engine you will see the days. Now, one of the most important part in transportation management is define the rate according to miles, days as per requirements. Which can be possible only through the rate master (combination of rate base and rate base type), addition to the rate master you have to define the break master which will be providing the necessary information in rate base form. Rate base form will help you to provide the rate information according to miles, which you have defined in break master form. Below images, will give you an idea. As you can see, according to mileage engine, I have defined the mileage with data type integer in break master form. In break master form, random values have been taken in order to define the rate in rate base form. As I said, the information provided in the break master form, will help you to fill the rate based on miles. As you can see in below image, the rates as per miles have been filled. While creating the rate base you have to select the break master which will fetch the information from break master form and will display in rate base form.
  • 4.
    In the ratebase form, you can have ” AddOnCharge” between destinations. Also, as per your client’s requirement you can assign a minimum charge to the route, no matter what distance load has moved.
  • 5.
    Above step canbe performed by following path: go to trax – setup – rating – rate master. After creating the rate base form, assign the rate base assignment in rate master form. Which is displayed above. With the help of this form, rate base can filled in order to make calculations. What all this setup will do ? In AX, rate master form consolidate all the information which you have provided back-end in rate base form, break master form, add on charges, freight charges, mode of transportation and relatively other forms of AX. After the rate master, shipping carrier can be defined to complete setup process shown below. In shipping carrier form, you can see the other options like constraints, accessorial assignments and so on. This is the final setup step to complete the cycle of transportation management in AX 2012 R3. The setups like constraints are used to avoid the transportation of goods in particular carrier in order to avoid the risk, the goods like petrol. You can decide the choice of constraint action like warning message, error or it will not allow the transportation of goods. The next logical setup is accessorial assignments which is nothing but your other charges like fuel surcharge, toll charges and so on. You can decide the accessorial fee type as per your requirements as shown in below image. You have to select the shipping carrier, in which you have to apply this figures.
  • 6.
    ABOUT AUTHOR It hasalways been my will to be engaged in an activity which has a tangible output, something which I could see my work making a difference. I have Masters in Finance and Bachelors in Mechanical Engineering. Both done with an impression to do something that will make a difference. I have an experience of working for multiple companies in the manufacturing and service sector for the past 3 years. This blog has my complete effort and detailing is to perfection because there is a lot of energy that I have and with a few more years I can complete the dots of using my knowledge into strategizing better business. Voila, setup of transportation is almost done! Next part of transportation will be post soon, in which the transportation cycle will be discussed along with functionalities. The next post will include the inbound and outbound scenarios of transportation management in AX 2012 R3. Till then, have a nice time! Sachin Agrawal