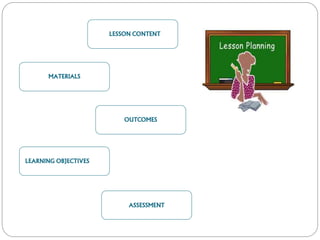
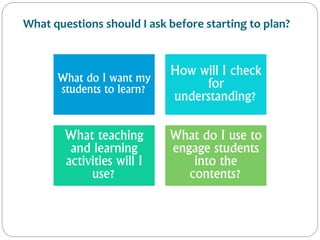
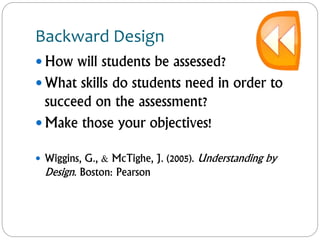
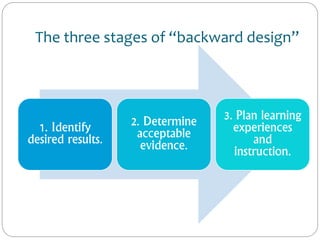
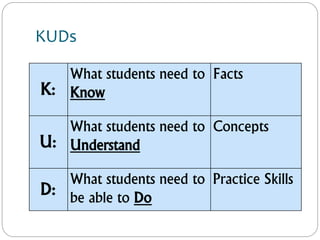
This document provides tips and guidance on lesson planning for teaching English as a foreign language. It discusses two common approaches to lesson planning: objectives-first and backward design. The objectives-first approach involves determining learning objectives, outcomes, materials, content, and assessment. The backward design approach starts with the assessment and works backward to determine learning objectives and activities. The document provides examples and templates for developing lesson plans using these approaches. It emphasizes the importance of clear learning objectives, engaging instructional activities, and checking for student understanding. Overall, the document aims to help participants effectively organize and structure their lesson planning.
2. Objectives of the webinar
To give participants some tips for them to organize
content, materials, time, instructional strategies and
assistance in the classroom when planning a lesson
effectively;
Describe two types of lesson planning
Provide a list of online ready-made lesson plans that can
be adapted to EFL classes in Moldova
3. COMMON LESSON PLANS MODELS
http://mathcs.wilkes.edu/~rpryor/ed589/lessplns.html
6. What questions should I ask before starting to plan?
What do I want my
students to learn?
How will I check
for
understanding?
What teaching
and learning
activities will I
use?
What do I use to
engage students
into the
contents?
8. Learning Objectives
A learning objective is an outcome statement that
captures specifically what knowledge, skills, attitudes
learners should be able to exhibit following instruction.
Learning objectives should be “SMART” Specific
Measurable/Observable
Attainable for target audience within scheduled time and specified conditions
Relevant and results-oriented
Targeted to the learner and to the desired level of learning.
9. Lesson aims
A course can have an aim, individual lessons can have an
aim, and stages within a lesson have aims too.
Aims can add focus to lessons and stages. A stage can
have more than one aim, as in the lesson that you saw,
but having a lot of different aims can lead to a lack of
focus. It’s often a good idea to think about your main
lesson aim first, and then to ensure that the stages in
your lesson work towards that aim. In other words –
think about what you want your learners to achieve and
how you will help them achieve it. This should help you
to plan your lessons with your learners’ needs in mind.
10. Discussion Time
Should teachers inform their learners of the aims of a
lesson or activity?
Is it OK to teach without a purpose, or aim? In what
situations?
11. Planning Preparation
Outline learning objectives
To determine what you want students to learn and be able to do at the end of class.
What is the topic of the lesson?
What do I want students to learn?
What do I want them to understand and be able to do at the end of class?
What do I want them to take away from this particular lesson?
Develop the introduction
Now that you have your learning objectives in order of their importance, design the specific
activities you will use to get students to understand and apply what they have learned.
Plan the specific learning activities (the main body of the lesson)
Prepare several different ways of explaining the material (real-life examples, analogies, visuals, etc.) to
catch the attention of more students and appeal to different learning styles.
Plan to check for understanding
Now that you have explained the topic and illustrated it with different examples, you need to check
for student understanding – how will you know that students are learning? Think about specific
questions you can ask students in order to check for understanding, write them down, and then
paraphrase them so that you are prepared to ask the questions in different ways.
12. Develop a conclusion and a preview
Conclude the lesson not only by summarizing the main
points, but also by previewing the next lesson. How does
the topic relate to the one that’s coming? This preview
will spur students’ interest and help them connect the
different ideas within a larger context.
14. Backward Design
How will students be assessed?
What skills do students need in order to
succeed on the assessment?
Make those your objectives!
Wiggins, G., & McTighe, J. (2005). Understanding by
Design. Boston: Pearson
15. The three stages of “backward design”
1. Identify
desired results.
2. Determine
acceptable
evidence.
3. Plan learning
experiences
and
instruction.
16. KUDs
K:
What students need to
Know
Facts
U:
What students need to
Understand
Concepts
D:
What students need to
be able to Do
Practice Skills
17. KUD Example
K: Students will know the meaning of present
perfect and the associated helping verbs (has/have).
U: Students will understand that the present perfect
tense indicates an action that happened before the
present point in time.
D: Students will be able to write (do) a paragraph
(using the present perfect) telling about what they
have done to prepare for September 1.
18. 5 Steps to Achieving the Objectives
(Source: TFA, Teaching as Leadership)
1. Opening /Attention getter
(might include pre-assessment)
2. Introduction to new material
3. Guided Practice
4. Independent Practice /
Homework
5. Closing / Assessment
19. Two column design
The teacher will … Students will …
-explain the present
perfect tense.
-sit and listen.
-write the conjugation of
examples on the board.
-sit and listen.
-provide some example
sentences using present
perfect.
-sit and listen.
20. Two column design
The teacher will … Students will …
-explain the present
perfect tense.
-take two-column notes.
-give students a model
text.
-find examples of present
perfect in the text.
-ask students to explain
the examples they found.
-work in pairs to explain
an example.
21. Which way do you usually use?
Forward or backward design?
22. Materials
Keep track of what you’ll need for your lesson.
Highlight any special materials that you’ll need to
remember to prepare/gather.
Have students prepare materials whenever
possible.
23. Pacing/Timing
How much time will each step take?
Do you need to split the lesson plan into
different days?
What “sponge activities” can you have
ready in case students work quickly?
24. For a class that takes too long
Choice time system:
1. You estimate how long an activity should take
and tell the class.
2. Class earns “choice time” for every minute they
save in doing it.
3. On a special day, they get “choice time” where
they do fun learning activities for however
many minutes they earned.
from Fred Jones, Tools for Teaching
25. Reflection
Did students meet my objectives? What evidence
do I have?
Even if not, what were the strengths of the
lesson?
What will I do differently next time I teach this
lesson?
26. What will you actually use when you
teach?
A checklist?
An agenda on the board?
A highlighted version of the lesson plan?
Notes in a notebook?
What works for you?