Busty Desi⚡Call Girls in Vasundhara Ghaziabad >༒8448380779 Escort Service
Step-by-Step Guide on how to create a note template
1. How to Create a Note Template that automates
virtually any task on Infusionsoft
This process allows you to automate a campaign by implementing tags in a contact record.
Step-by-Step Instructions
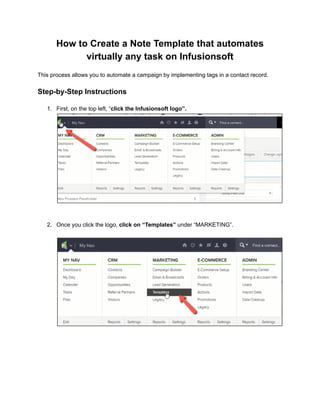
1. First, on the top left, “click the Infusionsoft logo”.
2. Once you click the logo, click on “Templates” under “MARKETING”.
2. 3. Once you’re inside the “TEMPLATES” on the top right, click on “Add a Template”.
4. And under the “Add a Template” field, select “Note”
5. When you’re in the “Manage Note Template”, click the “Title field”
3. 6. In the “TITLE FIELD”, put an “exclamatory point and then Spacebar”
Note: This process will tell you that it will automate something, and it brings you to the
very top of the dropdown menu when you’re selecting the note template within the
contact record.
7. After the spacebar, put “New Referral” or it depends on you.
Note: If this part of the sales pipeline steps, you are going to name it. But if this is not
part of the pipeline sales, then you don’t have to name it.
4. 8. For the sales pipeline, in the “TITLE FIELD, put “New Referral” then “spacebar” then
“dash” then “spacebar”, and then, name it.
9. Highlight the “TITLE FIELD” by pressing “Ctrl A to select all, and then “Ctrl C” to
copy.
10. Once you copied it, paste it to the title section by pressing “Ctrl V”
5. 11. In the “ACTION TYPE” section, “click” on whatever action type you want.
12. In the ‘DESCRIPTION BOX”, put your desired description.
13. And then, “scroll down”, “click” the button beside the “NO” Button.
6. 14. Once the ‘’YES” button appears, click “Save”.
15. Now, the “ACTION TAB” should be activated, click “Actions”.
16. Next, click the “Add New Action” and you can choose whatever you want that applies.
7. 17. Now, if you want to “APPLY” a tag in your template, click “Apply/Remove Tag”
18. For example, you have chosen your tag then, click “Save”
19. Here, you can see the action “APPLY” to the tag that you have chosen previously.
Note: You can do multiple actions if you want.
8. 20. Now, if you want to remove a tag, just click “Apply/Remove Tag” in the upper right
section.
21. And then, “click” the rounded button with a “REMOVE” sign on it. “Choose” what tag
you want to remove and then, click “Save”
22. You can see that the tag that you have chosen was added to the action tab, and now
click "Save.”
9. 23. Now that the template is done, you will do a test user. “Click” the quick search icon in
the right corner, then “type” a contact name, and then “Click Contact”
24. After selecting the contact, it will appear under Quick Search. Now click “Contact” to
get to the record.
25. Scroll down, and toward "NOTES,” click “Note Template” and “Select” the template
that you created.
10. 26. Now, click the “Add Note” button, and now you will see the action results of the
“APPLY” and “REMOVE” tags. And you’re done.