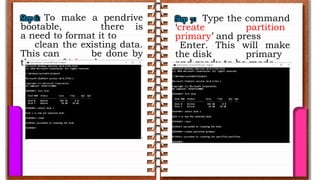
SlideShare a Scribd company logo
1 of 33
- containing the software required to boot a
computer.(OxfordLanguages)
a unit of physical hardware or any electronic element
with some computing ability that supports the
installation offirmwareorthird-partysoftware.
(OxfordLanguages)
- is any piece of hardware
that contains the files
required for a computer to
start.
1. hard drive
2. floppy disk drive
3. CD-ROM drive
4. DVD drive, and
5. USB jump drive/ USB flash drive
All are considered bootable devices. However,
unless the necessary boot files are stored on the drive,
diskette, or disc, the computer cannot boot from that
device.
How to create bootable versions of Windows ISOs
on CD, DVD, and USB flash drive.
-Any file that ends in .ISO is an exact copy of a disk.
-It is a virtual copy of a CD or DVD, with the same file
structure and the same data.
-ISO copies are referred to as "IMAGES" of the original.
-The acronym ISO stands for International Organization
for Standardization, the organization responsible for
creating industry standards.
-Any media, whether it is a hard
drive, USB flash drive, CD, or
DVD is bootable if you can use it
to boot your computer
In this case, we are creating
portable media which boots from
the USB drive or disc, instead of
the computer's hard drive. When
installing Windows, the media
you use must be bootable.
By far the easiest way to create Windows 10
bootable media is to use the Windows Media
Creation tool. The software is available as a free
download from Microsoft.
This tool can do three things:
1. Update the system to Windows 10.
2. Create a Windows 10 bootable USB stick.
3. Download a Windows 10 ISO file to your computer.
TASK:
You are given the option of downloading a 64-bit
version, a 32-bit version, or both. There is also an
option to Use the recommended options for this PC. If
you don't know which one you need, use this setting!
For 32-bit Windows installations, 4GB is the minimum
size USB stick that will work. For 64-bit, you'll need 8GB
minimum. It is advised to use something a little larger
where possible. Note that this will wipe the contents of
the USB drive so be sure to back up any data you want
to keep first.
Windows 10:
https://www.microsoft.com/en-us/software-download/windows10
You can Download window 7 ISO here:
https://www.microsoft.com/en-us/software-download/windows7
You can download windows 8.1 ISO here:
https://www.microsoft.com/en-us/software-
download/windows8ISO
1. Download WinISO.
https://www.winiso.com/support/tutorials/ma
ke-windows7bootable.html
2. Install WinISO and Open Windows 7 ISO
File
WinISO Main Interface
Open the Windows 7 ISO file. WinISO can detect the
image file is bootable iso or non-bootable automatically.
3. Set Windows 7 boot information
Click "Bootable" on the toolbar after saving the windows 7 boot image
file, choose the first option "Set boot image," a window will appear, and
then choose the boot information you have and click "Open." On the view
frame, you will discover the word “bootable” at this point.
Save the new ISO file you created. Prepare a blank disc and click "Burn" on the toolbar, then
select this Windows 7 bootable iso file. Then select "OK." The detailed steps can be found
here.
BOOTA
BLE
DEVIC
ES
USING
Is the very
common way
to make a
bootable
device. When
you purchase
a new
computer
there is
additional CD
There are
many ways to
make a
bootable
device. The
very basic
and first is
bootable
How to make a
bootable DVD?
What is a bootable
DVD and how does
it work?
Emergency Startup
Disk is a bootable
DVD that is
primarily used to
re-boot your
computer after it
has been
compromised or
Bootable devices
Using cd/dvd
STEPS ON HOW TO
MAKE A
BOOTABLE DVD?
STEP 2: Make
bootable ISO file.
STEP 1: Install and
run the WinISO.
Open an ISO file
and set it to the boot
image.
Ways to set up the
boot information
using WinISO.
1. Click “Bootable“ tab
from the toolbar and
the dialogue will
display on your screen
then select “Boot
Image”.
2. Load boot
information from
CD/DVD/BD Driver or
CD/DVD/BD image file.
STEP 3: Burn the bootable
ISO file to DVD
On the toolbar, select
"bootable" and then
"Import From." Click the
"Set into current" button.
Insert a blank DVD
into a DVD drive and
when the blank disc is
detected click "Burn".
Then wait until the
ISO is successfully
burnt, and the disc
will be ejected
automatically.
USB
BOOTA
BLE
USING
RUFUS
USB Bootable
Using Rufus
Software
To install the operating
system, it is typical to use
a bootable USB device
rather than CD/DVD
drive.
There are a lot of software
tools available for Windows
that can be used in
creating bootable USB
flash drive. Microsoft has
its own tool. Rufus, a free
and open-source
application, is one of the
best tools accessible. A
utility that every Windows
user should have in their
software collection is
What is
Rufus?
RUFUS is a utility
tool that aids in the
formatting and
creation of bootable
USB flash drives,
such as USB
keys/pendrives,
memory sticks, and
other similar devices.
If you need to
produce USB
installation media
from bootable ISOs
How to Use Rufus
to Create a
Bootable Flash
Drive?
Materials needed:
ISO File (Operating
System)
Rufus Installer
USB Flash Drive (atleast
8GB)
Use Rufus to Create
Bootable USB Drive
1. Download and install Rufus to
your computer.
2. Open the Rufus application and
plug-in the USB flash drive and
click on the “Select” button.
3. Locate your ISO file
(Operating
System) in the browse
box, then click
the "Open" button.
4. Click the small "Tick"
icon next to the "Boot
Selection" drop-down
option. This is useful for
determining whether the
ISO file has been altered in
any way.
5. From the Partition
Scheme drop-down menu,
choose "MBR," and from
the Target System drop-
down menu, choose "BIOS
or UEFI." Select the "Add
fixes for ancient BIOSes"
checkbox under the
"Advanced Drive
Properties" section if you're
trying to use this bootable
USB drive on an older
system.
6. (Optional) Using the
"Volume Label" option, you
can alter the USB drive
name. Additionally, under
“Advanced Format
Options” make sure that
the “Quick Format” tick is
set.
7. Click on the “Start”
button.
Rufus begins creating the
bootable USB drive as
soon as you press the
Start button. The creation
procedure can take a few
minutes depending on
your USB drive.
8. Click the Close button.
Once completed, you will
not see a completion
message instead it will
display the READY
message and the progress
bar will turn fully green.
HowdoesUSBBootwork?
USB Boot works in the
same way as a floppy disk did in
the past to start a computer. It's
usually used to rebuild an operating
system from the ground up, or to
repair, recover, or install it. You'll
need to build a bootable USB drive
first in order to do a USB boot.
This can be done on your own
PC or with the help of third-party
software. Afterwards, the software
will copy all of the operating system
files and install them on the USB
drive/pen drive, allowing for USB
booting. You'll need a USB drive/pen
drive with at least 8 GB of storage
to make a bootable USB.
USB
BOOTABLE
USING
DISKPART/CM
D
Steps to Create a Bootable USB Using
CMD
Step 1: Run command-
prompt in
Administrator
mode. There are
two ways todo the
same:
a. Search for cmd in Start
menu, right-click on
the command prompt,
click on Run as
Administrator.
b. Open Task Manager, go to
File->Run new task, search
for cmd and pressenter.
Step 2: Connect the USB
device to
the computer
that is to be
made bootable.
Step 3: Type the command
‘diskpart’ and then
press Enter.
Step 4: Type the command
‘list disk’ to
display a list of all
the available
storage devices on
your system.
Press Enter to
continue.
Step 5: Select the disk that is
your pen
drive. Generally, it is
marked as Disk 1, it
might vary system to
system. Make sure not to
select any other
available disk as it will
get formatted. To choose
the disk, type the
command ‘select disk1’
and press Enter.
Step 6: To make a pendrive
bootable, there is
a need to format it to
clean the existing data.
This can be done by
the use of ‘clean’
command.
Step 7: Type the command
‘create partition
primary’ and press
Enter. This will make
the disk primary
and ready to be made
bootable..
Step 8: To choose the partition
created as primary, type the
command ‘select partition 1’
and press Enter.
Step 9: Before making the disk
bootable, there is a
need to format it as
NTFS because Windows
uses NTFS file
system for storage. This
can be done with the use
of command
‘format=fs ntfs quick’
and press Enter.
Step 10: Type the command
‘active’ and press
Enter. This will mark the
primary bootable
partition as Active.
Step 11: Type the command
‘exit’ to exit
DISKPART and press
Enter.
Now close the command
prompt window.
Step 12: Copy all the data from
the
OS(Windows/Linux/etc.)
installation disk to
your USB drive that
is just been made bootable.
Now, this Pendrive
can be used to install
the desired Operating
System on any
computer.

More Related Content

Similar to CSS 4th Quarter Lessons.pptx

Installation of OS
Installation of OSInstallation of OS
Installation of OSOriginalGSM
 
Flashbios dos para placas-mãe chipset x79
Flashbios dos para placas-mãe chipset x79Flashbios dos para placas-mãe chipset x79
Flashbios dos para placas-mãe chipset x79arturbonilha mendes
 
10008.2-2-Bootable-Devices-Media-new.pdf
10008.2-2-Bootable-Devices-Media-new.pdf10008.2-2-Bootable-Devices-Media-new.pdf
10008.2-2-Bootable-Devices-Media-new.pdfemmanuelgalabo
 
Windows 8 usb installer maker
Windows 8 usb installer makerWindows 8 usb installer maker
Windows 8 usb installer makerjithvan
 
Making windows 7 bootable usb device
Making windows 7 bootable usb deviceMaking windows 7 bootable usb device
Making windows 7 bootable usb deviceRavi Kumar Lanke
 
Make pendrive bootable
Make pendrive bootableMake pendrive bootable
Make pendrive bootabletapu1987
 
Create windows 7 recovery usb without dvd
Create windows 7 recovery usb without dvdCreate windows 7 recovery usb without dvd
Create windows 7 recovery usb without dvdssuser1eca7d
 
Download Myboot disk
Download Myboot diskDownload Myboot disk
Download Myboot diskRoach
 
Createa Xp Recovery Diskwith Sp3
Createa Xp Recovery Diskwith Sp3Createa Xp Recovery Diskwith Sp3
Createa Xp Recovery Diskwith Sp3bizet
 
How to Create Bootable disk in Windows XP
How to Create Bootable disk in Windows XPHow to Create Bootable disk in Windows XP
How to Create Bootable disk in Windows XPChandrani Ray Chowdhury
 
Install ubuntu
Install ubuntuInstall ubuntu
Install ubuntupramoddps
 

Similar to CSS 4th Quarter Lessons.pptx (20)

Installation of OS
Installation of OSInstallation of OS
Installation of OS
 
Flashbios dos para placas-mãe chipset x79
Flashbios dos para placas-mãe chipset x79Flashbios dos para placas-mãe chipset x79
Flashbios dos para placas-mãe chipset x79
 
10008.2-2-Bootable-Devices-Media-new.pdf
10008.2-2-Bootable-Devices-Media-new.pdf10008.2-2-Bootable-Devices-Media-new.pdf
10008.2-2-Bootable-Devices-Media-new.pdf
 
Windows 8 usb installer maker
Windows 8 usb installer makerWindows 8 usb installer maker
Windows 8 usb installer maker
 
Making windows 7 bootable usb device
Making windows 7 bootable usb deviceMaking windows 7 bootable usb device
Making windows 7 bootable usb device
 
Make pendrive bootable
Make pendrive bootableMake pendrive bootable
Make pendrive bootable
 
Create windows 7 recovery usb without dvd
Create windows 7 recovery usb without dvdCreate windows 7 recovery usb without dvd
Create windows 7 recovery usb without dvd
 
Bootusb
BootusbBootusb
Bootusb
 
Bootusb
BootusbBootusb
Bootusb
 
Download Myboot disk
Download Myboot diskDownload Myboot disk
Download Myboot disk
 
Createa Xp Recovery Diskwith Sp3
Createa Xp Recovery Diskwith Sp3Createa Xp Recovery Diskwith Sp3
Createa Xp Recovery Diskwith Sp3
 
How to Create Bootable disk in Windows XP
How to Create Bootable disk in Windows XPHow to Create Bootable disk in Windows XP
How to Create Bootable disk in Windows XP
 
Readme
ReadmeReadme
Readme
 
Install ubuntu
Install ubuntuInstall ubuntu
Install ubuntu
 
To upgrade your pc from windows xp to windows 7
To upgrade your pc from windows xp to windows 7To upgrade your pc from windows xp to windows 7
To upgrade your pc from windows xp to windows 7
 
To upgrade your pc from windows xp to windows 7
To upgrade your pc from windows xp to windows 7To upgrade your pc from windows xp to windows 7
To upgrade your pc from windows xp to windows 7
 
How to install windows 7 operating system
How to install  windows 7 operating system How to install  windows 7 operating system
How to install windows 7 operating system
 
Os Virtualization
Os VirtualizationOs Virtualization
Os Virtualization
 
Bootable Usb
Bootable UsbBootable Usb
Bootable Usb
 
To upgrade your pc from windows xp to windows 7.rtf
To upgrade your pc from windows xp to windows 7.rtfTo upgrade your pc from windows xp to windows 7.rtf
To upgrade your pc from windows xp to windows 7.rtf
 

More from RGSMags

Computer System Servicing NC2 - Device Drivers for All Junior and Senior High...
Computer System Servicing NC2 - Device Drivers for All Junior and Senior High...Computer System Servicing NC2 - Device Drivers for All Junior and Senior High...
Computer System Servicing NC2 - Device Drivers for All Junior and Senior High...RGSMags
 
Lesson 3 - Netiquette REPORTING.pptx
Lesson 3 - Netiquette REPORTING.pptxLesson 3 - Netiquette REPORTING.pptx
Lesson 3 - Netiquette REPORTING.pptxRGSMags
 
CSS12 LESSON - Client Server Network.pdf
CSS12 LESSON - Client Server Network.pdfCSS12 LESSON - Client Server Network.pdf
CSS12 LESSON - Client Server Network.pdfRGSMags
 
PECs.pptx
PECs.pptxPECs.pptx
PECs.pptxRGSMags
 
2 - The Current State of ICT Technologies (1).pptx
2 - The Current State of ICT Technologies (1).pptx2 - The Current State of ICT Technologies (1).pptx
2 - The Current State of ICT Technologies (1).pptxRGSMags
 
CSS12 How to Set Up LESSON 3.pptx
CSS12 How to Set Up LESSON 3.pptxCSS12 How to Set Up LESSON 3.pptx
CSS12 How to Set Up LESSON 3.pptxRGSMags
 
CSS12 LESSON 02.pptx
CSS12 LESSON 02.pptxCSS12 LESSON 02.pptx
CSS12 LESSON 02.pptxRGSMags
 
Occupational Health and Safety.pptx
Occupational Health and Safety.pptxOccupational Health and Safety.pptx
Occupational Health and Safety.pptxRGSMags
 
CSS12- LESSON 2.pptx
CSS12- LESSON 2.pptxCSS12- LESSON 2.pptx
CSS12- LESSON 2.pptxRGSMags
 

More from RGSMags (9)

Computer System Servicing NC2 - Device Drivers for All Junior and Senior High...
Computer System Servicing NC2 - Device Drivers for All Junior and Senior High...Computer System Servicing NC2 - Device Drivers for All Junior and Senior High...
Computer System Servicing NC2 - Device Drivers for All Junior and Senior High...
 
Lesson 3 - Netiquette REPORTING.pptx
Lesson 3 - Netiquette REPORTING.pptxLesson 3 - Netiquette REPORTING.pptx
Lesson 3 - Netiquette REPORTING.pptx
 
CSS12 LESSON - Client Server Network.pdf
CSS12 LESSON - Client Server Network.pdfCSS12 LESSON - Client Server Network.pdf
CSS12 LESSON - Client Server Network.pdf
 
PECs.pptx
PECs.pptxPECs.pptx
PECs.pptx
 
2 - The Current State of ICT Technologies (1).pptx
2 - The Current State of ICT Technologies (1).pptx2 - The Current State of ICT Technologies (1).pptx
2 - The Current State of ICT Technologies (1).pptx
 
CSS12 How to Set Up LESSON 3.pptx
CSS12 How to Set Up LESSON 3.pptxCSS12 How to Set Up LESSON 3.pptx
CSS12 How to Set Up LESSON 3.pptx
 
CSS12 LESSON 02.pptx
CSS12 LESSON 02.pptxCSS12 LESSON 02.pptx
CSS12 LESSON 02.pptx
 
Occupational Health and Safety.pptx
Occupational Health and Safety.pptxOccupational Health and Safety.pptx
Occupational Health and Safety.pptx
 
CSS12- LESSON 2.pptx
CSS12- LESSON 2.pptxCSS12- LESSON 2.pptx
CSS12- LESSON 2.pptx
 

Recently uploaded

Grant Readiness 101 TechSoup and Remy Consulting
Grant Readiness 101 TechSoup and Remy ConsultingGrant Readiness 101 TechSoup and Remy Consulting
Grant Readiness 101 TechSoup and Remy ConsultingTechSoup
 
“Oh GOSH! Reflecting on Hackteria's Collaborative Practices in a Global Do-It...
“Oh GOSH! Reflecting on Hackteria's Collaborative Practices in a Global Do-It...“Oh GOSH! Reflecting on Hackteria's Collaborative Practices in a Global Do-It...
“Oh GOSH! Reflecting on Hackteria's Collaborative Practices in a Global Do-It...Marc Dusseiller Dusjagr
 
Introduction to ArtificiaI Intelligence in Higher Education
Introduction to ArtificiaI Intelligence in Higher EducationIntroduction to ArtificiaI Intelligence in Higher Education
Introduction to ArtificiaI Intelligence in Higher Educationpboyjonauth
 
Crayon Activity Handout For the Crayon A
Crayon Activity Handout For the Crayon ACrayon Activity Handout For the Crayon A
Crayon Activity Handout For the Crayon AUnboundStockton
 
Presentation by Andreas Schleicher Tackling the School Absenteeism Crisis 30 ...
Presentation by Andreas Schleicher Tackling the School Absenteeism Crisis 30 ...Presentation by Andreas Schleicher Tackling the School Absenteeism Crisis 30 ...
Presentation by Andreas Schleicher Tackling the School Absenteeism Crisis 30 ...EduSkills OECD
 
Micromeritics - Fundamental and Derived Properties of Powders
Micromeritics - Fundamental and Derived Properties of PowdersMicromeritics - Fundamental and Derived Properties of Powders
Micromeritics - Fundamental and Derived Properties of PowdersChitralekhaTherkar
 
How to Make a Pirate ship Primary Education.pptx
How to Make a Pirate ship Primary Education.pptxHow to Make a Pirate ship Primary Education.pptx
How to Make a Pirate ship Primary Education.pptxmanuelaromero2013
 
The Most Excellent Way | 1 Corinthians 13
The Most Excellent Way | 1 Corinthians 13The Most Excellent Way | 1 Corinthians 13
The Most Excellent Way | 1 Corinthians 13Steve Thomason
 
Measures of Central Tendency: Mean, Median and Mode
Measures of Central Tendency: Mean, Median and ModeMeasures of Central Tendency: Mean, Median and Mode
Measures of Central Tendency: Mean, Median and ModeThiyagu K
 
Q4-W6-Restating Informational Text Grade 3
Q4-W6-Restating Informational Text Grade 3Q4-W6-Restating Informational Text Grade 3
Q4-W6-Restating Informational Text Grade 3JemimahLaneBuaron
 
Concept of Vouching. B.Com(Hons) /B.Compdf
Concept of Vouching. B.Com(Hons) /B.CompdfConcept of Vouching. B.Com(Hons) /B.Compdf
Concept of Vouching. B.Com(Hons) /B.CompdfUmakantAnnand
 
Industrial Policy - 1948, 1956, 1973, 1977, 1980, 1991
Industrial Policy - 1948, 1956, 1973, 1977, 1980, 1991Industrial Policy - 1948, 1956, 1973, 1977, 1980, 1991
Industrial Policy - 1948, 1956, 1973, 1977, 1980, 1991RKavithamani
 
Separation of Lanthanides/ Lanthanides and Actinides
Separation of Lanthanides/ Lanthanides and ActinidesSeparation of Lanthanides/ Lanthanides and Actinides
Separation of Lanthanides/ Lanthanides and ActinidesFatimaKhan178732
 
POINT- BIOCHEMISTRY SEM 2 ENZYMES UNIT 5.pptx
POINT- BIOCHEMISTRY SEM 2 ENZYMES UNIT 5.pptxPOINT- BIOCHEMISTRY SEM 2 ENZYMES UNIT 5.pptx
POINT- BIOCHEMISTRY SEM 2 ENZYMES UNIT 5.pptxSayali Powar
 
BASLIQ CURRENT LOOKBOOK LOOKBOOK(1) (1).pdf
BASLIQ CURRENT LOOKBOOK  LOOKBOOK(1) (1).pdfBASLIQ CURRENT LOOKBOOK  LOOKBOOK(1) (1).pdf
BASLIQ CURRENT LOOKBOOK LOOKBOOK(1) (1).pdfSoniaTolstoy
 
Kisan Call Centre - To harness potential of ICT in Agriculture by answer farm...
Kisan Call Centre - To harness potential of ICT in Agriculture by answer farm...Kisan Call Centre - To harness potential of ICT in Agriculture by answer farm...
Kisan Call Centre - To harness potential of ICT in Agriculture by answer farm...Krashi Coaching
 
Introduction to AI in Higher Education_draft.pptx
Introduction to AI in Higher Education_draft.pptxIntroduction to AI in Higher Education_draft.pptx
Introduction to AI in Higher Education_draft.pptxpboyjonauth
 
Hybridoma Technology ( Production , Purification , and Application )
Hybridoma Technology  ( Production , Purification , and Application  ) Hybridoma Technology  ( Production , Purification , and Application  )
Hybridoma Technology ( Production , Purification , and Application ) Sakshi Ghasle
 

Recently uploaded (20)

Grant Readiness 101 TechSoup and Remy Consulting
Grant Readiness 101 TechSoup and Remy ConsultingGrant Readiness 101 TechSoup and Remy Consulting
Grant Readiness 101 TechSoup and Remy Consulting
 
“Oh GOSH! Reflecting on Hackteria's Collaborative Practices in a Global Do-It...
“Oh GOSH! Reflecting on Hackteria's Collaborative Practices in a Global Do-It...“Oh GOSH! Reflecting on Hackteria's Collaborative Practices in a Global Do-It...
“Oh GOSH! Reflecting on Hackteria's Collaborative Practices in a Global Do-It...
 
Introduction to ArtificiaI Intelligence in Higher Education
Introduction to ArtificiaI Intelligence in Higher EducationIntroduction to ArtificiaI Intelligence in Higher Education
Introduction to ArtificiaI Intelligence in Higher Education
 
Crayon Activity Handout For the Crayon A
Crayon Activity Handout For the Crayon ACrayon Activity Handout For the Crayon A
Crayon Activity Handout For the Crayon A
 
TataKelola dan KamSiber Kecerdasan Buatan v022.pdf
TataKelola dan KamSiber Kecerdasan Buatan v022.pdfTataKelola dan KamSiber Kecerdasan Buatan v022.pdf
TataKelola dan KamSiber Kecerdasan Buatan v022.pdf
 
Presentation by Andreas Schleicher Tackling the School Absenteeism Crisis 30 ...
Presentation by Andreas Schleicher Tackling the School Absenteeism Crisis 30 ...Presentation by Andreas Schleicher Tackling the School Absenteeism Crisis 30 ...
Presentation by Andreas Schleicher Tackling the School Absenteeism Crisis 30 ...
 
Micromeritics - Fundamental and Derived Properties of Powders
Micromeritics - Fundamental and Derived Properties of PowdersMicromeritics - Fundamental and Derived Properties of Powders
Micromeritics - Fundamental and Derived Properties of Powders
 
How to Make a Pirate ship Primary Education.pptx
How to Make a Pirate ship Primary Education.pptxHow to Make a Pirate ship Primary Education.pptx
How to Make a Pirate ship Primary Education.pptx
 
The Most Excellent Way | 1 Corinthians 13
The Most Excellent Way | 1 Corinthians 13The Most Excellent Way | 1 Corinthians 13
The Most Excellent Way | 1 Corinthians 13
 
Measures of Central Tendency: Mean, Median and Mode
Measures of Central Tendency: Mean, Median and ModeMeasures of Central Tendency: Mean, Median and Mode
Measures of Central Tendency: Mean, Median and Mode
 
Q4-W6-Restating Informational Text Grade 3
Q4-W6-Restating Informational Text Grade 3Q4-W6-Restating Informational Text Grade 3
Q4-W6-Restating Informational Text Grade 3
 
Concept of Vouching. B.Com(Hons) /B.Compdf
Concept of Vouching. B.Com(Hons) /B.CompdfConcept of Vouching. B.Com(Hons) /B.Compdf
Concept of Vouching. B.Com(Hons) /B.Compdf
 
Industrial Policy - 1948, 1956, 1973, 1977, 1980, 1991
Industrial Policy - 1948, 1956, 1973, 1977, 1980, 1991Industrial Policy - 1948, 1956, 1973, 1977, 1980, 1991
Industrial Policy - 1948, 1956, 1973, 1977, 1980, 1991
 
Separation of Lanthanides/ Lanthanides and Actinides
Separation of Lanthanides/ Lanthanides and ActinidesSeparation of Lanthanides/ Lanthanides and Actinides
Separation of Lanthanides/ Lanthanides and Actinides
 
POINT- BIOCHEMISTRY SEM 2 ENZYMES UNIT 5.pptx
POINT- BIOCHEMISTRY SEM 2 ENZYMES UNIT 5.pptxPOINT- BIOCHEMISTRY SEM 2 ENZYMES UNIT 5.pptx
POINT- BIOCHEMISTRY SEM 2 ENZYMES UNIT 5.pptx
 
BASLIQ CURRENT LOOKBOOK LOOKBOOK(1) (1).pdf
BASLIQ CURRENT LOOKBOOK  LOOKBOOK(1) (1).pdfBASLIQ CURRENT LOOKBOOK  LOOKBOOK(1) (1).pdf
BASLIQ CURRENT LOOKBOOK LOOKBOOK(1) (1).pdf
 
Kisan Call Centre - To harness potential of ICT in Agriculture by answer farm...
Kisan Call Centre - To harness potential of ICT in Agriculture by answer farm...Kisan Call Centre - To harness potential of ICT in Agriculture by answer farm...
Kisan Call Centre - To harness potential of ICT in Agriculture by answer farm...
 
Introduction to AI in Higher Education_draft.pptx
Introduction to AI in Higher Education_draft.pptxIntroduction to AI in Higher Education_draft.pptx
Introduction to AI in Higher Education_draft.pptx
 
Model Call Girl in Bikash Puri Delhi reach out to us at 🔝9953056974🔝
Model Call Girl in Bikash Puri  Delhi reach out to us at 🔝9953056974🔝Model Call Girl in Bikash Puri  Delhi reach out to us at 🔝9953056974🔝
Model Call Girl in Bikash Puri Delhi reach out to us at 🔝9953056974🔝
 
Hybridoma Technology ( Production , Purification , and Application )
Hybridoma Technology  ( Production , Purification , and Application  ) Hybridoma Technology  ( Production , Purification , and Application  )
Hybridoma Technology ( Production , Purification , and Application )
 

CSS 4th Quarter Lessons.pptx

  • 1.
  • 2.
  • 3. - containing the software required to boot a computer.(OxfordLanguages) a unit of physical hardware or any electronic element with some computing ability that supports the installation offirmwareorthird-partysoftware. (OxfordLanguages)
  • 4. - is any piece of hardware that contains the files required for a computer to start.
  • 5. 1. hard drive 2. floppy disk drive 3. CD-ROM drive 4. DVD drive, and 5. USB jump drive/ USB flash drive All are considered bootable devices. However, unless the necessary boot files are stored on the drive, diskette, or disc, the computer cannot boot from that device.
  • 6. How to create bootable versions of Windows ISOs on CD, DVD, and USB flash drive. -Any file that ends in .ISO is an exact copy of a disk. -It is a virtual copy of a CD or DVD, with the same file structure and the same data. -ISO copies are referred to as "IMAGES" of the original. -The acronym ISO stands for International Organization for Standardization, the organization responsible for creating industry standards.
  • 7.
  • 8. -Any media, whether it is a hard drive, USB flash drive, CD, or DVD is bootable if you can use it to boot your computer
  • 9. In this case, we are creating portable media which boots from the USB drive or disc, instead of the computer's hard drive. When installing Windows, the media you use must be bootable.
  • 10. By far the easiest way to create Windows 10 bootable media is to use the Windows Media Creation tool. The software is available as a free download from Microsoft. This tool can do three things: 1. Update the system to Windows 10. 2. Create a Windows 10 bootable USB stick. 3. Download a Windows 10 ISO file to your computer.
  • 11. TASK: You are given the option of downloading a 64-bit version, a 32-bit version, or both. There is also an option to Use the recommended options for this PC. If you don't know which one you need, use this setting! For 32-bit Windows installations, 4GB is the minimum size USB stick that will work. For 64-bit, you'll need 8GB minimum. It is advised to use something a little larger where possible. Note that this will wipe the contents of the USB drive so be sure to back up any data you want to keep first.
  • 12. Windows 10: https://www.microsoft.com/en-us/software-download/windows10 You can Download window 7 ISO here: https://www.microsoft.com/en-us/software-download/windows7 You can download windows 8.1 ISO here: https://www.microsoft.com/en-us/software- download/windows8ISO
  • 15. Open the Windows 7 ISO file. WinISO can detect the image file is bootable iso or non-bootable automatically.
  • 16. 3. Set Windows 7 boot information Click "Bootable" on the toolbar after saving the windows 7 boot image file, choose the first option "Set boot image," a window will appear, and then choose the boot information you have and click "Open." On the view frame, you will discover the word “bootable” at this point. Save the new ISO file you created. Prepare a blank disc and click "Burn" on the toolbar, then select this Windows 7 bootable iso file. Then select "OK." The detailed steps can be found here.
  • 17. BOOTA BLE DEVIC ES USING Is the very common way to make a bootable device. When you purchase a new computer there is additional CD
  • 18. There are many ways to make a bootable device. The very basic and first is bootable How to make a bootable DVD? What is a bootable DVD and how does it work? Emergency Startup Disk is a bootable DVD that is primarily used to re-boot your computer after it has been compromised or Bootable devices Using cd/dvd
  • 19. STEPS ON HOW TO MAKE A BOOTABLE DVD? STEP 2: Make bootable ISO file. STEP 1: Install and run the WinISO. Open an ISO file and set it to the boot image. Ways to set up the boot information using WinISO. 1. Click “Bootable“ tab from the toolbar and the dialogue will display on your screen then select “Boot Image”.
  • 20. 2. Load boot information from CD/DVD/BD Driver or CD/DVD/BD image file. STEP 3: Burn the bootable ISO file to DVD On the toolbar, select "bootable" and then "Import From." Click the "Set into current" button. Insert a blank DVD into a DVD drive and when the blank disc is detected click "Burn". Then wait until the ISO is successfully burnt, and the disc will be ejected automatically.
  • 21. USB BOOTA BLE USING RUFUS USB Bootable Using Rufus Software To install the operating system, it is typical to use a bootable USB device rather than CD/DVD drive. There are a lot of software tools available for Windows that can be used in creating bootable USB flash drive. Microsoft has its own tool. Rufus, a free and open-source application, is one of the best tools accessible. A utility that every Windows user should have in their software collection is
  • 22. What is Rufus? RUFUS is a utility tool that aids in the formatting and creation of bootable USB flash drives, such as USB keys/pendrives, memory sticks, and other similar devices. If you need to produce USB installation media from bootable ISOs How to Use Rufus to Create a Bootable Flash Drive? Materials needed: ISO File (Operating System) Rufus Installer USB Flash Drive (atleast 8GB) Use Rufus to Create Bootable USB Drive 1. Download and install Rufus to your computer. 2. Open the Rufus application and plug-in the USB flash drive and click on the “Select” button.
  • 23. 3. Locate your ISO file (Operating System) in the browse box, then click the "Open" button. 4. Click the small "Tick" icon next to the "Boot Selection" drop-down option. This is useful for determining whether the ISO file has been altered in any way.
  • 24. 5. From the Partition Scheme drop-down menu, choose "MBR," and from the Target System drop- down menu, choose "BIOS or UEFI." Select the "Add fixes for ancient BIOSes" checkbox under the "Advanced Drive Properties" section if you're trying to use this bootable USB drive on an older system. 6. (Optional) Using the "Volume Label" option, you can alter the USB drive name. Additionally, under “Advanced Format Options” make sure that the “Quick Format” tick is set.
  • 25. 7. Click on the “Start” button. Rufus begins creating the bootable USB drive as soon as you press the Start button. The creation procedure can take a few minutes depending on your USB drive.
  • 26. 8. Click the Close button. Once completed, you will not see a completion message instead it will display the READY message and the progress bar will turn fully green.
  • 27. HowdoesUSBBootwork? USB Boot works in the same way as a floppy disk did in the past to start a computer. It's usually used to rebuild an operating system from the ground up, or to repair, recover, or install it. You'll need to build a bootable USB drive first in order to do a USB boot. This can be done on your own PC or with the help of third-party software. Afterwards, the software will copy all of the operating system files and install them on the USB drive/pen drive, allowing for USB booting. You'll need a USB drive/pen drive with at least 8 GB of storage to make a bootable USB. USB BOOTABLE USING DISKPART/CM D
  • 28. Steps to Create a Bootable USB Using CMD Step 1: Run command- prompt in Administrator mode. There are two ways todo the same: a. Search for cmd in Start menu, right-click on the command prompt, click on Run as Administrator. b. Open Task Manager, go to File->Run new task, search for cmd and pressenter. Step 2: Connect the USB device to the computer that is to be made bootable.
  • 29. Step 3: Type the command ‘diskpart’ and then press Enter. Step 4: Type the command ‘list disk’ to display a list of all the available storage devices on your system. Press Enter to continue. Step 5: Select the disk that is your pen drive. Generally, it is marked as Disk 1, it might vary system to system. Make sure not to select any other available disk as it will get formatted. To choose the disk, type the command ‘select disk1’ and press Enter.
  • 30. Step 6: To make a pendrive bootable, there is a need to format it to clean the existing data. This can be done by the use of ‘clean’ command. Step 7: Type the command ‘create partition primary’ and press Enter. This will make the disk primary and ready to be made bootable..
  • 31. Step 8: To choose the partition created as primary, type the command ‘select partition 1’ and press Enter. Step 9: Before making the disk bootable, there is a need to format it as NTFS because Windows uses NTFS file system for storage. This can be done with the use of command ‘format=fs ntfs quick’ and press Enter.
  • 32. Step 10: Type the command ‘active’ and press Enter. This will mark the primary bootable partition as Active. Step 11: Type the command ‘exit’ to exit DISKPART and press Enter. Now close the command prompt window.
  • 33. Step 12: Copy all the data from the OS(Windows/Linux/etc.) installation disk to your USB drive that is just been made bootable. Now, this Pendrive can be used to install the desired Operating System on any computer.