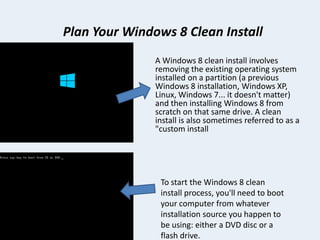
The document provides step-by-step instructions for completing a clean install of Windows 8. It begins by explaining what a clean install is and that it involves removing the existing operating system and installing Windows 8 from scratch. It then outlines each step of the clean install process, which includes booting from the installation media, selecting language/time settings, entering a product key, deleting existing partitions, installing Windows 8 on the unallocated space, completing post-installation configuration, and finishing the setup process. Screenshots are included throughout to illustrate each step.
2. Plan Your Windows 8 Clean Install
A Windows 8 clean install involves
removing the existing operating system
installed on a partition (a previous
Windows 8 installation, Windows XP,
Linux, Windows 7... it doesn't matter)
and then installing Windows 8 from
scratch on that same drive. A clean
install is also sometimes referred to as a
"custom install
To start the Windows 8 clean
install process, you'll need to boot
your computer from whatever
installation source you happen to
be using: either a DVD disc or a
flash drive.
3. Next
• Wait for the Windows 8 Installation
Files to Load
• You'll know that the Windows 8
setup process is starting properly if
you see the Windows 8 splash
screen as shown.
Choose the Language to install, the
Time and currency format, and the
Keyboard or input method.
4. next
Click or touch the Install now button
in the middle of the screen, right
under the Windows 8 logo.
The Windows 8 setup process is
now beginning.
5. next
Here is where you enter your
product key, the 25-digit code
you received when you
purchased Windows 8 You do
not need to enter the dashes
that are probably shown as
part of your product key.
The next screen you encounter
will be the Microsoft Software
License Agreement page, which
is essentially a giant text box
containing the license terms for
the edition of Windows 8 you're
installing.
6. next
• The next screen presents
you with an important
question: Which type of
installation do you want?.
You have two options:
Upgrade and Custom.
On the Where do you want to
install Windows? screen you'll
see a list of all the partitions
that Windows 8 sees on the
computer.
7. next
Now that you have access to
the full range of partition
management options, you can
delete any partitions from your
hard drive that are used by the
currently installed operating
system
After choosing to delete the
partition, Windows 8 Setup
will prompt you to confirm
that you really do want to
delete the partition.
8. next
If there are other partitions
that you need to delete, like
recovery partitions in use by
the previously installed
operating system,
Just like you did a few steps
back, Windows 8 Setup will
prompt you to confirm the
removal of this other
partition.
9. next
As you can now see, all the
space on my hard drive is
listed as Unallocated Space.
In other words, I have no
partitions setup and my
soon-to-begin installation
of Windows 8 will be
"clean" and "from scratch"
on this empty drive.
Windows 8 Setup will now begin
installing Windows 8 onto the
partition it created from the free
space you selected in the last
step. All you have to do here is
wait.
10. next
As the bulk of the Windows
8 installation process ends,
your computer will reboot
automatically.
Now that your computer has restarted,
Windows 8 can continue installing.
There's nothing to do here. Windows 8
Setup has a few important things it still
needs to do before it's done but none of
them require user intervention
11. next
As you're waiting for the Windows 8
clean install to finish up, you'll notice a
Getting devices ready indicator that
works its way up to 100% in several fits
and starts.
In the background, Windows 8 is
identifying all of the hardware that
makes up your computer and installing
the appropriate drivers for those
devices, if available.
After Windows 8 Setup finishes
installing hardware, you'll see a Getting
ready message at the bottom of the
screen.
During this short stage, Windows 8
Setup is finishing up the last few tasks,
like finalizing registry and other settings.
12. next
This screen only shows up for a
second, maybe less, so you may not
even see it, but as you can see in
the screenshot , Windows 8 setup
says Restarting your PC and then
promptly does just that. This is the
second, and final, restart required
during a Windows 8 clean install
Once again, you're waiting on
Windows 8 to start up. This should
only take a minute or two.
You're almost done waiting through
boring black screens, I promise!
13. next
you see is an introduction to a
wizard you're about to complete
that helps customize Windows 8 to
your preferences.
Four sections are shown, including
Personalize, Wireless, Settings, and
Sign in.
This screen only appears for a few
seconds before automatically
progressing to Personalize.
Two pretty simple options are
presented on the Personalize
screen: one for color you like
and another for PC name.
14. next
On the Settings screen, you
have the option of accepting
Microsoft's recommended
default settings for Windows 8,
which are detailed on screen,
or customizing them to your
preferences.
If you already have an email associated with
a major Microsoft service then you can use
that here. If you don't, that's OK, enter any
email address and Microsoft will create an
account for you based on that email address.
15. next
SkyDrive is Microsoft's online
storage service and is integrated
into Windows 8, making it easy to
keep your settings and saved files
like documents, photos, and music,
securely backed up and available
from other devices.
Touch or click Next to accept the
default SkyDrive settings.
Even though you may have
chosen to create, or use your
current, Microsoft account,
there is still a local account
created to help facilitate that.
16. next
Just wait during this short
phase.
Your Windows 8 clean
install is almost done... just
a few more steps.
Depending on the version of
Windows 8 you're installing, you
may sit through a long series of
screens, the first several of which
explain how to work with the
Windows 8 interface
17. Final step
This completes the
final step of your clean
install of Windows 8!
Thank you for your time,
Any questions you are
more than welcome to
ask.