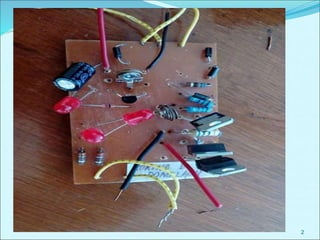
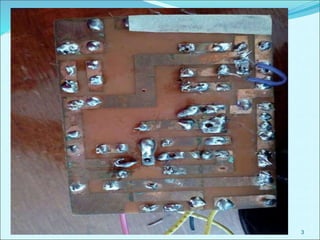
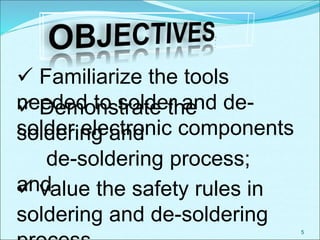
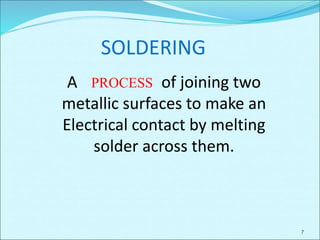
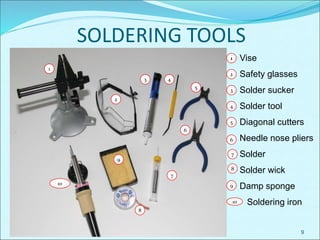
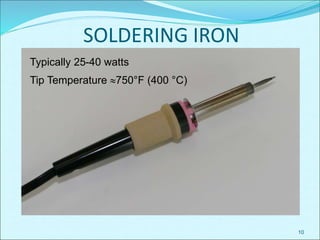
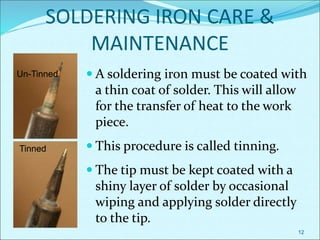
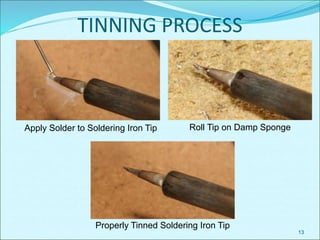
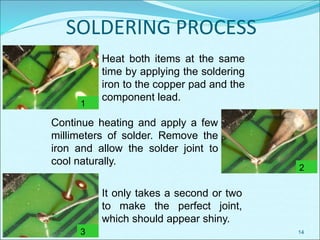
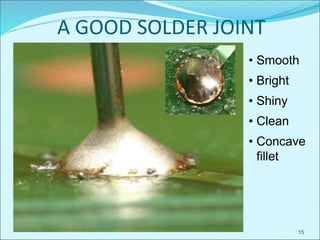
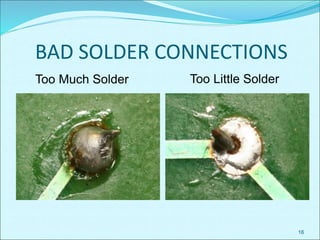
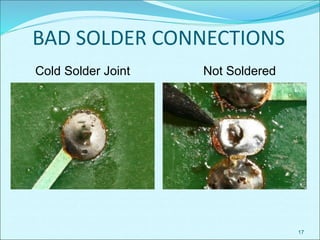
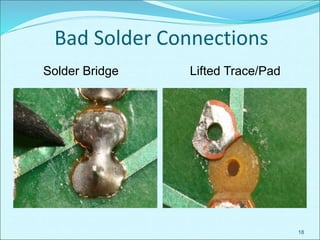
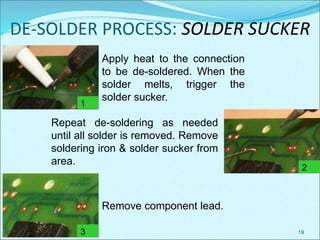
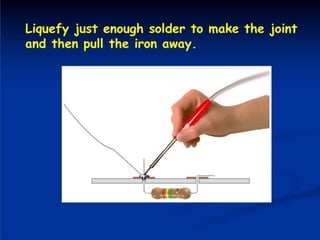
1
2
3
4
SOLDERING
AND
DESOLDERING
PROCESS
5
 Familiarize the tools
needed to solder and de-
solder electronic components
 Demonstrate the
soldering and
de-soldering process;
and
 value the safety rules in
soldering and de-soldering
6
This presentation will…
• Review the tools needed to solder and de-solder
electronic components.
• Demonstrate how to tin a soldering iron tip.
• Demonstrate the soldering process.
• Show the characteristics of a good solder
connection.
• Review classic soldering mistakes.
• Demonstrate the de-soldering process.
Soldering & De-soldering
7
SOLDERING
A of joining two
metallic surfaces to make an
Electrical contact by melting
solder across them.
PROCESS
8
MYSTERY BOX
SOLDERING TOOLS
9
Vise
Safety glasses
Solder sucker
Solder tool
Diagonal cutters
Needle nose pliers
Solder
Solder wick
Damp sponge
Soldering iron
1
2
3 4
5
6
7
9
8
10
1
2
3
4
5
6
7
8
9
10
SOLDERING IRON
10
Typically 25-40 watts
Tip Temperature 750°F (400 °C)
SOLDER
 Solder is an alloy of tin and lead.
 The solder used for electronics is frequently called
60/40 solder because it is made of 63% tin and
37% lead.
 60/40 solder melts at 361 F.
11
12
SOLDERING IRON CARE &
MAINTENANCE
Un-Tinned
Tinned
 A soldering iron must be coated with
a thin coat of solder. This will allow
for the transfer of heat to the work
piece.
 This procedure is called tinning.
 The tip must be kept coated with a
shiny layer of solder by occasional
wiping and applying solder directly
to the tip.
13
TINNING PROCESS
Apply Solder to Soldering Iron Tip Roll Tip on Damp Sponge
Properly Tinned Soldering Iron Tip
SOLDERING PROCESS
14
1
Heat both items at the same
time by applying the soldering
iron to the copper pad and the
component lead.
2
Continue heating and apply a few
millimeters of solder. Remove the
iron and allow the solder joint to
cool naturally.
3
It only takes a second or two
to make the perfect joint,
which should appear shiny.
A GOOD SOLDER JOINT
15
• Smooth
• Bright
• Shiny
• Clean
• Concave
fillet
BAD SOLDER CONNECTIONS
16
Too Much Solder Too Little Solder
BAD SOLDER CONNECTIONS
17
Cold Solder Joint Not Soldered
Bad Solder Connections
18
Solder Bridge Lifted Trace/Pad
DE-SOLDER PROCESS: SOLDER SUCKER
19
Apply heat to the connection
to be de-soldered. When the
solder melts, trigger the
solder sucker.
Repeat de-soldering as needed
until all solder is removed. Remove
soldering iron & solder sucker from
area.
Remove component lead.
1
2
3
DE-SOLDER PROCESS: SOLDER WICK
20
Solder wick is finely braided
copper that is used to wick
away excess solder from a
de-soldered connection.
Apply the solder wick and soldering
iron to the de-soldered connection.
The solder wick will draw the excess
solder off of the PCB pad.
De-soldered PCB pad
1
2
3
SOLDERING SAFETY
 Wear safety glasses when soldering. This includes all
individuals in the vicinity of someone who is soldering.
 Place soldering iron in an approved holder when not in
use. The iron is hot and can cause burns.
 Place the soldering iron so that the cord does not get
caught up in your arms or on others.
 Ensure access to proper ventilation.
 Verify that the type of solder is safe to use in your working
environment.
 Secure the components to be soldered before beginning
the soldering process.
21
SOLDERING SAFETY
 Provide plenty of space to work.
 Use a properly-sized point for the soldering job to be
completed.
 Verify that the tip on the soldering iron has a sharp point
and has not been damaged in any way.
 Check the power cord for burned or melted sections that
show bare wires. Label those cords DO NOT USE and ask
the instructor to repair or replace.
 Do not to touch molten solder - it is hot!
 Make sure that the solder strand is long enough to keep
fingers away from the hot iron.
22
SOLDERING SAFETY
 Tie back long hair and remove or tuck loose clothing.
 Use heat sinks for heat-sensitive parts. Provide sufficient
cooling time before removing parts.
 Do not flick solder off of the iron. Flicking can cause
solder to spray and hit skin or eyes.
 Cut leads evenly with wire cutters.
 Make sure that leads do not short across other traces or
leads.
 Thoroughly wash your hands after handling solder.
23
SOLDERING SAFETY
 Tie back long hair and remove or tuck loose clothing.
 Use heat sinks for heat-sensitive parts. Provide sufficient
cooling time before removing parts.
 Do not flick solder off of the iron. Flicking can cause
solder to spray and hit skin or eyes.
 Cut leads evenly with wire cutters.
 Make sure that leads do not short across other traces or
leads.
 Thoroughly wash your hands after handling solder.
24
Thank You!
25

SolderingDesolderingProcessGrade11n12Mar1772022.ppt

  • 1.
  • 2.
  • 3.
  • 4.
  • 5.
    5  Familiarize thetools needed to solder and de- solder electronic components  Demonstrate the soldering and de-soldering process; and  value the safety rules in soldering and de-soldering
  • 6.
    6 This presentation will… •Review the tools needed to solder and de-solder electronic components. • Demonstrate how to tin a soldering iron tip. • Demonstrate the soldering process. • Show the characteristics of a good solder connection. • Review classic soldering mistakes. • Demonstrate the de-soldering process. Soldering & De-soldering
  • 7.
    7 SOLDERING A of joiningtwo metallic surfaces to make an Electrical contact by melting solder across them. PROCESS
  • 8.
  • 9.
    SOLDERING TOOLS 9 Vise Safety glasses Soldersucker Solder tool Diagonal cutters Needle nose pliers Solder Solder wick Damp sponge Soldering iron 1 2 3 4 5 6 7 9 8 10 1 2 3 4 5 6 7 8 9 10
  • 10.
    SOLDERING IRON 10 Typically 25-40watts Tip Temperature 750°F (400 °C)
  • 11.
    SOLDER  Solder isan alloy of tin and lead.  The solder used for electronics is frequently called 60/40 solder because it is made of 63% tin and 37% lead.  60/40 solder melts at 361 F. 11
  • 12.
    12 SOLDERING IRON CARE& MAINTENANCE Un-Tinned Tinned  A soldering iron must be coated with a thin coat of solder. This will allow for the transfer of heat to the work piece.  This procedure is called tinning.  The tip must be kept coated with a shiny layer of solder by occasional wiping and applying solder directly to the tip.
  • 13.
    13 TINNING PROCESS Apply Solderto Soldering Iron Tip Roll Tip on Damp Sponge Properly Tinned Soldering Iron Tip
  • 14.
    SOLDERING PROCESS 14 1 Heat bothitems at the same time by applying the soldering iron to the copper pad and the component lead. 2 Continue heating and apply a few millimeters of solder. Remove the iron and allow the solder joint to cool naturally. 3 It only takes a second or two to make the perfect joint, which should appear shiny.
  • 15.
    A GOOD SOLDERJOINT 15 • Smooth • Bright • Shiny • Clean • Concave fillet
  • 16.
    BAD SOLDER CONNECTIONS 16 TooMuch Solder Too Little Solder
  • 17.
    BAD SOLDER CONNECTIONS 17 ColdSolder Joint Not Soldered
  • 18.
    Bad Solder Connections 18 SolderBridge Lifted Trace/Pad
  • 19.
    DE-SOLDER PROCESS: SOLDERSUCKER 19 Apply heat to the connection to be de-soldered. When the solder melts, trigger the solder sucker. Repeat de-soldering as needed until all solder is removed. Remove soldering iron & solder sucker from area. Remove component lead. 1 2 3
  • 20.
    DE-SOLDER PROCESS: SOLDERWICK 20 Solder wick is finely braided copper that is used to wick away excess solder from a de-soldered connection. Apply the solder wick and soldering iron to the de-soldered connection. The solder wick will draw the excess solder off of the PCB pad. De-soldered PCB pad 1 2 3
  • 21.
    SOLDERING SAFETY  Wearsafety glasses when soldering. This includes all individuals in the vicinity of someone who is soldering.  Place soldering iron in an approved holder when not in use. The iron is hot and can cause burns.  Place the soldering iron so that the cord does not get caught up in your arms or on others.  Ensure access to proper ventilation.  Verify that the type of solder is safe to use in your working environment.  Secure the components to be soldered before beginning the soldering process. 21
  • 22.
    SOLDERING SAFETY  Provideplenty of space to work.  Use a properly-sized point for the soldering job to be completed.  Verify that the tip on the soldering iron has a sharp point and has not been damaged in any way.  Check the power cord for burned or melted sections that show bare wires. Label those cords DO NOT USE and ask the instructor to repair or replace.  Do not to touch molten solder - it is hot!  Make sure that the solder strand is long enough to keep fingers away from the hot iron. 22
  • 23.
    SOLDERING SAFETY  Tieback long hair and remove or tuck loose clothing.  Use heat sinks for heat-sensitive parts. Provide sufficient cooling time before removing parts.  Do not flick solder off of the iron. Flicking can cause solder to spray and hit skin or eyes.  Cut leads evenly with wire cutters.  Make sure that leads do not short across other traces or leads.  Thoroughly wash your hands after handling solder. 23
  • 24.
    SOLDERING SAFETY  Tieback long hair and remove or tuck loose clothing.  Use heat sinks for heat-sensitive parts. Provide sufficient cooling time before removing parts.  Do not flick solder off of the iron. Flicking can cause solder to spray and hit skin or eyes.  Cut leads evenly with wire cutters.  Make sure that leads do not short across other traces or leads.  Thoroughly wash your hands after handling solder. 24
  • 25.

Editor's Notes

  • #10 These tools are required to properly solder a printed circuit board (PCB).
  • #11 Stress the importance of safety to students, as 250-280 degrees will burn the skin INSTANTLY.
  • #15 Review the steps in the soldering process.
  • #16 Characteristics of a good soldering joint.
  • #20 Review the steps in the de-soldering process using a solder sucker.
  • #21 Review the steps in the de-soldering process using solder wick.
  • #22 The next few slides address safety rules related to soldering. Be sure to cover any additional safety rules that are specific to your classroom/laboratory or school.