SlideShare a Scribd company logo
1 of 171
Download to read offline
Welcome to Snagit
Snagit helps you create and share high-quality screen captures for your presentations, documents and blogs.
Snagit’s streamlined workflow combined with Editor’s Open Captures Tray allows you to continuously capture then
save, edit, and share at a later time.
In Snagit…
Save often used capture settings as Profiles.
Apply edge effects, filters, and other effects during capture.
In Editor…
Add stamps, arrows, callouts, edge effects, and more.
Assign keywords and flags to captures and other media files.
Use the powerful search capabilities to find captures according to keywords, flags, or other information
automatically gathered during capture.
Email, copy and paste, and print your screen captures, or upload them to your website.
Snagit Interface Overview
A Profile includes an Input, Output, and Effects combination. The Capture Profile Properties display as
a tooltip when the mouse hovers over the profile icon.
Use the Profile Toolbar to create and edit profiles.
New Profile saves the current Profile Settings as a new capture profile.
Use New Profile Wizard to create a new profile by walking you through all profile settings.
Save Profile overwrites a selected profile with the current Profile Settings.
List View displays the profiles in a list.
Thumbnail View displays the profiles as icons.
Organize Profiles displays the Organize Profiles dialog box.
Find informational tips throughout Snagit and Snagit Editor as you hover over icons, buttons, etc.
Click the Capture button to initiate the capture. You can also use the default global hotkey, <PRINT
SCREEN>. See also Hotkeys.
A Capture Mode is the type of capture you want to take. To change the mode, click on the blue button
next to the Capture button. There are five different capture modes: Image Capture, Text Capture, Video
Capture, Web Capture, Printer Capture.
Options define how the capture looks or if you preview your capture in Editor before sending it to Output.
For example, options include: capture the mouse cursor, set a timer or delayed capture, capture multiple
areas, etc.
Use the Profile Settings to select the capture Mode and Input, Output, and Effects. Profile Settings
update when you select different profiles in the Profiles pane.
Related Tasks provides easy access to: Convert images, Turn on OneClick, Setup Snagit printer,
Organize profiles, and Manage Accessories.
Quick Launch gives access to Snagit Editor and Editor’s Library view.
Snagit Hotkeys
Hotkeys provide keyboard shortcuts for common tasks. To customize the hotkeys, select Snagit > Tools > Program
Preferences > Hotkeys or right-click on a profile and select Set Hotkey.
To Do This Press
Global capture
Initiate a capture with the currently selected profile.
<Print Screen>
Hide/Unhide Snagit <CTRL + SHIFT + X>
Repeat Last Capture <CTRL + SHIFT + R>
Image Capture
Capture an image of anything your screen. Use the following basic capture procedure to take your first capture.
1. Open what you want to capture.
2. Without minimizing what you want to capture, open Snagit.
3. Select a capture profile from the Basic Capture Profiles.
4. Click Capture.
Snagit disappears and a box with an explanation of how to complete the capture appears. Follow the instructions to
complete the capture.
When complete, the capture appears in Editor. In Editor:
Use the Draw tab to annotate the capture.
Use the Image tab to add special Effects.
To share the capture, click an Output on the Send tab.
In Editor, the capture remains in the Open Captures Tray and in Recent captures.
Snagit provides flexibility and versatility in what you want to capture.
For more information see:
Entire Screen
Window
Region
Fixed Region
Object
Menu
Scrolling Image Capture
Scrolling Text Capture
Capture the Entire Screen
If you have multiple monitors, Screen captures both monitors. To only capture one monitor, use Capture a
Region.
Setup Instructions
1. In Snagit, select Image capture mode.
2. For the Input, select Screen.
3. Select the Output and Effects.
4. Click the Capture button or press the global capture hotkey. The capture is sent to the selected Output.
5. For additional capture options, see Image Capture.
Capture a Window
Capture a window or an element on the window such as the window frame, scroll bar, open menu, window control
button, toolbar, and title.
Setup Instructions
1. In Snagit, select Image capture mode.
2. For the Input, select Window.
3. Select the Output and Effects.
4. Click the Capture button or press the capture hotkey.
5. A red rectangle appears. Move the rectangle to choose a window. Click to complete the capture. The capture is
sent to the selected Output.
6. For additional capture options, see Image Capture.
Capture a Region
Setup Instructions
1. In Snagit, select Image capture mode.
2. For the Input, select Region
3. Select the Output and Effects.
4. Click the Capture button or press the capture hotkey.
5. Drag the cursor to create a red border around the area to capture.
Use the magnifier window to help see the edges of the region.
6. Release the mouse to complete the capture. The capture is sent to the selected Output.
For additional capture options, see Image Capture.
Capture a Fixed Region
Capture a preset rectangular area you specify.
1. In Snagit, select Image capture mode.
2. For the Input, select Fixed Region.
3. In the Fixed Region tab, enter the width and height. Click OK.
4. Select the Output and Effects.
5. Click the Capture button or press the capture hotkey.
6. A red rectangle appears. Move the rectangle to choose a window. Click to complete the capture. The capture is
sent to the selected Output.
For additional capture options, see Image Capture.
Capture an Object
Capture a small item on your computer screen such as a toolbar button, icon, etc.
Setup Instructions
1. In Snagit, select Image capture mode.
2. For the Input, select Object.
3. Select the Output and Effects.
4. Click the Capture button or press the capture hotkey.
5. A red rectangle appears. Move the rectangle to choose an object. Click to complete the capture. The capture is
sent to the selected Output.
For additional capture options, see Image Capture.
Capture a Menu
Capture a drop-down or cascading menu.
Setup Instructions
1. In Snagit, select Image capture mode.
2. For the Input, select Object.
3. Select Snagit > Options > Timed Capture button. The Timer Setup dialog box appears.
4. In the Delay / Schedule tab, select the Enable delayed / scheduled capture option.
5. Click OK.
6. Select the Output and Effects.
7. Click the Capture button or press the capture hotkey.
8. Open the menu to capture. Don’t move the mouse or the open menu until the capture is taken.
9. Click the mouse to complete the capture. The capture is sent to the selected Output.
10. For additional capture options, see Image Capture.
Scrolling Image Capture
Setup Instructions
1. In Snagit, select Image capture mode.
2. For the Input, select Scrolling > Auto Scroll Window.
3. Select Input > Properties > Scrolling tab> Scroll from top of document and Scroll direction: Vertical.
4. Select the Output and Effects.
5. Click the browser window to give it focus.
6. Click the Capture button or press the capture hotkey.
7. A red rectangle appears. Move the rectangle to choose a browser window. Click the mouse. Snagit pauses
momentarily to configure the capture.
8. The capture area begins to scroll automatically, continuing until the lower edge of the scrolling window is
reached. The capture is sent to the selected Output.
For many other scrolling image capture instructions, see Take Scrolling, Large, or Oversized Image Captures.
For additional capture options, see Image Capture.
Scrolling Text Capture
Setup Instructions
1. In Snagit, select Text capture mode.
2. For the Input, select Scrolling > Auto Scroll Window.
3. Select Input down arrow > Properties > Scrolling tab> Scroll from top of document.
4. Select the Output and Effects.
5. Click the browser window to capture to give it focus.
6. Click the Capture button or press the capture hotkey.
7. A red rectangle appears. Move the rectangle to choose a browser window. Click the mouse. Snagit pauses
momentarily to configure the capture.
8. The capture area begins to scroll automatically, continuing until the lower edge of the scrolling window is
reached. The capture is sent to the selected Output.
For additional capture options, see Image Capture.
Capture a Shape
Take a capture using different shapes to define the capture area.
Setup Instructions
1. In Snagit, select Image capture mode.
2. For the Input, select Shape > then the desired shape.
3. Click the Capture button or press the capture hotkey.
4. Drag the cursor over the area to capture. A red border defines the area to capture as you drag.
5. Use the tips below to correctly define the shape and close the capture.
Free Hand Capture a closed loop. The loop automatically closes when you release the mouse.
When mouse is released, the capture is taken.
Ellipse Hold <SHIFT> during the capture to create a perfect circle.
When mouse is released, the capture is taken.
Rounded
Rectangle
Hold <SHIFT> during the capture to create a perfect square.
When mouse is released, the capture is taken.
Triangle The height and width are determined by the mouse movement.
Hold <SHIFT> during the capture to create a perfect equilateral triangle.
When mouse is released, the capture is taken.
Polygon The area must be a closed shape with straight lines.
Each time you click, a new line starts.
Double-click to close the shape.
When mouse is released, the capture is taken.
For additional capture options, see Image Capture.
Capture Clipboard Contents
Capture the graphic or text contents from the Windows Clipboard.
Setup Instructions
1. In Snagit, select Image or Text capture mode.
2. For the Input, select Advanced > Clipboard.
3. Select the Output and Effects.
4. Click the Capture button or press the capture hotkey.
5. A red rectangle appears. Move the rectangle to choose a region. Click to complete the capture. Click the mouse to
complete the capture. The capture is sent to the selected Output.
If you have text on the clipboard, and you select the image capture mode, Snagit makes an image Output file
even if the captured item is text. If you select the text capture mode, Snagit makes an ASCII text file from the text
Input.
For additional capture options, see Image Capture.
Create a Capture Clipboard Chain
Enable Snagit to capture every time you copy something to the Windows Clipboard.
Setup Instructions
1. In Snagit, select Image capture mode.
2. For the Input, select Advanced > Clipboard.
3. Select Input, select Advanced > Clipboard Chain.
4. Select the Output and Effects.
5. Click the Capture button or press the capture hotkey. A confirmation dialog box appears.
6. The clipboard contents are automatically captured each time you copy something to the Clipboard.
To disable Clipboard Chain capturing, in Snagit, select Input, select Advanced > Clipboard Chain.
If you have text on the clipboard, and you select the image capture mode, Snagit makes an image Output file
even if the captured item is text.
7. Click the Capture button or press the capture hotkey.
For additional capture options, see Image Capture.
Capture from Program File
Capture bitmap images, icons, or cursors contained in an .EXE or .DLL file.
Setup Instructions
1. In Snagit, select Image capture mode.
2. For the Input, select Advanced > Program File.
3. Select the Output and Effects.
4. Click the Capture button or press the capture hotkey.
5. The Open dialog box appears. Browse and select a file with an .EXE or.DLL extension. Click Open.
6. Select an image in the Images area.
Click the Browse button to search for an image.
If the image is larger than the preview pane, click on the image within the pane and drag into view.
7. Click OK. The capture is sent to the selected Output.
For additional capture options, see Image Capture.
Capture in Full-screen DOS
Capture the contents of a full screen MS-DOS session window. Snagit automatically inverts the colors of the capture.
You must press the <Print Screen> key to capture the DOS application.
Setup Instructions
1. In Snagit, select Image capture mode.
2. For the Input, select Advanced > Full-screen DOS. This automates two Snagit parameters:
The Clipboard Chain option is turned to “on” allowing Snagit to capture with the capture hotkey.
The Input is set to Clipboard.
3. Select the Output and Effects.
4. Open MS-DOS to the screen to capture. Click <ALT + ENTER> to change between windowed MS-DOS mode
and full-screen MS-DOS.
5. Press the <Print Screen> key. The capture is sent to the selected Output.
6. For additional capture options, see Image Capture.
Capture Off-Screen or Window Larger than Screen
Select a partially-shown window and capture the full window or capture windows larger than the screen including the
window frame.
Available on Windows XP and Vista only.
Setup Instructions
1. In Snagit, select Image capture mode.
2. For the Input, select Advanced > Extended Window.
3. Select the Output and Effects.
4. Click the Capture button or press the capture hotkey.
5. A red rectangle appears. Move the rectangle to choose a window. Click to complete the capture.
6. The Extended Window Capture Preview dialog box opens. Use to adjust the size of the window if necessary.
7. Click OK. The capture is sent to the selected Output.
For additional capture options, see Image Capture.
Capture the Desktop Wallpaper
Setup Instructions
1. In Snagit, select Image capture mode.
2. For the Input, select Advanced > Wallpaper.
3. Select the Output and Effects.
4. Click the Capture button or press the capture hotkey. The capture is sent to the selected Output.
For additional capture options, see Image Capture.
Capture from a Scanner or Camera
Capture images from a connected TWAIN-compliant device such as an optical scanner or digital camera
A TWAIN-compliant optical scanner or digital camera must be connected and configured in your computer before
selecting this Input.
Setup Instructions
1. In Snagit, select Image capture mode.
2. For the Input, select Advanced > Scanners and Cameras.
3. If you have more than one TWAIN-compliant device connected to your computer, select Input down arrow >
Properties > Scanners and Cameras tab. Select the correct device. Click OK.
4. Select the Output and Effects.
5. Click the Capture button or press the capture hotkey.
6. The TWAIN driver for the selected device displays a user interface to select the image(s) to acquire. Please see
your device documentation for the use of this interface.
For additional capture options, see Image Capture.
Capture Multiple Areas of the Screen
Select multiple areas of the screen to capture.
Setup Instructions
1. In Snagit, select Image capture mode.
2. For the Input, select Window, Region, Fixed Region, or Object.
3. Select Input down arrow > Properties > General tab to select the background color of the completed capture.
White is the default color. Click OK.
4. Select the Output and Effects.
5. Click the Multiple Area Capture button in the Options area.
6. Click the Capture button or press the capture hotkey.
7. As you select areas, colors invert to show the selection. Select multiple areas.
To unselect an area, hold <ALT> and left-click.
8. To finish capturing, right-click and select Finish from the popup menu. The image captured shows only those
areas you selected in their original locations.
Selection Directions
Window Input: Use the cursor to select more than one window on your screen.
Region Input: Click and drag the cursor to select more than one region on your screen.
Fixed Region Input: Use the cursor to select more than one fixed-size region on your screen. Set the fixed region
size with Input > Properties > Fixed Region. Uncheck the Use fixed starting point box.
Object Input: Use the cursor to select more than one object on your screen.
For additional capture options see Image Capture.
Include the Cursor in an Image Capture
Use the Include Cursor option to capture the mouse pointer in an image capture.
To include the cursor, click the Include Cursor button. The image above shows the Include Cursor option selected.
To turn off, click the Include Cursor button again.
Use the capture timer option or position the cursor and use the hotkey combination to take your capture to make
sure the cursor is in the correct position.
Preview a Capture in Snagit Editor
Use the Preview in Editor option to open a capture in Snagit Editor before sending it to the desired Output.
In Snagit Editor make edits, add annotations, apply keywords and flags, or discard the capture.
To view your capture in Snagit Editor, click the Preview in Editor button. The image above shows the Preview in
Editor option selected. To turn off, click the Preview in Editor button again.
Scrolling, Large, or Oversized Image Captures (Auto Scroll)
Snagit’s Auto Scroll feature captures images too long or wide to see in a window or browser. Different Auto Scroll
options help you get exactly the capture you need.
Auto Scroll Tip for Success: Look for the Cursor Icon
When taking an auto scroll capture, look at the cursor that appears when you click the Capture button and you move
around the screen.
Areas that Snagit determines are not scrollable using the current Auto Scroll settings display the following cursor:
(Not Scrollable with Current Settings)
Try a different Auto Scroll option such as Custom Scroll.
Cursor Auto Scroll Capture Type Instructions
Auto Scroll Window Both Vertically
and Horizontally
Click the left mouse button to begin the capture.
Auto Scroll Window Vertically Click the left mouse button to begin the capture.
Auto Scroll Window Horizontally Click the left mouse button to begin the capture.
Custom Scroll a Region Drag a region with the cursor then click on the down arrow
control with the left mouse button to begin the capture.
For specific examples of scrolling captures, see:
Web Page Longer than Browser Window
Web Page Longer and Wider than Browser Window
Vertical Region of Web Page with Active Links
Region of Web Page Not Visible In Browser Window
Secondary Web Page Window Longer and Wider than Browser Window
Region of Web Page Longer than Browser Window
Web Page Wider than the Browser Window
Spreadsheet Longer than the Application Window
Application Window Containing List of File Names or Other Data
Multiple Page PDF Document
Scrolling Pane within an Application Window
Music or Video Playlist within an Application Window
Web Page Longer than Browser Window
Setup Instructions
1. In Snagit, select Image capture mode.
2. For the Input, select Scrolling option > Auto Scroll Window.
3. Select Input down arrow > Properties > Scrolling tab> Scroll from top of document and Scroll direction: Vertical.
Click OK.
4. Select the Output and Effects.
5. Click the browser window to give it focus.
6. Click the Capture button or press the capture hotkey.
7. A red rectangle appears. Move the rectangle to choose a browser window. Click to complete the capture. Snagit
pauses momentarily to configure the capture.
8. The capture area begins to scroll automatically, continuing until the lower edge of the scrolling window is reached.
The capture is sent to the selected Output.
For additional capture options, see Take Scrolling, Large, or Oversized Image Captures.
Web Page Longer and Wider than Browser Window
Setup Instructions
1. In Snagit, select Image capture mode.
2. For the Input, select Scrolling option > Auto Scroll Window.
3. Select Input down arrow > Properties > Scrolling tab> Scroll from top of document and Scroll direction: Both.
Click OK.
4. Select the Output and Effects.
5. Click the browser window to give it focus.
6. Click the Capture button or press the capture hotkey.
7. A red rectangle appears. Move the rectangle to choose a browser window. Click to complete the capture. Snagit
pauses momentarily to configure the capture.
8. The capture area begins to scroll automatically, continuing until the lower edge of the scrolling window is reached.
9. Once the bottom is reached, Snagit returns to the top of the window, moves over, and finishes scrolling. The
capture is sent to the selected Output.
For additional capture options, see Take Scrolling, Large, or Oversized Image Captures.
Vertical Region of Web Page with Active Links
Setup Instructions
1. In Snagit, select Image capture mode.
2. For the Input, select Scrolling option > Custom Scroll.
3. Select the Input down arrow > Keep Links.
4. Select the Output and Effects.
5. Click the browser window to give it focus.
6. Click the Capture button or press the capture hotkey.
7. Drag the cursor over the area to capture. A red rectangle appears.
8. Click the down arrow on the window’s vertical scrollbar.
9. Snagit pauses momentarily to configure the capture. The capture area begins to scroll automatically, continuing
until the lower edge of the scrolling window is reached. The capture is sent to the selected Output.
For additional capture options, see Take Scrolling, Large, or Oversized Image Captures.
Region of Web Page Not Visible In Browser Window
Setup Instructions
1. In Snagit, select Image capture mode.
2. For the Input, select Scrolling option > Auto Scroll Window.
3. Select the Input down arrow > Properties > Scrolling tab > Uncheck Scroll from top of document and select
Scroll direction: Vertical. Click OK.
4. Select the Output and Effects.
5. Click the browser window to give it focus. Scroll down to the area to capture.
6. Click the Capture button or press the capture hotkey.
7. A red rectangle appears. Move the rectangle to choose a browser window. Click to complete the capture. Snagit
pauses momentarily to configure the capture.
8. The capture area begins to scroll automatically. Left-click the browser window to end the capture at the desired
location. The capture is sent to the selected Output.
For additional capture options, see Take Scrolling, Large, or Oversized Image Captures.
Secondary Web Page Window Longer and Wider than Browser
Window
Capture a scrolling window nested within a browser window.
Setup Instructions
1. In Snagit, select Image capture mode.
2. For the Input, select Scrolling option > Auto Scroll Window.
3. Select the Input down arrow > Properties > Scrolling tab > Scroll from top of document and Scroll direction:
Both. Click OK.
4. Select the Output and Effects.
5. Click the browser window to capture to give it focus. Scroll down to the area to capture.
6. Click the Capture button or press the capture hotkey.
7. A red rectangle appears. Move the rectangle to choose a browser window. Click to complete the capture. Snagit
pauses momentarily to configure the capture.
8. The capture area begins to scroll automatically continuing until the lower edge of the scrolling window is reached.
9. Once the bottom is reached, Snagit returns to the top of the window, moves over, and finishes scrolling. The
capture is sent to the selected Output.
For additional capture options, see Take Scrolling, Large, or Oversized Image Captures.
Region of Web Page Longer than Browser Window
Setup Instructions
1. In Snagit, select Image capture mode.
2. For the Input, select Scrolling option > Custom Scroll.
3. Select the Output and Effects.
4. Click the browser window to capture to give it focus. Scroll down to the area to capture. Click the Capture button
or press the capture hotkey.
5. Drag the cursor over the area to capture. A red rectangle appears.
6. Click the down arrow on the window’s vertical scrollbar.
7. Snagit pauses momentarily to configure the capture. The capture area begins to scroll automatically continuing
until the lower edge of the scrolling window is reached. The capture is sent to the selected Output.
For additional capture options, see Take Scrolling, Large, or Oversized Image Captures.
Web Page Wider than the Browser Window
Setup Instructions
1. In Snagit, select Image capture mode.
2. For the Input, select Scrolling option > Auto Scroll Window.
3. Select the Input down arrow > Properties > Scrolling tab > Scroll from top of document and Scroll direction:
Horizontal. Click OK.
4. Select the Output and Effects.
5. Click the browser window give it focus.
6. Click the Capture button or press the capture hotkey.
7. A red rectangle appears. Move the rectangle to choose a browser window. Click to complete the capture. Snagit
pauses momentarily to configure the capture.
8. The capture area begins to scroll automatically continuing until the horizontal edge of the scrolling window is
reached. The capture is sent to the selected Output.
For additional capture options, see Take Scrolling, Large, or Oversized Image Captures.
Spreadsheet Longer than the Application Window
Setup Instructions
1. In Snagit, select Image capture mode.
2. For the Input, select Scrolling option > Scrolling Region.
3. Select the Output and Effects.
4. Click the spreadsheet window to capture. Scroll to the area to capture.
5. Click the Capture button or press the capture hotkey.
6. Drag the cursor over the area to capture. A red rectangle appears. Continue to drag the cursor down over the
area to capture.
7. Release the mouse to complete the capture. The capture is sent to the selected Output.
For additional capture options, see Take Scrolling, Large, or Oversized Image Captures.
Application Window Containing List of File Names or Other Data
Setup Instructions
1. In Snagit, select Image capture mode.
2. For the Input, select Scrolling option > Custom Scroll.
3. Select the Output and Effects.
4. Click the application window to capture. Scroll to the area to capture.
5. Click the Capture button or press the capture hotkey.
6. Drag the cursor over the area to capture. A red rectangle appears.
7. Click the down arrow on the window’s vertical scrollbar.
8. Snagit pauses momentarily to configure the capture. The capture area begins to scroll automatically, continuing
until the lower edge of the scrolling window is reached. The capture is sent to the selected Output.
For additional capture options, see Take Scrolling, Large, or Oversized Image Captures.
Multiple Page PDF Document
Setup Instructions
1. In Snagit, select Image capture mode.
2. For the Input, select Scrolling option > Auto Scroll Window.
3. Select the Input down arrow > Properties > Scrolling tab > Scroll from top of document and Scroll direction:
Vertical. Click OK.
4. Select the Output and Effects.
5. Click the document to capture.
6. Click the Capture button or press the capture hotkey.
7. A red rectangle appears. Move the rectangle to choose a browser window. Click to complete the capture. Snagit
pauses momentarily to configure the capture.
8. The capture area begins to scroll automatically continuing until the horizontal edge of the scrolling window is
reached. The capture is sent to the selected Output.
For additional capture options, see Take Scrolling, Large, or Oversized Image Captures.
Scrolling Pane within an Application Window
Setup Instructions
1. In Snagit, select Image capture mode.
2. For the Input, select Scrolling option > Auto Scroll Window.
3. Select the Input down arrow > Properties > Scrolling tab > Scroll from top of document and Scroll direction:
Vertical. Click OK.
4. Select the Output and Effects.
5. Click the application window to capture.
6. Click the Capture button or press the capture hotkey.
7. A red rectangle appears. Move the rectangle to choose a browser window. Click to complete the capture. Snagit
pauses momentarily to configure the capture.
8. The capture area begins to scroll automatically continuing until the lower edge of the scrolling window is reached.
The capture is sent to the selected Output.
For additional capture options, see Take Scrolling, Large, or Oversized Image Captures.
Music or Video Playlist within an Application Window
Setup Instructions
1. In Snagit, select Image capture mode.
2. For the Input, select Scrolling option > Auto Scroll Window.
3. Select the Input down arrow > Properties > Scrolling tab > Scroll from top of document and Scroll direction:
Vertical. Click OK.
4. Select the Output and Effects.
5. Click the application window to capture.
6. Click the Capture button or press the capture hotkey.
7. A red rectangle appears. Move the rectangle to choose a window. Click to complete the capture. Snagit pauses
momentarily to configure the capture.
8. The capture area begins to scroll automatically continuing until the lower edge of the scrolling window is reached.
The capture is sent to the selected Output.
For additional capture options, see Take Scrolling, Large, or Oversized Image Captures.
Take a Timed, Delayed, or Scheduled Image Capture
Use the Snagit Capture Timer option to perform unattended captures at intervals that you define. Examples
include following stock market tickers, monitoring factory floor equipment, and monitoring remote computer
operations.
Use the Capture Timer option with the Web Output (FTP) to automatically update a Web site with screen
captures, or to automatically send email with the screen capture as an attachment.
Use the Delayed/Scheduled Capture option to set up a delayed capture (after a number of seconds) or a
scheduled capture (at a certain time or date).
Use both options together to begin interval capture at some user-defined future date/time.
Snagit is not accessible in the meantime and cannot be used for additional screen captures when a
delayed/scheduled capture is set.
The Timed Capture option appears in the Options portion of the Profile Settings pane.
For more information see:
Set Up a Time Delayed Capture
Set Up a Time Scheduled Capture
Set Up Capture Timer for Intermittent Capturing
Set Up a Time Delayed Capture
1. In Snagit, select Image capture mode.
2. Select the Input, Output and Effects.
3. Select the Timed Capture option in the Options portion of the Profile Settings pane. The Timer Setup dialog box
appears.
4. Select the Delay/Schedule tab > Enable Delayed/Scheduled capture option.
5. Select the Delayed Capture radio button. The Delay and Display a countdown items are now available.
6. Type a Delay of between 1 and 60 seconds, or use the arrows to select the number of seconds of delay.
7. Check the Display a countdown box to see a countdown in the lower right corner of the screen prior to capture.
8. Click OK.
9. Click the Capture button or press the capture hotkey. The capture is sent to the selected Output.
To stop a delayed capture you have started, select the Stop button on the Snagit toolbar or push the hotkeys.
For additional capture options, see Set Up a Time Scheduled Capture and Set Up Capture Timer for Intermittent
Capturing.
Set Up a Time Scheduled Capture
1. In Snagit, select Image capture mode.
2. Select the Input, Output and Effects.
3. Select the Timed Capture option in the Options portion of the Profile Settings pane.
4. The Timer Setup dialog box appears. Select the Delay/Schedule tab > Scheduled capture option.
5. Type a future Date and Time using the format shown next to the selection boxes. Or, use the arrows to select the
date and time.
6. Click OK.
7. Click the Capture button or press the capture hotkey. The capture is sent to the selected Output.
To stop a delayed capture you have started, click the Stop button on the Snagit toolbar or push the hotkeys.
For additional capture options, see Set Up a Time Scheduled Capture and Set Up Capture Timer for Intermittent
Capturing.
Set Up Capture Timer for Intermittent Capturing
Capture screens intermittently at predefined times.
In timed capture mode, the hide and repeat hotkeys operate. The Input and Output options for Capture Timer
captures must be set so that the captures can occur unattended. If Snagit detects a combination of capture
options that cannot be used, the status displays "Timer unavailable" and the timer will not start.
1. In Snagit, select Image capture mode.
2. Select the Input, Output and Effects.
3. Select the Timed Capture option in the Options portion of the Profile Settings pane. The Timer Setup dialog box
appears.
4. Select the Capture Timer tab > Enable timer-activated capture option.
5. To remove redundant captures (for example, when the screen does not change for a period of time), enable
Discard identical captures.
6. Specify the frequency of captures in Hours, Minutes, or Seconds.
7. Click OK.
8. Click the Capture button or press the capture hotkey.
9. Snagit automatically captures at the timed intervals you specify. Press <CTRL+SHIFT+P> to stop taking timed
captures.
For additional capture options, see Set Up a Time Scheduled Capture and Set Up Capture Timer for Intermittent
Capturing.
Add an Effect during Image Capture
Use Effects in the Profile Settings pane to automatically apply the following during the capture process:
Halftone, Monochrome, or Grayscale Effect
Single Color Substitution Effect
Multiple Color Substitution Effect
Swap Colors Effect
Invert Color Effect
Brightness, Contrast, Hue, or Saturation Effect
Image Resolution Effect
Image Scaling Effect
Caption Effect
Border Effect
Fade, Torn, Saw, Sharktooth, Beveled, and Wave Edge Effects
Watermark Effect
Trim Effect
Halftone, Monochrome, or Grayscale Effect
Use the Color Depth color conversion Effect to change the capture to halftone, monochrome, or grayscale during the
capture process. The following graphic shows a sample of each Effect.
1. Original capture
2. Monochrome
3. Halftone
4. Grayscale
5. Custom
Setup Instructions
1. In Snagit, select Image capture mode.
2. Select the Input and Output.
3. Select Effects down arrow > Color Depth. From the flyout menu, select the desired option. Or, select Custom
Color Depth to create your own Effect using the available settings. Click OK.
4. Click the Capture button or press the capture hotkey. The capture is sent to the selected Output.
To disable the Color Depth Effect, select Effects down arrow > Color Depth > None.
For additional effects, see Add an Effect during Image Capture.
Single Color Substitution Effect
Use the Color Substitution Effect to replace one color with a different color during the capture process.
Setup Instructions
1. In Snagit, select Image capture mode.
2. Select the Input and Output.
3. Select Effects down arrow > Color Substitution > Color Substitution. The Color Substitution task pane
appears.
4. Use the Old Color tool or the adjacent Color swatch to select the color to remove. (In example above, green.)
5. Use the New Color tool or the adjacent Color swatch to select the color to replace the old color in the capture. (In
example above, black.)
6. In Color accuracy, specify the range of colors close to the Old color to include in the substitution. Select the
default value of 100% to use only the exact color identified. Select a lower value to increase the range of colors
for the color substitution.
7. Click Close.
8. Click the Capture button or press the capture hotkey. The capture is sent to the selected Output.
To disable the Color Substitution effect, select Effects down arrow > Color Substitution > None.
For additional effects, see Add an Effect during Image Capture.
Multiple Color Substitution Effect
Use the Color Substitution Effect to replace more than one color during the capture process.
Setup Instructions
1. In Snagit, select Image capture mode.
2. Select the Input and Output.
3. Select Effects down arrow > Color Substitution > Color Substitution. The Color Substitution task pane
appears.
4. Use the Old Color tool or the adjacent Color swatch to select the color to remove from the capture. (In example
above, white.)
5. Use the New Color tool or the adjacent Color swatch to select the color to replace the old color in the capture. (In
example above, green.)
6. Click Add to add another color to change. Repeat steps 4 and 5 for every color to change.
7. In Color accuracy, specify the range of colors close to the Old color to include in the substitution. Select the
default value of 100% to use only the exact color identified. Select a lower value to increase the range of colors
for the color substitution. (In example above, 77% because the image included white that had been anti-aliased.)
8. Click Close.
9. Click the Capture button or press the capture hotkey. The capture is sent to the selected Output.
To disable the Color Substitution Effect, select Effects down arrow > Color Substitution > None.
For additional effects, see Add an Effect during Image Capture.
Swap Colors Effect
Use the Color Substitution Effect to swap two colors with each other during the capture process.
You must select both the old and new colors from within the image. In this example, everything green was
swapped with red.
Setup Instructions
1. In Snagit, select Image capture mode.
2. Select the desired Input and Output.
3. Select Effects down arrow > Color Substitution > Color Substitution. The Color Substitution task pane
appears.
4. Use the Old Color tool or the adjacent Color swatch to select the color to remove in the capture.
5. Use the New Color tool or the adjacent Color swatch to select the color to replace the old color in the capture.
6. In Color accuracy, specify the range of colors close to the Old color to include in the substitution. Select the
default value of 100% to use only the exact color identified. Select a lower value to increase the range of colors
for the color substitution. (In example above, 77% because the image included white was anti-aliased.)
7. Enable the Swap colors option.
8. When the desired Effect is achieved, click Close.
9. Click the Capture button or press the capture hotkey. The capture is sent to the selected Output.
To disable the Color Substitution effect, select Effects down arrow > Color Substitution > None.
For additional effects, see Add an Effect during Image Capture.
Invert Color Effect
Use the Invert Colors Effect to invert RGB color values during the capture process. There are no custom options for
this Effect. The following graphic shows a sample invert color Effect.
1. Original capture
2. Invert Colors
Setup Instructions
1. In Snagit, select Image capture mode.
2. Select the Input and Output.
3. Select Effects down arrow > Color Substitution > Invert Colors.
4. Click the Capture button or press the capture hotkey. The capture is sent to the selected Output.
To disable the Invert Color effect, select Effects down arrow > Color Depth > None.
For additional effects, see Add an Effect during Image Capture.
Brightness, Contrast, Hue, or Saturation Effect
Use the Color Correction Effect to change the capture’s brightness, contrast, hue, saturation, and gamma properties
during the capture process. The following graphic shows a sample:
1. Original capture
2. Brightness
3. Contrast: Change the contrast between the light and dark colors.
4. Hue: Change is similar to rotating a color wheel to select a different mixture of colors.
5. Saturation: The quantity of a color in pixels, from gray at the lowest saturation to rich color in the highest.
6. Gamma: Adjust the intensity of colors by changing the gamma constant used to map the intensity values. Gamma
correction changes brightness using a logarithmic scale for visual perception. Gamma is a constant used to
calculate the progression. For most CRTs, the gamma constant is in the range of 2.2 to 2.5.
Setup Instructions
1. In Snagit, select Image capture mode.
2. Select the Input and Output.
3. Select Effects down arrow > Color Correction.
4. Create your own Effect using the available settings. Click OK.
5. Click the Capture button or press the capture hotkey. The capture is sent to the selected Output.
To disable the Color Correction effect, select Effects down arrow > Color Correction. Set all options to zero
(with the exception of the Gamma option which should be set to 1.0). Click OK.
For additional effects, see Add an Effect during Image Capture.
Image Resolution Effect
Use the Image Resolution Effect to set an image resolution in dots per inch or allow Snagit to configure the DPI
automatically using the default setting. For most captures, the default setting of 96 DPI is sufficient.
The Image Resolution can control how other applications display and print Snagit captured images. Adjusting the
image resolution does not affect the way Snagit displays or prints the image.
Setup Instructions
1. In Snagit, select Image capture mode.
2. Select the Input and Output.
3. Select Effects down arrow > Image Resolution.
4. By default, the Auto configure option is enabled. To enter a custom DPI setting, remove the check mark and
enter the desired DPI in the Resolution field. Click OK.
5. Click the Capture button or press the capture hotkey. The capture is sent to the selected Output.
For additional effects, see Add an Effect during Image Capture.
Image Scaling Effect
Use the Image Scaling Effect to scale your image during the capture process to a specific size using preset or custom
settings.
Setup Instructions
1. In Snagit, select Image capture mode.
2. Select the Input and Output.
3. Select Effects down arrow > Image Scaling. A flyout menu appears. Select one of the preset options (continue
with step 5). Or, select Resize Image to set a custom size. The Resize Image task pane appears.
4. Enable Keep Aspect Ratio to keep the image aspect ratio fixed while changing the width or height. Click OK.
5. Click the Capture button or press the capture hotkey. The capture is sent to the selected Output.
To give the edges of the capture a “smooth” appearance, select Effects down arrow > Image Scaling > Smooth
Scaling.
To disable an Image Scaling effect, select Effects down arrow > Image Scaling > None.
For additional effects, see Add an Effect during Image Capture.
Caption Effect
Use the Caption Effect to add text, formatted to your specifications, during the capture process. Include a time/date
stamp, system-related data, a title or free text. Use the custom settings to change the font, font, size and color,
position of the text, and more. The following graphic shows a sample.
Setup Instructions
1. In Snagit, select Image capture mode.
2. Select the Input and Output.
3. Select Effects down arrow > Caption.
4. Create your own Effect using the available settings. Click OK.
5. Click the Capture button or press the capture hotkey. The capture is sent to the selected Output.
To disable a Caption effect, select Effects down arrow > Caption. Within the Caption task page, remove the text
from the Text field. Click OK.
For additional effects, see Add an Effect during Image Capture.
Border Effect
Use the Border Effect to add a custom border around the image during the capture process. Customize with a 3D look,
shadow, color, and more. The following graphic shows a sample.
Setup Instructions
1. In Snagit, select Image capture mode.
2. Select the Input and Output.
3. Select Effects down arrow > Border.
4. Click the Enable border option.
5. Create your own Effect using the available settings. Click OK.
6. Click the Capture button or press the capture hotkey. The capture is sent to the selected Output.
To disable a Border effect, select Effects down arrow > Border. Disable the Enable border option. Click OK.
For additional effects, see Add an Effect during Image Capture.
Fade, Torn, Saw, Sharktooth, Beveled, and Wave Edge Effects
Use an Edge Effect to add a professional, finished look to your image during the capture process. The Edge Effects
include drop shadow, torn, faded, wave, saw, shark tooth and beveled edge.
Customize the Effect by adjusting the:
Size and location of the Effect.
Shadow size, location and color.
Outline and defining its size and color.
Background color
The following graphic shows a:
1. Torn Edge
2. Wave Edge
3. Saw Edge
4. Sharktooth Edge
5. Fade Edge
6. Beveled Edge
.
Setup Instructions
1. In Snagit, select Image capture mode.
2. Select the Input and Output.
3. Select Effects down arrow > Edge Effects. Select an Effect from the flyout menu.
4. Create your own Effect using the available settings. Click OK.
5. Click the Capture button or press the capture hotkey. The capture is sent to the selected Output.
To disable an Edge effect, select Effects down arrow > Edge Effects > None.
For additional effects, see Add an Effect during Image Capture.
Watermark Effect
Use the Watermark Effect to add a graphic file to the image during the capture process. Add logos, titles, signatures,
banner ads and more. You can also customize the image file with emboss, transparent, and more. Experiment to
discover the variety of creative ways you can use the Watermark Effect.
Setup Instructions
1. In Snagit, select Image capture mode.
2. Select the Input and Output.
3. Select Effects down arrow > Watermark.
4. Browse to select a graphic file.
5. Click Advanced settings to customize the Effect using the available settings. Click OK.
6. The capture is sent to the selected Output.
To disable a Watermark effect, select Effects down arrow > Watermark. Disable the Enable watermark option.
Click OK.
For additional effects, see Add an Effect during Image Capture.
Trim Effect
Use the Trim Effect to cut the outside borders the image during the capture process. Trim the top, bottom, and sides
of your capture.
Set up a custom trim Effect or select Automatic trimming which allows Snagit to determine the best trim based on
the amount solid color around the edges of your capture.
The following graphic shows the Automatic trim option:
The following graphic shows an example of a Custom trim:
Setup Instructions
1. In Snagit, select Image capture mode.
2. Select the Input and Output.
3. Select Effects down arrow > Trim.
4. Select Automatic or customize the Effect using the available settings. Click OK.
5. Click the Capture button or press the capture hotkey. The capture is sent to the selected Output.
To disable a Trim effect, select Effects down arrow > Trim. Click the None option. Click OK.
For additional effects, see Add an Effect during Image Capture.
Text Capture
Text mode provides a solution for anyone writing down text from the screen or a dialog box. Text captures include
only the text on the screen, not graphics. Text capture includes the following features:
Capture text from screens that do not allow copy and paste in Windows.
Send Output to a variety of destinations.
Annotate and timestamp the captured text.
Collect captured text in one file to keep a running log of captured passages. Use the text as notes from a Web
browser or email, or to capture a series of error messages from a program to send to technical support.
Customize the text Output using the Output Properties.
For additional capture options, see:
Text Longer than a Browser Window
Text from a Dialog Box
Text in a Scrolling Region Longer Than Window
Text from an Object on the Screen
Text from a DOS Application
Add a Caption Effect to a Text Capture
Set Up Folders and File Naming Conventions for Text Capture
Text Longer than a Browser Window
Setup Instructions
1. In Snagit, select Text capture mode.
2. For the Input, select Scrolling option > Auto Scroll Window.
3. Select Input down arrow > Properties > Scrolling tab> Enable: Scroll from top of document and Scroll
direction: Vertical
4. Select the Output.
5. Select Effects > Layout to remove blank lines or columns.
6. Click the browser window to capture.
7. Click the Capture button or press the capture hotkey.
8. A red rectangle appears. Move the rectangle to choose a browser window. Click to complete the capture. Snagit
pauses momentarily to configure the capture.
9. The capture area begins to scroll automatically, continuing until the lower edge of the scrolling window is reached.
The capture is sent to the selected Output.
For additional capture options, see Text Capture.
Text from a Dialog Box
Setup Instructions
1. In Snagit, select Text capture mode.
2. For the Input, select Scrolling option > Window.
3. Select the Output.
4. Select Effects > Layout to remove blank lines or columns.
5. Click the dialog box to capture.
6. Click the Capture button or press the capture hotkey.
7. A red rectangle appears. Move the rectangle to choose a browser window. Click to complete the capture. The
capture is sent to the selected Output.
For additional capture options, see Text Capture.
Text in a Scrolling Region Longer Than Window
Setup Instructions
1. In Snagit, select Text capture mode.
2. For the Input, select Scrolling option > Custom Scroll.
3. Select the Output.
4. Select Effects > Layout to remove blank lines or columns. Click the browser window to give it focus.
5. Click the Capture button or press the capture hotkey.
6. Drag the cursor over the area to capture. A red rectangle appears.
7. Click the down arrow on the window’s vertical scrollbar.
8. Snagit pauses momentarily to configure the capture. The capture area begins to scroll automatically, continuing
until the lower edge of the scrolling window is reached. The capture is sent to the selected Output.
For additional capture options, see Text Capture.
Text from an Object on the Screen
Use Object to capture data for objects on the screen. Select what Object data to capture for Object Input while using
the Text capture mode.
Setup Instructions
1. In Snagit, select Text capture mode.
2. For the Input, select Object.
3. Select Input > Properties > Layout tab to define the object data to capture. Click OK.
4. Select the Output.
5. Select Effects > Layout to remove blank lines or columns.
6. Click the Capture button or press the capture hotkey.
7. Move the cursor over the area to capture. A red rectangle appears.
8. Click the mouse to complete the capture. The capture is sent to the selected Output.
For additional capture options, see Text Capture.
Text from a DOS Application
Capture the contents of a full screen MS-DOS session window. Snagit automatically inverts the colors of the capture.
You must press the <Print Screen> key to capture the DOS application.
Setup Instructions
1. In Snagit, select Text capture mode.
2. For the Input, select Advanced > Full-screen DOS. This will automate two Snagit parameters:
The Clipboard Chain option is turned to “on” allowing Snagit to capture when you use the capture hotkey.
The Input is set to Clipboard.
3. Select the Output.
4. Select Effects > Layout to remove blank lines or columns.
5. Open MS-DOS to the screen to capture. Click <ALT + ENTER> to change between windowed MS-DOS mode
and full-screen MS-DOS.
6. Press the <Print Screen> key. The capture is sent to the selected Output.
For additional capture options, see Text Capture.
Add a Caption Effect to a Text Capture
Use the Text Caption Effect to add a caption during the capture process. Captions can include a time/date stamp,
system-related data, a title or free text within your capture. You can customize the font, color, and placement of
captions.
Setup Instructions
1. In Snagit, select Text capture mode.
2. Select the Input and Output.
3. Select Effects > Layout to remove blank lines or columns.
4. Select Effects down arrow > Caption.
5. Check the Enable Caption option.
6. Create your own Effect using the available settings. Click OK.
7. Click the Capture button or press the capture hotkey. The capture is sent to the selected Output.
To disable the Caption effect, select Effects down arrow > Caption. Uncheck the Enable Caption option. Click
OK.
For additional capture options, see Text Capture.
Set Up Folders and File Naming Conventions for Text Capture
Snagit, Text capture mode > Output down arrow > Properties > Text File tab
Use the Text File tab options to customize the file name, file format, caption, and location options for text captures.
Option Description
TXT - Text File Default option for a text capture.
Annotate captures Add a caption to the text capture Output.
Caption prefix Enter the text to appear before each text caption.
Append to file Add each text capture to a single file.
Ask for file name Enter a file name before saving the capture Output.
Fixed file name Assign the same file name assigned to each text capture. This is useful for continually
and automatically updating the same Output file.
Name If you use the Fixed File Name option, type the file name for the text Output file in this
field.
Automatic file name Automatically give your capture a file name and location. To change the default auto
name, then select the Options button.
Output folder Select a location for your captures.
Video Capture
Use Video capture mode to create a video recording of your screen. Snagit records on-screen activity on your
Windows desktop. Capture all your mouse movements and application action then, save the video as an AVI file. You
can also use Snagit to create time-lapse video of desktop activity over a period of time.
The maximum size of an AVI file produced by Snagit is 2 GB. If you pass this size limit, the entire capture is lost.
Use the following tips to limit the AVI file size:
Limit the size of the program window captured. Do not add unnecessary content (size or length).
Use Snagit Region Input selection to select a smaller area to capture then "pan" across the screen while
capturing, thereby making a much smaller video file.
Limit the video frames capture speed.
Limit the length of the video capture sequence. Snagit captures video sequences in real-time seconds and
minutes. The shorter your sequence, the smaller the AVI files.
Change compression. By default, Snagit selects the best compression to use for your capture and system.
Experimenting with the settings is also possible.
For additional tips, see Video Capture Tips.
Record Your First Video Capture
1. In Snagit, select Video capture mode.
2. Select the Output.
3. Click the Capture button or press the capture hotkey.
4. A red rectangle appears. Use the rectangle to choose a window to capture or drag the mouse to select a region.
The Video Capture dialog box appears.
5. Click Start to begin recording.
6. Press <CTRL+Shift+P> to end recording. The video renders for a moment. After rendering, the capture is sent to
the selected Output.
For more information, see:
Record a Video with a Caption Effect
Record a Video in Time-Lapse Capture Mode
Record a Video and Upload to the Web via FTP
Video Capture Tips
Record a Video with a Caption Effect
Use the Caption Effect to add text, formatted to your specifications, during the capture process. Include a time/date
stamp, system-related data, a title or free text. Use the custom settings to change the font, font, size and color,
position of the text, and more.
Setup Instructions
1. In Snagit, select Video capture mode.
2. Select the Input and Output.
3. Select Effects down arrow > Caption.
4. Enable the Enable Caption option.
5. Create your own Effect using the available settings. Click the Options button in the Caption group box to
customize the font and caption location. Click OK. Click OK to exit the Video Caption dialog box.
6. Click the Capture button or press the capture hotkey.
7. A red rectangle appears. Use the rectangle to choose a window to capture or drag the mouse to select a region.
The Video Capture dialog box appears.
8. Click Start to begin recording.
9. Press <CTRL+Shift+P> to end recording. The video renders for a moment. After rendering, the capture is sent to
the selected Output.
To disable the Caption effect, select Effects down arrow > Caption. Within the Caption task page, disable the
Enable Caption option. Click OK.
For additional capture options, see Video Capture. For additional tips, see Video Capture Tips.
Record a Video in Time-Lapse Capture Mode
Use Time-lapse capture mode to capture at one frame rate and playback at a slower/faster rate. Set the timing to
slow or very slow frame rates for setting up a monitoring application or capturing program activities that requires
lengthy processing times.
If the Time-lapse capture mode is on, the audio recording and camera recording features are disabled.
Setup Instructions
1. In Snagit, select Video capture mode.
2. Select the Input and Output.
3. Select Input down arrow > Properties > Video tab > Enable Time-lapse capture option.
4. Click the Time-lapse Setup button. The Time-lapse capture Setup dialog appears. Enter the desired Capture
rate. Click OK. Click OK to exit the Video tab.
5. Click the Capture button or press the capture hotkey.
6. A red rectangle appears. Use the rectangle to choose a window to capture or drag the mouse to select a region.
The Video Capture dialog box appears.
7. Click Start to begin recording.
8. Press <CTRL+Shift+P> to end recording. The video renders for a moment. After rendering, the capture is sent to
the selected Output.
To disable the Time-lapse Effect, select Input down arrow > Properties > Video tab > Enable Auto
configuration option. Click OK.
For additional capture options, see Video Capture. See also Video Capture Tips.
Record a Video and Upload to the Web via FTP
Use the FTP options to send the video directly to a location on the Web. When using FTP Output, you must first
configure the properties on the FTP tab.
Setup Instructions
1. In Snagit, select Video capture mode.
2. Select the Input.
3. Select Output > FTP.
4. Select Output down arrow > Properties > FTP tab.
5. Enter the correct FTP information. Click OK.
6. Click the Capture button or press the capture hotkey.
7. A red rectangle appears. Use the rectangle to choose a window to capture or drag the mouse to select a region.
The Video Capture dialog box appears.
8. Click Start to begin recording.
9. Press <CTRL+Shift+P> to end recording. The video renders for a moment. After rendering, the capture is sent to
the selected Output.
FTP Options
Option Description
FTP Server Specify the IP Address or DNS Name of the target FTP server.
Port Specify the port on the server used for FTP services. This is usually port 21, the default.
Remote path Type the directory path on the target server to store the captured files.
Use passive FTP Select to connect with the FTP server in passive mode.
Show progress Display a progress bar.
Fixed file name Send a file at regular times to the server that always overwrites an existing file.
Automatic file name Name files automatically with a sequential number included. For example, if you specify
a sequence limit of 9, files are written with the prefix from the File Name or Prefix box,
then a numeral string that writes nine files before overwriting the first one.
Use temp/rename
replacement method
Send your screen capture to the server with a temporary file name then renames the
temporary file to the name specified in the File Name or Prefix box.
Server authentication Enter the User Name and Password if authentication is required.
User name Type in the correct User Name for Server authentication.
Password Type in the correct Password for Server authentication.
Use proxy server Enter the Proxy Server and Port. (A proxy server has a different IP or DNS name, such
as proxy.companyname.com:8080.)
Proxy server and port Enter the Proxy Server/Port in this field.
For additional capture options, see Video Capture. For additional tips, see Video Capture Tips.
Video Capture Tips
If you are recording more than one video, decide on a standard set of Snagit options for your organization. For
example, will your videos highlight the cursor? Should your videos all be the same size? Will you record with a
caption or system stamp?
Practice, practice, practice. Overall, how much and how often you practice will be the key to creating professional
videos.
Snagit records anything on your screen. Clean up your browser and desktop by closing or removing all
nonessential applications, browser toolbars, and desktop icons. Use a plain background on your desktop is better
than a busy wallpaper image.
Practice using the mouse around the screen in a slow, fluid motion.
Video Scripting and Narration Tips
For lengthy or involved sequences of action, write a script before recording.
Avoid narration filler by using words such as “umm” or “ahh.” Speak slowly and enunciate properly.
Include an overview of the recording in the first line or two of the script.
To eliminate the sound of paper shuffling, tape the script pages together and hang them near the monitor so they
are easy to read. Print the script in large type to make it easy to read while recording.
Audio Tips
Generally, USB microphones provide a better sound than other microphones (minus the high-end equipment)
since you do not have to rely on your computer’s sound card. USB microphones use less computer resources,
and record far better audio than an analog mic connected to your computer's audio card.
Experiment with different volume levels and placement settings allowing different distances from the microphone
to select the right one.
Record in a quiet location.
Capture What You Can Print
Use Printer Capture to capture and manipulate the print Output from any application as a digital image. You can
create an image file of what the printed material would look like if you had printed it on a printer. Snagit does not need
to be running when you select the Snagit Printer from within an application; it starts automatically and begins the
capture using the Printer Capture settings.
With Snagit Printer Capture, you can:
Print anywhere without being connected to a printer. Transfer or email the capture to a system with a printer.
Convert any file format that can be printed into standard graphic file formats or electronic documents. This
eliminates the need to scan paper Output to create electronic documents.
Add graphic file format export to any application that can print.
Share documents without special software to view them.
Annotate Output, add a watermark, or include a border or frame.
Print using Snagit Printer Capture
1. From within an application, select File > Print (or the equivalent in that application).
2. From the list of printers, select Snagit 9.
3. Click the Properties button to setup any special print properties such as layout and paper.
4. In the Print dialog box, click OK to complete the capture.
For more information, see:
Customize your Printer Capture
Create a Snagit Printer Capture Profile
Capture and View a Multiple Page Document with Printer Capture
Capture and Save Multiple Page Documents as Individual Image Files
Customize your Printer Capture
You can set up a printer capture to include an Output, Effect, and the destination folder for your captures prior to
capturing in an application.
1. Within Snagit in the Related Tasks pane, click Setup Snagit printer.
2. The Snagit Printer Capture Settings dialog box appears. Click the Properties button to setup special print
properties such as layout and paper.
3. Click the Output down arrow to select an Output. Use the Output Properties button to customize the Output.
4. Click the Effects down arrow to add a special Effect to the capture. Depending on the Effect, you may see a task
pane where you customize the Effect.
5. Click OK. The settings will be used next time you use Printer Capture from within a host application.
Set up a Printer Capture profile to create and save several different Snagit printers.
For additional capture options, see Capture What You Can Print.
Create a Snagit Printer Capture Profile
You can create several different Printer Capture profiles to use during a printer capture. You can customize the
Output, filters, layout, and more and save the configuration with a name that you specify.
1. In Snagit, select Tools > Snagit Printer Capture Settings > Input Properties button. The Input Properties
dialog box displays.
2. In Printers tab, click the Add a Snagit Printer button.
3. In the Printer Name dialog box, enter the name for this printer. To help you remember what settings are enabled
for each printer, the name should correspond to the settings that you will select. For example, Send Email with a
Border or Capture Preview window with Drop Shadow. Click OK. A confirmation dialog box appears. Click OK.
4. Select the Properties button. The Document Properties dialog box display. Select layout and paper/quality
options. Click OK.
5. Your new printer appears within the dropdown list box in the Input Properties dialog box. Click OK to return to the
Snagit Printer Capture Settings dialog box.
6. Click the Output down arrow to select an Output. Use the Output Properties button to customize the Output.
7. Click the Effects down arrow to add a special Effect to the capture. Depending on the Effect, you may see a task
pane where you customize the Effect.
8. After the options are selected, in the Snagit Printer Capture Settings dialog box, click OK.
For additional capture options, see Capture What You Can Print.
To use a Printer Capture profile
1. From within the host application, select File > Print (or the equivalent in that application).
2. From the list of printers, select the printer that you just created.
3. Click the Properties button to setup special print properties such as layout and paper.
4. In the Print dialog box, click OK to complete the capture.
To change the settings for a Snagit Printer profiles repeat the process given above but select the printer to
change within the Snagit Printers tab.
Capture and View a Multiple Page Document with Printer
Capture
Save a Printer Capture as a multipage file to include all of the pages of the capture within one image file. If you do not
save the Printer Capture using the multipage file format, each page of the capture is saved as an individual image file.
With the multipage file format, when the capture is complete, it displays in the Editor window where you can use the
Multipage viewing tools to page through the capture pages.
Multipage file capability is only available when you set your Printer Capture Output setting to File and specify PDF
or TIF format in the Output Properties dialog box.
If you have taken a Printer Capture using the configuration for multipage file Output but select to complete your
capture in Editor using the Save As option within Editor instead of clicking on the Finish Profile button in the
Send tab only the current image will be saved as an image file.
1. In Snagit, select Tools > Snagit Printer Capture Settings > Output > File.
2. Select Output Properties button > Image File tab > File Format > PDF or TIF. Click OK to save changes.
3. Within the Snagit Printer Capture Settings dialog box, click OK.
4. Select Snagit 9 printer as the current printer. Print the desired number of pages within an application.
The capture displays in Editor.
5. Click Finish Profile to complete the capture.
6. The Save As dialog box displays. Select the location to save this capture to and enter the file a name. Keep the
PDF or TIF file format.
To edit the file, use Adobe Acrobat to open the PDF or Snagit Editor to open the TIF file.
For additional capture options, see Capture What You Can Print.
Capture and Save Multiple Page Documents as Individual
Image Files
From within a host application, you can use Printer Capture to capture multiple pages at one time and save each page
as an individual image file.
Multipage file capability is only available when you set your Printer Capture Output setting to File and do not
specify PDF, SNAG, or TIF format in the Output Properties dialog box.
1. In Snagit, select Tools > Snagit Printer Capture Settings > Output > File.
2. Select Output Properties button > Image File tab > File format > any file format except PDF or TIF. Click OK.
3. In Snagit Printer Capture Settings dialog box, click OK.
4. Select the Snagit 9 printer as the current printer. Print the desired number of pages within the host application.
The capture displays in Editor.
5. Click Finish Profile to complete the capture.
6. The Save Multiple Images dialog box displays. Select the following options:
Select an Output Folder for your captures.
Enter a Prefix in the filename for the captures
Enter a number in the filename for each of the captures in this series that is going to be saved. This option is
used in conjunction with the prefix option. By default, the number of images to save appears.
Specify the file format for image captures.
Select Options to access customization options for this particular file format.
7. Click OK to complete the capture.
For additional capture options, see Capture What You Can Print.
Web Capture
Web capture captures images or other kinds of files from a Web site. Enter the Web site address and select the Web
page link depth (the number of links away from the first Web page) to include in the search.
With Web capture you can:
Specify public Web site URL to capture all images used on the site.
Capture image files, for example GIF, JPG, and PNG.
Capture audio files, for example MP3, WAV, WMA.
Capture video files, for example AVI, MPG, WMV.
Capture other files from Microsoft Word, PowerPoint, and Excel.
Preview the images from the Web site, then include or exclude them from the final scan.
Direct the files to a folder on your PC so they can be browsed and viewed using Snagit Editor’s Library.
This mode does not capture Web pages. Use the Web page capture profile.
Setup Instructions
1. In Snagit, select Web capture mode.
2. For the Input, select Prompt for Address.
3. For the Effects, select Properties.
In the General tab, select the number in the Link search depth field. Also enter domains to ignore.
In the Images tab, select the type of image files to capture and set size restrictions.
In the Audio tab, select the type of audio files (if any) to capture and set size restrictions.
In the Video tab, select the type of video files (if any) to capture and set size restrictions.
In the Custom tab, enter the extensions of all other type of files (if any) to capture and set size restrictions.
4. Click OK.
5. Click the Capture button or press the capture hotkey. Enter the web address at the prompt and click OK. As
Snagit captures, the Web Capture Progress dialog box displays.
6. When the capture is complete, the Select Output Folder dialog box appears. Browse and select the folder to store
your capture in. Click OK. The captures display with Snagit Editor’s Library view.
For more information, see:
Web Capture Folder and File Naming Conventions
Web Capture Preferences
Web Capture Proxy Settings
Web Capture Folder and File Naming Conventions
Snagit > Web capture mode > Output > Properties > File tab.
Use the File tab to configure the location, folder options, and naming options for files containing Web capture Output.
Option Description
Ask for folder name Enter a new folder name after each capture.
Fixed folder name Use the same folder name for each new capture.
Create a subfolder for
each capture
Add each new capture in a subfolder within the designated Output Folder.
Use a single folder to
store all images
All of the capture images to be stored within the same folder.
Create a hierarchy of
folders to store images
Create folders to match the structure of the Web sites captured.
Rename files
automatically
Automatically rename captured files with the same name.
Overwrite files Always overwrite a file that already exists in the capture folder.
For additional capture options, see Web Capture.
Web Capture Preferences
Snagit > Web capture mode > Input > Properties > Web Capture Preferences tab
Option Description
Work offline Only scans files stored on your computer in the Internet cache (see Windows Control
Panel > Internet Options >Temporary Internet Files).
HTTP Request Timeout
(seconds)
Set the number of seconds Snagit waits until the host you are scanning answers. The
default setting is 60 seconds.
Primary capture method
(requires IE 5.5 or later)
Capture all Web content. If you use Internet Explorer 5.5 or later, this option is
enabled by default.
Disable scripting (blocks
pop-ups)
Block pop-ups on the Web pages.
Secondary capture
method
If you do not have Internet Explorer 5.5 or later, this option is enabled by default.
Enabling this option enables the Allow Web site cookies option and the Proxy
Settings button.
When using this option, there may be some Web content that you cannot capture,
especially true when capturing from a site using frames. As an alternate option,
enable the Primary capture method option and redo your capture.
Allow Web site cookies Permit cookies to store on your computer. This option may be necessary to scan
some Web sites.
Proxy Settings Open the Proxy Settings dialog box. Continue with Web Capture Proxy Settings
For additional capture options, see Web Capture.
Web Capture Proxy Settings
Web mode > Input Properties > Web Preferences tab > Secondary capture method > Proxy Settings button
Option Description
Use Web Browser’s
Proxy Settings
This default option works in most cases. This setting reads your Web browser's proxy
settings and uses them for Web capture. It is designed to eliminate the need to configure
your connection settings manually in Snagit.
Direct Connection (No
Proxy)
Select to use a direct connection (No Proxy).
Manually Configure
Proxy Settings
Select if there is a proxy in your Web connection and you need to specify a different one.
You may need to reconfigure proxy settings if your network proxy information changed
since your browser was installed.
Host For manual configuration, type an IP address for your proxy host. If you do not have this
information, contact your system administrator for help.
Port For manual configuration, type a port number. The default proxy port is 80, but your
system can use another.
Enable Proxy
Authentication
Select this option if a username and password are needed to make outside connections.
Enter the Username and Password.
For additional capture options, see Web Capture.
Snagit Profiles: A Faster, More Efficient Way to
Capture
If you had a previous version of Snagit installed on your computer, profiles are automatically imported into Snagit
during installation.
Capturing with Snagit can be as simple as clicking the Capture button. But, the real power behind Snagit lies with its
unique and systematic method of creating not just any capture – but the right capture!
When you save a Capture Mode, Input, Effect, and Output combination, this is called a Profile. Profiles make the
capture process quicker and more efficient.
Built-In Profiles
Snagit includes several built-in or preconfigured profiles to help you begin capturing quickly. Find the profiles in the
center of the Snagit screen.
The quickest way to capture when you are just learning to use Snagit is to select a profile and click the Capture
button.
Built-in profiles have no Output set and Preview in Editor is enabled. In Editor, add annotations and select an
Output. To complete the capture, click Finish in Editor’s Send tab.
Edit or export preconfigured profiles.
Use a preconfigured profile as the basis for a new profile.
Capture Modes
A Mode is the type of capture you want to take. To change the mode, click on the blue button next to the Capture
button.
Image Capture to capture an image of anything your screen. Send the image to one or more Outputs including a
graphic file, the printer, email, Snagit Editor or even a Web server.
Text Capture to capture the text you see on the screen as editable ASCII text. You can save the text in tab delimited
format to import into spreadsheets or database applications.
Video Capture to record onscreen activity on your Windows desktop. Capture mouse movements and application
action, then save the video as an AVI file. You can also use Snagit to create time-lapse video of desktop activity over
a period of time.
Web Capture to capture all the images from a Web site as graphic files. Just enter a Web site address and select the
Web page link depth, which is the number of levels of directories from the root Web address to include in the capture.
Printer Capture to capture anything you would send to a printer and send it to an image file instead. Print to the
Snagit virtual printer from within any Windows application. Within Snagit, select Tools > Snagit Printer Capture
Settings to configure the Printer Capture settings.
Input
Input tells Snagit what to capture on the screen.
The capture Mode and the Input define exactly what to capture. Think of
the Mode as the general capture category and the Input as the more
specific category. Each mode has its own particular Input options.
For example, if Image Capture is the Mode, you can select Screen as
the Input. This means that Snagit captures the entire PC screen as an
image.
Or, if you select Image Capture as the Mode and Window as the Input,
you get to select the single window on your screen that you want to
capture. Each capture mode has its own set of Input options and
associated Properties.
Effects
Effects tell Snagit how to customize the capture.
Snagit Effects include Captions, Borders, Edge Effects, Watermarks, and more. Additionally, you can convert and
substitute colors, change image scale and resolution, and trim images. Select Effects to automatically apply to your
capture.
Output
Output tells Snagit where to send the capture.
Select File to save your capture as one of twenty eight
file formats, or select Email to send your capture as an
attachment or in the body of an email message.
Snagit Outputs allow you to send your capture directly to
your blog, or to a Microsoft application such as Word or
PowerPoint.
Overall, there are more than twenty ways to share your
capture.
For more information, see:
Profile Context Sensitive Menu Options
Create a New Profile Based on an Existing Profile
Create a New Profile with the Profile Wizard
Profile Hotkeys
Organize and Sort Profiles
Profile Context Sensitive Menu Options
Right-click on a profile or group of profiles to open the context menu.
The options apply to the profile or profile group that you right-clicked on – not the profile or profile group currently
selected within the Profiles pane.
For more information, see:
Snagit Profiles: A Faster, More Efficient Way to Capture
Create a New Profile with the Profile Wizard
Create a New Profile Based on an Existing Profile
Profile Hotkeys
Create a New Profile Based on an Existing Profile
Save new settings as an updated profile, as a new profile, or use the profile settings once and do not save them.
When you change profile settings, the profile selected in the Profiles pane has a yellow box around it and an asterisk
next to the profile name to indicate you have modified a profile.
The following instructions provide a general method for changing your settings followed in parenthesis by a specific
example. Substitute any profile and select your desired profile settings.
Select a Profile close to what you need.
(In the Profiles pane, click the Window profile.)
If necessary, change the Output.
(In the Profile settings pane, select Output > Email from the dropdown list.)
Include an Effect to add a special Effect, specific size, color, or resolution requirement.
(In the Profile settings pane, select Effects > Edge Effect > Drop Shadow Edge from the dropdown menu.)
Customize the Edge Effect in the Edge Effect task page.
(In the Drop Shadow Edge task page, set the Shadow Depth to 40.)
Click the Capture button to take the capture.
(Move the rectangle around the screen to highlight a window. Click with the mouse to capture. The capture
displays within the Capture Preview window.)
Save Profile Options
To save the settings as the current profile’s new defaults, click the Save Profile’s Current Settings button
at the top right of the Snagit screen.
To save the settings as a new profile, click the Save As New Profile button at the top right of the Snagit
screen.
For more information, see:
Snagit Profiles: A Faster, More Efficient Way to Capture
Create a New Profile with the Profile Wizard
Profile Hotkeys
Organize and Sort Profiles
Profile Context Sensitive Menu Options
Create a New Profile with the Profile Wizard
Use the Add New Profile Wizard to create a new profile rather than modifying and saving an existing capture profile.
To access the Add New Profile Wizard, click the Add New Profile Wizard button in Snagit.
Profile Wizard Instructions
Follow the instructions on each dialog box, and read the Description fields for additional information as you hover over
each option.
For more information, see:
Snagit Profiles: A Faster, More Efficient Way to Capture
Create a New Profile Based on an Existing Profile
Profile Hotkeys
Organize and Sort Profiles
Profile Hotkeys
Use a hotkey to quickly take captures without interacting with the Snagit interface.
Customize the hotkey(s) for Snagit or on a per capture profile basis.
Profile hotkeys invoke a specific set of capture commands. Each profile can have its own hotkey.
Snagit OneClick gives you access to your capture profiles while Snagit is reduced to the system tray.
When a profile hotkey is set, the Snagit interface gives you three visual clues to help you remember what that hotkey
is:
To customize the hotkeys, select Snagit > Tools > Program Preferences > Hotkeys or right-click on a profile and
select Set Hotkey.
For more information, see:
Snagit Hotkeys
Snagit Profiles: A Faster, More Efficient Way to Capture
Organize and Sort Profiles
Use the Organize Profiles options to change the order of your capture profiles within the Profiles pane and import or
export profiles using a .snagprof file. To access the Organize Profiles options:
From Snagit, select File > Organize Profiles.
Right-click a profile and select Organize Profiles.
Click Organize Profiles in the Related Tasks area of Snagit.
Import and Export Profile Tips
When you import a profile, if there is an existing profile with the same name, the existing profile is not overwritten.
The imported profile is added to the profile group.
Groups that do not have identical names are directly imported into the Profiles pane.
In Windows Explorer, double-click on a profile file (.snagprof) and import it directly into Snagit.
When you import a group of profiles that already exist within the Profiles pane, click:
Merge to decide for each group to merge, rename the group, or skip a group,
Merge All to merge all the groups without being prompted
Skip to skip a group you do not want to import
Select to Include the following items with a profile or group of profiles:
Hotkeys or Password included in the profile or group
Machine specific items including Output directories, Web addresses, codecs, font settings, etc.
Program Output to import or export information related to External Program Output
Program Output is disabled by default for security measures and prohibits the import of a profile using external
program Output that could potentially launch a destructive application or virus on your system. Keep this option
disabled if you are not sure of the quality or source of the profiles.
For more information, see:
Snagit Profiles: A Faster, More Efficient Way to Capture
Create a New Profile with the Profile Wizard
Snagit OneClick – The Fastest Way to Capture
Profiles are automatically synched to Snagit OneClick.
Snagit OneClick provides a quick and easy way to take a capture from your desktop. OneClick provides access to
your capture profiles when Snagit is minimized to the system tray. To enable and configure OneClick, within Snagit, in
the Related Tasks pane, click Turn on OneClick.
OneClick appears on the side of your monitor. A balloon tip displays to let you know where OneClick is hidden.
An orange bar appears on the monitor side where OneClick is hidden. To access OneClick while it is hidden, pass
your cursor over the orange bar.
Drag OneClick to a location around the edge of the monitor.
OneClick contains the Capture Profiles located in the Profiles pane. Profiles or hotkeys created within
Snagit are automatically updated to OneClick.
To take a capture using OneClick, click on a profile. The capture is taken and OneClick is hidden again from
view until you need it again.
The I want to option gives you quick access to Snagit and Snagit Editor.
Click the Configure Snagit OneClick link to customize OneClick.
OneClick Configuration Options
OneClick > I want to > Configure Snagit OneClick
Configure the behavior and appearance of OneClick with your preferences.
Option Description
Click to activate Click on the orange OneClick bar to access OneClick rather than hovering over the
orange bar.
Hover to activate Hover over the orange OneClick bar to access OneClick rather than clicking on the
orange bar. The Hover time (ms) box lets you specify how long you need to hover
before OneClick appears.
Hotkey setup Select a combination of CTRL, SHIFT, ALT, and a key from the dropdown list to set a
hotkey for using OneClick. When you press the hotkey combination OneClick appears.
Begin hiding timeout
(seconds)
Define the length of time (in seconds) that OneClick waits before hiding.
Hide animate speed Specify how quickly OneClick hides: Normal, Fast, Slow, or Instant.
Amount shown while
hidden
Determine how much (in pixels) of OneClick appears on your screen while hidden.
Make OneClick
transparent when hidden
Make OneClick completely disappear from the edges of your screen when hidden.
Open animate speed Set how quickly OneClick opens: Normal, Fast, Slow, or Instant.
Delay time for Time
Delay Capture(s)
Set up a delay prior to captures, type the length of the delay, in seconds, in this box.
Default Select Default to restore the options in this dialog box back to their original settings.
Welcome to Snagit Editor
Use Snagit Editor to apply professional, quality finishing touches to your captures. Also share or locate, view, and
manage captures and multimedia files.
The Open Captures Tray automatically stores captures.
Editing options include flip, mirror, shear, rotate, crop, and cut.
Adjust the color depth, add text, or view the frames of a video capture.
Add custom edge effects such as drop shadow, torn or faded edges, and enhancements such as arrows,
cursors, lines, text, and much more.
Use the Search Pane, find and move/organize captures.
In the Library, view captures as a thumbnail or a list view and sort by name, size, type, date, dimensions, flags or
keywords.
Share captures via email or FTP, send to Office applications, or print multiple images.
Because Snagit and Snagit Editor are two separate applications that can exist side by side….
View more than one capture at a time.
Assemble multiple images together.
Visually select groups of images to e-mail, batch convert, and more.
For more information, see:
Get Familiar with the Editor
The Ribbon Tabs
The Quick Access Toolbar
Open Captures Tray
Get Familiar with the Editor
To open Snagit Editor, do one of the following:
Select Windows Start menu > All Programs > Snagit 9 > Snagit 9 Editor
Click Snagit Editor on the Quick Launch pane in Snagit.
Select Tools > Snagit Editor from the Snagit menu bar.
Click the Snagit Button to access basic commands such as New, Open, Save, Save As, Send, Print,
Delete, and Close.
Also select:
Convert Images to batch convert images.
Resources to access the Snagit Web site, find out about other TechSmith products, download
Snagit Accessories, and more. Also open the About Snagit dialog box that contains the version
number and copyright information.
Editor Options button to set application preferences.
The Ribbon helps you quickly find the tools and options you need to complete a task.
Customize the Quick Access Toolbar with the tools and commands used most frequently. Right-click
icons and options throughout the ribbon to add to the Quick Access Toolbar.
The Quick Styles Gallery is a collection of ready-made styles or effects. To use, select a style from
the gallery and drag or click on the canvas.
Click the gallery’s More button to see even more style options to choose from.
Right-click a modified object on the canvas and select Add to Quick Styles to add it to the gallery.
With the Search Pane find and view images, videos and text captures by date, folder, keywords, and
more.
Click to assign Flags such as Important, Idea, or Personal to captures or media files.
All assigned flags display in color in the vertical flag row of the Search Pane when the pane is
collapsed or, at the bottom of the Search Pane when the pane is expanded.
Use the Library to locate, view, and manage captures and multimedia files in thumbnail or list view.
Select multiple files to save, convert file formats, print, and e-mail in batches.
Use the Zoom Slider to enlarge the view for an image or the thumbnails in Library view.
Open Captures Tray displays thumbnails of recent captures as well as all open media files.
The Canvas is where you edit or annotate your captures. Add Callouts, Arrows, Stamps, and more.
The Ribbon Tabs
The Ribbon helps you quickly find the tools and options you need to complete a task. Tools and options are organized
in logical groups that are collected together under specific tabs.
Each tab relates to a particular type of activity such as adding annotations with the drawing tools or interactive
Hotspots.
Tips for interacting with the ribbon follow the table below.
Click the Snagit Button to access basic commands such as New, Open, Save, Save As, Send, Print,
Delete, and Close.
Also select:
Convert Images to batch convert images.
Resources to access more Snagit resources on the TechSmith Web site.
Editor Options button to set application preferences.
Tools and options are located throughout the ribbon and are organized in logical groups. Click icons
with down arrows to see more options and effects for a particular tool.
Find groups of related tools and options in the Ribbon. Right click on a tool or option to add it to the
Quick Access Toolbar.
Customize the Quick Access Toolbar with the tools and commands used most frequently. Right-click
icons and options throughout the ribbon to add to the Quick Access Toolbar.
The Quick Styles Gallery is a collection of ready-made styles or effects. To use, select a style from the
gallery and drag or click on the canvas.
Click the gallery’s More button to see even more style options to choose from.
Right-click a modified object on the canvas and select Add to Quick Styles to add it to the gallery.
Throughout the Editor interface, as you hover over commands and tools enhanced screen tips appear
and F1 help links (press the F1 key while the tip displays to open the help file topic.)
Arrows next to the option icons indicate dropdown menus of additional effects and options.
Minimize or Maximize the Ribbon from the Quick Access Toolbar
1. Click the Customize Quick Access Toolbar down arrow.
2. Select Minimize the Ribbon.
3. To use the tools and commands while the Ribbon is minimized, click the name of the tab you want to use. The
ribbon will appear. Once the canvas is clicked on, the ribbon will minimized again.
To restore the Ribbon, repeat steps 1-2.
Minimize or Maximize the Ribbon Using the Tabs
1. To quickly minimize the Ribbon, double-click the name of a tab.
2. Double-click a tab again to restore the Ribbon.
Minimize or Maximize the Ribbon Keyboard Shortcut
To minimize or restore the Ribbon, press <CTRL+F1>.
Things you Cannot Do with the Ribbon
Add to or rearrange the commands on the Ribbon
Change or remove a command or group on the Ribbon
Add tabs to the Ribbon.
Switch to the toolbars and menus from earlier versions of Snagit.
Draw Tab
The Clipboard group contains the following tools and commands:
Copy All, Cut, Copy, Paste, Paste Transparent or Opaque.
The Drawing Tools group contains the following tools and commands:
Selection, Zoom, Callout, Text, Arrow, Line, Stamp, Shape, Pen, Fill, Highlight, Eraser.
The Quick Styles Gallery is a collection of ready-made styles or effects. To use, select a style from the
gallery and drag or click on the canvas.
Click the gallery’s More button to see even more style options to choose from.
Right-click a vector object on the canvas and select Add to Quick Styles to add it to the gallery’s
Quick Styles category.
The Outline, Fill, and Effects options for the selected tool are available in the Styles group. Click the
down arrow on an icon to expose the available options.
The Arrange group contains the vector object options for arranging and aligning objects.
Right-click on an object to view vector object options.
The Send group contains Output options. Click the top of the icon to send the contents of the canvas to
the output listed. Click the bottom of the icon to select a new output from a list.
The Output icon changes to a Finish Profile icon if you use a profile capture with a designated output.
Continue with Complete a Profile or Add-In Capture.
When you close Editor, the Finish Profile icon closes and the Output icon displays when you open
Editor again.
Complete a Profile or Add-In Capture
When you take a capture in Snagit with an assigned Output and the Preview in Editor option selected, the Finish
Profile icon appears in the Draw tab > Send group instead of the Output icon.
To complete the capture, click green checkmark on the Finish Profile button.
To change the Output, click the arrow on the Finish Profile button. Select a new output from the list.
Image Tab
The Canvas group contains the following tools and commands:
Crop, Cut Out, Trim, Rotate, Resize, Canvas Color.
The Edge Effects in the Quick Styles Gallery add a professional, finished look to a selection or the entire
canvas. Edge effects include drop shadow, torn, faded, wave, saw, shark tooth and beveled edge. Click an
effect in the gallery to apply the effect to a selection or the entire canvas.
Click the gallery’s More button to see even more Edge Effects to choose from.
Custom Edge Effects added to the gallery appear in the Quick Styles category.
The Styles group contains Border, Effects, and Edge Effects options for a selected tool. Effects include
Shadow, Perspective, Shear, and Edges. Click the down arrow on a tool to view the available options.
Click Edges to access the Edge Effects customize options. In the customize task pane, create
an effect and click Add to Quick Styles to reuse the effect at a later time.
The Modify group contains the following effects:
Blur, Grayscale, Watermark, Filters, and Spotlight and Magnify.
Hotspots Tab
Create or modify links and hotspots in a capture or, insert new hotspots. Click on a hotspot to view and modify the
hotspot properties or reposition and resize the hotspot.
You can only see the hotspots in the Hotspots tab.
Once you complete the hotspots, email or save the image in a format that supports hotspots. See also Image File
Types that Support Hotspots and Hotspots Not Supported Dialog Box.
Copy the image to the clipboard and paste it into Microsoft PowerPoint to retain all hotspots and Flash Popups.
To add a link or hotspot:
1. Select the shape of the Selection tool.
2. Drag to create a hotspot on the canvas.
3. Add hotspot properties including tooltip and link address.
In the Shapes group, select the shape of the hotspot. Drag on the canvas to create.
In the Links group, enter the following:
Link address: Enter the address for the link.
Tooltip: Enter the text that appears when you hover over the hotspot with the mouse.
In the Flash Popup group select the following options:
Outline: Only available with the Text Flash popup option. Select a color for the text popup border.
Fill: Only available with the Text Flash popup option. Select a color for the text popup background.
Highlight: Available for both text and graphic popups. Select the color the hotspot turns when you
hover over the hotspot with the mouse.
Click Flash Popup to select No Popup, Text Popup, or Graphic Popup.
For text option, add and format text and click OK.
For graphic option, browse and find graphic and click OK.
The Outline, Fill, and Highlight options for the popups enable after you select an option.
To use the hotspots with Flash Popup properties, you must use the E-mail Output or save as a
Macromedia Flash file (SWF). Flash is used for interactive images intended for Web sites or for
viewing within a browser.
The Editing group contains the following commands:
Select all: Select all hotspots on the canvas.
Remove Selected: Delete hotspots currently selected.
Image File Types that Support Hotspots
To use hotspots in your final image, you must e-mail or save your image as one of the following:
Web page with image (MHTML file)
Adobe PDF (PDF)
Macromedia Flash file (SWF)
Snagit Capture File (SNAG) Save as a Snagit Capture File (SNAG) to open later in Snagit Editor. SNAG files
support both hotspots and Flash Popup properties.
To use hotspots in a capture embedded in an e-mail (only with Outlook or Outlook Express), you can use one of the
following file types:
Portable Network Graphics (PNG)
JPEG image (JPG)
CompuServe GIF (GIF)
Windows Bitmap (BMP)
Hotspots Not Supported Dialog Box
There are two versions of the Hotspots Not Supported dialog box:
Hotspots Not Supported
Flash Hotspots Not Supported
In these dialog boxes, you can do one of the following:
Discard hotspots or advanced Flash hotspots and save the capture as the current file type.
Keep the hotspots and select a new file type.
Cancel the save and go back to your capture.
Tags Tab
Use the Keywords group to assign keywords to the current capture or media file, thumbnails highlighted in
the Open Captures Tray, or thumbnails highlighted in the Library.
Enter keywords in quotes to create a phrase.
The All Keywords lists all the keywords used. Select a keyword from the list to apply it to the current
capture, thumbnails highlighted in the Open Captures Tray, or thumbnails highlighted in the Library.
The Flags group contains icons you can assign to the current capture, capture thumbnails highlighted in
the Open Captures Tray, or thumbnails highlighted in the Library.
The first three flags assigned to a capture display in the Tray.
Use the Tags tab in the Search Pane to find media based on assigned flags.
All assigned flags display in color in the vertical flag row of the Search Pane when the pane is
collapsed or, at the bottom of the Search Pane when the pane is expanded.
The Details group contains information automatically gathered during capture. This is called metadata.
For captures from the Web, an active link to that Web page displays. Click the link to go to that page.
Use the metadata to search for captures. For example, all captures from a specific application or taken on
a specific date.
Click the More Details icon to view the Details dialog box. This contains additional metadata.
View Tab
The Show / Hide group gives options for turning on the gridline view, opening and closing the Search
Pane, and opening and closing the Library.
When using Gridlines, zoom in to 600% or higher to bring the gridlines into view.
Create and share high-quality screen captures with Snagit

More Related Content

What's hot

Untitled document (1)
Untitled document (1)Untitled document (1)
Untitled document (1)SofiaNisco
 
Adobe Illustrator CC 2018
Adobe Illustrator CC 2018 Adobe Illustrator CC 2018
Adobe Illustrator CC 2018 NYCCTfab
 
Adobe After Effects
Adobe After EffectsAdobe After Effects
Adobe After EffectsKat350
 
Photoshop_BlendingPhotos
Photoshop_BlendingPhotosPhotoshop_BlendingPhotos
Photoshop_BlendingPhotostutorialsruby
 
Mode d’emploie delta force xtreme mission editor
Mode d’emploie delta force xtreme mission editorMode d’emploie delta force xtreme mission editor
Mode d’emploie delta force xtreme mission editorFabian Chailler
 
Manual Segmentation-3747
Manual Segmentation-3747Manual Segmentation-3747
Manual Segmentation-3747Kitware Kitware
 
Power pointlabs quick tutorial
Power pointlabs quick tutorialPower pointlabs quick tutorial
Power pointlabs quick tutorialDa Huang
 
Modul 2: Menggunakan drawing tool
Modul 2: Menggunakan drawing toolModul 2: Menggunakan drawing tool
Modul 2: Menggunakan drawing toolIzatul Akma
 
Using Snapchat to Reach Library Patrons: Part 1 (April 2018)
Using Snapchat to Reach Library Patrons: Part 1 (April 2018)Using Snapchat to Reach Library Patrons: Part 1 (April 2018)
Using Snapchat to Reach Library Patrons: Part 1 (April 2018)ALATechSource
 
Photoshop tools and their functions
Photoshop tools and their functionsPhotoshop tools and their functions
Photoshop tools and their functionsGener Evangelista
 
Presentation on Photoshop Tools By Batra Computer Centre
Presentation on Photoshop Tools By Batra Computer CentrePresentation on Photoshop Tools By Batra Computer Centre
Presentation on Photoshop Tools By Batra Computer CentreBatra Computer Centre
 
Adobe Illustrator CS6 - Magic paintbrush howto
Adobe Illustrator CS6 - Magic paintbrush howtoAdobe Illustrator CS6 - Magic paintbrush howto
Adobe Illustrator CS6 - Magic paintbrush howtoRafael Felipe Santos
 
Sculpted skateboard fusion 360 rev2
Sculpted skateboard fusion 360 rev2Sculpted skateboard fusion 360 rev2
Sculpted skateboard fusion 360 rev2dsp39
 
AiM Spinner Design Tutorial in Solidworks
AiM Spinner Design Tutorial in SolidworksAiM Spinner Design Tutorial in Solidworks
AiM Spinner Design Tutorial in Solidworksdsp39
 

What's hot (20)

Mayacompositetutorials
MayacompositetutorialsMayacompositetutorials
Mayacompositetutorials
 
Untitled document (1)
Untitled document (1)Untitled document (1)
Untitled document (1)
 
Adobe Illustrator CC 2018
Adobe Illustrator CC 2018 Adobe Illustrator CC 2018
Adobe Illustrator CC 2018
 
Adobe After Effects
Adobe After EffectsAdobe After Effects
Adobe After Effects
 
Photoshop_BlendingPhotos
Photoshop_BlendingPhotosPhotoshop_BlendingPhotos
Photoshop_BlendingPhotos
 
Mode d’emploie delta force xtreme mission editor
Mode d’emploie delta force xtreme mission editorMode d’emploie delta force xtreme mission editor
Mode d’emploie delta force xtreme mission editor
 
Manual Segmentation-3747
Manual Segmentation-3747Manual Segmentation-3747
Manual Segmentation-3747
 
J charts help
J charts helpJ charts help
J charts help
 
dr_4
dr_4dr_4
dr_4
 
Power pointlabs quick tutorial
Power pointlabs quick tutorialPower pointlabs quick tutorial
Power pointlabs quick tutorial
 
Modul 2: Menggunakan drawing tool
Modul 2: Menggunakan drawing toolModul 2: Menggunakan drawing tool
Modul 2: Menggunakan drawing tool
 
Juliet evangelista
Juliet evangelistaJuliet evangelista
Juliet evangelista
 
Using Snapchat to Reach Library Patrons: Part 1 (April 2018)
Using Snapchat to Reach Library Patrons: Part 1 (April 2018)Using Snapchat to Reach Library Patrons: Part 1 (April 2018)
Using Snapchat to Reach Library Patrons: Part 1 (April 2018)
 
Photoshop tools and their functions
Photoshop tools and their functionsPhotoshop tools and their functions
Photoshop tools and their functions
 
Adobe Photoshop Tools
Adobe Photoshop ToolsAdobe Photoshop Tools
Adobe Photoshop Tools
 
Map Browser Training
Map Browser TrainingMap Browser Training
Map Browser Training
 
Presentation on Photoshop Tools By Batra Computer Centre
Presentation on Photoshop Tools By Batra Computer CentrePresentation on Photoshop Tools By Batra Computer Centre
Presentation on Photoshop Tools By Batra Computer Centre
 
Adobe Illustrator CS6 - Magic paintbrush howto
Adobe Illustrator CS6 - Magic paintbrush howtoAdobe Illustrator CS6 - Magic paintbrush howto
Adobe Illustrator CS6 - Magic paintbrush howto
 
Sculpted skateboard fusion 360 rev2
Sculpted skateboard fusion 360 rev2Sculpted skateboard fusion 360 rev2
Sculpted skateboard fusion 360 rev2
 
AiM Spinner Design Tutorial in Solidworks
AiM Spinner Design Tutorial in SolidworksAiM Spinner Design Tutorial in Solidworks
AiM Spinner Design Tutorial in Solidworks
 

Viewers also liked

Reuters: Pictures of the Year 2016 (Part 2)
Reuters: Pictures of the Year 2016 (Part 2)Reuters: Pictures of the Year 2016 (Part 2)
Reuters: Pictures of the Year 2016 (Part 2)maditabalnco
 
What's Next in Growth? 2016
What's Next in Growth? 2016What's Next in Growth? 2016
What's Next in Growth? 2016Andrew Chen
 
The Six Highest Performing B2B Blog Post Formats
The Six Highest Performing B2B Blog Post FormatsThe Six Highest Performing B2B Blog Post Formats
The Six Highest Performing B2B Blog Post FormatsBarry Feldman
 
The Outcome Economy
The Outcome EconomyThe Outcome Economy
The Outcome EconomyHelge Tennø
 
32 Ways a Digital Marketing Consultant Can Help Grow Your Business
32 Ways a Digital Marketing Consultant Can Help Grow Your Business32 Ways a Digital Marketing Consultant Can Help Grow Your Business
32 Ways a Digital Marketing Consultant Can Help Grow Your BusinessBarry Feldman
 

Viewers also liked (6)

Stay Up To Date on the Latest Happenings in the Boardroom: Recommended Summer...
Stay Up To Date on the Latest Happenings in the Boardroom: Recommended Summer...Stay Up To Date on the Latest Happenings in the Boardroom: Recommended Summer...
Stay Up To Date on the Latest Happenings in the Boardroom: Recommended Summer...
 
Reuters: Pictures of the Year 2016 (Part 2)
Reuters: Pictures of the Year 2016 (Part 2)Reuters: Pictures of the Year 2016 (Part 2)
Reuters: Pictures of the Year 2016 (Part 2)
 
What's Next in Growth? 2016
What's Next in Growth? 2016What's Next in Growth? 2016
What's Next in Growth? 2016
 
The Six Highest Performing B2B Blog Post Formats
The Six Highest Performing B2B Blog Post FormatsThe Six Highest Performing B2B Blog Post Formats
The Six Highest Performing B2B Blog Post Formats
 
The Outcome Economy
The Outcome EconomyThe Outcome Economy
The Outcome Economy
 
32 Ways a Digital Marketing Consultant Can Help Grow Your Business
32 Ways a Digital Marketing Consultant Can Help Grow Your Business32 Ways a Digital Marketing Consultant Can Help Grow Your Business
32 Ways a Digital Marketing Consultant Can Help Grow Your Business
 

Similar to Create and share high-quality screen captures with Snagit

Job Aid Makeover - Captivate
Job Aid Makeover - CaptivateJob Aid Makeover - Captivate
Job Aid Makeover - CaptivateS. Rose
 
TECHNOLOGY LIVLYHO ICT GRADE 9 QUARTER 3
TECHNOLOGY LIVLYHO ICT GRADE 9 QUARTER 3TECHNOLOGY LIVLYHO ICT GRADE 9 QUARTER 3
TECHNOLOGY LIVLYHO ICT GRADE 9 QUARTER 3kennethdecena54
 
How to Edit in Photoshop (Part 1): Inserting, Cropping, and Fixing Images
How to Edit in Photoshop (Part 1): Inserting, Cropping, and Fixing ImagesHow to Edit in Photoshop (Part 1): Inserting, Cropping, and Fixing Images
How to Edit in Photoshop (Part 1): Inserting, Cropping, and Fixing ImagesMaria Eloisa Blanza
 
miniPhotoshop
miniPhotoshopminiPhotoshop
miniPhotoshopKim John
 
NewTek Lightwave 3D: Learning the Layout
NewTek Lightwave 3D: Learning the LayoutNewTek Lightwave 3D: Learning the Layout
NewTek Lightwave 3D: Learning the LayoutSamuel Edsall
 
Gl13 m0-c4-presentation
Gl13 m0-c4-presentationGl13 m0-c4-presentation
Gl13 m0-c4-presentationTracie King
 
ETECH_WEEK7-Image-Manipulation-Techniques-1.pdf
ETECH_WEEK7-Image-Manipulation-Techniques-1.pdfETECH_WEEK7-Image-Manipulation-Techniques-1.pdf
ETECH_WEEK7-Image-Manipulation-Techniques-1.pdfbongsantiago96
 
Ppt exercise
Ppt exercisePpt exercise
Ppt exercisekaz naqvi
 
Final Cut Pro 7 Certification Lesson 1
Final Cut Pro 7 Certification Lesson 1Final Cut Pro 7 Certification Lesson 1
Final Cut Pro 7 Certification Lesson 1Samuel Edsall
 

Similar to Create and share high-quality screen captures with Snagit (20)

Snagit
SnagitSnagit
Snagit
 
Snagit Gsg
Snagit GsgSnagit Gsg
Snagit Gsg
 
Scanner Guide
Scanner GuideScanner Guide
Scanner Guide
 
Pf track
Pf trackPf track
Pf track
 
Ksnapshot
KsnapshotKsnapshot
Ksnapshot
 
Job Aid Makeover - Captivate
Job Aid Makeover - CaptivateJob Aid Makeover - Captivate
Job Aid Makeover - Captivate
 
TECHNOLOGY LIVLYHO ICT GRADE 9 QUARTER 3
TECHNOLOGY LIVLYHO ICT GRADE 9 QUARTER 3TECHNOLOGY LIVLYHO ICT GRADE 9 QUARTER 3
TECHNOLOGY LIVLYHO ICT GRADE 9 QUARTER 3
 
Mayamatchmovertutorials
MayamatchmovertutorialsMayamatchmovertutorials
Mayamatchmovertutorials
 
Basic tutorials
Basic tutorialsBasic tutorials
Basic tutorials
 
Basic tutorials
Basic tutorialsBasic tutorials
Basic tutorials
 
How to Edit in Photoshop (Part 1): Inserting, Cropping, and Fixing Images
How to Edit in Photoshop (Part 1): Inserting, Cropping, and Fixing ImagesHow to Edit in Photoshop (Part 1): Inserting, Cropping, and Fixing Images
How to Edit in Photoshop (Part 1): Inserting, Cropping, and Fixing Images
 
miniPhotoshop
miniPhotoshopminiPhotoshop
miniPhotoshop
 
NewTek Lightwave 3D: Learning the Layout
NewTek Lightwave 3D: Learning the LayoutNewTek Lightwave 3D: Learning the Layout
NewTek Lightwave 3D: Learning the Layout
 
Gl13 m0-c4-presentation
Gl13 m0-c4-presentationGl13 m0-c4-presentation
Gl13 m0-c4-presentation
 
SnagIt Job Aid
SnagIt Job AidSnagIt Job Aid
SnagIt Job Aid
 
Photoshop
PhotoshopPhotoshop
Photoshop
 
How to use Jing
How to use JingHow to use Jing
How to use Jing
 
ETECH_WEEK7-Image-Manipulation-Techniques-1.pdf
ETECH_WEEK7-Image-Manipulation-Techniques-1.pdfETECH_WEEK7-Image-Manipulation-Techniques-1.pdf
ETECH_WEEK7-Image-Manipulation-Techniques-1.pdf
 
Ppt exercise
Ppt exercisePpt exercise
Ppt exercise
 
Final Cut Pro 7 Certification Lesson 1
Final Cut Pro 7 Certification Lesson 1Final Cut Pro 7 Certification Lesson 1
Final Cut Pro 7 Certification Lesson 1
 

Recently uploaded

Pigging Solutions in Pet Food Manufacturing
Pigging Solutions in Pet Food ManufacturingPigging Solutions in Pet Food Manufacturing
Pigging Solutions in Pet Food ManufacturingPigging Solutions
 
Breaking the Kubernetes Kill Chain: Host Path Mount
Breaking the Kubernetes Kill Chain: Host Path MountBreaking the Kubernetes Kill Chain: Host Path Mount
Breaking the Kubernetes Kill Chain: Host Path MountPuma Security, LLC
 
My Hashitalk Indonesia April 2024 Presentation
My Hashitalk Indonesia April 2024 PresentationMy Hashitalk Indonesia April 2024 Presentation
My Hashitalk Indonesia April 2024 PresentationRidwan Fadjar
 
Hyderabad Call Girls Khairatabad ✨ 7001305949 ✨ Cheap Price Your Budget
Hyderabad Call Girls Khairatabad ✨ 7001305949 ✨ Cheap Price Your BudgetHyderabad Call Girls Khairatabad ✨ 7001305949 ✨ Cheap Price Your Budget
Hyderabad Call Girls Khairatabad ✨ 7001305949 ✨ Cheap Price Your BudgetEnjoy Anytime
 
How to Remove Document Management Hurdles with X-Docs?
How to Remove Document Management Hurdles with X-Docs?How to Remove Document Management Hurdles with X-Docs?
How to Remove Document Management Hurdles with X-Docs?XfilesPro
 
Snow Chain-Integrated Tire for a Safe Drive on Winter Roads
Snow Chain-Integrated Tire for a Safe Drive on Winter RoadsSnow Chain-Integrated Tire for a Safe Drive on Winter Roads
Snow Chain-Integrated Tire for a Safe Drive on Winter RoadsHyundai Motor Group
 
Unblocking The Main Thread Solving ANRs and Frozen Frames
Unblocking The Main Thread Solving ANRs and Frozen FramesUnblocking The Main Thread Solving ANRs and Frozen Frames
Unblocking The Main Thread Solving ANRs and Frozen FramesSinan KOZAK
 
Azure Monitor & Application Insight to monitor Infrastructure & Application
Azure Monitor & Application Insight to monitor Infrastructure & ApplicationAzure Monitor & Application Insight to monitor Infrastructure & Application
Azure Monitor & Application Insight to monitor Infrastructure & ApplicationAndikSusilo4
 
Artificial intelligence in the post-deep learning era
Artificial intelligence in the post-deep learning eraArtificial intelligence in the post-deep learning era
Artificial intelligence in the post-deep learning eraDeakin University
 
08448380779 Call Girls In Greater Kailash - I Women Seeking Men
08448380779 Call Girls In Greater Kailash - I Women Seeking Men08448380779 Call Girls In Greater Kailash - I Women Seeking Men
08448380779 Call Girls In Greater Kailash - I Women Seeking MenDelhi Call girls
 
AI as an Interface for Commercial Buildings
AI as an Interface for Commercial BuildingsAI as an Interface for Commercial Buildings
AI as an Interface for Commercial BuildingsMemoori
 
#StandardsGoals for 2024: What’s new for BISAC - Tech Forum 2024
#StandardsGoals for 2024: What’s new for BISAC - Tech Forum 2024#StandardsGoals for 2024: What’s new for BISAC - Tech Forum 2024
#StandardsGoals for 2024: What’s new for BISAC - Tech Forum 2024BookNet Canada
 
FULL ENJOY 🔝 8264348440 🔝 Call Girls in Diplomatic Enclave | Delhi
FULL ENJOY 🔝 8264348440 🔝 Call Girls in Diplomatic Enclave | DelhiFULL ENJOY 🔝 8264348440 🔝 Call Girls in Diplomatic Enclave | Delhi
FULL ENJOY 🔝 8264348440 🔝 Call Girls in Diplomatic Enclave | Delhisoniya singh
 
Injustice - Developers Among Us (SciFiDevCon 2024)
Injustice - Developers Among Us (SciFiDevCon 2024)Injustice - Developers Among Us (SciFiDevCon 2024)
Injustice - Developers Among Us (SciFiDevCon 2024)Allon Mureinik
 
Key Features Of Token Development (1).pptx
Key  Features Of Token  Development (1).pptxKey  Features Of Token  Development (1).pptx
Key Features Of Token Development (1).pptxLBM Solutions
 
Benefits Of Flutter Compared To Other Frameworks
Benefits Of Flutter Compared To Other FrameworksBenefits Of Flutter Compared To Other Frameworks
Benefits Of Flutter Compared To Other FrameworksSoftradix Technologies
 
Automating Business Process via MuleSoft Composer | Bangalore MuleSoft Meetup...
Automating Business Process via MuleSoft Composer | Bangalore MuleSoft Meetup...Automating Business Process via MuleSoft Composer | Bangalore MuleSoft Meetup...
Automating Business Process via MuleSoft Composer | Bangalore MuleSoft Meetup...shyamraj55
 
Advanced Test Driven-Development @ php[tek] 2024
Advanced Test Driven-Development @ php[tek] 2024Advanced Test Driven-Development @ php[tek] 2024
Advanced Test Driven-Development @ php[tek] 2024Scott Keck-Warren
 
Transcript: #StandardsGoals for 2024: What’s new for BISAC - Tech Forum 2024
Transcript: #StandardsGoals for 2024: What’s new for BISAC - Tech Forum 2024Transcript: #StandardsGoals for 2024: What’s new for BISAC - Tech Forum 2024
Transcript: #StandardsGoals for 2024: What’s new for BISAC - Tech Forum 2024BookNet Canada
 

Recently uploaded (20)

Pigging Solutions in Pet Food Manufacturing
Pigging Solutions in Pet Food ManufacturingPigging Solutions in Pet Food Manufacturing
Pigging Solutions in Pet Food Manufacturing
 
Breaking the Kubernetes Kill Chain: Host Path Mount
Breaking the Kubernetes Kill Chain: Host Path MountBreaking the Kubernetes Kill Chain: Host Path Mount
Breaking the Kubernetes Kill Chain: Host Path Mount
 
My Hashitalk Indonesia April 2024 Presentation
My Hashitalk Indonesia April 2024 PresentationMy Hashitalk Indonesia April 2024 Presentation
My Hashitalk Indonesia April 2024 Presentation
 
Hyderabad Call Girls Khairatabad ✨ 7001305949 ✨ Cheap Price Your Budget
Hyderabad Call Girls Khairatabad ✨ 7001305949 ✨ Cheap Price Your BudgetHyderabad Call Girls Khairatabad ✨ 7001305949 ✨ Cheap Price Your Budget
Hyderabad Call Girls Khairatabad ✨ 7001305949 ✨ Cheap Price Your Budget
 
How to Remove Document Management Hurdles with X-Docs?
How to Remove Document Management Hurdles with X-Docs?How to Remove Document Management Hurdles with X-Docs?
How to Remove Document Management Hurdles with X-Docs?
 
Snow Chain-Integrated Tire for a Safe Drive on Winter Roads
Snow Chain-Integrated Tire for a Safe Drive on Winter RoadsSnow Chain-Integrated Tire for a Safe Drive on Winter Roads
Snow Chain-Integrated Tire for a Safe Drive on Winter Roads
 
Unblocking The Main Thread Solving ANRs and Frozen Frames
Unblocking The Main Thread Solving ANRs and Frozen FramesUnblocking The Main Thread Solving ANRs and Frozen Frames
Unblocking The Main Thread Solving ANRs and Frozen Frames
 
Azure Monitor & Application Insight to monitor Infrastructure & Application
Azure Monitor & Application Insight to monitor Infrastructure & ApplicationAzure Monitor & Application Insight to monitor Infrastructure & Application
Azure Monitor & Application Insight to monitor Infrastructure & Application
 
Artificial intelligence in the post-deep learning era
Artificial intelligence in the post-deep learning eraArtificial intelligence in the post-deep learning era
Artificial intelligence in the post-deep learning era
 
08448380779 Call Girls In Greater Kailash - I Women Seeking Men
08448380779 Call Girls In Greater Kailash - I Women Seeking Men08448380779 Call Girls In Greater Kailash - I Women Seeking Men
08448380779 Call Girls In Greater Kailash - I Women Seeking Men
 
AI as an Interface for Commercial Buildings
AI as an Interface for Commercial BuildingsAI as an Interface for Commercial Buildings
AI as an Interface for Commercial Buildings
 
#StandardsGoals for 2024: What’s new for BISAC - Tech Forum 2024
#StandardsGoals for 2024: What’s new for BISAC - Tech Forum 2024#StandardsGoals for 2024: What’s new for BISAC - Tech Forum 2024
#StandardsGoals for 2024: What’s new for BISAC - Tech Forum 2024
 
FULL ENJOY 🔝 8264348440 🔝 Call Girls in Diplomatic Enclave | Delhi
FULL ENJOY 🔝 8264348440 🔝 Call Girls in Diplomatic Enclave | DelhiFULL ENJOY 🔝 8264348440 🔝 Call Girls in Diplomatic Enclave | Delhi
FULL ENJOY 🔝 8264348440 🔝 Call Girls in Diplomatic Enclave | Delhi
 
Injustice - Developers Among Us (SciFiDevCon 2024)
Injustice - Developers Among Us (SciFiDevCon 2024)Injustice - Developers Among Us (SciFiDevCon 2024)
Injustice - Developers Among Us (SciFiDevCon 2024)
 
Vulnerability_Management_GRC_by Sohang Sengupta.pptx
Vulnerability_Management_GRC_by Sohang Sengupta.pptxVulnerability_Management_GRC_by Sohang Sengupta.pptx
Vulnerability_Management_GRC_by Sohang Sengupta.pptx
 
Key Features Of Token Development (1).pptx
Key  Features Of Token  Development (1).pptxKey  Features Of Token  Development (1).pptx
Key Features Of Token Development (1).pptx
 
Benefits Of Flutter Compared To Other Frameworks
Benefits Of Flutter Compared To Other FrameworksBenefits Of Flutter Compared To Other Frameworks
Benefits Of Flutter Compared To Other Frameworks
 
Automating Business Process via MuleSoft Composer | Bangalore MuleSoft Meetup...
Automating Business Process via MuleSoft Composer | Bangalore MuleSoft Meetup...Automating Business Process via MuleSoft Composer | Bangalore MuleSoft Meetup...
Automating Business Process via MuleSoft Composer | Bangalore MuleSoft Meetup...
 
Advanced Test Driven-Development @ php[tek] 2024
Advanced Test Driven-Development @ php[tek] 2024Advanced Test Driven-Development @ php[tek] 2024
Advanced Test Driven-Development @ php[tek] 2024
 
Transcript: #StandardsGoals for 2024: What’s new for BISAC - Tech Forum 2024
Transcript: #StandardsGoals for 2024: What’s new for BISAC - Tech Forum 2024Transcript: #StandardsGoals for 2024: What’s new for BISAC - Tech Forum 2024
Transcript: #StandardsGoals for 2024: What’s new for BISAC - Tech Forum 2024
 

Create and share high-quality screen captures with Snagit

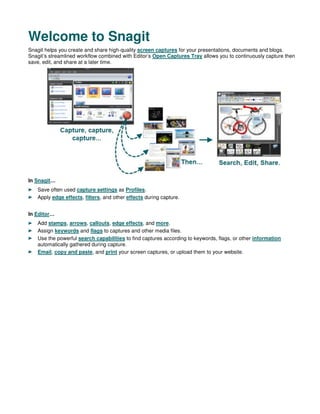
  • 1. Welcome to Snagit Snagit helps you create and share high-quality screen captures for your presentations, documents and blogs. Snagit’s streamlined workflow combined with Editor’s Open Captures Tray allows you to continuously capture then save, edit, and share at a later time. In Snagit… Save often used capture settings as Profiles. Apply edge effects, filters, and other effects during capture. In Editor… Add stamps, arrows, callouts, edge effects, and more. Assign keywords and flags to captures and other media files. Use the powerful search capabilities to find captures according to keywords, flags, or other information automatically gathered during capture. Email, copy and paste, and print your screen captures, or upload them to your website.
  • 2. Snagit Interface Overview A Profile includes an Input, Output, and Effects combination. The Capture Profile Properties display as a tooltip when the mouse hovers over the profile icon. Use the Profile Toolbar to create and edit profiles. New Profile saves the current Profile Settings as a new capture profile. Use New Profile Wizard to create a new profile by walking you through all profile settings. Save Profile overwrites a selected profile with the current Profile Settings. List View displays the profiles in a list. Thumbnail View displays the profiles as icons. Organize Profiles displays the Organize Profiles dialog box. Find informational tips throughout Snagit and Snagit Editor as you hover over icons, buttons, etc. Click the Capture button to initiate the capture. You can also use the default global hotkey, <PRINT SCREEN>. See also Hotkeys. A Capture Mode is the type of capture you want to take. To change the mode, click on the blue button next to the Capture button. There are five different capture modes: Image Capture, Text Capture, Video Capture, Web Capture, Printer Capture. Options define how the capture looks or if you preview your capture in Editor before sending it to Output. For example, options include: capture the mouse cursor, set a timer or delayed capture, capture multiple areas, etc. Use the Profile Settings to select the capture Mode and Input, Output, and Effects. Profile Settings update when you select different profiles in the Profiles pane.
  • 3. Related Tasks provides easy access to: Convert images, Turn on OneClick, Setup Snagit printer, Organize profiles, and Manage Accessories. Quick Launch gives access to Snagit Editor and Editor’s Library view. Snagit Hotkeys Hotkeys provide keyboard shortcuts for common tasks. To customize the hotkeys, select Snagit > Tools > Program Preferences > Hotkeys or right-click on a profile and select Set Hotkey. To Do This Press Global capture Initiate a capture with the currently selected profile. <Print Screen> Hide/Unhide Snagit <CTRL + SHIFT + X> Repeat Last Capture <CTRL + SHIFT + R> Image Capture Capture an image of anything your screen. Use the following basic capture procedure to take your first capture. 1. Open what you want to capture. 2. Without minimizing what you want to capture, open Snagit. 3. Select a capture profile from the Basic Capture Profiles. 4. Click Capture. Snagit disappears and a box with an explanation of how to complete the capture appears. Follow the instructions to complete the capture. When complete, the capture appears in Editor. In Editor: Use the Draw tab to annotate the capture. Use the Image tab to add special Effects. To share the capture, click an Output on the Send tab. In Editor, the capture remains in the Open Captures Tray and in Recent captures. Snagit provides flexibility and versatility in what you want to capture. For more information see:
  • 4. Entire Screen Window Region Fixed Region Object Menu Scrolling Image Capture Scrolling Text Capture Capture the Entire Screen If you have multiple monitors, Screen captures both monitors. To only capture one monitor, use Capture a Region. Setup Instructions 1. In Snagit, select Image capture mode. 2. For the Input, select Screen. 3. Select the Output and Effects. 4. Click the Capture button or press the global capture hotkey. The capture is sent to the selected Output. 5. For additional capture options, see Image Capture. Capture a Window Capture a window or an element on the window such as the window frame, scroll bar, open menu, window control button, toolbar, and title.
  • 5. Setup Instructions 1. In Snagit, select Image capture mode. 2. For the Input, select Window. 3. Select the Output and Effects. 4. Click the Capture button or press the capture hotkey. 5. A red rectangle appears. Move the rectangle to choose a window. Click to complete the capture. The capture is sent to the selected Output. 6. For additional capture options, see Image Capture. Capture a Region Setup Instructions 1. In Snagit, select Image capture mode. 2. For the Input, select Region 3. Select the Output and Effects. 4. Click the Capture button or press the capture hotkey.
  • 6. 5. Drag the cursor to create a red border around the area to capture. Use the magnifier window to help see the edges of the region. 6. Release the mouse to complete the capture. The capture is sent to the selected Output. For additional capture options, see Image Capture. Capture a Fixed Region Capture a preset rectangular area you specify. 1. In Snagit, select Image capture mode. 2. For the Input, select Fixed Region. 3. In the Fixed Region tab, enter the width and height. Click OK. 4. Select the Output and Effects. 5. Click the Capture button or press the capture hotkey. 6. A red rectangle appears. Move the rectangle to choose a window. Click to complete the capture. The capture is sent to the selected Output. For additional capture options, see Image Capture. Capture an Object Capture a small item on your computer screen such as a toolbar button, icon, etc.
  • 7. Setup Instructions 1. In Snagit, select Image capture mode. 2. For the Input, select Object. 3. Select the Output and Effects. 4. Click the Capture button or press the capture hotkey. 5. A red rectangle appears. Move the rectangle to choose an object. Click to complete the capture. The capture is sent to the selected Output. For additional capture options, see Image Capture. Capture a Menu Capture a drop-down or cascading menu.
  • 8. Setup Instructions 1. In Snagit, select Image capture mode. 2. For the Input, select Object. 3. Select Snagit > Options > Timed Capture button. The Timer Setup dialog box appears. 4. In the Delay / Schedule tab, select the Enable delayed / scheduled capture option. 5. Click OK. 6. Select the Output and Effects. 7. Click the Capture button or press the capture hotkey. 8. Open the menu to capture. Don’t move the mouse or the open menu until the capture is taken. 9. Click the mouse to complete the capture. The capture is sent to the selected Output. 10. For additional capture options, see Image Capture.
  • 9. Scrolling Image Capture Setup Instructions 1. In Snagit, select Image capture mode. 2. For the Input, select Scrolling > Auto Scroll Window. 3. Select Input > Properties > Scrolling tab> Scroll from top of document and Scroll direction: Vertical. 4. Select the Output and Effects. 5. Click the browser window to give it focus. 6. Click the Capture button or press the capture hotkey. 7. A red rectangle appears. Move the rectangle to choose a browser window. Click the mouse. Snagit pauses momentarily to configure the capture. 8. The capture area begins to scroll automatically, continuing until the lower edge of the scrolling window is reached. The capture is sent to the selected Output. For many other scrolling image capture instructions, see Take Scrolling, Large, or Oversized Image Captures. For additional capture options, see Image Capture.
  • 10. Scrolling Text Capture Setup Instructions 1. In Snagit, select Text capture mode. 2. For the Input, select Scrolling > Auto Scroll Window. 3. Select Input down arrow > Properties > Scrolling tab> Scroll from top of document. 4. Select the Output and Effects. 5. Click the browser window to capture to give it focus. 6. Click the Capture button or press the capture hotkey. 7. A red rectangle appears. Move the rectangle to choose a browser window. Click the mouse. Snagit pauses momentarily to configure the capture. 8. The capture area begins to scroll automatically, continuing until the lower edge of the scrolling window is reached. The capture is sent to the selected Output. For additional capture options, see Image Capture. Capture a Shape Take a capture using different shapes to define the capture area.
  • 11. Setup Instructions 1. In Snagit, select Image capture mode. 2. For the Input, select Shape > then the desired shape. 3. Click the Capture button or press the capture hotkey. 4. Drag the cursor over the area to capture. A red border defines the area to capture as you drag. 5. Use the tips below to correctly define the shape and close the capture. Free Hand Capture a closed loop. The loop automatically closes when you release the mouse. When mouse is released, the capture is taken. Ellipse Hold <SHIFT> during the capture to create a perfect circle. When mouse is released, the capture is taken. Rounded Rectangle Hold <SHIFT> during the capture to create a perfect square. When mouse is released, the capture is taken. Triangle The height and width are determined by the mouse movement. Hold <SHIFT> during the capture to create a perfect equilateral triangle. When mouse is released, the capture is taken. Polygon The area must be a closed shape with straight lines. Each time you click, a new line starts. Double-click to close the shape. When mouse is released, the capture is taken. For additional capture options, see Image Capture. Capture Clipboard Contents Capture the graphic or text contents from the Windows Clipboard. Setup Instructions 1. In Snagit, select Image or Text capture mode. 2. For the Input, select Advanced > Clipboard. 3. Select the Output and Effects.
  • 12. 4. Click the Capture button or press the capture hotkey. 5. A red rectangle appears. Move the rectangle to choose a region. Click to complete the capture. Click the mouse to complete the capture. The capture is sent to the selected Output. If you have text on the clipboard, and you select the image capture mode, Snagit makes an image Output file even if the captured item is text. If you select the text capture mode, Snagit makes an ASCII text file from the text Input. For additional capture options, see Image Capture. Create a Capture Clipboard Chain Enable Snagit to capture every time you copy something to the Windows Clipboard. Setup Instructions 1. In Snagit, select Image capture mode. 2. For the Input, select Advanced > Clipboard. 3. Select Input, select Advanced > Clipboard Chain. 4. Select the Output and Effects. 5. Click the Capture button or press the capture hotkey. A confirmation dialog box appears. 6. The clipboard contents are automatically captured each time you copy something to the Clipboard. To disable Clipboard Chain capturing, in Snagit, select Input, select Advanced > Clipboard Chain. If you have text on the clipboard, and you select the image capture mode, Snagit makes an image Output file even if the captured item is text. 7. Click the Capture button or press the capture hotkey. For additional capture options, see Image Capture. Capture from Program File Capture bitmap images, icons, or cursors contained in an .EXE or .DLL file. Setup Instructions 1. In Snagit, select Image capture mode. 2. For the Input, select Advanced > Program File. 3. Select the Output and Effects. 4. Click the Capture button or press the capture hotkey. 5. The Open dialog box appears. Browse and select a file with an .EXE or.DLL extension. Click Open. 6. Select an image in the Images area. Click the Browse button to search for an image. If the image is larger than the preview pane, click on the image within the pane and drag into view. 7. Click OK. The capture is sent to the selected Output. For additional capture options, see Image Capture. Capture in Full-screen DOS Capture the contents of a full screen MS-DOS session window. Snagit automatically inverts the colors of the capture.
  • 13. You must press the <Print Screen> key to capture the DOS application. Setup Instructions 1. In Snagit, select Image capture mode. 2. For the Input, select Advanced > Full-screen DOS. This automates two Snagit parameters: The Clipboard Chain option is turned to “on” allowing Snagit to capture with the capture hotkey. The Input is set to Clipboard. 3. Select the Output and Effects. 4. Open MS-DOS to the screen to capture. Click <ALT + ENTER> to change between windowed MS-DOS mode and full-screen MS-DOS. 5. Press the <Print Screen> key. The capture is sent to the selected Output. 6. For additional capture options, see Image Capture. Capture Off-Screen or Window Larger than Screen Select a partially-shown window and capture the full window or capture windows larger than the screen including the window frame. Available on Windows XP and Vista only.
  • 14. Setup Instructions 1. In Snagit, select Image capture mode. 2. For the Input, select Advanced > Extended Window. 3. Select the Output and Effects. 4. Click the Capture button or press the capture hotkey. 5. A red rectangle appears. Move the rectangle to choose a window. Click to complete the capture. 6. The Extended Window Capture Preview dialog box opens. Use to adjust the size of the window if necessary. 7. Click OK. The capture is sent to the selected Output. For additional capture options, see Image Capture. Capture the Desktop Wallpaper Setup Instructions
  • 15. 1. In Snagit, select Image capture mode. 2. For the Input, select Advanced > Wallpaper. 3. Select the Output and Effects. 4. Click the Capture button or press the capture hotkey. The capture is sent to the selected Output. For additional capture options, see Image Capture. Capture from a Scanner or Camera Capture images from a connected TWAIN-compliant device such as an optical scanner or digital camera A TWAIN-compliant optical scanner or digital camera must be connected and configured in your computer before selecting this Input. Setup Instructions 1. In Snagit, select Image capture mode. 2. For the Input, select Advanced > Scanners and Cameras. 3. If you have more than one TWAIN-compliant device connected to your computer, select Input down arrow > Properties > Scanners and Cameras tab. Select the correct device. Click OK. 4. Select the Output and Effects. 5. Click the Capture button or press the capture hotkey. 6. The TWAIN driver for the selected device displays a user interface to select the image(s) to acquire. Please see your device documentation for the use of this interface. For additional capture options, see Image Capture. Capture Multiple Areas of the Screen Select multiple areas of the screen to capture. Setup Instructions 1. In Snagit, select Image capture mode. 2. For the Input, select Window, Region, Fixed Region, or Object. 3. Select Input down arrow > Properties > General tab to select the background color of the completed capture. White is the default color. Click OK.
  • 16. 4. Select the Output and Effects. 5. Click the Multiple Area Capture button in the Options area. 6. Click the Capture button or press the capture hotkey. 7. As you select areas, colors invert to show the selection. Select multiple areas. To unselect an area, hold <ALT> and left-click. 8. To finish capturing, right-click and select Finish from the popup menu. The image captured shows only those areas you selected in their original locations. Selection Directions Window Input: Use the cursor to select more than one window on your screen. Region Input: Click and drag the cursor to select more than one region on your screen. Fixed Region Input: Use the cursor to select more than one fixed-size region on your screen. Set the fixed region size with Input > Properties > Fixed Region. Uncheck the Use fixed starting point box. Object Input: Use the cursor to select more than one object on your screen. For additional capture options see Image Capture. Include the Cursor in an Image Capture Use the Include Cursor option to capture the mouse pointer in an image capture. To include the cursor, click the Include Cursor button. The image above shows the Include Cursor option selected. To turn off, click the Include Cursor button again. Use the capture timer option or position the cursor and use the hotkey combination to take your capture to make sure the cursor is in the correct position. Preview a Capture in Snagit Editor Use the Preview in Editor option to open a capture in Snagit Editor before sending it to the desired Output. In Snagit Editor make edits, add annotations, apply keywords and flags, or discard the capture. To view your capture in Snagit Editor, click the Preview in Editor button. The image above shows the Preview in Editor option selected. To turn off, click the Preview in Editor button again.
  • 17. Scrolling, Large, or Oversized Image Captures (Auto Scroll) Snagit’s Auto Scroll feature captures images too long or wide to see in a window or browser. Different Auto Scroll options help you get exactly the capture you need. Auto Scroll Tip for Success: Look for the Cursor Icon When taking an auto scroll capture, look at the cursor that appears when you click the Capture button and you move around the screen. Areas that Snagit determines are not scrollable using the current Auto Scroll settings display the following cursor: (Not Scrollable with Current Settings) Try a different Auto Scroll option such as Custom Scroll. Cursor Auto Scroll Capture Type Instructions Auto Scroll Window Both Vertically and Horizontally Click the left mouse button to begin the capture. Auto Scroll Window Vertically Click the left mouse button to begin the capture. Auto Scroll Window Horizontally Click the left mouse button to begin the capture. Custom Scroll a Region Drag a region with the cursor then click on the down arrow control with the left mouse button to begin the capture. For specific examples of scrolling captures, see: Web Page Longer than Browser Window Web Page Longer and Wider than Browser Window Vertical Region of Web Page with Active Links Region of Web Page Not Visible In Browser Window Secondary Web Page Window Longer and Wider than Browser Window Region of Web Page Longer than Browser Window Web Page Wider than the Browser Window Spreadsheet Longer than the Application Window Application Window Containing List of File Names or Other Data Multiple Page PDF Document Scrolling Pane within an Application Window Music or Video Playlist within an Application Window
  • 18. Web Page Longer than Browser Window Setup Instructions 1. In Snagit, select Image capture mode. 2. For the Input, select Scrolling option > Auto Scroll Window. 3. Select Input down arrow > Properties > Scrolling tab> Scroll from top of document and Scroll direction: Vertical. Click OK. 4. Select the Output and Effects. 5. Click the browser window to give it focus. 6. Click the Capture button or press the capture hotkey. 7. A red rectangle appears. Move the rectangle to choose a browser window. Click to complete the capture. Snagit pauses momentarily to configure the capture. 8. The capture area begins to scroll automatically, continuing until the lower edge of the scrolling window is reached. The capture is sent to the selected Output. For additional capture options, see Take Scrolling, Large, or Oversized Image Captures.
  • 19. Web Page Longer and Wider than Browser Window Setup Instructions 1. In Snagit, select Image capture mode. 2. For the Input, select Scrolling option > Auto Scroll Window. 3. Select Input down arrow > Properties > Scrolling tab> Scroll from top of document and Scroll direction: Both. Click OK. 4. Select the Output and Effects. 5. Click the browser window to give it focus. 6. Click the Capture button or press the capture hotkey. 7. A red rectangle appears. Move the rectangle to choose a browser window. Click to complete the capture. Snagit pauses momentarily to configure the capture. 8. The capture area begins to scroll automatically, continuing until the lower edge of the scrolling window is reached. 9. Once the bottom is reached, Snagit returns to the top of the window, moves over, and finishes scrolling. The capture is sent to the selected Output. For additional capture options, see Take Scrolling, Large, or Oversized Image Captures.
  • 20. Vertical Region of Web Page with Active Links Setup Instructions 1. In Snagit, select Image capture mode. 2. For the Input, select Scrolling option > Custom Scroll. 3. Select the Input down arrow > Keep Links. 4. Select the Output and Effects. 5. Click the browser window to give it focus. 6. Click the Capture button or press the capture hotkey. 7. Drag the cursor over the area to capture. A red rectangle appears. 8. Click the down arrow on the window’s vertical scrollbar. 9. Snagit pauses momentarily to configure the capture. The capture area begins to scroll automatically, continuing until the lower edge of the scrolling window is reached. The capture is sent to the selected Output. For additional capture options, see Take Scrolling, Large, or Oversized Image Captures.
  • 21. Region of Web Page Not Visible In Browser Window Setup Instructions 1. In Snagit, select Image capture mode. 2. For the Input, select Scrolling option > Auto Scroll Window. 3. Select the Input down arrow > Properties > Scrolling tab > Uncheck Scroll from top of document and select Scroll direction: Vertical. Click OK. 4. Select the Output and Effects. 5. Click the browser window to give it focus. Scroll down to the area to capture. 6. Click the Capture button or press the capture hotkey. 7. A red rectangle appears. Move the rectangle to choose a browser window. Click to complete the capture. Snagit pauses momentarily to configure the capture. 8. The capture area begins to scroll automatically. Left-click the browser window to end the capture at the desired location. The capture is sent to the selected Output. For additional capture options, see Take Scrolling, Large, or Oversized Image Captures. Secondary Web Page Window Longer and Wider than Browser Window Capture a scrolling window nested within a browser window.
  • 22. Setup Instructions 1. In Snagit, select Image capture mode. 2. For the Input, select Scrolling option > Auto Scroll Window. 3. Select the Input down arrow > Properties > Scrolling tab > Scroll from top of document and Scroll direction: Both. Click OK. 4. Select the Output and Effects. 5. Click the browser window to capture to give it focus. Scroll down to the area to capture. 6. Click the Capture button or press the capture hotkey. 7. A red rectangle appears. Move the rectangle to choose a browser window. Click to complete the capture. Snagit pauses momentarily to configure the capture. 8. The capture area begins to scroll automatically continuing until the lower edge of the scrolling window is reached. 9. Once the bottom is reached, Snagit returns to the top of the window, moves over, and finishes scrolling. The capture is sent to the selected Output. For additional capture options, see Take Scrolling, Large, or Oversized Image Captures.
  • 23. Region of Web Page Longer than Browser Window Setup Instructions 1. In Snagit, select Image capture mode. 2. For the Input, select Scrolling option > Custom Scroll. 3. Select the Output and Effects. 4. Click the browser window to capture to give it focus. Scroll down to the area to capture. Click the Capture button or press the capture hotkey. 5. Drag the cursor over the area to capture. A red rectangle appears. 6. Click the down arrow on the window’s vertical scrollbar. 7. Snagit pauses momentarily to configure the capture. The capture area begins to scroll automatically continuing until the lower edge of the scrolling window is reached. The capture is sent to the selected Output. For additional capture options, see Take Scrolling, Large, or Oversized Image Captures.
  • 24. Web Page Wider than the Browser Window Setup Instructions 1. In Snagit, select Image capture mode. 2. For the Input, select Scrolling option > Auto Scroll Window. 3. Select the Input down arrow > Properties > Scrolling tab > Scroll from top of document and Scroll direction: Horizontal. Click OK. 4. Select the Output and Effects. 5. Click the browser window give it focus. 6. Click the Capture button or press the capture hotkey. 7. A red rectangle appears. Move the rectangle to choose a browser window. Click to complete the capture. Snagit pauses momentarily to configure the capture. 8. The capture area begins to scroll automatically continuing until the horizontal edge of the scrolling window is reached. The capture is sent to the selected Output. For additional capture options, see Take Scrolling, Large, or Oversized Image Captures.
  • 25. Spreadsheet Longer than the Application Window Setup Instructions 1. In Snagit, select Image capture mode. 2. For the Input, select Scrolling option > Scrolling Region. 3. Select the Output and Effects. 4. Click the spreadsheet window to capture. Scroll to the area to capture. 5. Click the Capture button or press the capture hotkey. 6. Drag the cursor over the area to capture. A red rectangle appears. Continue to drag the cursor down over the area to capture. 7. Release the mouse to complete the capture. The capture is sent to the selected Output. For additional capture options, see Take Scrolling, Large, or Oversized Image Captures.
  • 26. Application Window Containing List of File Names or Other Data Setup Instructions 1. In Snagit, select Image capture mode. 2. For the Input, select Scrolling option > Custom Scroll. 3. Select the Output and Effects. 4. Click the application window to capture. Scroll to the area to capture. 5. Click the Capture button or press the capture hotkey. 6. Drag the cursor over the area to capture. A red rectangle appears. 7. Click the down arrow on the window’s vertical scrollbar. 8. Snagit pauses momentarily to configure the capture. The capture area begins to scroll automatically, continuing until the lower edge of the scrolling window is reached. The capture is sent to the selected Output. For additional capture options, see Take Scrolling, Large, or Oversized Image Captures.
  • 27. Multiple Page PDF Document Setup Instructions 1. In Snagit, select Image capture mode. 2. For the Input, select Scrolling option > Auto Scroll Window. 3. Select the Input down arrow > Properties > Scrolling tab > Scroll from top of document and Scroll direction: Vertical. Click OK. 4. Select the Output and Effects. 5. Click the document to capture. 6. Click the Capture button or press the capture hotkey. 7. A red rectangle appears. Move the rectangle to choose a browser window. Click to complete the capture. Snagit pauses momentarily to configure the capture. 8. The capture area begins to scroll automatically continuing until the horizontal edge of the scrolling window is reached. The capture is sent to the selected Output. For additional capture options, see Take Scrolling, Large, or Oversized Image Captures.
  • 28. Scrolling Pane within an Application Window Setup Instructions 1. In Snagit, select Image capture mode. 2. For the Input, select Scrolling option > Auto Scroll Window. 3. Select the Input down arrow > Properties > Scrolling tab > Scroll from top of document and Scroll direction: Vertical. Click OK. 4. Select the Output and Effects. 5. Click the application window to capture. 6. Click the Capture button or press the capture hotkey. 7. A red rectangle appears. Move the rectangle to choose a browser window. Click to complete the capture. Snagit pauses momentarily to configure the capture. 8. The capture area begins to scroll automatically continuing until the lower edge of the scrolling window is reached. The capture is sent to the selected Output. For additional capture options, see Take Scrolling, Large, or Oversized Image Captures.
  • 29. Music or Video Playlist within an Application Window Setup Instructions 1. In Snagit, select Image capture mode. 2. For the Input, select Scrolling option > Auto Scroll Window. 3. Select the Input down arrow > Properties > Scrolling tab > Scroll from top of document and Scroll direction: Vertical. Click OK. 4. Select the Output and Effects. 5. Click the application window to capture. 6. Click the Capture button or press the capture hotkey. 7. A red rectangle appears. Move the rectangle to choose a window. Click to complete the capture. Snagit pauses momentarily to configure the capture. 8. The capture area begins to scroll automatically continuing until the lower edge of the scrolling window is reached. The capture is sent to the selected Output. For additional capture options, see Take Scrolling, Large, or Oversized Image Captures. Take a Timed, Delayed, or Scheduled Image Capture Use the Snagit Capture Timer option to perform unattended captures at intervals that you define. Examples include following stock market tickers, monitoring factory floor equipment, and monitoring remote computer operations. Use the Capture Timer option with the Web Output (FTP) to automatically update a Web site with screen captures, or to automatically send email with the screen capture as an attachment. Use the Delayed/Scheduled Capture option to set up a delayed capture (after a number of seconds) or a scheduled capture (at a certain time or date). Use both options together to begin interval capture at some user-defined future date/time. Snagit is not accessible in the meantime and cannot be used for additional screen captures when a delayed/scheduled capture is set. The Timed Capture option appears in the Options portion of the Profile Settings pane.
  • 30. For more information see: Set Up a Time Delayed Capture Set Up a Time Scheduled Capture Set Up Capture Timer for Intermittent Capturing Set Up a Time Delayed Capture 1. In Snagit, select Image capture mode. 2. Select the Input, Output and Effects. 3. Select the Timed Capture option in the Options portion of the Profile Settings pane. The Timer Setup dialog box appears. 4. Select the Delay/Schedule tab > Enable Delayed/Scheduled capture option. 5. Select the Delayed Capture radio button. The Delay and Display a countdown items are now available. 6. Type a Delay of between 1 and 60 seconds, or use the arrows to select the number of seconds of delay. 7. Check the Display a countdown box to see a countdown in the lower right corner of the screen prior to capture. 8. Click OK. 9. Click the Capture button or press the capture hotkey. The capture is sent to the selected Output. To stop a delayed capture you have started, select the Stop button on the Snagit toolbar or push the hotkeys. For additional capture options, see Set Up a Time Scheduled Capture and Set Up Capture Timer for Intermittent Capturing. Set Up a Time Scheduled Capture 1. In Snagit, select Image capture mode. 2. Select the Input, Output and Effects. 3. Select the Timed Capture option in the Options portion of the Profile Settings pane. 4. The Timer Setup dialog box appears. Select the Delay/Schedule tab > Scheduled capture option. 5. Type a future Date and Time using the format shown next to the selection boxes. Or, use the arrows to select the date and time. 6. Click OK. 7. Click the Capture button or press the capture hotkey. The capture is sent to the selected Output. To stop a delayed capture you have started, click the Stop button on the Snagit toolbar or push the hotkeys. For additional capture options, see Set Up a Time Scheduled Capture and Set Up Capture Timer for Intermittent Capturing. Set Up Capture Timer for Intermittent Capturing Capture screens intermittently at predefined times. In timed capture mode, the hide and repeat hotkeys operate. The Input and Output options for Capture Timer captures must be set so that the captures can occur unattended. If Snagit detects a combination of capture options that cannot be used, the status displays "Timer unavailable" and the timer will not start.
  • 31. 1. In Snagit, select Image capture mode. 2. Select the Input, Output and Effects. 3. Select the Timed Capture option in the Options portion of the Profile Settings pane. The Timer Setup dialog box appears. 4. Select the Capture Timer tab > Enable timer-activated capture option. 5. To remove redundant captures (for example, when the screen does not change for a period of time), enable Discard identical captures. 6. Specify the frequency of captures in Hours, Minutes, or Seconds. 7. Click OK. 8. Click the Capture button or press the capture hotkey. 9. Snagit automatically captures at the timed intervals you specify. Press <CTRL+SHIFT+P> to stop taking timed captures. For additional capture options, see Set Up a Time Scheduled Capture and Set Up Capture Timer for Intermittent Capturing. Add an Effect during Image Capture Use Effects in the Profile Settings pane to automatically apply the following during the capture process: Halftone, Monochrome, or Grayscale Effect Single Color Substitution Effect Multiple Color Substitution Effect Swap Colors Effect Invert Color Effect Brightness, Contrast, Hue, or Saturation Effect Image Resolution Effect Image Scaling Effect Caption Effect Border Effect Fade, Torn, Saw, Sharktooth, Beveled, and Wave Edge Effects Watermark Effect Trim Effect Halftone, Monochrome, or Grayscale Effect Use the Color Depth color conversion Effect to change the capture to halftone, monochrome, or grayscale during the capture process. The following graphic shows a sample of each Effect. 1. Original capture 2. Monochrome 3. Halftone 4. Grayscale 5. Custom
  • 32. Setup Instructions 1. In Snagit, select Image capture mode. 2. Select the Input and Output. 3. Select Effects down arrow > Color Depth. From the flyout menu, select the desired option. Or, select Custom Color Depth to create your own Effect using the available settings. Click OK. 4. Click the Capture button or press the capture hotkey. The capture is sent to the selected Output. To disable the Color Depth Effect, select Effects down arrow > Color Depth > None. For additional effects, see Add an Effect during Image Capture. Single Color Substitution Effect Use the Color Substitution Effect to replace one color with a different color during the capture process. Setup Instructions 1. In Snagit, select Image capture mode. 2. Select the Input and Output. 3. Select Effects down arrow > Color Substitution > Color Substitution. The Color Substitution task pane appears. 4. Use the Old Color tool or the adjacent Color swatch to select the color to remove. (In example above, green.)
  • 33. 5. Use the New Color tool or the adjacent Color swatch to select the color to replace the old color in the capture. (In example above, black.) 6. In Color accuracy, specify the range of colors close to the Old color to include in the substitution. Select the default value of 100% to use only the exact color identified. Select a lower value to increase the range of colors for the color substitution. 7. Click Close. 8. Click the Capture button or press the capture hotkey. The capture is sent to the selected Output. To disable the Color Substitution effect, select Effects down arrow > Color Substitution > None. For additional effects, see Add an Effect during Image Capture. Multiple Color Substitution Effect Use the Color Substitution Effect to replace more than one color during the capture process. Setup Instructions 1. In Snagit, select Image capture mode. 2. Select the Input and Output. 3. Select Effects down arrow > Color Substitution > Color Substitution. The Color Substitution task pane appears. 4. Use the Old Color tool or the adjacent Color swatch to select the color to remove from the capture. (In example above, white.) 5. Use the New Color tool or the adjacent Color swatch to select the color to replace the old color in the capture. (In example above, green.) 6. Click Add to add another color to change. Repeat steps 4 and 5 for every color to change. 7. In Color accuracy, specify the range of colors close to the Old color to include in the substitution. Select the default value of 100% to use only the exact color identified. Select a lower value to increase the range of colors for the color substitution. (In example above, 77% because the image included white that had been anti-aliased.) 8. Click Close. 9. Click the Capture button or press the capture hotkey. The capture is sent to the selected Output. To disable the Color Substitution Effect, select Effects down arrow > Color Substitution > None. For additional effects, see Add an Effect during Image Capture.
  • 34. Swap Colors Effect Use the Color Substitution Effect to swap two colors with each other during the capture process. You must select both the old and new colors from within the image. In this example, everything green was swapped with red. Setup Instructions 1. In Snagit, select Image capture mode. 2. Select the desired Input and Output. 3. Select Effects down arrow > Color Substitution > Color Substitution. The Color Substitution task pane appears. 4. Use the Old Color tool or the adjacent Color swatch to select the color to remove in the capture. 5. Use the New Color tool or the adjacent Color swatch to select the color to replace the old color in the capture. 6. In Color accuracy, specify the range of colors close to the Old color to include in the substitution. Select the default value of 100% to use only the exact color identified. Select a lower value to increase the range of colors for the color substitution. (In example above, 77% because the image included white was anti-aliased.) 7. Enable the Swap colors option. 8. When the desired Effect is achieved, click Close. 9. Click the Capture button or press the capture hotkey. The capture is sent to the selected Output. To disable the Color Substitution effect, select Effects down arrow > Color Substitution > None. For additional effects, see Add an Effect during Image Capture. Invert Color Effect Use the Invert Colors Effect to invert RGB color values during the capture process. There are no custom options for this Effect. The following graphic shows a sample invert color Effect. 1. Original capture 2. Invert Colors
  • 35. Setup Instructions 1. In Snagit, select Image capture mode. 2. Select the Input and Output. 3. Select Effects down arrow > Color Substitution > Invert Colors. 4. Click the Capture button or press the capture hotkey. The capture is sent to the selected Output. To disable the Invert Color effect, select Effects down arrow > Color Depth > None. For additional effects, see Add an Effect during Image Capture. Brightness, Contrast, Hue, or Saturation Effect Use the Color Correction Effect to change the capture’s brightness, contrast, hue, saturation, and gamma properties during the capture process. The following graphic shows a sample: 1. Original capture 2. Brightness 3. Contrast: Change the contrast between the light and dark colors. 4. Hue: Change is similar to rotating a color wheel to select a different mixture of colors. 5. Saturation: The quantity of a color in pixels, from gray at the lowest saturation to rich color in the highest. 6. Gamma: Adjust the intensity of colors by changing the gamma constant used to map the intensity values. Gamma correction changes brightness using a logarithmic scale for visual perception. Gamma is a constant used to calculate the progression. For most CRTs, the gamma constant is in the range of 2.2 to 2.5.
  • 36. Setup Instructions 1. In Snagit, select Image capture mode. 2. Select the Input and Output. 3. Select Effects down arrow > Color Correction. 4. Create your own Effect using the available settings. Click OK. 5. Click the Capture button or press the capture hotkey. The capture is sent to the selected Output. To disable the Color Correction effect, select Effects down arrow > Color Correction. Set all options to zero (with the exception of the Gamma option which should be set to 1.0). Click OK. For additional effects, see Add an Effect during Image Capture. Image Resolution Effect Use the Image Resolution Effect to set an image resolution in dots per inch or allow Snagit to configure the DPI automatically using the default setting. For most captures, the default setting of 96 DPI is sufficient. The Image Resolution can control how other applications display and print Snagit captured images. Adjusting the image resolution does not affect the way Snagit displays or prints the image. Setup Instructions 1. In Snagit, select Image capture mode. 2. Select the Input and Output. 3. Select Effects down arrow > Image Resolution. 4. By default, the Auto configure option is enabled. To enter a custom DPI setting, remove the check mark and enter the desired DPI in the Resolution field. Click OK. 5. Click the Capture button or press the capture hotkey. The capture is sent to the selected Output. For additional effects, see Add an Effect during Image Capture.
  • 37. Image Scaling Effect Use the Image Scaling Effect to scale your image during the capture process to a specific size using preset or custom settings. Setup Instructions 1. In Snagit, select Image capture mode. 2. Select the Input and Output. 3. Select Effects down arrow > Image Scaling. A flyout menu appears. Select one of the preset options (continue with step 5). Or, select Resize Image to set a custom size. The Resize Image task pane appears. 4. Enable Keep Aspect Ratio to keep the image aspect ratio fixed while changing the width or height. Click OK. 5. Click the Capture button or press the capture hotkey. The capture is sent to the selected Output. To give the edges of the capture a “smooth” appearance, select Effects down arrow > Image Scaling > Smooth Scaling. To disable an Image Scaling effect, select Effects down arrow > Image Scaling > None. For additional effects, see Add an Effect during Image Capture. Caption Effect Use the Caption Effect to add text, formatted to your specifications, during the capture process. Include a time/date stamp, system-related data, a title or free text. Use the custom settings to change the font, font, size and color, position of the text, and more. The following graphic shows a sample. Setup Instructions 1. In Snagit, select Image capture mode. 2. Select the Input and Output. 3. Select Effects down arrow > Caption. 4. Create your own Effect using the available settings. Click OK. 5. Click the Capture button or press the capture hotkey. The capture is sent to the selected Output.
  • 38. To disable a Caption effect, select Effects down arrow > Caption. Within the Caption task page, remove the text from the Text field. Click OK. For additional effects, see Add an Effect during Image Capture. Border Effect Use the Border Effect to add a custom border around the image during the capture process. Customize with a 3D look, shadow, color, and more. The following graphic shows a sample. Setup Instructions 1. In Snagit, select Image capture mode. 2. Select the Input and Output. 3. Select Effects down arrow > Border. 4. Click the Enable border option. 5. Create your own Effect using the available settings. Click OK. 6. Click the Capture button or press the capture hotkey. The capture is sent to the selected Output. To disable a Border effect, select Effects down arrow > Border. Disable the Enable border option. Click OK. For additional effects, see Add an Effect during Image Capture. Fade, Torn, Saw, Sharktooth, Beveled, and Wave Edge Effects Use an Edge Effect to add a professional, finished look to your image during the capture process. The Edge Effects include drop shadow, torn, faded, wave, saw, shark tooth and beveled edge. Customize the Effect by adjusting the: Size and location of the Effect. Shadow size, location and color. Outline and defining its size and color.
  • 39. Background color The following graphic shows a: 1. Torn Edge 2. Wave Edge 3. Saw Edge 4. Sharktooth Edge 5. Fade Edge 6. Beveled Edge . Setup Instructions 1. In Snagit, select Image capture mode. 2. Select the Input and Output. 3. Select Effects down arrow > Edge Effects. Select an Effect from the flyout menu. 4. Create your own Effect using the available settings. Click OK. 5. Click the Capture button or press the capture hotkey. The capture is sent to the selected Output. To disable an Edge effect, select Effects down arrow > Edge Effects > None. For additional effects, see Add an Effect during Image Capture. Watermark Effect Use the Watermark Effect to add a graphic file to the image during the capture process. Add logos, titles, signatures, banner ads and more. You can also customize the image file with emboss, transparent, and more. Experiment to discover the variety of creative ways you can use the Watermark Effect.
  • 40. Setup Instructions 1. In Snagit, select Image capture mode. 2. Select the Input and Output. 3. Select Effects down arrow > Watermark. 4. Browse to select a graphic file. 5. Click Advanced settings to customize the Effect using the available settings. Click OK. 6. The capture is sent to the selected Output. To disable a Watermark effect, select Effects down arrow > Watermark. Disable the Enable watermark option. Click OK. For additional effects, see Add an Effect during Image Capture. Trim Effect Use the Trim Effect to cut the outside borders the image during the capture process. Trim the top, bottom, and sides of your capture. Set up a custom trim Effect or select Automatic trimming which allows Snagit to determine the best trim based on the amount solid color around the edges of your capture. The following graphic shows the Automatic trim option:
  • 41. The following graphic shows an example of a Custom trim: Setup Instructions 1. In Snagit, select Image capture mode. 2. Select the Input and Output. 3. Select Effects down arrow > Trim. 4. Select Automatic or customize the Effect using the available settings. Click OK. 5. Click the Capture button or press the capture hotkey. The capture is sent to the selected Output. To disable a Trim effect, select Effects down arrow > Trim. Click the None option. Click OK. For additional effects, see Add an Effect during Image Capture. Text Capture Text mode provides a solution for anyone writing down text from the screen or a dialog box. Text captures include only the text on the screen, not graphics. Text capture includes the following features: Capture text from screens that do not allow copy and paste in Windows. Send Output to a variety of destinations.
  • 42. Annotate and timestamp the captured text. Collect captured text in one file to keep a running log of captured passages. Use the text as notes from a Web browser or email, or to capture a series of error messages from a program to send to technical support. Customize the text Output using the Output Properties. For additional capture options, see: Text Longer than a Browser Window Text from a Dialog Box Text in a Scrolling Region Longer Than Window Text from an Object on the Screen Text from a DOS Application Add a Caption Effect to a Text Capture Set Up Folders and File Naming Conventions for Text Capture Text Longer than a Browser Window Setup Instructions 1. In Snagit, select Text capture mode. 2. For the Input, select Scrolling option > Auto Scroll Window. 3. Select Input down arrow > Properties > Scrolling tab> Enable: Scroll from top of document and Scroll direction: Vertical 4. Select the Output. 5. Select Effects > Layout to remove blank lines or columns. 6. Click the browser window to capture. 7. Click the Capture button or press the capture hotkey. 8. A red rectangle appears. Move the rectangle to choose a browser window. Click to complete the capture. Snagit pauses momentarily to configure the capture. 9. The capture area begins to scroll automatically, continuing until the lower edge of the scrolling window is reached. The capture is sent to the selected Output.
  • 43. For additional capture options, see Text Capture. Text from a Dialog Box Setup Instructions 1. In Snagit, select Text capture mode. 2. For the Input, select Scrolling option > Window. 3. Select the Output. 4. Select Effects > Layout to remove blank lines or columns. 5. Click the dialog box to capture. 6. Click the Capture button or press the capture hotkey. 7. A red rectangle appears. Move the rectangle to choose a browser window. Click to complete the capture. The capture is sent to the selected Output. For additional capture options, see Text Capture.
  • 44. Text in a Scrolling Region Longer Than Window Setup Instructions 1. In Snagit, select Text capture mode. 2. For the Input, select Scrolling option > Custom Scroll. 3. Select the Output. 4. Select Effects > Layout to remove blank lines or columns. Click the browser window to give it focus. 5. Click the Capture button or press the capture hotkey. 6. Drag the cursor over the area to capture. A red rectangle appears. 7. Click the down arrow on the window’s vertical scrollbar. 8. Snagit pauses momentarily to configure the capture. The capture area begins to scroll automatically, continuing until the lower edge of the scrolling window is reached. The capture is sent to the selected Output. For additional capture options, see Text Capture. Text from an Object on the Screen Use Object to capture data for objects on the screen. Select what Object data to capture for Object Input while using the Text capture mode. Setup Instructions 1. In Snagit, select Text capture mode. 2. For the Input, select Object. 3. Select Input > Properties > Layout tab to define the object data to capture. Click OK. 4. Select the Output. 5. Select Effects > Layout to remove blank lines or columns. 6. Click the Capture button or press the capture hotkey. 7. Move the cursor over the area to capture. A red rectangle appears.
  • 45. 8. Click the mouse to complete the capture. The capture is sent to the selected Output. For additional capture options, see Text Capture. Text from a DOS Application Capture the contents of a full screen MS-DOS session window. Snagit automatically inverts the colors of the capture. You must press the <Print Screen> key to capture the DOS application. Setup Instructions 1. In Snagit, select Text capture mode. 2. For the Input, select Advanced > Full-screen DOS. This will automate two Snagit parameters: The Clipboard Chain option is turned to “on” allowing Snagit to capture when you use the capture hotkey. The Input is set to Clipboard. 3. Select the Output. 4. Select Effects > Layout to remove blank lines or columns. 5. Open MS-DOS to the screen to capture. Click <ALT + ENTER> to change between windowed MS-DOS mode and full-screen MS-DOS. 6. Press the <Print Screen> key. The capture is sent to the selected Output. For additional capture options, see Text Capture. Add a Caption Effect to a Text Capture Use the Text Caption Effect to add a caption during the capture process. Captions can include a time/date stamp, system-related data, a title or free text within your capture. You can customize the font, color, and placement of captions. Setup Instructions 1. In Snagit, select Text capture mode. 2. Select the Input and Output.
  • 46. 3. Select Effects > Layout to remove blank lines or columns. 4. Select Effects down arrow > Caption. 5. Check the Enable Caption option. 6. Create your own Effect using the available settings. Click OK. 7. Click the Capture button or press the capture hotkey. The capture is sent to the selected Output. To disable the Caption effect, select Effects down arrow > Caption. Uncheck the Enable Caption option. Click OK. For additional capture options, see Text Capture. Set Up Folders and File Naming Conventions for Text Capture Snagit, Text capture mode > Output down arrow > Properties > Text File tab Use the Text File tab options to customize the file name, file format, caption, and location options for text captures. Option Description TXT - Text File Default option for a text capture. Annotate captures Add a caption to the text capture Output. Caption prefix Enter the text to appear before each text caption. Append to file Add each text capture to a single file. Ask for file name Enter a file name before saving the capture Output. Fixed file name Assign the same file name assigned to each text capture. This is useful for continually and automatically updating the same Output file. Name If you use the Fixed File Name option, type the file name for the text Output file in this field. Automatic file name Automatically give your capture a file name and location. To change the default auto name, then select the Options button. Output folder Select a location for your captures. Video Capture Use Video capture mode to create a video recording of your screen. Snagit records on-screen activity on your Windows desktop. Capture all your mouse movements and application action then, save the video as an AVI file. You can also use Snagit to create time-lapse video of desktop activity over a period of time. The maximum size of an AVI file produced by Snagit is 2 GB. If you pass this size limit, the entire capture is lost. Use the following tips to limit the AVI file size: Limit the size of the program window captured. Do not add unnecessary content (size or length). Use Snagit Region Input selection to select a smaller area to capture then "pan" across the screen while capturing, thereby making a much smaller video file. Limit the video frames capture speed. Limit the length of the video capture sequence. Snagit captures video sequences in real-time seconds and minutes. The shorter your sequence, the smaller the AVI files. Change compression. By default, Snagit selects the best compression to use for your capture and system. Experimenting with the settings is also possible. For additional tips, see Video Capture Tips.
  • 47. Record Your First Video Capture 1. In Snagit, select Video capture mode. 2. Select the Output. 3. Click the Capture button or press the capture hotkey. 4. A red rectangle appears. Use the rectangle to choose a window to capture or drag the mouse to select a region. The Video Capture dialog box appears. 5. Click Start to begin recording. 6. Press <CTRL+Shift+P> to end recording. The video renders for a moment. After rendering, the capture is sent to the selected Output. For more information, see: Record a Video with a Caption Effect Record a Video in Time-Lapse Capture Mode Record a Video and Upload to the Web via FTP Video Capture Tips Record a Video with a Caption Effect Use the Caption Effect to add text, formatted to your specifications, during the capture process. Include a time/date stamp, system-related data, a title or free text. Use the custom settings to change the font, font, size and color, position of the text, and more. Setup Instructions 1. In Snagit, select Video capture mode. 2. Select the Input and Output. 3. Select Effects down arrow > Caption. 4. Enable the Enable Caption option. 5. Create your own Effect using the available settings. Click the Options button in the Caption group box to customize the font and caption location. Click OK. Click OK to exit the Video Caption dialog box. 6. Click the Capture button or press the capture hotkey. 7. A red rectangle appears. Use the rectangle to choose a window to capture or drag the mouse to select a region. The Video Capture dialog box appears. 8. Click Start to begin recording. 9. Press <CTRL+Shift+P> to end recording. The video renders for a moment. After rendering, the capture is sent to the selected Output. To disable the Caption effect, select Effects down arrow > Caption. Within the Caption task page, disable the Enable Caption option. Click OK. For additional capture options, see Video Capture. For additional tips, see Video Capture Tips. Record a Video in Time-Lapse Capture Mode Use Time-lapse capture mode to capture at one frame rate and playback at a slower/faster rate. Set the timing to slow or very slow frame rates for setting up a monitoring application or capturing program activities that requires lengthy processing times. If the Time-lapse capture mode is on, the audio recording and camera recording features are disabled. Setup Instructions 1. In Snagit, select Video capture mode. 2. Select the Input and Output.
  • 48. 3. Select Input down arrow > Properties > Video tab > Enable Time-lapse capture option. 4. Click the Time-lapse Setup button. The Time-lapse capture Setup dialog appears. Enter the desired Capture rate. Click OK. Click OK to exit the Video tab. 5. Click the Capture button or press the capture hotkey. 6. A red rectangle appears. Use the rectangle to choose a window to capture or drag the mouse to select a region. The Video Capture dialog box appears. 7. Click Start to begin recording. 8. Press <CTRL+Shift+P> to end recording. The video renders for a moment. After rendering, the capture is sent to the selected Output. To disable the Time-lapse Effect, select Input down arrow > Properties > Video tab > Enable Auto configuration option. Click OK. For additional capture options, see Video Capture. See also Video Capture Tips. Record a Video and Upload to the Web via FTP Use the FTP options to send the video directly to a location on the Web. When using FTP Output, you must first configure the properties on the FTP tab. Setup Instructions 1. In Snagit, select Video capture mode. 2. Select the Input. 3. Select Output > FTP. 4. Select Output down arrow > Properties > FTP tab. 5. Enter the correct FTP information. Click OK. 6. Click the Capture button or press the capture hotkey. 7. A red rectangle appears. Use the rectangle to choose a window to capture or drag the mouse to select a region. The Video Capture dialog box appears. 8. Click Start to begin recording. 9. Press <CTRL+Shift+P> to end recording. The video renders for a moment. After rendering, the capture is sent to the selected Output. FTP Options Option Description FTP Server Specify the IP Address or DNS Name of the target FTP server. Port Specify the port on the server used for FTP services. This is usually port 21, the default. Remote path Type the directory path on the target server to store the captured files. Use passive FTP Select to connect with the FTP server in passive mode. Show progress Display a progress bar. Fixed file name Send a file at regular times to the server that always overwrites an existing file. Automatic file name Name files automatically with a sequential number included. For example, if you specify a sequence limit of 9, files are written with the prefix from the File Name or Prefix box, then a numeral string that writes nine files before overwriting the first one. Use temp/rename replacement method Send your screen capture to the server with a temporary file name then renames the temporary file to the name specified in the File Name or Prefix box. Server authentication Enter the User Name and Password if authentication is required. User name Type in the correct User Name for Server authentication. Password Type in the correct Password for Server authentication. Use proxy server Enter the Proxy Server and Port. (A proxy server has a different IP or DNS name, such as proxy.companyname.com:8080.)
  • 49. Proxy server and port Enter the Proxy Server/Port in this field. For additional capture options, see Video Capture. For additional tips, see Video Capture Tips. Video Capture Tips If you are recording more than one video, decide on a standard set of Snagit options for your organization. For example, will your videos highlight the cursor? Should your videos all be the same size? Will you record with a caption or system stamp? Practice, practice, practice. Overall, how much and how often you practice will be the key to creating professional videos. Snagit records anything on your screen. Clean up your browser and desktop by closing or removing all nonessential applications, browser toolbars, and desktop icons. Use a plain background on your desktop is better than a busy wallpaper image. Practice using the mouse around the screen in a slow, fluid motion. Video Scripting and Narration Tips For lengthy or involved sequences of action, write a script before recording. Avoid narration filler by using words such as “umm” or “ahh.” Speak slowly and enunciate properly. Include an overview of the recording in the first line or two of the script. To eliminate the sound of paper shuffling, tape the script pages together and hang them near the monitor so they are easy to read. Print the script in large type to make it easy to read while recording. Audio Tips Generally, USB microphones provide a better sound than other microphones (minus the high-end equipment) since you do not have to rely on your computer’s sound card. USB microphones use less computer resources, and record far better audio than an analog mic connected to your computer's audio card. Experiment with different volume levels and placement settings allowing different distances from the microphone to select the right one. Record in a quiet location. Capture What You Can Print Use Printer Capture to capture and manipulate the print Output from any application as a digital image. You can create an image file of what the printed material would look like if you had printed it on a printer. Snagit does not need to be running when you select the Snagit Printer from within an application; it starts automatically and begins the capture using the Printer Capture settings. With Snagit Printer Capture, you can: Print anywhere without being connected to a printer. Transfer or email the capture to a system with a printer. Convert any file format that can be printed into standard graphic file formats or electronic documents. This eliminates the need to scan paper Output to create electronic documents. Add graphic file format export to any application that can print. Share documents without special software to view them. Annotate Output, add a watermark, or include a border or frame. Print using Snagit Printer Capture 1. From within an application, select File > Print (or the equivalent in that application). 2. From the list of printers, select Snagit 9. 3. Click the Properties button to setup any special print properties such as layout and paper. 4. In the Print dialog box, click OK to complete the capture.
  • 50. For more information, see: Customize your Printer Capture Create a Snagit Printer Capture Profile Capture and View a Multiple Page Document with Printer Capture Capture and Save Multiple Page Documents as Individual Image Files Customize your Printer Capture You can set up a printer capture to include an Output, Effect, and the destination folder for your captures prior to capturing in an application. 1. Within Snagit in the Related Tasks pane, click Setup Snagit printer. 2. The Snagit Printer Capture Settings dialog box appears. Click the Properties button to setup special print properties such as layout and paper. 3. Click the Output down arrow to select an Output. Use the Output Properties button to customize the Output. 4. Click the Effects down arrow to add a special Effect to the capture. Depending on the Effect, you may see a task pane where you customize the Effect. 5. Click OK. The settings will be used next time you use Printer Capture from within a host application. Set up a Printer Capture profile to create and save several different Snagit printers. For additional capture options, see Capture What You Can Print. Create a Snagit Printer Capture Profile You can create several different Printer Capture profiles to use during a printer capture. You can customize the Output, filters, layout, and more and save the configuration with a name that you specify. 1. In Snagit, select Tools > Snagit Printer Capture Settings > Input Properties button. The Input Properties dialog box displays. 2. In Printers tab, click the Add a Snagit Printer button. 3. In the Printer Name dialog box, enter the name for this printer. To help you remember what settings are enabled for each printer, the name should correspond to the settings that you will select. For example, Send Email with a Border or Capture Preview window with Drop Shadow. Click OK. A confirmation dialog box appears. Click OK. 4. Select the Properties button. The Document Properties dialog box display. Select layout and paper/quality options. Click OK. 5. Your new printer appears within the dropdown list box in the Input Properties dialog box. Click OK to return to the Snagit Printer Capture Settings dialog box. 6. Click the Output down arrow to select an Output. Use the Output Properties button to customize the Output. 7. Click the Effects down arrow to add a special Effect to the capture. Depending on the Effect, you may see a task pane where you customize the Effect. 8. After the options are selected, in the Snagit Printer Capture Settings dialog box, click OK. For additional capture options, see Capture What You Can Print.
  • 51. To use a Printer Capture profile 1. From within the host application, select File > Print (or the equivalent in that application). 2. From the list of printers, select the printer that you just created. 3. Click the Properties button to setup special print properties such as layout and paper. 4. In the Print dialog box, click OK to complete the capture. To change the settings for a Snagit Printer profiles repeat the process given above but select the printer to change within the Snagit Printers tab. Capture and View a Multiple Page Document with Printer Capture Save a Printer Capture as a multipage file to include all of the pages of the capture within one image file. If you do not save the Printer Capture using the multipage file format, each page of the capture is saved as an individual image file. With the multipage file format, when the capture is complete, it displays in the Editor window where you can use the Multipage viewing tools to page through the capture pages. Multipage file capability is only available when you set your Printer Capture Output setting to File and specify PDF or TIF format in the Output Properties dialog box. If you have taken a Printer Capture using the configuration for multipage file Output but select to complete your capture in Editor using the Save As option within Editor instead of clicking on the Finish Profile button in the Send tab only the current image will be saved as an image file. 1. In Snagit, select Tools > Snagit Printer Capture Settings > Output > File. 2. Select Output Properties button > Image File tab > File Format > PDF or TIF. Click OK to save changes. 3. Within the Snagit Printer Capture Settings dialog box, click OK. 4. Select Snagit 9 printer as the current printer. Print the desired number of pages within an application. The capture displays in Editor. 5. Click Finish Profile to complete the capture. 6. The Save As dialog box displays. Select the location to save this capture to and enter the file a name. Keep the PDF or TIF file format. To edit the file, use Adobe Acrobat to open the PDF or Snagit Editor to open the TIF file. For additional capture options, see Capture What You Can Print. Capture and Save Multiple Page Documents as Individual Image Files From within a host application, you can use Printer Capture to capture multiple pages at one time and save each page as an individual image file. Multipage file capability is only available when you set your Printer Capture Output setting to File and do not specify PDF, SNAG, or TIF format in the Output Properties dialog box. 1. In Snagit, select Tools > Snagit Printer Capture Settings > Output > File. 2. Select Output Properties button > Image File tab > File format > any file format except PDF or TIF. Click OK. 3. In Snagit Printer Capture Settings dialog box, click OK. 4. Select the Snagit 9 printer as the current printer. Print the desired number of pages within the host application. The capture displays in Editor. 5. Click Finish Profile to complete the capture. 6. The Save Multiple Images dialog box displays. Select the following options: Select an Output Folder for your captures.
  • 52. Enter a Prefix in the filename for the captures Enter a number in the filename for each of the captures in this series that is going to be saved. This option is used in conjunction with the prefix option. By default, the number of images to save appears. Specify the file format for image captures. Select Options to access customization options for this particular file format. 7. Click OK to complete the capture. For additional capture options, see Capture What You Can Print. Web Capture Web capture captures images or other kinds of files from a Web site. Enter the Web site address and select the Web page link depth (the number of links away from the first Web page) to include in the search. With Web capture you can: Specify public Web site URL to capture all images used on the site. Capture image files, for example GIF, JPG, and PNG. Capture audio files, for example MP3, WAV, WMA. Capture video files, for example AVI, MPG, WMV. Capture other files from Microsoft Word, PowerPoint, and Excel. Preview the images from the Web site, then include or exclude them from the final scan. Direct the files to a folder on your PC so they can be browsed and viewed using Snagit Editor’s Library. This mode does not capture Web pages. Use the Web page capture profile. Setup Instructions 1. In Snagit, select Web capture mode. 2. For the Input, select Prompt for Address. 3. For the Effects, select Properties. In the General tab, select the number in the Link search depth field. Also enter domains to ignore. In the Images tab, select the type of image files to capture and set size restrictions. In the Audio tab, select the type of audio files (if any) to capture and set size restrictions. In the Video tab, select the type of video files (if any) to capture and set size restrictions. In the Custom tab, enter the extensions of all other type of files (if any) to capture and set size restrictions. 4. Click OK. 5. Click the Capture button or press the capture hotkey. Enter the web address at the prompt and click OK. As Snagit captures, the Web Capture Progress dialog box displays. 6. When the capture is complete, the Select Output Folder dialog box appears. Browse and select the folder to store your capture in. Click OK. The captures display with Snagit Editor’s Library view. For more information, see: Web Capture Folder and File Naming Conventions Web Capture Preferences Web Capture Proxy Settings Web Capture Folder and File Naming Conventions Snagit > Web capture mode > Output > Properties > File tab. Use the File tab to configure the location, folder options, and naming options for files containing Web capture Output. Option Description
  • 53. Ask for folder name Enter a new folder name after each capture. Fixed folder name Use the same folder name for each new capture. Create a subfolder for each capture Add each new capture in a subfolder within the designated Output Folder. Use a single folder to store all images All of the capture images to be stored within the same folder. Create a hierarchy of folders to store images Create folders to match the structure of the Web sites captured. Rename files automatically Automatically rename captured files with the same name. Overwrite files Always overwrite a file that already exists in the capture folder. For additional capture options, see Web Capture. Web Capture Preferences Snagit > Web capture mode > Input > Properties > Web Capture Preferences tab Option Description Work offline Only scans files stored on your computer in the Internet cache (see Windows Control Panel > Internet Options >Temporary Internet Files). HTTP Request Timeout (seconds) Set the number of seconds Snagit waits until the host you are scanning answers. The default setting is 60 seconds. Primary capture method (requires IE 5.5 or later) Capture all Web content. If you use Internet Explorer 5.5 or later, this option is enabled by default. Disable scripting (blocks pop-ups) Block pop-ups on the Web pages. Secondary capture method If you do not have Internet Explorer 5.5 or later, this option is enabled by default. Enabling this option enables the Allow Web site cookies option and the Proxy Settings button. When using this option, there may be some Web content that you cannot capture, especially true when capturing from a site using frames. As an alternate option, enable the Primary capture method option and redo your capture. Allow Web site cookies Permit cookies to store on your computer. This option may be necessary to scan some Web sites. Proxy Settings Open the Proxy Settings dialog box. Continue with Web Capture Proxy Settings For additional capture options, see Web Capture. Web Capture Proxy Settings Web mode > Input Properties > Web Preferences tab > Secondary capture method > Proxy Settings button Option Description Use Web Browser’s Proxy Settings This default option works in most cases. This setting reads your Web browser's proxy settings and uses them for Web capture. It is designed to eliminate the need to configure your connection settings manually in Snagit. Direct Connection (No Proxy) Select to use a direct connection (No Proxy). Manually Configure Proxy Settings Select if there is a proxy in your Web connection and you need to specify a different one. You may need to reconfigure proxy settings if your network proxy information changed since your browser was installed.
  • 54. Host For manual configuration, type an IP address for your proxy host. If you do not have this information, contact your system administrator for help. Port For manual configuration, type a port number. The default proxy port is 80, but your system can use another. Enable Proxy Authentication Select this option if a username and password are needed to make outside connections. Enter the Username and Password. For additional capture options, see Web Capture. Snagit Profiles: A Faster, More Efficient Way to Capture If you had a previous version of Snagit installed on your computer, profiles are automatically imported into Snagit during installation. Capturing with Snagit can be as simple as clicking the Capture button. But, the real power behind Snagit lies with its unique and systematic method of creating not just any capture – but the right capture! When you save a Capture Mode, Input, Effect, and Output combination, this is called a Profile. Profiles make the capture process quicker and more efficient. Built-In Profiles Snagit includes several built-in or preconfigured profiles to help you begin capturing quickly. Find the profiles in the center of the Snagit screen. The quickest way to capture when you are just learning to use Snagit is to select a profile and click the Capture button. Built-in profiles have no Output set and Preview in Editor is enabled. In Editor, add annotations and select an Output. To complete the capture, click Finish in Editor’s Send tab. Edit or export preconfigured profiles. Use a preconfigured profile as the basis for a new profile. Capture Modes
  • 55. A Mode is the type of capture you want to take. To change the mode, click on the blue button next to the Capture button. Image Capture to capture an image of anything your screen. Send the image to one or more Outputs including a graphic file, the printer, email, Snagit Editor or even a Web server. Text Capture to capture the text you see on the screen as editable ASCII text. You can save the text in tab delimited format to import into spreadsheets or database applications. Video Capture to record onscreen activity on your Windows desktop. Capture mouse movements and application action, then save the video as an AVI file. You can also use Snagit to create time-lapse video of desktop activity over a period of time. Web Capture to capture all the images from a Web site as graphic files. Just enter a Web site address and select the Web page link depth, which is the number of levels of directories from the root Web address to include in the capture. Printer Capture to capture anything you would send to a printer and send it to an image file instead. Print to the Snagit virtual printer from within any Windows application. Within Snagit, select Tools > Snagit Printer Capture Settings to configure the Printer Capture settings. Input Input tells Snagit what to capture on the screen. The capture Mode and the Input define exactly what to capture. Think of the Mode as the general capture category and the Input as the more specific category. Each mode has its own particular Input options. For example, if Image Capture is the Mode, you can select Screen as the Input. This means that Snagit captures the entire PC screen as an image. Or, if you select Image Capture as the Mode and Window as the Input, you get to select the single window on your screen that you want to capture. Each capture mode has its own set of Input options and associated Properties. Effects Effects tell Snagit how to customize the capture. Snagit Effects include Captions, Borders, Edge Effects, Watermarks, and more. Additionally, you can convert and substitute colors, change image scale and resolution, and trim images. Select Effects to automatically apply to your capture. Output Output tells Snagit where to send the capture.
  • 56. Select File to save your capture as one of twenty eight file formats, or select Email to send your capture as an attachment or in the body of an email message. Snagit Outputs allow you to send your capture directly to your blog, or to a Microsoft application such as Word or PowerPoint. Overall, there are more than twenty ways to share your capture. For more information, see: Profile Context Sensitive Menu Options Create a New Profile Based on an Existing Profile Create a New Profile with the Profile Wizard Profile Hotkeys Organize and Sort Profiles Profile Context Sensitive Menu Options Right-click on a profile or group of profiles to open the context menu. The options apply to the profile or profile group that you right-clicked on – not the profile or profile group currently selected within the Profiles pane. For more information, see: Snagit Profiles: A Faster, More Efficient Way to Capture Create a New Profile with the Profile Wizard Create a New Profile Based on an Existing Profile Profile Hotkeys Create a New Profile Based on an Existing Profile Save new settings as an updated profile, as a new profile, or use the profile settings once and do not save them. When you change profile settings, the profile selected in the Profiles pane has a yellow box around it and an asterisk next to the profile name to indicate you have modified a profile.
  • 57. The following instructions provide a general method for changing your settings followed in parenthesis by a specific example. Substitute any profile and select your desired profile settings. Select a Profile close to what you need. (In the Profiles pane, click the Window profile.) If necessary, change the Output. (In the Profile settings pane, select Output > Email from the dropdown list.) Include an Effect to add a special Effect, specific size, color, or resolution requirement. (In the Profile settings pane, select Effects > Edge Effect > Drop Shadow Edge from the dropdown menu.) Customize the Edge Effect in the Edge Effect task page. (In the Drop Shadow Edge task page, set the Shadow Depth to 40.) Click the Capture button to take the capture. (Move the rectangle around the screen to highlight a window. Click with the mouse to capture. The capture displays within the Capture Preview window.) Save Profile Options To save the settings as the current profile’s new defaults, click the Save Profile’s Current Settings button at the top right of the Snagit screen. To save the settings as a new profile, click the Save As New Profile button at the top right of the Snagit screen. For more information, see: Snagit Profiles: A Faster, More Efficient Way to Capture Create a New Profile with the Profile Wizard Profile Hotkeys Organize and Sort Profiles Profile Context Sensitive Menu Options Create a New Profile with the Profile Wizard Use the Add New Profile Wizard to create a new profile rather than modifying and saving an existing capture profile. To access the Add New Profile Wizard, click the Add New Profile Wizard button in Snagit. Profile Wizard Instructions Follow the instructions on each dialog box, and read the Description fields for additional information as you hover over each option.
  • 58. For more information, see: Snagit Profiles: A Faster, More Efficient Way to Capture Create a New Profile Based on an Existing Profile Profile Hotkeys Organize and Sort Profiles Profile Hotkeys Use a hotkey to quickly take captures without interacting with the Snagit interface. Customize the hotkey(s) for Snagit or on a per capture profile basis. Profile hotkeys invoke a specific set of capture commands. Each profile can have its own hotkey. Snagit OneClick gives you access to your capture profiles while Snagit is reduced to the system tray. When a profile hotkey is set, the Snagit interface gives you three visual clues to help you remember what that hotkey is:
  • 59. To customize the hotkeys, select Snagit > Tools > Program Preferences > Hotkeys or right-click on a profile and select Set Hotkey. For more information, see: Snagit Hotkeys Snagit Profiles: A Faster, More Efficient Way to Capture Organize and Sort Profiles Use the Organize Profiles options to change the order of your capture profiles within the Profiles pane and import or export profiles using a .snagprof file. To access the Organize Profiles options: From Snagit, select File > Organize Profiles. Right-click a profile and select Organize Profiles. Click Organize Profiles in the Related Tasks area of Snagit. Import and Export Profile Tips When you import a profile, if there is an existing profile with the same name, the existing profile is not overwritten. The imported profile is added to the profile group. Groups that do not have identical names are directly imported into the Profiles pane. In Windows Explorer, double-click on a profile file (.snagprof) and import it directly into Snagit.
  • 60. When you import a group of profiles that already exist within the Profiles pane, click: Merge to decide for each group to merge, rename the group, or skip a group, Merge All to merge all the groups without being prompted Skip to skip a group you do not want to import Select to Include the following items with a profile or group of profiles: Hotkeys or Password included in the profile or group Machine specific items including Output directories, Web addresses, codecs, font settings, etc. Program Output to import or export information related to External Program Output Program Output is disabled by default for security measures and prohibits the import of a profile using external program Output that could potentially launch a destructive application or virus on your system. Keep this option disabled if you are not sure of the quality or source of the profiles. For more information, see: Snagit Profiles: A Faster, More Efficient Way to Capture Create a New Profile with the Profile Wizard Snagit OneClick – The Fastest Way to Capture Profiles are automatically synched to Snagit OneClick. Snagit OneClick provides a quick and easy way to take a capture from your desktop. OneClick provides access to your capture profiles when Snagit is minimized to the system tray. To enable and configure OneClick, within Snagit, in the Related Tasks pane, click Turn on OneClick. OneClick appears on the side of your monitor. A balloon tip displays to let you know where OneClick is hidden. An orange bar appears on the monitor side where OneClick is hidden. To access OneClick while it is hidden, pass your cursor over the orange bar. Drag OneClick to a location around the edge of the monitor. OneClick contains the Capture Profiles located in the Profiles pane. Profiles or hotkeys created within Snagit are automatically updated to OneClick. To take a capture using OneClick, click on a profile. The capture is taken and OneClick is hidden again from view until you need it again.
  • 61. The I want to option gives you quick access to Snagit and Snagit Editor. Click the Configure Snagit OneClick link to customize OneClick. OneClick Configuration Options OneClick > I want to > Configure Snagit OneClick Configure the behavior and appearance of OneClick with your preferences. Option Description Click to activate Click on the orange OneClick bar to access OneClick rather than hovering over the orange bar. Hover to activate Hover over the orange OneClick bar to access OneClick rather than clicking on the orange bar. The Hover time (ms) box lets you specify how long you need to hover before OneClick appears. Hotkey setup Select a combination of CTRL, SHIFT, ALT, and a key from the dropdown list to set a hotkey for using OneClick. When you press the hotkey combination OneClick appears. Begin hiding timeout (seconds) Define the length of time (in seconds) that OneClick waits before hiding. Hide animate speed Specify how quickly OneClick hides: Normal, Fast, Slow, or Instant. Amount shown while hidden Determine how much (in pixels) of OneClick appears on your screen while hidden. Make OneClick transparent when hidden Make OneClick completely disappear from the edges of your screen when hidden.
  • 62. Open animate speed Set how quickly OneClick opens: Normal, Fast, Slow, or Instant. Delay time for Time Delay Capture(s) Set up a delay prior to captures, type the length of the delay, in seconds, in this box. Default Select Default to restore the options in this dialog box back to their original settings.
  • 63. Welcome to Snagit Editor Use Snagit Editor to apply professional, quality finishing touches to your captures. Also share or locate, view, and manage captures and multimedia files. The Open Captures Tray automatically stores captures. Editing options include flip, mirror, shear, rotate, crop, and cut. Adjust the color depth, add text, or view the frames of a video capture. Add custom edge effects such as drop shadow, torn or faded edges, and enhancements such as arrows, cursors, lines, text, and much more. Use the Search Pane, find and move/organize captures. In the Library, view captures as a thumbnail or a list view and sort by name, size, type, date, dimensions, flags or keywords. Share captures via email or FTP, send to Office applications, or print multiple images. Because Snagit and Snagit Editor are two separate applications that can exist side by side…. View more than one capture at a time. Assemble multiple images together. Visually select groups of images to e-mail, batch convert, and more. For more information, see: Get Familiar with the Editor The Ribbon Tabs The Quick Access Toolbar Open Captures Tray Get Familiar with the Editor To open Snagit Editor, do one of the following: Select Windows Start menu > All Programs > Snagit 9 > Snagit 9 Editor Click Snagit Editor on the Quick Launch pane in Snagit. Select Tools > Snagit Editor from the Snagit menu bar.
  • 64. Click the Snagit Button to access basic commands such as New, Open, Save, Save As, Send, Print, Delete, and Close. Also select: Convert Images to batch convert images. Resources to access the Snagit Web site, find out about other TechSmith products, download Snagit Accessories, and more. Also open the About Snagit dialog box that contains the version number and copyright information. Editor Options button to set application preferences. The Ribbon helps you quickly find the tools and options you need to complete a task. Customize the Quick Access Toolbar with the tools and commands used most frequently. Right-click icons and options throughout the ribbon to add to the Quick Access Toolbar. The Quick Styles Gallery is a collection of ready-made styles or effects. To use, select a style from the gallery and drag or click on the canvas. Click the gallery’s More button to see even more style options to choose from. Right-click a modified object on the canvas and select Add to Quick Styles to add it to the gallery. With the Search Pane find and view images, videos and text captures by date, folder, keywords, and more. Click to assign Flags such as Important, Idea, or Personal to captures or media files. All assigned flags display in color in the vertical flag row of the Search Pane when the pane is collapsed or, at the bottom of the Search Pane when the pane is expanded.
  • 65. Use the Library to locate, view, and manage captures and multimedia files in thumbnail or list view. Select multiple files to save, convert file formats, print, and e-mail in batches. Use the Zoom Slider to enlarge the view for an image or the thumbnails in Library view. Open Captures Tray displays thumbnails of recent captures as well as all open media files. The Canvas is where you edit or annotate your captures. Add Callouts, Arrows, Stamps, and more. The Ribbon Tabs The Ribbon helps you quickly find the tools and options you need to complete a task. Tools and options are organized in logical groups that are collected together under specific tabs. Each tab relates to a particular type of activity such as adding annotations with the drawing tools or interactive Hotspots. Tips for interacting with the ribbon follow the table below. Click the Snagit Button to access basic commands such as New, Open, Save, Save As, Send, Print, Delete, and Close. Also select: Convert Images to batch convert images. Resources to access more Snagit resources on the TechSmith Web site. Editor Options button to set application preferences. Tools and options are located throughout the ribbon and are organized in logical groups. Click icons with down arrows to see more options and effects for a particular tool. Find groups of related tools and options in the Ribbon. Right click on a tool or option to add it to the Quick Access Toolbar. Customize the Quick Access Toolbar with the tools and commands used most frequently. Right-click icons and options throughout the ribbon to add to the Quick Access Toolbar. The Quick Styles Gallery is a collection of ready-made styles or effects. To use, select a style from the gallery and drag or click on the canvas. Click the gallery’s More button to see even more style options to choose from. Right-click a modified object on the canvas and select Add to Quick Styles to add it to the gallery.
  • 66. Throughout the Editor interface, as you hover over commands and tools enhanced screen tips appear and F1 help links (press the F1 key while the tip displays to open the help file topic.) Arrows next to the option icons indicate dropdown menus of additional effects and options. Minimize or Maximize the Ribbon from the Quick Access Toolbar 1. Click the Customize Quick Access Toolbar down arrow. 2. Select Minimize the Ribbon. 3. To use the tools and commands while the Ribbon is minimized, click the name of the tab you want to use. The ribbon will appear. Once the canvas is clicked on, the ribbon will minimized again. To restore the Ribbon, repeat steps 1-2. Minimize or Maximize the Ribbon Using the Tabs 1. To quickly minimize the Ribbon, double-click the name of a tab. 2. Double-click a tab again to restore the Ribbon. Minimize or Maximize the Ribbon Keyboard Shortcut To minimize or restore the Ribbon, press <CTRL+F1>. Things you Cannot Do with the Ribbon Add to or rearrange the commands on the Ribbon Change or remove a command or group on the Ribbon Add tabs to the Ribbon. Switch to the toolbars and menus from earlier versions of Snagit. Draw Tab
  • 67. The Clipboard group contains the following tools and commands: Copy All, Cut, Copy, Paste, Paste Transparent or Opaque. The Drawing Tools group contains the following tools and commands: Selection, Zoom, Callout, Text, Arrow, Line, Stamp, Shape, Pen, Fill, Highlight, Eraser. The Quick Styles Gallery is a collection of ready-made styles or effects. To use, select a style from the gallery and drag or click on the canvas. Click the gallery’s More button to see even more style options to choose from. Right-click a vector object on the canvas and select Add to Quick Styles to add it to the gallery’s Quick Styles category. The Outline, Fill, and Effects options for the selected tool are available in the Styles group. Click the down arrow on an icon to expose the available options. The Arrange group contains the vector object options for arranging and aligning objects. Right-click on an object to view vector object options. The Send group contains Output options. Click the top of the icon to send the contents of the canvas to the output listed. Click the bottom of the icon to select a new output from a list. The Output icon changes to a Finish Profile icon if you use a profile capture with a designated output. Continue with Complete a Profile or Add-In Capture. When you close Editor, the Finish Profile icon closes and the Output icon displays when you open Editor again. Complete a Profile or Add-In Capture When you take a capture in Snagit with an assigned Output and the Preview in Editor option selected, the Finish Profile icon appears in the Draw tab > Send group instead of the Output icon. To complete the capture, click green checkmark on the Finish Profile button. To change the Output, click the arrow on the Finish Profile button. Select a new output from the list.
  • 68. Image Tab The Canvas group contains the following tools and commands: Crop, Cut Out, Trim, Rotate, Resize, Canvas Color. The Edge Effects in the Quick Styles Gallery add a professional, finished look to a selection or the entire canvas. Edge effects include drop shadow, torn, faded, wave, saw, shark tooth and beveled edge. Click an effect in the gallery to apply the effect to a selection or the entire canvas. Click the gallery’s More button to see even more Edge Effects to choose from. Custom Edge Effects added to the gallery appear in the Quick Styles category. The Styles group contains Border, Effects, and Edge Effects options for a selected tool. Effects include Shadow, Perspective, Shear, and Edges. Click the down arrow on a tool to view the available options. Click Edges to access the Edge Effects customize options. In the customize task pane, create an effect and click Add to Quick Styles to reuse the effect at a later time. The Modify group contains the following effects: Blur, Grayscale, Watermark, Filters, and Spotlight and Magnify. Hotspots Tab Create or modify links and hotspots in a capture or, insert new hotspots. Click on a hotspot to view and modify the hotspot properties or reposition and resize the hotspot. You can only see the hotspots in the Hotspots tab. Once you complete the hotspots, email or save the image in a format that supports hotspots. See also Image File Types that Support Hotspots and Hotspots Not Supported Dialog Box. Copy the image to the clipboard and paste it into Microsoft PowerPoint to retain all hotspots and Flash Popups. To add a link or hotspot: 1. Select the shape of the Selection tool. 2. Drag to create a hotspot on the canvas. 3. Add hotspot properties including tooltip and link address.
  • 69. In the Shapes group, select the shape of the hotspot. Drag on the canvas to create. In the Links group, enter the following: Link address: Enter the address for the link. Tooltip: Enter the text that appears when you hover over the hotspot with the mouse. In the Flash Popup group select the following options: Outline: Only available with the Text Flash popup option. Select a color for the text popup border. Fill: Only available with the Text Flash popup option. Select a color for the text popup background. Highlight: Available for both text and graphic popups. Select the color the hotspot turns when you hover over the hotspot with the mouse. Click Flash Popup to select No Popup, Text Popup, or Graphic Popup. For text option, add and format text and click OK. For graphic option, browse and find graphic and click OK. The Outline, Fill, and Highlight options for the popups enable after you select an option. To use the hotspots with Flash Popup properties, you must use the E-mail Output or save as a Macromedia Flash file (SWF). Flash is used for interactive images intended for Web sites or for viewing within a browser. The Editing group contains the following commands: Select all: Select all hotspots on the canvas. Remove Selected: Delete hotspots currently selected. Image File Types that Support Hotspots To use hotspots in your final image, you must e-mail or save your image as one of the following: Web page with image (MHTML file) Adobe PDF (PDF) Macromedia Flash file (SWF) Snagit Capture File (SNAG) Save as a Snagit Capture File (SNAG) to open later in Snagit Editor. SNAG files support both hotspots and Flash Popup properties. To use hotspots in a capture embedded in an e-mail (only with Outlook or Outlook Express), you can use one of the following file types: Portable Network Graphics (PNG) JPEG image (JPG) CompuServe GIF (GIF) Windows Bitmap (BMP) Hotspots Not Supported Dialog Box There are two versions of the Hotspots Not Supported dialog box: Hotspots Not Supported Flash Hotspots Not Supported
  • 70. In these dialog boxes, you can do one of the following: Discard hotspots or advanced Flash hotspots and save the capture as the current file type. Keep the hotspots and select a new file type. Cancel the save and go back to your capture. Tags Tab Use the Keywords group to assign keywords to the current capture or media file, thumbnails highlighted in the Open Captures Tray, or thumbnails highlighted in the Library. Enter keywords in quotes to create a phrase. The All Keywords lists all the keywords used. Select a keyword from the list to apply it to the current capture, thumbnails highlighted in the Open Captures Tray, or thumbnails highlighted in the Library. The Flags group contains icons you can assign to the current capture, capture thumbnails highlighted in the Open Captures Tray, or thumbnails highlighted in the Library. The first three flags assigned to a capture display in the Tray. Use the Tags tab in the Search Pane to find media based on assigned flags. All assigned flags display in color in the vertical flag row of the Search Pane when the pane is collapsed or, at the bottom of the Search Pane when the pane is expanded. The Details group contains information automatically gathered during capture. This is called metadata. For captures from the Web, an active link to that Web page displays. Click the link to go to that page. Use the metadata to search for captures. For example, all captures from a specific application or taken on a specific date. Click the More Details icon to view the Details dialog box. This contains additional metadata. View Tab The Show / Hide group gives options for turning on the gridline view, opening and closing the Search Pane, and opening and closing the Library. When using Gridlines, zoom in to 600% or higher to bring the gridlines into view.