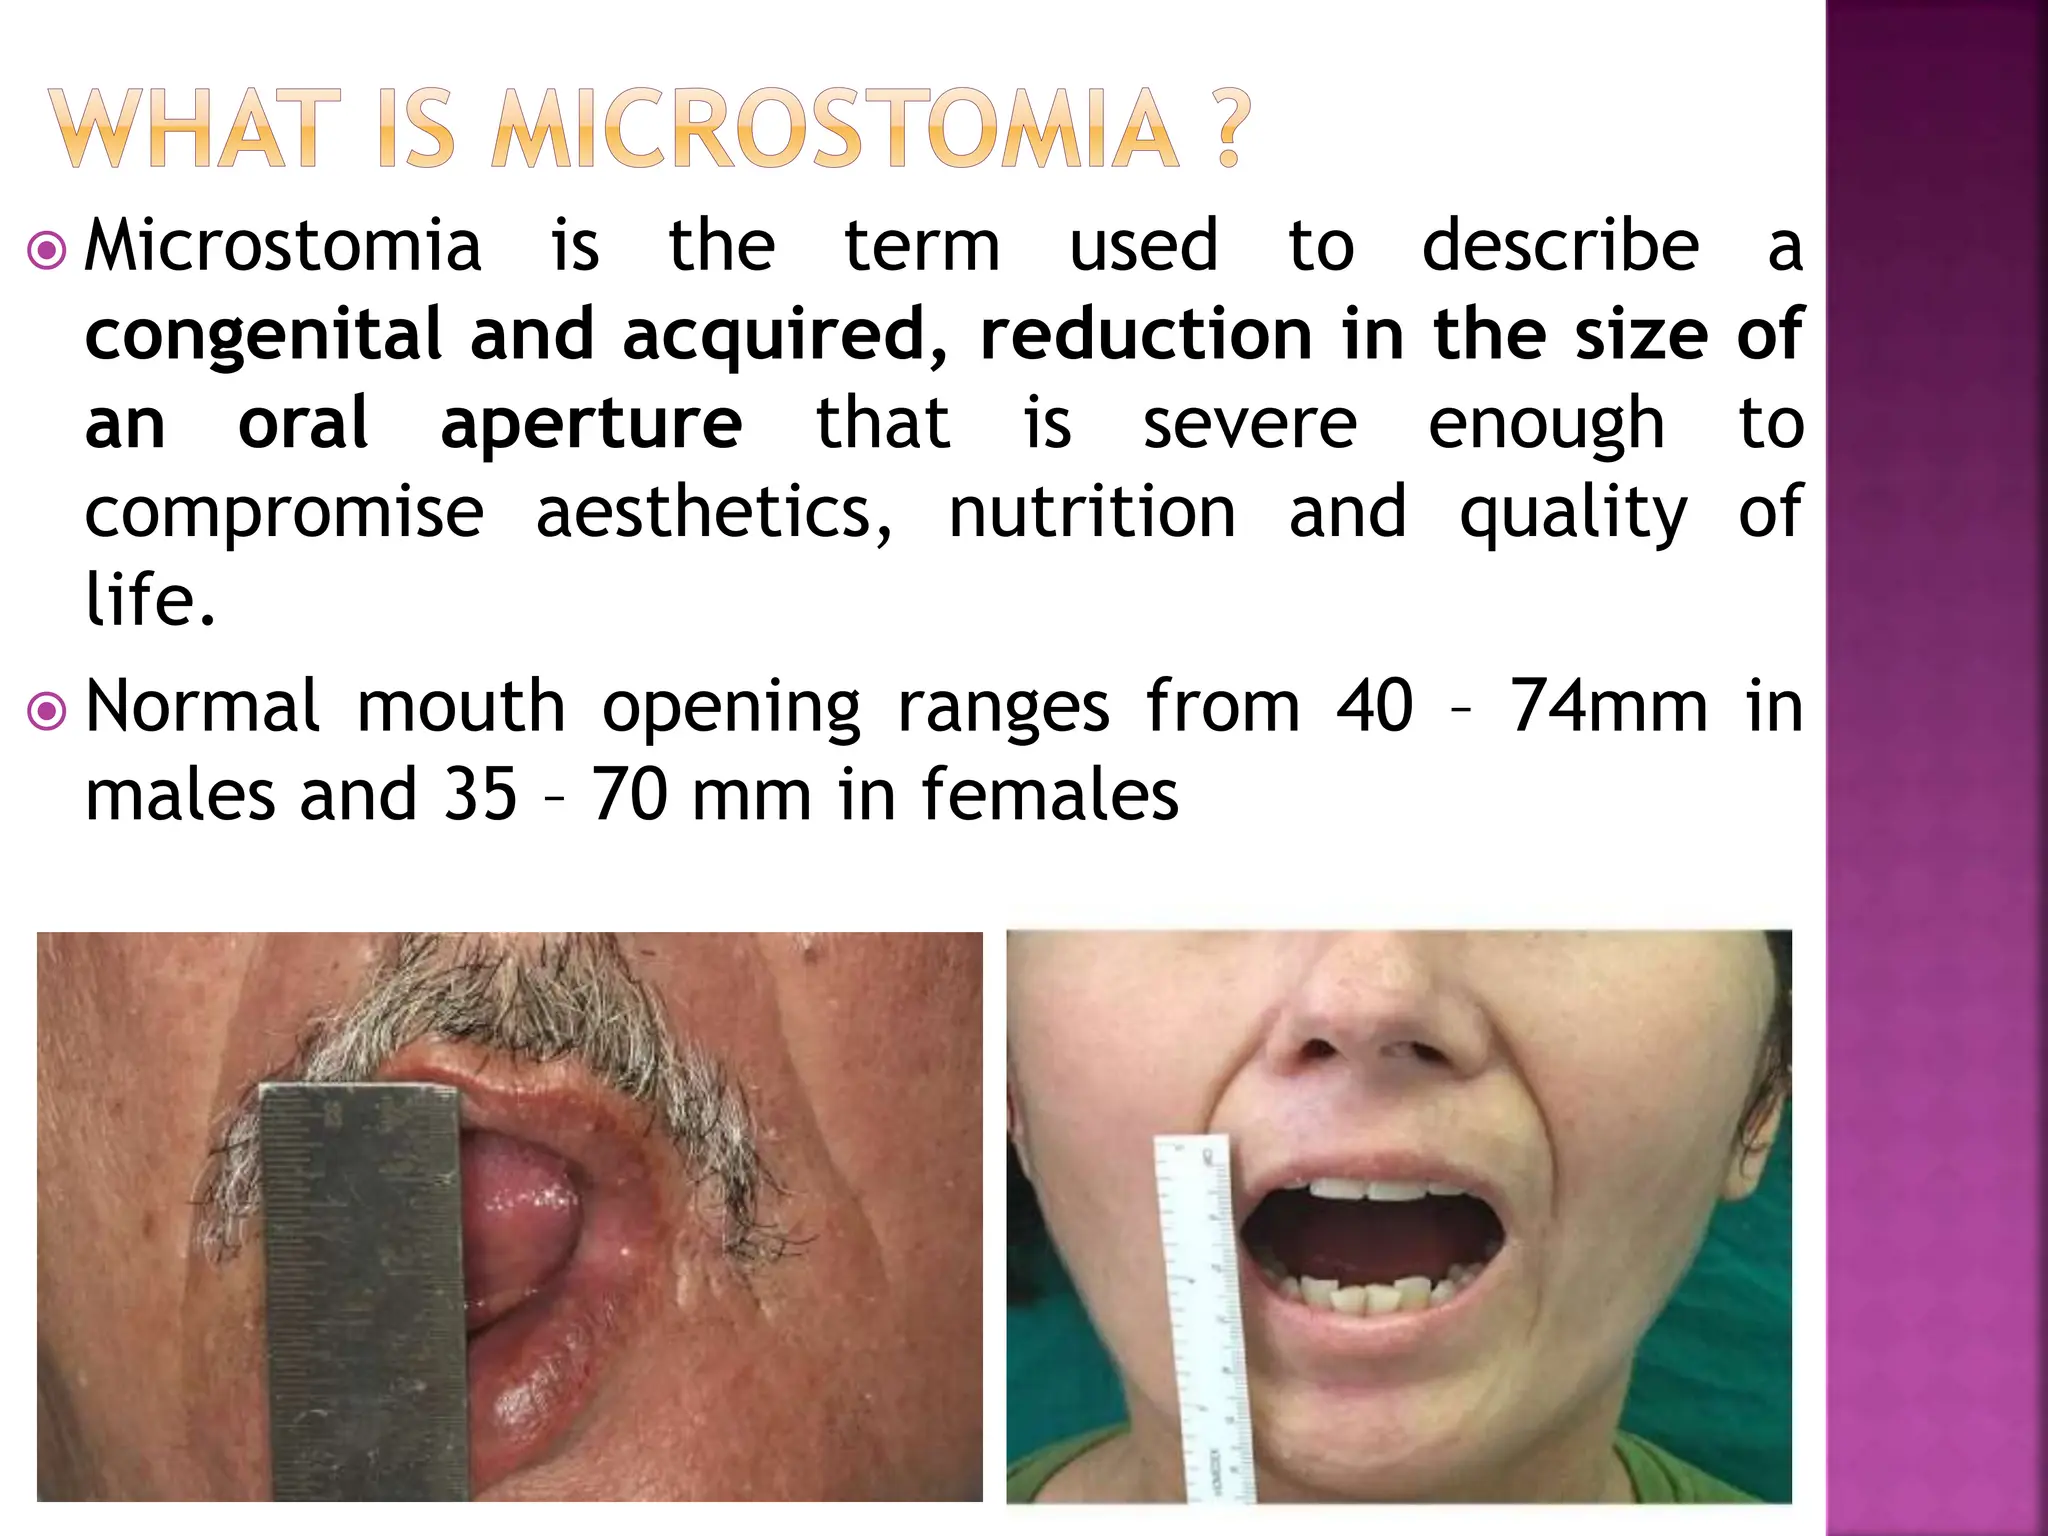
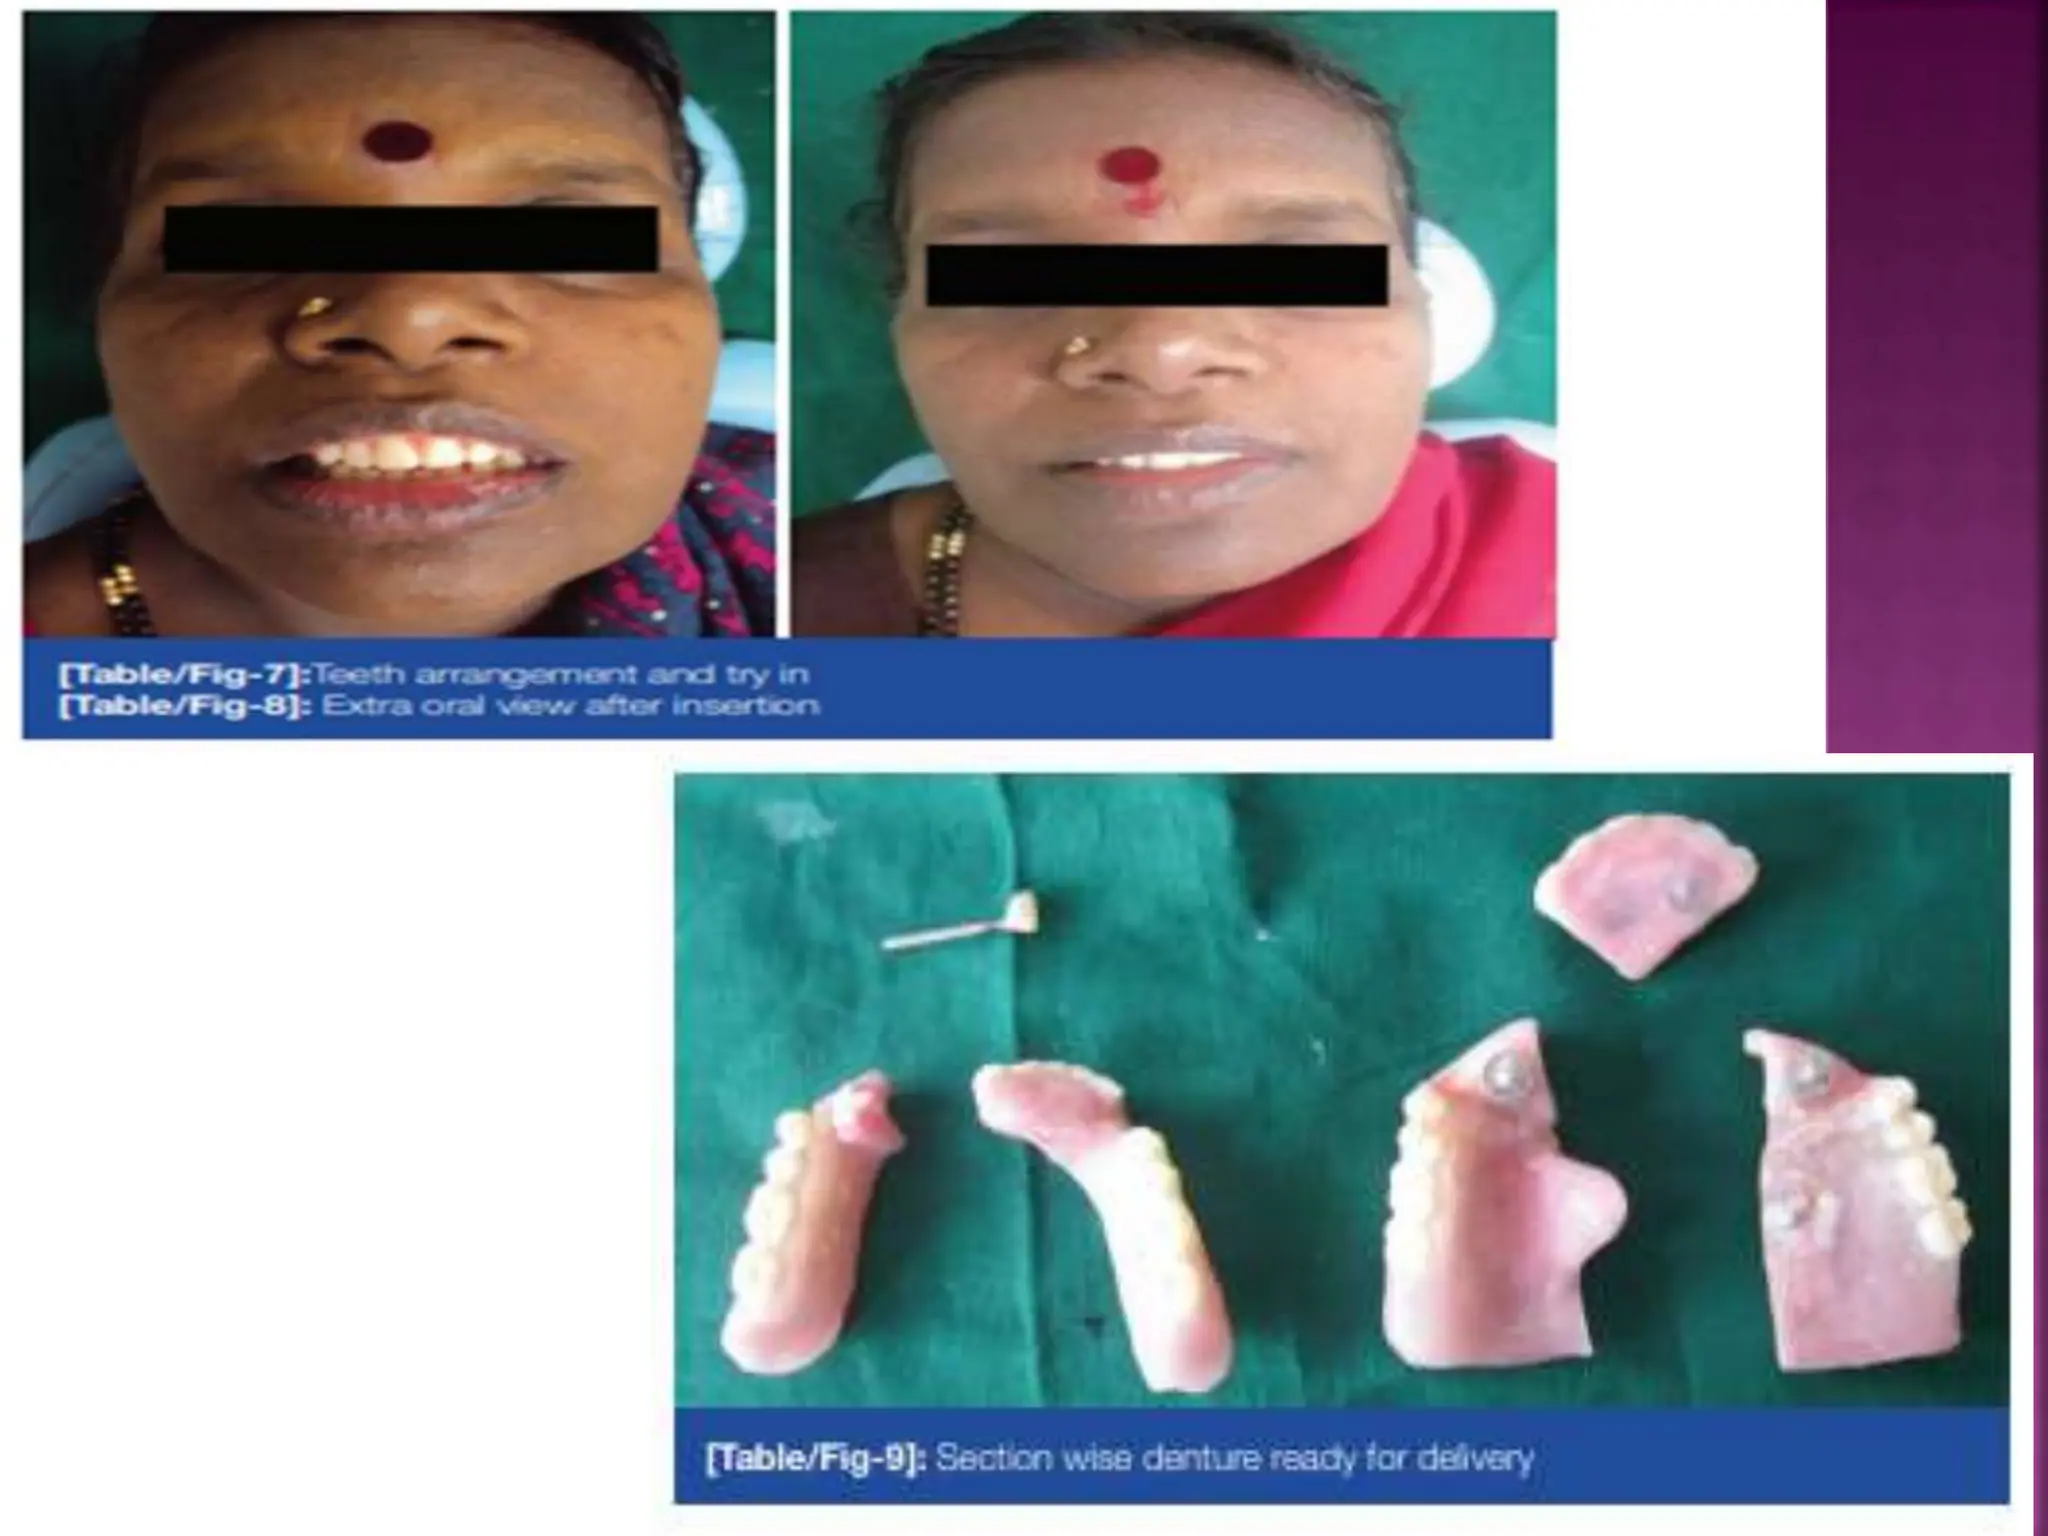
SECTIONAL DENTURES FOR
MICROSTOMIA PATIENTS
- DR. SATVIKA PRASAD
MDS
DEPT OF PROSTHODONTICS
 What is Microstomia?
 Causes of Microstomia.
 Complications.
 Techniques of primary impression
 Case reports
 Various techniques
 Post denture treatment
 Conclusion
 Microstomia is the term used to describe a
congenital and acquired, reduction in the size of
an oral aperture that is severe enough to
compromise aesthetics, nutrition and quality of
life.
 Normal mouth opening ranges from 40 – 74mm in
males and 35 – 70 mm in females
 CONGENITAL –
 Systemic sclerodrma
 Freeman sheldon
syndrome
 Plummer Vinson Syndrome
 ACQUIRED –
 Facial burns
 Post radiotherapy
 Direct physical trauma to
masticatory muscles or TMJ
 Normal mouth opening is essential for the
function of
 speech,
 nutritional needs,
 dental hygiene,
 facial expression and
 social interaction
 regaining favourable aesthetics
 providing lip support
 improving articulation
 Restoring functionality
 Nutritional needs
 Regaing Social well being
 In this technique, silicone
putty that was inserted and
molded in the mouth before
it polymerized.
 Because of its flexible
nature, the silicone tray
could be easily inserted and
removed.
 To pour the cast without
distortion, we have to
mount the impression on
dental platser.
• A horse-shoe-shaped flexible plastic
tray (used for fluoride application)
was selected.
• No. 8 round bur was used to make
perforations in many places over
the surface.
• A mixture of well-kneaded silicone
putty impression material was
loaded into the tray and it was
molded over the inner surface of the
tray.
• The loaded tray was squeezed
enough to insert through the limited
oral opening and was seated over
the ridge.
No. 8 round bur
• The material was adapted to the palate
with finger pressure, and the tissue was
used to mold the material around the
periphery.
• After the material was almost set, it was
removed from the mouth and the
undercuts and overextended portions of
the impression material were trimmed
off, thus making an individualized
impression tray.
• Later, a wash impression in this
individualized impression tray with light
body silicone impression material was
made. After the material was set, the
impression is examined for details and
the cast was prepared.
 This is a modified method of Technique I.
 A 19-gauge orthodontic wire was formed into a
“U”-shape corresponding to the arch form. A cross
bar made of the similar dimension wire was soldered
to connect the two arms of the horseshoe wire.
 Apply acrylic over the u shaped arch wire which we
fabricated.
 Load the tray with putty silicone material and
additional polymerizing resin is added for additional
strength,
 This helped in preventing the excess flexibility of
the impression and prevented it from distortion
while removing from the mouth and later while
pouring the impression
 In this technique, preliminary impressions
for both arches were obtained by sectioned
stock trays.
 Then, two identical stock trays for both
jaws corresponding to the measurements
were selected.
 The first set of trays for each jaw were cut
anteroposteriorly in two sections with a
disk following a line that bisected the tray
into one-third and two-third pieces .
 The larger section of the tray included the
handle. This tray was made as wide as the
mouth opening width of the patient to
allow ease of insertion into the oral cavity.
 At the same time, it was large enough to
register as much of the oral structures
beyond the midline as possible. The second
trays were cut anteroposteriorly to the
other side of the midline. Disc bur
 In this technique, the selected stock trays
were sectioned mediolaterally instead of
sectioning anteroposteriorly as in the
previous technique.
 The impression is made in the posterior
segment first, and then the anterior segment
was used to make impression with the
posterior impression in the mouth.
 Both the impressions were taken out
separately, assembled, and were poured with
dental plaster.
 Here, a suitable plastic impression tray was
selected that corresponded to the
measurements of the arch width of the
patient’s ridge measured using a caliper.
 Plaster or artificial dental stone was poured
into the plastic impression tray to form a
matrix. To ensure the subsequent fit of the tray
on the matrix, the impression tray was removed
and reinserted on the matrix.
 The plastic tray was cut into two sections with
a disk, the larger section to include the handle.
 Three plastic building blocks (toy) were
selected to approximate the sectioned tray as a
single unit. Two of them were of the similar
dimension, i.e., 16 mm × 8 mm × 3 mm and the
other one was of double its length, i.e., 32 mm
× 8 mm × 3 mm.
 The two smaller blocks were assembled under
the larger block. The entire assembly was
positioned on the sectioned tray overlying the
sectioned area.
 The smaller blocks were then joined with the
tray using auto polymerizing resin.
3mm
32mm
• The larger block was joined with the
smaller block that was attached to the
smaller segment of the tray (tray
segment that was without the handle).
In the clinical procedure, impression
was first made with irreversible
hydrocolloid using the larger sectional
tray.
• Excess impression material was
trimmed to flush with tray. With this
impression in the mouth, impression on
the smaller tray segment was made.
When the impressions were in the
mouth, pressure was applied on the
building blocks till the material was
set. Once the material was set, the
smaller segment was disassembled and
removed before removing the larger
segment and was reassembled outside
the mouth before pouring the cast.
 In this technique, a magnet was embedded in acrylic
formed around the handle of one-half of the cut stock
tray and a metal plate was attached on the other half.
 After the sectional impressions were made, the two
halves of the impression were aligned outside the mouth
aided by the magnetic attraction
 Prosthodontic management of a patient with
limited mouth opening- A practical approach.
Prasad R, Bhide SV, Gandhi PV, Divekar NS, Madhav VN. Prosthodontic
management of a patient with limited mouth opening: A practical approach.
The Journal of Indian Prosthodontic Society. 2008 Apr 1;8(2):83-6.
 A 75 years old female
patient came for receiving
the complete denture.
 On examination she was
found to have severe
limitation in mouth
opening in the range of
23-25mm.
 So fabrication of
conventional complete
denture was quite
difficult , therefore it was
decided to fabricate a
sectional prosthesis.
STEP 1- SECTIONAL STOCK TRAY FABRICATION-
 Since it was difficult to place the smallest stock metal tray in the patient’s
mouth , a sectional stock tray was fabricated by duplicating a size ‘0’
maxillary and mandibular metal stock tray in acrylic.
 It was then sectioned through the midline after which cross pin slots were
placed on the handle of each tray using pindex machine.
 To enusre tray stability
as well as uniformity of
pressure and impression
material, tissue stops
were placed on the
intaglio surface of the
tray.
STEP 2- SECTIONAL PRIMARY IMPRESSION -
 The sectional maxillary and mandibular primary impressions were then
made using impression compound
 The impressions were then refined, making sure excess impression
material that had flown past the midline had been trimmed to flush with
surface of the tray.
 The trays were then
reassembled extraorally,
followed by beading, boxing,
and pouring of the primary
cast using model plaster .
 Some authors recommend
intraoral assembly of sectional
trays. This can be easily done
by sectioning the cross-pin to
half its length and assembling
the loaded tray intraorally.
STEP 3- SECTIONAL CUSTOM TRAY FABRICATION AND
FINAL IMPRESSION-
 Spacer wax was adapted on the primary cast and tissue
stops are made.
 Border moulding is done and final impression is taken by
eugenol free zinc oxide impression paste.
Impressions were
refined and were
assembled
extraorally for
pouring the
master cast after
beading and
boxing
STEP 4- SECTIONAL RECORD BASE FABRICATION-
Temporary record bases were fabricated on the obtained
master casts using autopolymerizing acrylic resin.
Record bases were recovered and sectioned through
midline.
 Sectioned
halves were
then connected
using size ‘0’
stainless steel
press buttons
and acrylic tabs.
STEP 5- FABRICATION OF WAX RIMS AND SECTIONAL
JAW RELATION
 On these sectional record bases, wax rims were
fabricated and jaw relation was recorded, after placing
the individual sections intraorally.
STEP 6- TRY-IN OF WAXED-UP SECTIONAL PROSTHESIS –
 The transfer of jaw relation record to the articulator,
arrangement of teeth, and the try-in were carried out
in the conventional manner.
 STEP 7- ACRYLIZATION OF THE SECTIONAL
PROSTHESIS
STEP 8 - SECTIONAL PROSTHESIS PLACEMENT –
 After ensuring the fit and stability of the sectional
prosthesis, it was placed in the patient's mouth. The
patient was thoroughly educated and instructed
regarding the use of the prosthesis to ensure proper
assembly of the same. Post-insertion and oral hygiene
instructions were
given, and
routine follow-up
appointments were
scheduled.
 ADVANTAGES-
 Simplified sectional tray design and ease of fabrication
 The technique can be accomplished in any dental laboratory,
without using complicated machinery or attachment devices
 The press buttons are available easily and at a nominal cost.
 In case of any damage, they can be replaced and relocated
easily with the help of self cure acrylic resin.
 DISADVANTAGES-
 Additional time, labour, and materials.
 Periodic recall.
 Snap buttons can collect food debris so proper
hygiene/cleaning is required.
 Can loosen with time
A novel approach of rehabilitation of a
microstomia patient with sectional hinged
dentures.
Kumar CA, Jei JB, Murugesan K, Muthukumar B. A novel approach of
rehabilitation of a microstomia patient with sectional hinged dentures.
Journal of Interdisciplinary Dentistry. 2020 Jan 1;10(1):39-43.
 A female patient aged 74 years with a chief
complaint of missing teeth in her upper jaw
and lower jaw for the past 6 years, and
wanted fabrication of complete denture.
 On examination, it was found that the patient
had reduced mouth opening of 25 mm
 The treatment plan was made to provide
sectional maxillary and mandibular
impression procedures and followed with
fabrication of hinged maxillary and
mandibular sectional complete dentures.
PRIMARY
IMPRESSION
CUSTOM
TRAY
FINAL
IMPRESSION
DENTURE
BASES
JAW
RELATION
TRY IN
FINAL
DENTURE
 In the mandibular denture, a
hinge of 0.5-mm thickness
and 2.5-mm width of stainless
steel hinge was placed in the
anterior part of the lingual
surface.
• In this, two stainless steel butt hinges
of 0.5-mm thickness and 5-mm width
were placed in the maxillary denture
in the midline: one in the anterior
palatal area and the other near the
junction of vertical and horizontal
section made 8 mm before the
posterior palatal seal area
 Advantages-
 Posterior seal was maintained.
 In maxillary denture 2 hinges give better stability
 Maximum coverage and support
 Disadvantages-
 While maintaing the PPS, the widest portion of the
denture in posterior region- it will be difficult to insert
and remove the denture.
Complete Denture in a Microstomia Patient.
SAtpAthy A, GujjAri AK. Complete denture in a microstomia
patient. Journal of clinical and diagnostic research: JCDR. 2015
May;9(5):ZD16.
 A 58-year-old female
edentulous patient having
microstomia with the chief
complaint of inability to
chew food due to missing
teeth.
 With the history of last
extraction done six months
back.
 The maximum mouth opening
of the patient was measured
to be 23mm.
Telescopic
section
 The advantages of the design are –
 ease of insertion and removal,
 Structural durability
 maximum coverage for retention, stability, and support
 In maxilla there are 3 units so no midline diastema is there
and phonetics will not get hampered.
 The disadvantages of this treatment plan are –
 restricted tongue space,
 increased laboratory time and
 requirement of patient’s compliance.
 the buttons should be regularly replaced when they lose
their retention.
 the buttons can corrode
 In mandibular denture the cross pin can get lost as it is small
 A technique for fabricating a hinged mandibular
complete dental prosthesis with swing lock for a
patient with microstomia
Rathi N, Heshmati R, Yilmaz B, Wilson W. A technique for fabricating a
hinged mandibular complete dental prosthesis with swing lock for a
patient with microstomia. The Journal of Prosthetic Dentistry. 2013 Dec
1;110(6):540-3.
 A 32-year-old man with limited mouth
opening (vertical approximately 25 mm,
horizontal approximately 35 mm) due to
muscular dystrophy is presented.
 Mandibular edentulous arch is there.
 A foldable, single-piece mandibular
prosthesis for a patient with limited mouth
opening is a successful treatment but
technique sensitive
 patients should be educated about proper
insertion and removal, and future
maintenance.
 Microstomia—A Treatment Challenge to A
Prosthodontist
Dewan SK, Arora A, Sehgal M, Khullar A. Microstomia—a treatment challenge
to a prosthodontist. Journal of clinical and diagnostic research: JCDR. 2015
Apr;9(4):ZD12.
• A 65-years-old male had a chief
complaint of missing teeth in
both the jaws and wanted
replacement for the same.
• On clinical examination the
patient was found to have
limited mouth opening of about
24 mm.
• Due to restricted mouth
opening of the patient, even
the smallest sized available
stock tray could not be inserted
in the patient’s mouth. So
customized stock trays for
primary as well as secondary
impression making were
fabricated.
• Both the maxillary and
mandibular stock trays were cut
into halves.
• For the stability of the two
halves, press button
attatchments on the tray
handles as well as on a steel
bar.
• The trays could be reassembled
and stabilized outside mouth
with the help of this bar.
• Primary impressions are
taken.
• The set impressions were
removed sectionally from
the oral cavity and
reassembled outside by
using the press button
attachments.
• For maxillary special tray,
impression tray was sectioned
into half without compromising
the labial frenum and was
approximated with the aid of
nick and notch both at the
palatal region and the handle
level
• For mandibular special tray, the
special tray was halved and the
two parts were stabilised by
acrylic bar.
• Two metal pins, each of 2.5 mm
diameter were placed, one on
each side of the special tray near
the handle.
• An acrylic resin bar that slid
tightly on the pins was prepared
• During wax up, two small round magnets were
placed in the anterior region of maxillary as well
as mandibular denture bases
• Two press button attatchments were placed in the
line of intersection of the posterior two halves of
the maxillary denture base.
• The sequential steps of dewaxing, curing,
finishing and polishing were done in conventional
manner.
 Earlier reports have fabricated the maxillary complete denture in two
parts which creates the problem of midline diastema as well as problems
in phonetics.
 Here, the maxillary denture had anterior component which had improved
esthetics as well as the correct phonetic component present.
Advantages –
• structural durability,
• no restriction of tongue space and
• ease of insertion and removal of the
prosthesis
• The attachments (neo magnets and
snap fasteners ) were very light in
weight and thin.
Disadvantages –
• Bit expensive
• loss of magnetic attachments
• its lab work is tedious
Magnetic attachments –
 Advantages –
 can attach easily.
 Disadvantages –
 expensive
 loss of magnetic attachments
Pre fabricated hinges
 Advantages -
 Less expensive
 Ease of insertion and removal,
 Structural durability
 Maximum coverage for retention,
 Stability, and support .
 Disadvantages –
 restricted tongue space
 increased laboratory time
 requirement of patient’s
compliance
Snap buttons or push
buttons
 Advantages –
 Less expensive
 Disadvantages –
 Can collect debris
 While clipping pressure is
applied on a particular
place only.
 With time clip can
become loose.
Valpalst flexible dentures for partially
edentulous cases
 Advantages-
 Ability to engage undercuts for retention.
 Soft and inherent flexibility: No need for periodic
adjustment of clasp to keep them tight.
 Low modulus of elasticity.
 Will not warp or become brittle.
 clinically unbreakable.
 Good biocompatibility: because it is free of
monomer and metal.
 No porosity, so no bacteria can build up within it.
 No gingival inflammation.
 More comfortable.
 Absorb small amounts of water to make the denture
more soft and tissue compatible.
o Less bulky (thinner) and lighter weight
 Better chewing efficiency
 Better esthetics: Translucent, so it allows natural
gum to show through, making it invisible. Clasps rest
on the gums surrounding the natural teeth. They are
indistinguishable from the gums
 No metal framework.
 More retention and stability.
 Retention depends mainly on the tissue and only a
small portion of abutment tooth. No evidence of
excessive abutment mobility.
 Ease of fabrication (in comparison with cast RPD).
 Reduces chair side time (shorter fabrication time)
Disadvantages
 Intended only for provisional or temporary applications.
 Flexible dentures are generally only used when
traditional dentures cause discomfort to the patient
and cannot be solved through relining.
 A major drawback is de-bonding of the acrylic teeth
from nylon denture base. Nylon polyamide denture base
material does not bond chemically with acrylic
resin/porcelain, so mechanical undercuts (diatorics) are
made in each tooth.
 It cannot be used with patients having low vertical
dimension and closed bite.
 Tend to absorb the water content and will discolor
often.
 Discoloration and gradual fading of denture base color
are reported after 1-2 years.
 Brushing a Valplast appliance is not recommended as
this may remove the polish and roughen the surface
over time
 The procedure is technique sensitive. Extreme caution
is necessary when processing to avoid skin contact with
the heated sleeve, cartridge, furnace, hot cartridge,
injection insert, hot flasks and heat lamps.
 Difficult to adjust and polish.
 Lower hardness
 Lacks important elements of RPD, in particular, occlusal
rests and a rigid framework, So it won't maintain
vertical dimension.
 It is contraindicated for unilateral distal extension.
 Usually cannot be relined, so stability is a concern if
the alveolar ridge resorbs.Usually cannot be repaired.
 To maintain the mouth opening, an
exercise program should be
performed.
 Use of an electric tooth brush and
0.2% CHX solution should be
recommended. Collis curve
toothbrush is designed esp. for
patients with limited mouth opening
 To prevent caries, daily application of 0.4%
stannous fluoride gel was recommended on the
root surfaces which were used for over-dentures.
 Routine follow-up appointments should be
scheduled.
 If dentures are relined by soft liners (as in case
of OSMF) that should be changed after every 10-
12 months.
 They should be educated and instructed
regarding the removal and insertion of the
prosthesis.
 Post insertion and oral hygiene instructions
should be given.
Patient’s with microstomia seeking prosthodontic
rehabilitation pose a challenge to the clinician,
they can be conservatively managed by modifying
clinical and laboratory procedures.
However in these modifications , care should be
taken to avoid compromising the basic principles of
providing optimum function and aesthetics to the
patients.
 Shafer’s – textbook of oral pathology – 8th edition
 Sandeep C, Bindu OS, Sreedevi B, Prasad KS. Prosthodontic management of a
completely edentulous microstomia patient. Journal of Orofacial Sciences. 2014
Jan 1;6(1):65.
 Basavanna JM, Raikhy A. Sectional Denture for Microstomia Patient: A Clinical
Report. International Journal of Prosthodontics & Restorative Dentistry. 2013 Apr
1;3(2):62.
 Sharma A, Arora P, Wazir SS. Hinged and sectional complete dentures for
restricted mouth opening: A case report and review. Contemporary Clinical
Dentistry. 2013 Jan;4(1):74.
 SAtpAthy A, GujjAri AK. Complete denture in a microstomia patient. Journal of
clinical and diagnostic research: JCDR. 2015 May;9(5):ZD16.
 Kumar CA, Jei JB, Murugesan K, Muthukumar B. A novel approach of
rehabilitation of a microstomia patient with sectional hinged dentures. Journal
of Interdisciplinary Dentistry. 2020 Jan 1;10(1):39.
 Prasad R, Bhide SV, Gandhi PV, Divekar NS, Madhav VN. Prosthodontic
management of a patient with limited mouth opening: a practical approach.
The Journal of Indian Prosthodontic Society. 2008 Apr 1;8(2):83.

Sectional dentures for microstomia patients.pptx

  • 1.
    SECTIONAL DENTURES FOR MICROSTOMIAPATIENTS - DR. SATVIKA PRASAD MDS DEPT OF PROSTHODONTICS
  • 2.
     What isMicrostomia?  Causes of Microstomia.  Complications.  Techniques of primary impression  Case reports  Various techniques  Post denture treatment  Conclusion
  • 3.
     Microstomia isthe term used to describe a congenital and acquired, reduction in the size of an oral aperture that is severe enough to compromise aesthetics, nutrition and quality of life.  Normal mouth opening ranges from 40 – 74mm in males and 35 – 70 mm in females
  • 5.
     CONGENITAL – Systemic sclerodrma  Freeman sheldon syndrome  Plummer Vinson Syndrome  ACQUIRED –  Facial burns  Post radiotherapy  Direct physical trauma to masticatory muscles or TMJ
  • 6.
     Normal mouthopening is essential for the function of  speech,  nutritional needs,  dental hygiene,  facial expression and  social interaction
  • 7.
     regaining favourableaesthetics  providing lip support  improving articulation  Restoring functionality  Nutritional needs  Regaing Social well being
  • 9.
     In thistechnique, silicone putty that was inserted and molded in the mouth before it polymerized.  Because of its flexible nature, the silicone tray could be easily inserted and removed.  To pour the cast without distortion, we have to mount the impression on dental platser.
  • 10.
    • A horse-shoe-shapedflexible plastic tray (used for fluoride application) was selected. • No. 8 round bur was used to make perforations in many places over the surface. • A mixture of well-kneaded silicone putty impression material was loaded into the tray and it was molded over the inner surface of the tray. • The loaded tray was squeezed enough to insert through the limited oral opening and was seated over the ridge. No. 8 round bur
  • 11.
    • The materialwas adapted to the palate with finger pressure, and the tissue was used to mold the material around the periphery. • After the material was almost set, it was removed from the mouth and the undercuts and overextended portions of the impression material were trimmed off, thus making an individualized impression tray. • Later, a wash impression in this individualized impression tray with light body silicone impression material was made. After the material was set, the impression is examined for details and the cast was prepared.
  • 12.
     This isa modified method of Technique I.  A 19-gauge orthodontic wire was formed into a “U”-shape corresponding to the arch form. A cross bar made of the similar dimension wire was soldered to connect the two arms of the horseshoe wire.  Apply acrylic over the u shaped arch wire which we fabricated.  Load the tray with putty silicone material and additional polymerizing resin is added for additional strength,  This helped in preventing the excess flexibility of the impression and prevented it from distortion while removing from the mouth and later while pouring the impression
  • 13.
     In thistechnique, preliminary impressions for both arches were obtained by sectioned stock trays.  Then, two identical stock trays for both jaws corresponding to the measurements were selected.  The first set of trays for each jaw were cut anteroposteriorly in two sections with a disk following a line that bisected the tray into one-third and two-third pieces .  The larger section of the tray included the handle. This tray was made as wide as the mouth opening width of the patient to allow ease of insertion into the oral cavity.  At the same time, it was large enough to register as much of the oral structures beyond the midline as possible. The second trays were cut anteroposteriorly to the other side of the midline. Disc bur
  • 15.
     In thistechnique, the selected stock trays were sectioned mediolaterally instead of sectioning anteroposteriorly as in the previous technique.  The impression is made in the posterior segment first, and then the anterior segment was used to make impression with the posterior impression in the mouth.  Both the impressions were taken out separately, assembled, and were poured with dental plaster.
  • 16.
     Here, asuitable plastic impression tray was selected that corresponded to the measurements of the arch width of the patient’s ridge measured using a caliper.  Plaster or artificial dental stone was poured into the plastic impression tray to form a matrix. To ensure the subsequent fit of the tray on the matrix, the impression tray was removed and reinserted on the matrix.  The plastic tray was cut into two sections with a disk, the larger section to include the handle.  Three plastic building blocks (toy) were selected to approximate the sectioned tray as a single unit. Two of them were of the similar dimension, i.e., 16 mm × 8 mm × 3 mm and the other one was of double its length, i.e., 32 mm × 8 mm × 3 mm.  The two smaller blocks were assembled under the larger block. The entire assembly was positioned on the sectioned tray overlying the sectioned area.  The smaller blocks were then joined with the tray using auto polymerizing resin. 3mm 32mm
  • 17.
    • The largerblock was joined with the smaller block that was attached to the smaller segment of the tray (tray segment that was without the handle). In the clinical procedure, impression was first made with irreversible hydrocolloid using the larger sectional tray. • Excess impression material was trimmed to flush with tray. With this impression in the mouth, impression on the smaller tray segment was made. When the impressions were in the mouth, pressure was applied on the building blocks till the material was set. Once the material was set, the smaller segment was disassembled and removed before removing the larger segment and was reassembled outside the mouth before pouring the cast.
  • 18.
     In thistechnique, a magnet was embedded in acrylic formed around the handle of one-half of the cut stock tray and a metal plate was attached on the other half.  After the sectional impressions were made, the two halves of the impression were aligned outside the mouth aided by the magnetic attraction
  • 19.
     Prosthodontic managementof a patient with limited mouth opening- A practical approach. Prasad R, Bhide SV, Gandhi PV, Divekar NS, Madhav VN. Prosthodontic management of a patient with limited mouth opening: A practical approach. The Journal of Indian Prosthodontic Society. 2008 Apr 1;8(2):83-6.
  • 20.
     A 75years old female patient came for receiving the complete denture.  On examination she was found to have severe limitation in mouth opening in the range of 23-25mm.  So fabrication of conventional complete denture was quite difficult , therefore it was decided to fabricate a sectional prosthesis.
  • 21.
    STEP 1- SECTIONALSTOCK TRAY FABRICATION-  Since it was difficult to place the smallest stock metal tray in the patient’s mouth , a sectional stock tray was fabricated by duplicating a size ‘0’ maxillary and mandibular metal stock tray in acrylic.  It was then sectioned through the midline after which cross pin slots were placed on the handle of each tray using pindex machine.  To enusre tray stability as well as uniformity of pressure and impression material, tissue stops were placed on the intaglio surface of the tray.
  • 22.
    STEP 2- SECTIONALPRIMARY IMPRESSION -  The sectional maxillary and mandibular primary impressions were then made using impression compound  The impressions were then refined, making sure excess impression material that had flown past the midline had been trimmed to flush with surface of the tray.  The trays were then reassembled extraorally, followed by beading, boxing, and pouring of the primary cast using model plaster .  Some authors recommend intraoral assembly of sectional trays. This can be easily done by sectioning the cross-pin to half its length and assembling the loaded tray intraorally.
  • 23.
    STEP 3- SECTIONALCUSTOM TRAY FABRICATION AND FINAL IMPRESSION-  Spacer wax was adapted on the primary cast and tissue stops are made.  Border moulding is done and final impression is taken by eugenol free zinc oxide impression paste. Impressions were refined and were assembled extraorally for pouring the master cast after beading and boxing
  • 24.
    STEP 4- SECTIONALRECORD BASE FABRICATION- Temporary record bases were fabricated on the obtained master casts using autopolymerizing acrylic resin. Record bases were recovered and sectioned through midline.  Sectioned halves were then connected using size ‘0’ stainless steel press buttons and acrylic tabs.
  • 25.
    STEP 5- FABRICATIONOF WAX RIMS AND SECTIONAL JAW RELATION  On these sectional record bases, wax rims were fabricated and jaw relation was recorded, after placing the individual sections intraorally. STEP 6- TRY-IN OF WAXED-UP SECTIONAL PROSTHESIS –  The transfer of jaw relation record to the articulator, arrangement of teeth, and the try-in were carried out in the conventional manner.
  • 26.
     STEP 7-ACRYLIZATION OF THE SECTIONAL PROSTHESIS
  • 27.
    STEP 8 -SECTIONAL PROSTHESIS PLACEMENT –  After ensuring the fit and stability of the sectional prosthesis, it was placed in the patient's mouth. The patient was thoroughly educated and instructed regarding the use of the prosthesis to ensure proper assembly of the same. Post-insertion and oral hygiene instructions were given, and routine follow-up appointments were scheduled.
  • 29.
     ADVANTAGES-  Simplifiedsectional tray design and ease of fabrication  The technique can be accomplished in any dental laboratory, without using complicated machinery or attachment devices  The press buttons are available easily and at a nominal cost.  In case of any damage, they can be replaced and relocated easily with the help of self cure acrylic resin.  DISADVANTAGES-  Additional time, labour, and materials.  Periodic recall.  Snap buttons can collect food debris so proper hygiene/cleaning is required.  Can loosen with time
  • 30.
    A novel approachof rehabilitation of a microstomia patient with sectional hinged dentures. Kumar CA, Jei JB, Murugesan K, Muthukumar B. A novel approach of rehabilitation of a microstomia patient with sectional hinged dentures. Journal of Interdisciplinary Dentistry. 2020 Jan 1;10(1):39-43.
  • 31.
     A femalepatient aged 74 years with a chief complaint of missing teeth in her upper jaw and lower jaw for the past 6 years, and wanted fabrication of complete denture.  On examination, it was found that the patient had reduced mouth opening of 25 mm  The treatment plan was made to provide sectional maxillary and mandibular impression procedures and followed with fabrication of hinged maxillary and mandibular sectional complete dentures.
  • 32.
  • 33.
  • 34.
  • 35.
     In themandibular denture, a hinge of 0.5-mm thickness and 2.5-mm width of stainless steel hinge was placed in the anterior part of the lingual surface. • In this, two stainless steel butt hinges of 0.5-mm thickness and 5-mm width were placed in the maxillary denture in the midline: one in the anterior palatal area and the other near the junction of vertical and horizontal section made 8 mm before the posterior palatal seal area
  • 37.
     Advantages-  Posteriorseal was maintained.  In maxillary denture 2 hinges give better stability  Maximum coverage and support  Disadvantages-  While maintaing the PPS, the widest portion of the denture in posterior region- it will be difficult to insert and remove the denture.
  • 38.
    Complete Denture ina Microstomia Patient. SAtpAthy A, GujjAri AK. Complete denture in a microstomia patient. Journal of clinical and diagnostic research: JCDR. 2015 May;9(5):ZD16.
  • 39.
     A 58-year-oldfemale edentulous patient having microstomia with the chief complaint of inability to chew food due to missing teeth.  With the history of last extraction done six months back.  The maximum mouth opening of the patient was measured to be 23mm.
  • 41.
  • 44.
     The advantagesof the design are –  ease of insertion and removal,  Structural durability  maximum coverage for retention, stability, and support  In maxilla there are 3 units so no midline diastema is there and phonetics will not get hampered.  The disadvantages of this treatment plan are –  restricted tongue space,  increased laboratory time and  requirement of patient’s compliance.  the buttons should be regularly replaced when they lose their retention.  the buttons can corrode  In mandibular denture the cross pin can get lost as it is small
  • 45.
     A techniquefor fabricating a hinged mandibular complete dental prosthesis with swing lock for a patient with microstomia Rathi N, Heshmati R, Yilmaz B, Wilson W. A technique for fabricating a hinged mandibular complete dental prosthesis with swing lock for a patient with microstomia. The Journal of Prosthetic Dentistry. 2013 Dec 1;110(6):540-3.
  • 46.
     A 32-year-oldman with limited mouth opening (vertical approximately 25 mm, horizontal approximately 35 mm) due to muscular dystrophy is presented.  Mandibular edentulous arch is there.
  • 51.
     A foldable,single-piece mandibular prosthesis for a patient with limited mouth opening is a successful treatment but technique sensitive  patients should be educated about proper insertion and removal, and future maintenance.
  • 52.
     Microstomia—A TreatmentChallenge to A Prosthodontist Dewan SK, Arora A, Sehgal M, Khullar A. Microstomia—a treatment challenge to a prosthodontist. Journal of clinical and diagnostic research: JCDR. 2015 Apr;9(4):ZD12.
  • 53.
    • A 65-years-oldmale had a chief complaint of missing teeth in both the jaws and wanted replacement for the same. • On clinical examination the patient was found to have limited mouth opening of about 24 mm. • Due to restricted mouth opening of the patient, even the smallest sized available stock tray could not be inserted in the patient’s mouth. So customized stock trays for primary as well as secondary impression making were fabricated.
  • 54.
    • Both themaxillary and mandibular stock trays were cut into halves. • For the stability of the two halves, press button attatchments on the tray handles as well as on a steel bar. • The trays could be reassembled and stabilized outside mouth with the help of this bar. • Primary impressions are taken. • The set impressions were removed sectionally from the oral cavity and reassembled outside by using the press button attachments.
  • 55.
    • For maxillaryspecial tray, impression tray was sectioned into half without compromising the labial frenum and was approximated with the aid of nick and notch both at the palatal region and the handle level • For mandibular special tray, the special tray was halved and the two parts were stabilised by acrylic bar. • Two metal pins, each of 2.5 mm diameter were placed, one on each side of the special tray near the handle. • An acrylic resin bar that slid tightly on the pins was prepared
  • 56.
    • During waxup, two small round magnets were placed in the anterior region of maxillary as well as mandibular denture bases • Two press button attatchments were placed in the line of intersection of the posterior two halves of the maxillary denture base. • The sequential steps of dewaxing, curing, finishing and polishing were done in conventional manner.
  • 57.
     Earlier reportshave fabricated the maxillary complete denture in two parts which creates the problem of midline diastema as well as problems in phonetics.  Here, the maxillary denture had anterior component which had improved esthetics as well as the correct phonetic component present. Advantages – • structural durability, • no restriction of tongue space and • ease of insertion and removal of the prosthesis • The attachments (neo magnets and snap fasteners ) were very light in weight and thin. Disadvantages – • Bit expensive • loss of magnetic attachments • its lab work is tedious
  • 59.
    Magnetic attachments – Advantages –  can attach easily.  Disadvantages –  expensive  loss of magnetic attachments
  • 60.
    Pre fabricated hinges Advantages -  Less expensive  Ease of insertion and removal,  Structural durability  Maximum coverage for retention,  Stability, and support .  Disadvantages –  restricted tongue space  increased laboratory time  requirement of patient’s compliance
  • 61.
    Snap buttons orpush buttons  Advantages –  Less expensive  Disadvantages –  Can collect debris  While clipping pressure is applied on a particular place only.  With time clip can become loose.
  • 62.
    Valpalst flexible denturesfor partially edentulous cases
  • 63.
     Advantages-  Abilityto engage undercuts for retention.  Soft and inherent flexibility: No need for periodic adjustment of clasp to keep them tight.  Low modulus of elasticity.  Will not warp or become brittle.  clinically unbreakable.  Good biocompatibility: because it is free of monomer and metal.  No porosity, so no bacteria can build up within it.  No gingival inflammation.  More comfortable.  Absorb small amounts of water to make the denture more soft and tissue compatible.
  • 64.
    o Less bulky(thinner) and lighter weight  Better chewing efficiency  Better esthetics: Translucent, so it allows natural gum to show through, making it invisible. Clasps rest on the gums surrounding the natural teeth. They are indistinguishable from the gums  No metal framework.  More retention and stability.  Retention depends mainly on the tissue and only a small portion of abutment tooth. No evidence of excessive abutment mobility.  Ease of fabrication (in comparison with cast RPD).  Reduces chair side time (shorter fabrication time)
  • 65.
    Disadvantages  Intended onlyfor provisional or temporary applications.  Flexible dentures are generally only used when traditional dentures cause discomfort to the patient and cannot be solved through relining.  A major drawback is de-bonding of the acrylic teeth from nylon denture base. Nylon polyamide denture base material does not bond chemically with acrylic resin/porcelain, so mechanical undercuts (diatorics) are made in each tooth.  It cannot be used with patients having low vertical dimension and closed bite.  Tend to absorb the water content and will discolor often.  Discoloration and gradual fading of denture base color are reported after 1-2 years.
  • 66.
     Brushing aValplast appliance is not recommended as this may remove the polish and roughen the surface over time  The procedure is technique sensitive. Extreme caution is necessary when processing to avoid skin contact with the heated sleeve, cartridge, furnace, hot cartridge, injection insert, hot flasks and heat lamps.  Difficult to adjust and polish.  Lower hardness  Lacks important elements of RPD, in particular, occlusal rests and a rigid framework, So it won't maintain vertical dimension.  It is contraindicated for unilateral distal extension.  Usually cannot be relined, so stability is a concern if the alveolar ridge resorbs.Usually cannot be repaired.
  • 67.
     To maintainthe mouth opening, an exercise program should be performed.  Use of an electric tooth brush and 0.2% CHX solution should be recommended. Collis curve toothbrush is designed esp. for patients with limited mouth opening
  • 68.
     To preventcaries, daily application of 0.4% stannous fluoride gel was recommended on the root surfaces which were used for over-dentures.  Routine follow-up appointments should be scheduled.  If dentures are relined by soft liners (as in case of OSMF) that should be changed after every 10- 12 months.  They should be educated and instructed regarding the removal and insertion of the prosthesis.  Post insertion and oral hygiene instructions should be given.
  • 69.
    Patient’s with microstomiaseeking prosthodontic rehabilitation pose a challenge to the clinician, they can be conservatively managed by modifying clinical and laboratory procedures. However in these modifications , care should be taken to avoid compromising the basic principles of providing optimum function and aesthetics to the patients.
  • 70.
     Shafer’s –textbook of oral pathology – 8th edition  Sandeep C, Bindu OS, Sreedevi B, Prasad KS. Prosthodontic management of a completely edentulous microstomia patient. Journal of Orofacial Sciences. 2014 Jan 1;6(1):65.  Basavanna JM, Raikhy A. Sectional Denture for Microstomia Patient: A Clinical Report. International Journal of Prosthodontics & Restorative Dentistry. 2013 Apr 1;3(2):62.  Sharma A, Arora P, Wazir SS. Hinged and sectional complete dentures for restricted mouth opening: A case report and review. Contemporary Clinical Dentistry. 2013 Jan;4(1):74.  SAtpAthy A, GujjAri AK. Complete denture in a microstomia patient. Journal of clinical and diagnostic research: JCDR. 2015 May;9(5):ZD16.  Kumar CA, Jei JB, Murugesan K, Muthukumar B. A novel approach of rehabilitation of a microstomia patient with sectional hinged dentures. Journal of Interdisciplinary Dentistry. 2020 Jan 1;10(1):39.  Prasad R, Bhide SV, Gandhi PV, Divekar NS, Madhav VN. Prosthodontic management of a patient with limited mouth opening: a practical approach. The Journal of Indian Prosthodontic Society. 2008 Apr 1;8(2):83.

Editor's Notes

  • #5 Add clinical picture to evaluate microstomia.
  • #6 Hand deformities ( raynaud’s phenomenon) along with loss of tactile sensation make denture insertion and removal diificult
  • #7 Challenges facing in each step
  • #13 Techq 1- flexible imp. trays
  • #46 Swing and hinge
  • #64 Is it flexible in warm temp. and the challenges face for using it.
  • #65 Is it flexible in warm temp. and the challenges face for using it.