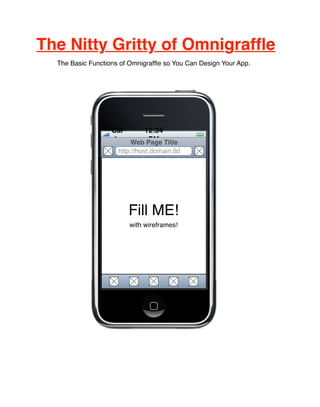
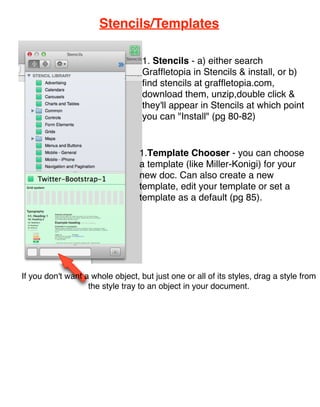
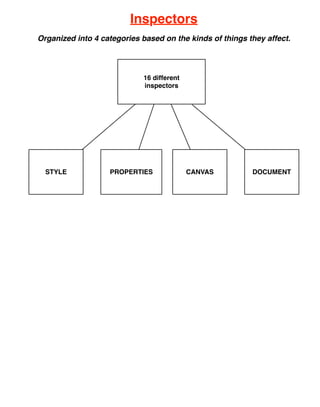
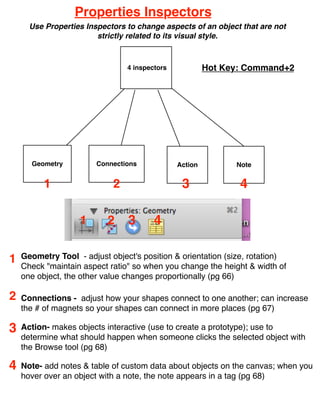
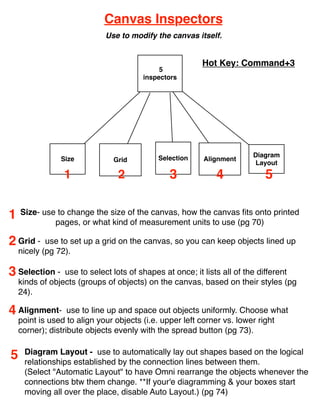
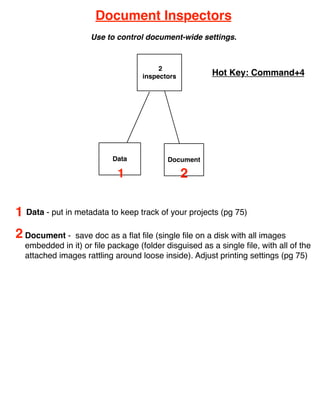
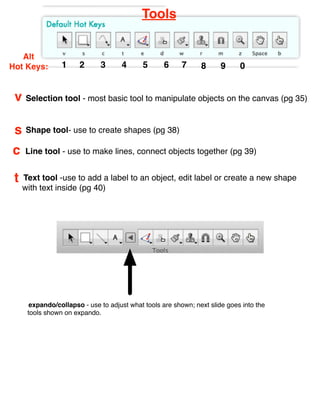
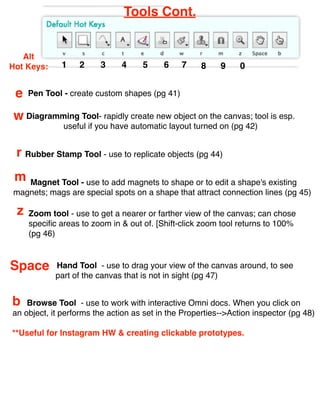
The Nitty Gritty of Omnigraffle
  The Basic Functions of Omnigraffle so You Can Design Your App.


                   Car     12:34
                   rier Web Page Title
                            PM
                     http://host.domain.tld


                        Fill ME!
                        with wireframes!
Stencils/Templates

                                   1. Stencils - a) either search
                                   Graffletopia in Stencils & install, or b)
                                   find stencils at graffletopia.com,
                                   download them, unzip,double click &
                      pg 80
                                   they'll appear in Stencils at which point
                                   you can "Install" (pg 80-82)


                                  1.Template Chooser - you can choose
                                  a template (like Miller-Konigi) for your
                                  new doc. Can also create a new
                                  template, edit your template or set a
                                  template as a default (pg 85).


If you don't want a whole object, but just one or all of its styles, drag a style from
                   the style tray to an object in your document.
Inspectors
Organized into 4 categories based on the kinds of things they affect.


                            16 different
                            inspectors


  STYLE            PROPERTIES              CANVAS         DOCUMENT
Style Inspectors
                      Use to modify any object on the canvas.

                                                       Hot Key: Command+1
                                           5
                                      inspectors       Shift+Command+C = color
                                                                         panel


            Fill             Lines         Shadow         Image           Text
                           & Shapes

            1                 2                3            4              5


                       1       2      3    4       5

 1    Fill Tool - choose a color or gradient to fill the inside of selected shapes
     (pg 58)

 2 Lines corners); choose shape of your object stroke, thickness, roundness
   of the
          and Shapes - adjust style of line (i.e.
                                                  (pg 59)

 3 Shadow - use to drop a shadow behind selected objects (pg 61)
 4 Image - use to position an image inside a shape (you also can drag & drop
   an image instead of adding an image) (pg 62)

 5 Text - use to control the positioning & appearance of a selected shape's text
(change font, alignment, wrapping to shape, kerning, leading, margins here) (pg 64)
Properties Inspectors
      Use Properties Inspectors to change aspects of an object that are not
                        strictly related to its visual style.


                                4 inspectors            Hot Key: Command+2


      Geometry          Connections            Action         Note


          1                 2                   3              4

                   1       2    3       4

1   Geometry Tool - adjust object's position & orientation (size, rotation)
    Check "maintain aspect ratio" so when you change the height & width of
    one object, the other value changes proportionally (pg 66)

2   Connections - adjust how your shapes connect to one another; can increase
    the # of magnets so your shapes can connect in more places (pg 67)

3   Action- makes objects interactive (use to create a prototype); use to
    determine what should happen when someone clicks the selected object with
    the Browse tool (pg 68)

4   Note- add notes & table of custom data about objects on the canvas; when you
    hover over an object with a note, the note appears in a tag (pg 68)
Canvas Inspectors
                             Use to modify the canvas itself.


                                                        Hot Key: Command+3
                                            5
                                       inspectors


                                            Selection                  Diagram
                Size           Grid                      Alignment
                                                                        Layout
                 1              2              3            4              5


1   Size- use to change the size of the canvas, how the canvas fits onto printed
             pages, or what kind of measurement units to use (pg 70)

2 Grid -    use to set up a grid on the canvas, so you can keep objects lined up
    nicely (pg 72).

3 Selection -    use to select lots of shapes at once; it lists all of the different
    kinds of objects (groups of objects) on the canvas, based on their styles (pg
    24).

4 Alignment-       use to line up and space out objects uniformly. Choose what
    point is used to align your objects (i.e. upper left corner vs. lower right
    corner); distribute objects evenly with the spread button (pg 73).

     Diagram Layout - use to automatically lay out shapes based on the logical
5    relationships established by the connection lines between them.
     (Select "Automatic Layout" to have Omni rearrange the objects whenever the
     connections btw them change. **If your'e diagramming & your boxes start
     moving all over the place, disable Auto Layout.) (pg 74)
Document Inspectors
                    Use to control document-wide settings.


                                        2
                                   inspectors          Hot Key: Command+4


                          Data            Document

                            1                   2

1 Data - put in metadata to keep track of your projects (pg 75)
2 Document -   save doc as a flat file (single file on a disk with all images
  embedded in it) or file package (folder disguised as a single file, with all of the
  attached images rattling around loose inside). Adjust printing settings (pg 75)
Tools


   Alt
Hot Keys:        1     2      3      4      5      6     7      8      9     0


 v Selection tool - most basic tool to manipulate objects on the canvas (pg 35)

 s Shape tool- use to create shapes (pg 38)
c    Line tool - use to make lines, connect objects together (pg 39)


 t   Text tool -use to add a label to an object, edit label or create a new shape
     with text inside (pg 40)


       expando/collapso - use to adjust what tools are shown; next slide goes into the
      tools shown on expando.
Tools Cont.


   Alt
Hot Keys:     1   2     3     4     5     6    7     8    9    0


 e   Pen Tool - create custom shapes (pg 41)

w Diagramming Tool- rapidly create new object on the canvas; tool is esp.
              useful if you have automatic layout turned on (pg 42)


 r Rubber Stamp Tool - use to replicate objects (pg 44)
 m Magnet Tool - use to add magnets to shape or to edit a shape's existing
magnets; mags are special spots on a shape that attract connection lines (pg 45)

 z   Zoom tool - use to get a nearer or farther view of the canvas; can chose
     specific areas to zoom in & out of. [Shift-click zoom tool returns to 100%
     (pg 46)


Space       Hand Tool - use to drag your view of the canvas around, to see
            part of the canvas that is not in sight (pg 47)


b   Browse Tool - use to work with interactive Omni docs. When you click on
an object, it performs the action as set in the Properties-->Action inspector (pg 48)

**Useful for Instagram HW & creating clickable prototypes.
Grouping/Locking/Layering Objects


                 1    2      3      4         5

1Bring to Front- use to place one object in front of another (Shift+Com+F)
2 Bring to Back- use to place one object in back of another (Shift+Com+B)
3   Lock/Unlock - use to lock certain objects in place (Command+L)

4 Group/Ungroup -use to group objects together so they group of objects can
             be manipulated as a single object (Shift+Com+G) (pg 51)

5   Smart Guides- keep on to help you keep your objects aligned
Your Workflow: Canvas & Outline Sidebars


       1               2


                   1 Canvases Sidebar - shows all the
                   canvases in your doc & the layers
                   they contain. You can hide this. (pg 5)

                   (Note: with layers, higher layers
                   appear in front of stuff on lower layers.)
                   (pg 26)

                   2  Outline Sidebar -gives hierarchical,
                     text-based view of the diagram on the
                    selected canvas. (Can also change view
                         to see objects as "List.") (pg 5)
Adding New Canvas/New Layer


     1     2
1 Add new canvas
2 Add new layer


                   The Style Tray


     1         2

1   Drag & drop style of one object onto another


2   Drag & drop a particular style element of one object onto another

                                                                  (pg 76)
Getting Around with the Selection Tool
Other Omni Resources

1   lynda.com - some freebie tutorials

2 Keyboard Shortcuts - under Help menu.
3 http://www.omnigroup.com/applications/omnigraffle - find latest Omni info
4   http://forums.omnigroup.com - online Omni forum


5 Canvas! - post cool tips or troubleshooting you've had to do

Omnigraffle tutorial

  • 1.
    The Nitty Grittyof Omnigraffle The Basic Functions of Omnigraffle so You Can Design Your App. Car 12:34 rier Web Page Title PM http://host.domain.tld Fill ME! with wireframes!
  • 2.
    Stencils/Templates 1. Stencils - a) either search Graffletopia in Stencils & install, or b) find stencils at graffletopia.com, download them, unzip,double click & pg 80 they'll appear in Stencils at which point you can "Install" (pg 80-82) 1.Template Chooser - you can choose a template (like Miller-Konigi) for your new doc. Can also create a new template, edit your template or set a template as a default (pg 85). If you don't want a whole object, but just one or all of its styles, drag a style from the style tray to an object in your document.
  • 3.
    Inspectors Organized into 4categories based on the kinds of things they affect. 16 different inspectors STYLE PROPERTIES CANVAS DOCUMENT
  • 4.
    Style Inspectors Use to modify any object on the canvas. Hot Key: Command+1 5 inspectors Shift+Command+C = color panel Fill Lines Shadow Image Text & Shapes 1 2 3 4 5 1 2 3 4 5 1 Fill Tool - choose a color or gradient to fill the inside of selected shapes (pg 58) 2 Lines corners); choose shape of your object stroke, thickness, roundness of the and Shapes - adjust style of line (i.e. (pg 59) 3 Shadow - use to drop a shadow behind selected objects (pg 61) 4 Image - use to position an image inside a shape (you also can drag & drop an image instead of adding an image) (pg 62) 5 Text - use to control the positioning & appearance of a selected shape's text (change font, alignment, wrapping to shape, kerning, leading, margins here) (pg 64)
  • 5.
    Properties Inspectors Use Properties Inspectors to change aspects of an object that are not strictly related to its visual style. 4 inspectors Hot Key: Command+2 Geometry Connections Action Note 1 2 3 4 1 2 3 4 1 Geometry Tool - adjust object's position & orientation (size, rotation) Check "maintain aspect ratio" so when you change the height & width of one object, the other value changes proportionally (pg 66) 2 Connections - adjust how your shapes connect to one another; can increase the # of magnets so your shapes can connect in more places (pg 67) 3 Action- makes objects interactive (use to create a prototype); use to determine what should happen when someone clicks the selected object with the Browse tool (pg 68) 4 Note- add notes & table of custom data about objects on the canvas; when you hover over an object with a note, the note appears in a tag (pg 68)
  • 6.
    Canvas Inspectors Use to modify the canvas itself. Hot Key: Command+3 5 inspectors Selection Diagram Size Grid Alignment Layout 1 2 3 4 5 1 Size- use to change the size of the canvas, how the canvas fits onto printed pages, or what kind of measurement units to use (pg 70) 2 Grid - use to set up a grid on the canvas, so you can keep objects lined up nicely (pg 72). 3 Selection - use to select lots of shapes at once; it lists all of the different kinds of objects (groups of objects) on the canvas, based on their styles (pg 24). 4 Alignment- use to line up and space out objects uniformly. Choose what point is used to align your objects (i.e. upper left corner vs. lower right corner); distribute objects evenly with the spread button (pg 73). Diagram Layout - use to automatically lay out shapes based on the logical 5 relationships established by the connection lines between them. (Select "Automatic Layout" to have Omni rearrange the objects whenever the connections btw them change. **If your'e diagramming & your boxes start moving all over the place, disable Auto Layout.) (pg 74)
  • 7.
    Document Inspectors Use to control document-wide settings. 2 inspectors Hot Key: Command+4 Data Document 1 2 1 Data - put in metadata to keep track of your projects (pg 75) 2 Document - save doc as a flat file (single file on a disk with all images embedded in it) or file package (folder disguised as a single file, with all of the attached images rattling around loose inside). Adjust printing settings (pg 75)
  • 8.
    Tools Alt Hot Keys: 1 2 3 4 5 6 7 8 9 0 v Selection tool - most basic tool to manipulate objects on the canvas (pg 35) s Shape tool- use to create shapes (pg 38) c Line tool - use to make lines, connect objects together (pg 39) t Text tool -use to add a label to an object, edit label or create a new shape with text inside (pg 40) expando/collapso - use to adjust what tools are shown; next slide goes into the tools shown on expando.
  • 9.
    Tools Cont. Alt Hot Keys: 1 2 3 4 5 6 7 8 9 0 e Pen Tool - create custom shapes (pg 41) w Diagramming Tool- rapidly create new object on the canvas; tool is esp. useful if you have automatic layout turned on (pg 42) r Rubber Stamp Tool - use to replicate objects (pg 44) m Magnet Tool - use to add magnets to shape or to edit a shape's existing magnets; mags are special spots on a shape that attract connection lines (pg 45) z Zoom tool - use to get a nearer or farther view of the canvas; can chose specific areas to zoom in & out of. [Shift-click zoom tool returns to 100% (pg 46) Space Hand Tool - use to drag your view of the canvas around, to see part of the canvas that is not in sight (pg 47) b Browse Tool - use to work with interactive Omni docs. When you click on an object, it performs the action as set in the Properties-->Action inspector (pg 48) **Useful for Instagram HW & creating clickable prototypes.
  • 10.
    Grouping/Locking/Layering Objects 1 2 3 4 5 1Bring to Front- use to place one object in front of another (Shift+Com+F) 2 Bring to Back- use to place one object in back of another (Shift+Com+B) 3 Lock/Unlock - use to lock certain objects in place (Command+L) 4 Group/Ungroup -use to group objects together so they group of objects can be manipulated as a single object (Shift+Com+G) (pg 51) 5 Smart Guides- keep on to help you keep your objects aligned
  • 11.
    Your Workflow: Canvas& Outline Sidebars 1 2 1 Canvases Sidebar - shows all the canvases in your doc & the layers they contain. You can hide this. (pg 5) (Note: with layers, higher layers appear in front of stuff on lower layers.) (pg 26) 2 Outline Sidebar -gives hierarchical, text-based view of the diagram on the selected canvas. (Can also change view to see objects as "List.") (pg 5)
  • 12.
    Adding New Canvas/NewLayer 1 2 1 Add new canvas 2 Add new layer The Style Tray 1 2 1 Drag & drop style of one object onto another 2 Drag & drop a particular style element of one object onto another (pg 76)
  • 13.
    Getting Around withthe Selection Tool
  • 14.
    Other Omni Resources 1 lynda.com - some freebie tutorials 2 Keyboard Shortcuts - under Help menu. 3 http://www.omnigroup.com/applications/omnigraffle - find latest Omni info 4 http://forums.omnigroup.com - online Omni forum 5 Canvas! - post cool tips or troubleshooting you've had to do