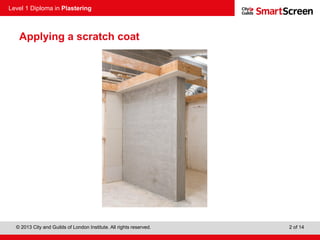
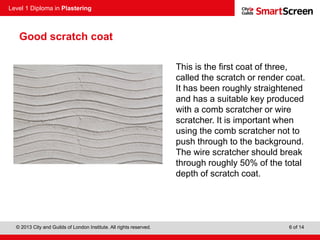
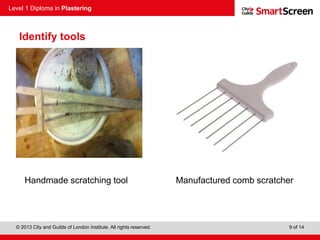
Level 1 Diploma in Plastering
© 2013 City and Guilds of London Institute. All rights reserved. 1 of 14
PowerPointpresentation
Applying scratch coats
Unit 122: Applying scratch coats to internal
backgrounds
Level 1 Diploma in Plastering
© 2013 City and Guilds of London Institute. All rights reserved. 2 of 14
Applying a scratch coat
Level 1 Diploma in Plastering
© 2013 City and Guilds of London Institute. All rights reserved. 3 of 14
Material for applying sand/lime scratch coats
The sand/lime material needs to be well mixed in the roller pan mixer
and wet enough to spread easily. The reason the material needs to be
well mixed is so that all large lumps of dry sand/lime mortar are
crushed and therefore do not create problems when applying the
material to the background.
Unmixed material will be dragged across the face of the work. This can
be time-consuming if every stroke of the trowel has to be corrected and
frustrating for the individual attempting to get a plumb surface ready to
receive the next coat.
If the material is too wet this can also create problems with the material
sagging if applied to thickly.
It is therefore important that the mix is prepared in advance of the class
and mixed at the correct consistency.
Level 1 Diploma in Plastering
© 2013 City and Guilds of London Institute. All rights reserved. 4 of 14
Before starting
The work area should be prepared and include items such as:
• spot board and stand
• wet bucket and flat brush
• hawk and a trowel
• comb scratcher
• darby or feather edge
• shovel
• floor scraper
• brush
• wheelbarrow.
Level 1 Diploma in Plastering
© 2013 City and Guilds of London Institute. All rights reserved. 5 of 14
Poor scratch coat
The mechanical key has to be suitable for the coat that will
follow the scratch coat. Therefore, when a further 10mm coat
of sand/lime or cement is to go on top of the scratch coat, it is
important that the mechanical key is deep enough to provide
a good key and bond.
Level 1 Diploma in Plastering
© 2013 City and Guilds of London Institute. All rights reserved. 6 of 14
Good scratch coat
This is the first coat of three,
called the scratch or render coat.
It has been roughly straightened
and has a suitable key produced
with a comb scratcher or wire
scratcher. It is important when
using the comb scratcher not to
push through to the background.
The wire scratcher should break
through roughly 50% of the total
depth of scratch coat.
Level 1 Diploma in Plastering
© 2013 City and Guilds of London Institute. All rights reserved. 7 of 14
Identify the coat of plaster
Question: Which coat of
plaster would follow this?
Level 1 Diploma in Plastering
© 2013 City and Guilds of London Institute. All rights reserved. 8 of 14
Identify tools
Question: What tool is
being used?
Level 1 Diploma in Plastering
© 2013 City and Guilds of London Institute. All rights reserved. 9 of 14
Identify tools
Handmade scratching tool Manufactured comb scratcher
Level 1 Diploma in Plastering
© 2013 City and Guilds of London Institute. All rights reserved. 10 of 14
Any questions?

Power point 5

  • 1.
    Level 1 Diplomain Plastering © 2013 City and Guilds of London Institute. All rights reserved. 1 of 14 PowerPointpresentation Applying scratch coats Unit 122: Applying scratch coats to internal backgrounds
  • 2.
    Level 1 Diplomain Plastering © 2013 City and Guilds of London Institute. All rights reserved. 2 of 14 Applying a scratch coat
  • 3.
    Level 1 Diplomain Plastering © 2013 City and Guilds of London Institute. All rights reserved. 3 of 14 Material for applying sand/lime scratch coats The sand/lime material needs to be well mixed in the roller pan mixer and wet enough to spread easily. The reason the material needs to be well mixed is so that all large lumps of dry sand/lime mortar are crushed and therefore do not create problems when applying the material to the background. Unmixed material will be dragged across the face of the work. This can be time-consuming if every stroke of the trowel has to be corrected and frustrating for the individual attempting to get a plumb surface ready to receive the next coat. If the material is too wet this can also create problems with the material sagging if applied to thickly. It is therefore important that the mix is prepared in advance of the class and mixed at the correct consistency.
  • 4.
    Level 1 Diplomain Plastering © 2013 City and Guilds of London Institute. All rights reserved. 4 of 14 Before starting The work area should be prepared and include items such as: • spot board and stand • wet bucket and flat brush • hawk and a trowel • comb scratcher • darby or feather edge • shovel • floor scraper • brush • wheelbarrow.
  • 5.
    Level 1 Diplomain Plastering © 2013 City and Guilds of London Institute. All rights reserved. 5 of 14 Poor scratch coat The mechanical key has to be suitable for the coat that will follow the scratch coat. Therefore, when a further 10mm coat of sand/lime or cement is to go on top of the scratch coat, it is important that the mechanical key is deep enough to provide a good key and bond.
  • 6.
    Level 1 Diplomain Plastering © 2013 City and Guilds of London Institute. All rights reserved. 6 of 14 Good scratch coat This is the first coat of three, called the scratch or render coat. It has been roughly straightened and has a suitable key produced with a comb scratcher or wire scratcher. It is important when using the comb scratcher not to push through to the background. The wire scratcher should break through roughly 50% of the total depth of scratch coat.
  • 7.
    Level 1 Diplomain Plastering © 2013 City and Guilds of London Institute. All rights reserved. 7 of 14 Identify the coat of plaster Question: Which coat of plaster would follow this?
  • 8.
    Level 1 Diplomain Plastering © 2013 City and Guilds of London Institute. All rights reserved. 8 of 14 Identify tools Question: What tool is being used?
  • 9.
    Level 1 Diplomain Plastering © 2013 City and Guilds of London Institute. All rights reserved. 9 of 14 Identify tools Handmade scratching tool Manufactured comb scratcher
  • 10.
    Level 1 Diplomain Plastering © 2013 City and Guilds of London Institute. All rights reserved. 10 of 14 Any questions?