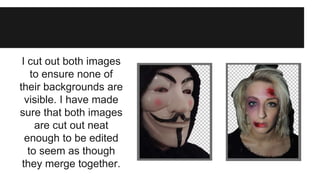
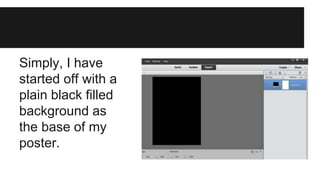
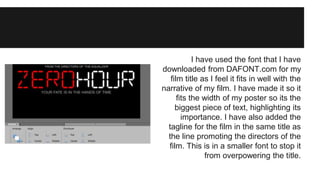
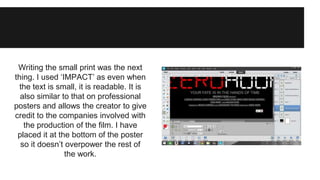
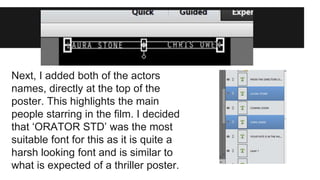
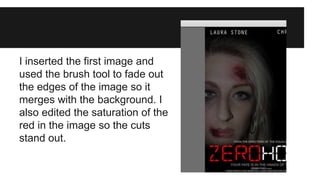
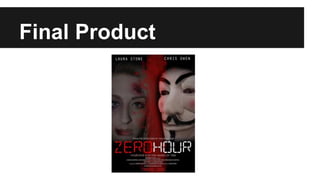
Making My Poster 
Using Photoshop
I cut out both images 
to ensure none of 
their backgrounds are 
visible. I have made 
sure that both images 
are cut out neat 
enough to be edited 
to seem as though 
they merge together.
Simply, I have 
started off with a 
plain black filled 
background as 
the base of my 
poster.
I have used the font that I have 
downloaded from DAFONT.com for my 
film title as I feel it fits in well with the 
narrative of my film. I have made it so it 
fits the width of my poster so its the 
biggest piece of text, highlighting its 
importance. I have also added the 
tagline for the film in the same title as 
the line promoting the directors of the 
film. This is in a smaller font to stop it 
from overpowering the title.
Writing the small print was the next 
thing. I used ‘IMPACT’ as even when 
the text is small, it is readable. It is 
also similar to that on professional 
posters and allows the creator to give 
credit to the companies involved with 
the production of the film. I have 
placed it at the bottom of the poster 
so it doesn’t overpower the rest of 
the work.
I added both the website and release 
information. I decided to put ‘coming 
soon’ in red as it is an important piece 
of information that needs to stand out. 
I have also put the website in a 
brighter white than the small print so it 
stand out slightly more. The fonts I 
have chosen allow both texts to show 
up as the contrast but still compliment 
each other.
Next, I added both of the actors 
names, directly at the top of the 
poster. This highlights the main 
people starring in the film. I decided 
that ‘ORATOR STD’ was the most 
suitable font for this as it is quite a 
harsh looking font and is similar to 
what is expected of a thriller poster.
I inserted the first image and 
used the brush tool to fade out 
the edges of the image so it 
merges with the background. I 
also edited the saturation of the 
red in the image so the cuts 
stand out.
I finally inserted the second image and edited the 
contrast so that the black is prominent. I also edited 
the saturation of the red so the cheeks of the mask 
stand out and match the title. I then used the brush 
tool and held down ‘shift’ to draw a straight line down 
the centre of the poster, highlighting the divide 
between the characters. I edited the opacity of the 
line so that the mask is still visible underneath and 
then used another brush tool on top of this to add a 
stippled effect, connoting the idea of bloodshed. I also 
used the brush tool in ‘clear’ mode to fade the edges 
of the image to stop it from looking so harsh and help 
it fade into the background.
Final Product

Poster Production

  • 1.
    Making My Poster Using Photoshop
  • 2.
    I cut outboth images to ensure none of their backgrounds are visible. I have made sure that both images are cut out neat enough to be edited to seem as though they merge together.
  • 3.
    Simply, I have started off with a plain black filled background as the base of my poster.
  • 4.
    I have usedthe font that I have downloaded from DAFONT.com for my film title as I feel it fits in well with the narrative of my film. I have made it so it fits the width of my poster so its the biggest piece of text, highlighting its importance. I have also added the tagline for the film in the same title as the line promoting the directors of the film. This is in a smaller font to stop it from overpowering the title.
  • 5.
    Writing the smallprint was the next thing. I used ‘IMPACT’ as even when the text is small, it is readable. It is also similar to that on professional posters and allows the creator to give credit to the companies involved with the production of the film. I have placed it at the bottom of the poster so it doesn’t overpower the rest of the work.
  • 6.
    I added boththe website and release information. I decided to put ‘coming soon’ in red as it is an important piece of information that needs to stand out. I have also put the website in a brighter white than the small print so it stand out slightly more. The fonts I have chosen allow both texts to show up as the contrast but still compliment each other.
  • 7.
    Next, I addedboth of the actors names, directly at the top of the poster. This highlights the main people starring in the film. I decided that ‘ORATOR STD’ was the most suitable font for this as it is quite a harsh looking font and is similar to what is expected of a thriller poster.
  • 8.
    I inserted thefirst image and used the brush tool to fade out the edges of the image so it merges with the background. I also edited the saturation of the red in the image so the cuts stand out.
  • 9.
    I finally insertedthe second image and edited the contrast so that the black is prominent. I also edited the saturation of the red so the cheeks of the mask stand out and match the title. I then used the brush tool and held down ‘shift’ to draw a straight line down the centre of the poster, highlighting the divide between the characters. I edited the opacity of the line so that the mask is still visible underneath and then used another brush tool on top of this to add a stippled effect, connoting the idea of bloodshed. I also used the brush tool in ‘clear’ mode to fade the edges of the image to stop it from looking so harsh and help it fade into the background.
  • 10.