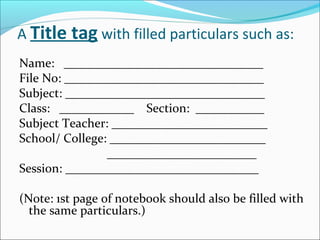
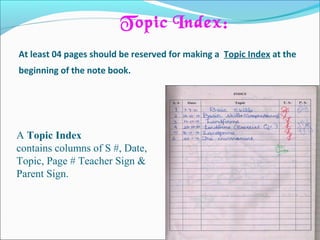
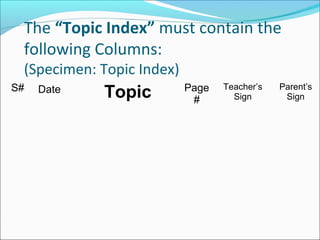
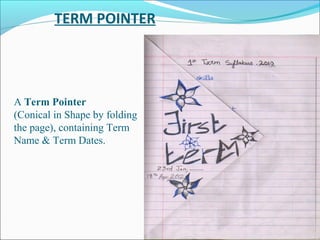
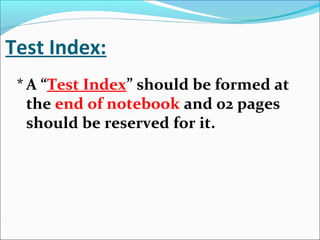
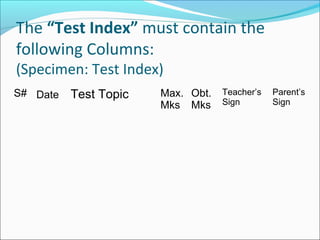
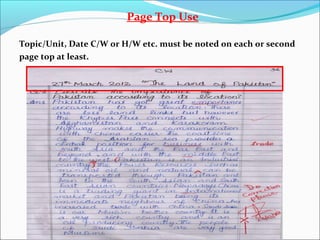
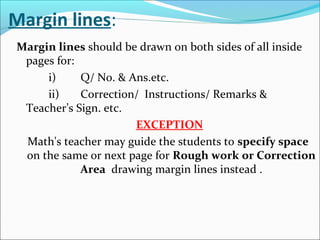
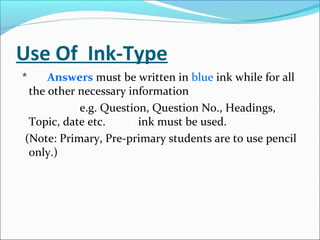
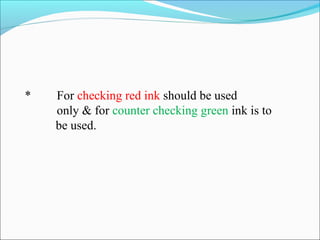
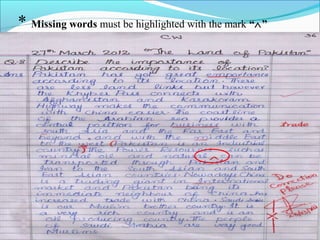
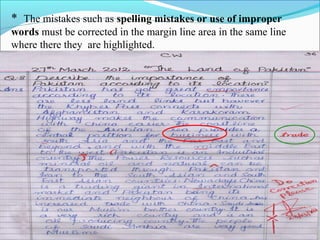
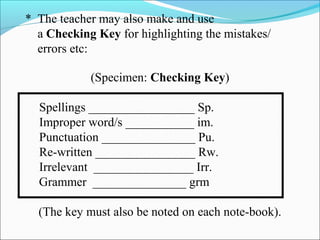
This document provides guidelines for proper notebook maintenance and checking by teachers. It states that a notebook represents a teacher's assessment of a student's work and should show both qualitative and quantitative work. It then lists the components that should be included in each subject notebook such as a title page with student details, a topic index at the beginning with columns for topic, date, and sign-offs, term pointers identifying term names and dates, a test index at the back, pagination, and margin lines. It provides instructions for teachers on checking notebooks including using red ink for markings and green for counter-checking, highlighting errors, and leaving remarks that are positive and guiding.
Notebook Correction/Exercise Book Correction MethodsRajeev Ranjan
Teaching is an art. It demands a lot of expertise and patience while checking notebooks. Errors are integral parts of learning process. Do not create error threatening environment; at the same time sensitize your learners gradually to write accurately and fluently. In order to achieve an effective error correction method, it is very important for teachers to have a clear understanding of the nature of errors. As Corder (1967, cited in Cook, 1995: 22) Rajeev Ranjan
Education World Global ECE Conference Workshops.
Workshop 3: “I know what’s best for the child”: The Art of Effective Parent Communication, 22 January 2016.
PROJECT WORK: TOOLS AND TECHNIQUES FOR ASSESSMENTADITYA ARYA
PROJECT WORK: TOOLS AND TECHNIQUES FOR ASSESSMENT
Project-based assessments are an alternative to tests that allow students to engage with their learning in more concrete ways. Instead of merely studying theory, a hands-on project asks students to apply what they've learned to an in-depth exploration of a topic. You can use projects as part of the ongoing learning process or as a capstone assessment in place of a traditional final exam.
Project-based assessment is often a component of project-based learning (PBL), in which the entire focus of a course or unit is to teach via student engagement in problem-solving and exploration. Like PBL, project-based assessment is student-centered and requires reflection on both the process and the content to be meaningful.
A presentation about how to manage classroom discipline. It is very useful for novice teachers as well as experience teachers who face the discipline problems in their classrooms.
Teaching is a very important job and once you get your classroom management skills in order you will be enjoying teaching more and will have a more productive teaching career.
The most important element of classroom management is allowing your students an opportunity to understand that your rules are a part of giving them the best education possible.
f
Assignment Name:
Unit 2 Individual Project
Deliverable Length:
1 page
Details:
In this project, you will use the Travel Tips 3 document and add a table, a bulleted list, and a page border. To view these instructions while working in Word, do either of the following:
Print this page of instructions.
Move back and forth between this page and Word by clicking each application's button on the Windows taskbar.
Open the document
Travel Tips 3
, save it on your computer, and open it in Word.
When you follow these steps, this assignment must be finished and still fit on 1 page. Please be sure to work with font sizes or resize the Word art at the bottom to make room if necessary. You may also remove additional paragraph marks if they do not ruin the general look and feel of the document. Remember, this assignment requires you to use the starting document and have an improved but relatively similar-looking end product.
Windows Instructions:
Open the Travel Tips 3 document from the link provided above.
Next, be sure that you have the show/hide button selected on the toolbar. This is the button usually located on the Home tab, Paragraph section of the ribbon next to the Sort button and looks like a backwards
P
. The Show/Hide button reveals all of the non-printing word-processing control information, like the arrows for tabs, the section and page breaks, and the backward
P
s, which are paragraph marks.
Please take note of the lines labeled "Section Break."
Section 1 is considered to be above the first section break line.
Section 2 is considered to be above the second section break line.
Section 3 is considered to be below the second section break line.
In section 2, there is a paragraph that starts with the words "You need identification." Select this paragraph all the way up to the second-to-last paragraph of section 2, ending with the words "excess baggage."
Apply numbering to these paragraphs (
Home menu > Numbering button
). Select any style of numbering available by clicking on the down arrow next to the numbering button. Use your best judgment on what looks good.
Anywhere in Section 3, insert a 3 row by 3 column table. Type the names of 9 major cities into the table, one city per cell.
Use the Table Styles feature to give the table a more professional look. First, clear all the check boxes; then, select the appropriate check boxes to apply special formats to heading rows and the first column. Center the table on the page.
Highlight all of the cells in the table, and apply bullets to the entire table so that each city has a bullet next to it and there are no additional bullets around the table (
Home menu > Bullets button
). There should be only 9 bullets in the table.
Include an Art Page border.
Create a header (
Insert > Header
) with the following text: Travel the World, Get Advice Here. Left-justify this text in the header, make it bold, and change its font size to between 14–16 points.
Put the date in the footer (
Insert > Footer
). Left-j.
ENG 215 – Appendices Appendix A Peer Review Feedback.docxMARRY7
ENG 215 – Appendices
Appendix A: Peer Review Feedback Form 1
Reviewer’s Name:_________________________________________ Date:_____________
Writer’s Assigned #: _______________________________________
Course:_________________________________________________ Section: ___________
Assignment 3: Persuasive Paper Part 1: A Problem Exists
Peer reviews should provide feedback to a peer on the criteria expected in the paper. Follow these
instructions:
1) Receive a classmate’s paper from your professor (in class if on-ground; by e-mail if online).
2) Copy the Peer Review Feedback Form from the Appendix.
3) Comment on all criteria, noting strengths and / or areas for improvement on the feedback form.
Provide completed Peer Review Feedback Form and classmate’s paper to your professor. Note:
On-ground students should submit the feedback form and paper to the professor during the class
meeting in which the paper is reviewed; online students should submit the feedback form and paper
to the professor via the Assignment Tab in the course shell.
Criteria Comments
+ Strengths < Areas for Improvement
1 Provide an appropriate title and an
interesting opening paragraph to
appeal to your stated audience (appeal
with logic, ethics, or emotion).
2 Include a defensible, relevant thesis
statement in the first paragraph. (With
revised thesis statement.)
3 Describe the history and status of the
issue and provide an overview of the
problem(s) that need to be addressed.
This should be one or two (1-2)
paragraphs.
4 Explain the first problem (economic,
social, political, environmental,
complexity, inequity, ethical/moral,
etc.) and provide support for your
claims. This should be one or two (1-
2)paragraphs.
5 Explain the second problem
(economic, social, political,
environmental, complexity, inequity,
ethical/moral, etc.). and provide
support for your claims. This should be
one or two (1-2) paragraphs.
6 Explain the third problem (economic,
social, political, environmental,
complexity, inequity, ethical/moral,
etc.) and provide support for your
claims. This should be one or two (1-2)
paragraphs.
ENG 215 – Appendices
Criteria Comments
+ Strengths < Areas for Improvement
7 Use effective transitional words,
phrases, and sentences throughout the
paper.
8 Provide a concluding paragraph that
summarizes the stated problems and
promises a solution.
9 Develop a coherently structured paper
with an introduction, body, and
conclusion.
10 Support claims with at least three (3)
quality, relevant references. Use
credible, academic sources available
through Strayer University’s Resource
Center.
11 Other
ENG 215 – Appendices
Appendix A: Peer Review Feedback Form 2
Reviewer’s Name:_________________________________________ Date:_____________
Writer’s Assigned #: _____________ ...
From MLA handbook edition 7 I have given expanding thought about Format of Research paper that examine your research skill and methodology of research work.
Macroeconomics- Movie Location
This will be used as part of your Personal Professional Portfolio once graded.
Objective:
Prepare a presentation or a paper using research, basic comparative analysis, data organization and application of economic information. You will make an informed assessment of an economic climate outside of the United States to accomplish an entertainment industry objective.
How to Make a Field invisible in Odoo 17Celine George
It is possible to hide or invisible some fields in odoo. Commonly using “invisible” attribute in the field definition to invisible the fields. This slide will show how to make a field invisible in odoo 17.
Instructions for Submissions thorugh G- Classroom.pptxJheel Barad
This presentation provides a briefing on how to upload submissions and documents in Google Classroom. It was prepared as part of an orientation for new Sainik School in-service teacher trainees. As a training officer, my goal is to ensure that you are comfortable and proficient with this essential tool for managing assignments and fostering student engagement.
2024.06.01 Introducing a competency framework for languag learning materials ...Sandy Millin
http://sandymillin.wordpress.com/iateflwebinar2024
Published classroom materials form the basis of syllabuses, drive teacher professional development, and have a potentially huge influence on learners, teachers and education systems. All teachers also create their own materials, whether a few sentences on a blackboard, a highly-structured fully-realised online course, or anything in between. Despite this, the knowledge and skills needed to create effective language learning materials are rarely part of teacher training, and are mostly learnt by trial and error.
Knowledge and skills frameworks, generally called competency frameworks, for ELT teachers, trainers and managers have existed for a few years now. However, until I created one for my MA dissertation, there wasn’t one drawing together what we need to know and do to be able to effectively produce language learning materials.
This webinar will introduce you to my framework, highlighting the key competencies I identified from my research. It will also show how anybody involved in language teaching (any language, not just English!), teacher training, managing schools or developing language learning materials can benefit from using the framework.
The French Revolution, which began in 1789, was a period of radical social and political upheaval in France. It marked the decline of absolute monarchies, the rise of secular and democratic republics, and the eventual rise of Napoleon Bonaparte. This revolutionary period is crucial in understanding the transition from feudalism to modernity in Europe.
For more information, visit-www.vavaclasses.com
Synthetic Fiber Construction in lab .pptxPavel ( NSTU)
Synthetic fiber production is a fascinating and complex field that blends chemistry, engineering, and environmental science. By understanding these aspects, students can gain a comprehensive view of synthetic fiber production, its impact on society and the environment, and the potential for future innovations. Synthetic fibers play a crucial role in modern society, impacting various aspects of daily life, industry, and the environment. ynthetic fibers are integral to modern life, offering a range of benefits from cost-effectiveness and versatility to innovative applications and performance characteristics. While they pose environmental challenges, ongoing research and development aim to create more sustainable and eco-friendly alternatives. Understanding the importance of synthetic fibers helps in appreciating their role in the economy, industry, and daily life, while also emphasizing the need for sustainable practices and innovation.
3. A notebook represents a teacher’s picture to
the respective community, therefore its proper
maintenance and checking by the teacher is a
very important job. The note book must show a
qualitative and a balanced quantitative work.
The checking methodology and quality checking
is rather a more important job. The teacher
must observe the Notebook Making Rules and
Notebook Checking Rules as well.
Note Book
6. A Title tag with filled particulars such as:
Name: ________________________________
File No: ________________________________
Subject: ________________________________
Class: ____________ Section: ___________
Subject Teacher: _________________________
School/ College: _________________________
________________________
Session: _______________________________
(Note: 1st page of notebook should also be filled with
the same particulars.)
7. At least 04 pages should be reserved for making a Topic Index at the
beginning of the note book.
A Topic Index
contains columns of S #, Date,
Topic, Page # Teacher Sign &
Parent Sign.
Topic Index:
8. The “Topic Index” must contain the
following Columns:
(Specimen: Topic Index)
S# Date Topic Page
#
Teacher’s
Sign
Parent’s
Sign
9. TERM POINTER
A Term Pointer
(Conical in Shape by folding
the page), containing Term
Name & Term Dates.
10. Term Topics List:
* Term Topics must be listed on
the next page/s to the pointer.
11. Test Index:
* A “Test Index” should be formed at
the end of notebook and 02 pages
should be reserved for it.
12. The “Test Index” must contain the
following Columns:
(Specimen: Test Index)
S# Date Test Topic Max.
Mks
Obt.
Mks
Teacher’s
Sign
Parent’s
Sign
14. Page Top Use
Topic/Unit, Date C/W or H/W etc. must be noted on each or second
page top at least.
15. Margin lines:
Margin lines should be drawn on both sides of all inside
pages for:
i) Q/ No. & Ans.etc.
ii) Correction/ Instructions/ Remarks &
Teacher’s Sign. etc.
EXCEPTION
Math's teacher may guide the students to specify space
on the same or next page for Rough work or Correction
Area drawing margin lines instead .
16.
17. Use Of Ink-Type
* Answers must be written in blue ink while for all
the other necessary information
e.g. Question, Question No., Headings,
Topic, date etc. black ink must be used.
(Note: Primary, Pre-primary students are to use pencil
only.)
20. The checker must observe the following points while
checking a note book:
* Note books must be checked on time. i.e. on
completion of a lesson/chapter/unit/ topic
or an exercise.
21. * For checking red ink should be used
only & for counter checking green ink is to
be used.
25. * Incorrect sentences must be
highlighted by enclosing them in brackets
with a
cross at one end “ (----------)× ”
26. * When an unwanted paragraph /part of it or the whole page is to
be omitted or not to be included, two vertical lines, in between
them a cross is to be added in the margin line area.
27. * The mistakes such as spelling mistakes or use of improper
words must be corrected in the margin line area in the same line
where there they are highlighted.
28. * The teacher is not supposed to use the text area but may
use only the margin area for putting ( √ Or × ) marks,
signature or giving instructions /remarks etc..
29. * The teacher may also make and use
a Checking Key for highlighting the mistakes/
errors etc:
(Specimen: Checking Key)
Spellings _________________ Sp.
Improper word/s ___________ im.
Punctuation _______________ Pu.
Re-written ________________ Rw.
Irrelevant ________________ Irr.
Grammer _______________ grm
(The key must also be noted on each note-book).
30. * The remarks by the checker must be short,
positive, polite and guiding one.
REMARKS
31. * Students must be properly guided to
correct their mistakes by themselves.
* The teachers at primary and pre- primary
level must do most of the corrections by
themselves.
Important