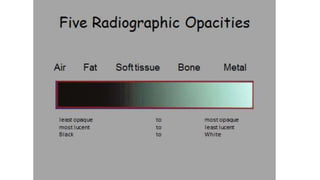
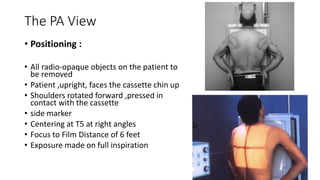
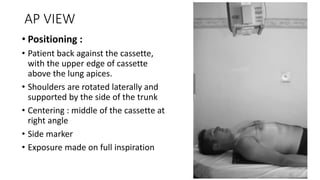
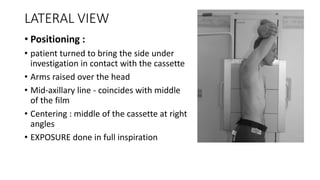
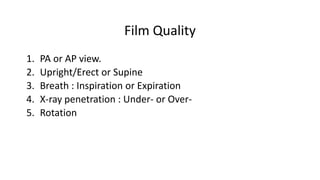
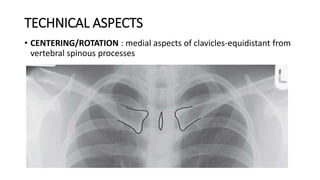
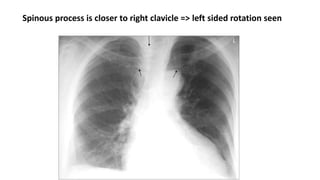
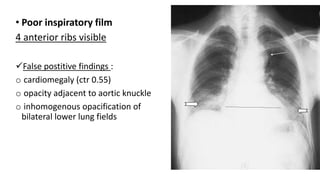
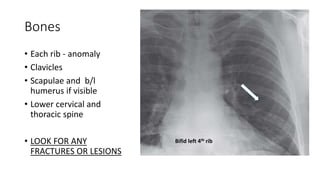
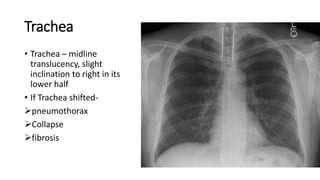
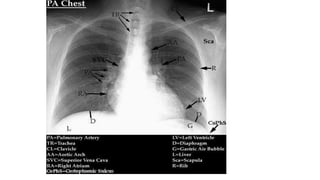
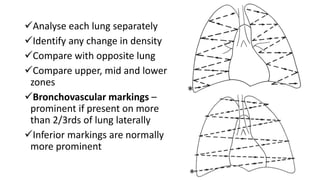
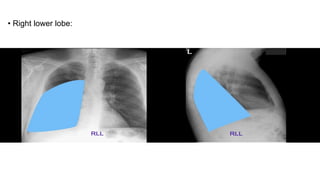
- The document describes the positioning and technical aspects of performing a normal chest x-ray. It discusses the positioning of the patient for PA, AP, and lateral views. It also describes how to assess the quality of the x-ray image and what structures to evaluate, including the bones, heart, lungs, diaphragm and soft tissues. Anatomical variations are also discussed. The goal of the chest x-ray is to evaluate the lungs, heart, bones, and soft tissues for any abnormalities.
VIP Call Girls Tirunelveli Aaradhya 8250192130 Independent Escort Service Tir...
Normal Chest X-Ray Anatomy and Positioning Guide
1. Normal Chest X- Ray
- Dr Sandeep Singh Awal
Dept of Radiodiagnosis GRMC
2.
3. The PA View
• Positioning :
• All radio-opaque objects on the patient to
be removed
• Patient ,upright, faces the cassette chin up
• Shoulders rotated forward ,pressed in
contact with the cassette
• side marker
• Centering at T5 at right angles
• Focus to Film Distance of 6 feet
• Exposure made on full inspiration
4. AP VIEW
• Positioning :
• Patient back against the cassette,
with the upper edge of cassette
above the lung apices.
• Shoulders are rotated laterally and
supported by the side of the trunk
• Centering : middle of the cassette at
right angle
• Side marker
• Exposure made on full inspiration
5. LATERAL VIEW
• Positioning :
• patient turned to bring the side under
investigation in contact with the cassette
• Arms raised over the head
• Mid-axillary line - coincides with middle
of the film
• Centering : middle of the cassette at right
angles
• EXPOSURE done in full inspiration
6. Film Quality
1. PA or AP view.
2. Upright/Erect or Supine
3. Breath : Inspiration or Expiration
4. X-ray penetration : Under- or Over-
5. Rotation
7. PA VIEW AP VIEW
SCAPULA DO NOT OVERLAP THE LUNG FIELDS SCAPULA OVERLAPPING THE LUNG FIELDS
CLAVICLES PROJECT On THE LUNG FIELDS CLAVICLES ARE ABOVE THE APICES OF LUNG
NO CARDIAC MAGNIFICATION CARDIAC MAGNIFICATION
11. Spinous process is closer to right clavicle => left sided rotation seen
L
12. •ADEQUATE
PENETRATION –
• Vertebral bodies and disc spaces
should be just visible through
the cardiac shadow.
Underpenetration – miss an
abnormality hidden by another
structure
Overpenetration – loss of
visibility of low density lesions
13. • ADEQUATE
INSPIRATORY EFFORT
Good inspiratory film :
6 complete Anterior ribs
10 complete Posterior ribs
Poor Inspiratory film :
Less than 6 anterior ribs
seen
14. • Poor inspiratory film
4 anterior ribs visible
False postitive findings :
o cardiomegaly (ctr 0.55)
o opacity adjacent to aortic knuckle
o inhomogenous opacification of
bilateral lower lung fields
15. Bones
• Each rib - anomaly
• Clavicles
• Scapulae and b/l
humerus if visible
• Lower cervical and
thoracic spine
• LOOK FOR ANY
FRACTURES OR LESIONS
Bifid left 4th rib
17. Soft tissues
• Confirm presence or absence of
breast shadows. Breast shadows
may obscure lung bases or
costophrenic angles
• Skin folds may mimic
pneumothorax
• Lateral chest wall (subcutaneous
emphysema)
Left sided mastectomy
18. Trachea
• Trachea – midline
translucency, slight
inclination to right in its
lower half
• If Trachea shifted-
pneumothorax
Collapse
fibrosis
19. HEART
• Position
• Cardiothoracic ratio :ratio betn
the max transverse diam of
heart and max width of the
thorax above the costophrenic
angles
• CTr = A+B / C
• If >0.5(adults) and >0.6(children)
in a good quality film =>
Cardiomegaly
20. A=3 B = 5
C = 12
A+B = 8 units
CTr = A+B/C
= 8/12
= 0.66
Imp -
Cardiomegaly
21. • RIGHT HEART BORDER
SVC
RIGHT ATRIUM
IVC
• LEFT HEART BORDER
AORTIC KNUCKLE
PULMONARY TRUNK
LEFT VENTRICLE
svc
RA
IVC
A
P
LV
22.
23. HILAR REGIONS
• 97% of subjects- left hilum is
higher than right.
formed where superior
pulmonary vein meets the
lower pulmonary artery
Clearly defined CONCAVE
lateral borders
Normal lymph nodes not visible
24. Lung
• There are 3 lobes in right lung and 2 in left.
Right lung
• Upper lobe
• Middle lobe
• Lower lobe.
Left lung : also contains the lingula,part of the upper lobe.
• Upper lobe; this contains the lingula
• Lower lobe.
25. LUNG
• On a PA VIEW , for descriptive
purposes the lungs are divided
into three zones separated by
imaginary horizontal lines
• Upper zone - above the anterior
end of the second ribs
• Midzone - between the second
and fourth anterior ribs
• Lower zone - below the level of
the fourth anterior rib.
26. Analyse each lung separately
Identify any change in density
Compare with opposite lung
Compare upper, mid and lower
zones
Bronchovascular markings –
prominent if present on more
than 2/3rds of lung laterally
Inferior markings are normally
more prominent
34. Oblique/major fissure – separates
upper lobe from lower lobe
• seen on lateral view
• Extends from T4/T5 posteriorly to
diaphragm anterioinferiorly.
Horizonta/minor fissure – separates
upper and middle lobes of Right lung.
• Can be seen on PA and lateral views
• Seen running from the hilum to sixth
rib in axillary line in pa film.
• Posteriorly ends at the right
major/oblique fissure
35. Accessory fissures
• Azygous fissure (0.4 % of pop)
– comma shaped, mostly right
sided in the apex of the lung
• Forms due to abnormal
migration of azygous vein
during development.
• invagination of the azygous
vein through the apical portion
of right upper lung.
36. • Inferior accessory fissure –
oblique line running from the
cardiophrenic angle toward the
hilum. separates medial basal
from other basal segments.
Commoner on right side.
• Superior accessory fissure –
separates the right lower lobe
into superior and basal
segments.
Inferior accessory fissure
37. Diaphragm
• Right hemidiaphragm is higher than
the left.
• Assess curvature of b/l
hemidiaphragms to identify
diaphragmatic flattening or bulge
• Assess bilateral Costophernic angles-
normally acute & well defined
• Rule out any free gas under
hemidiaphragm