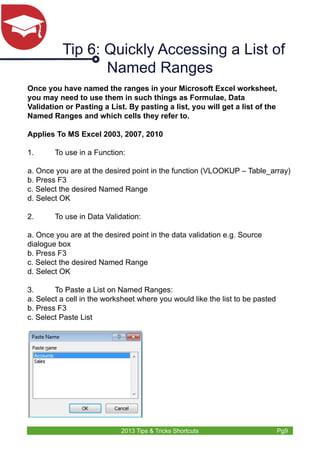
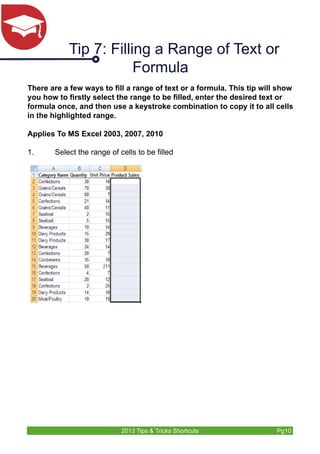
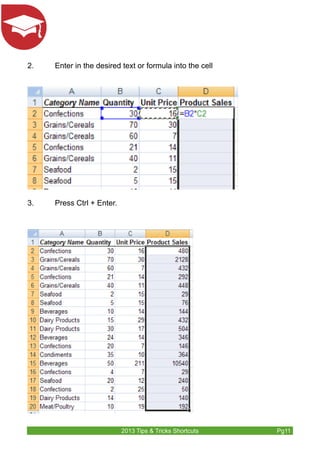
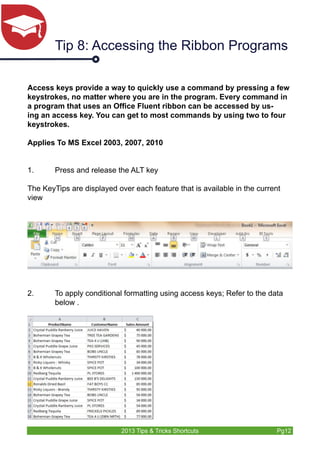
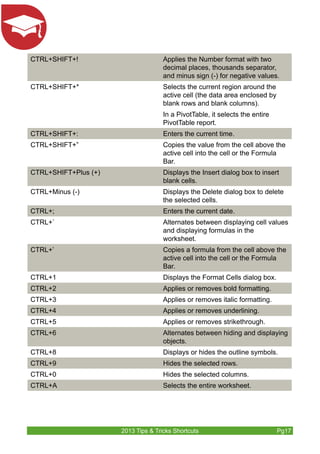
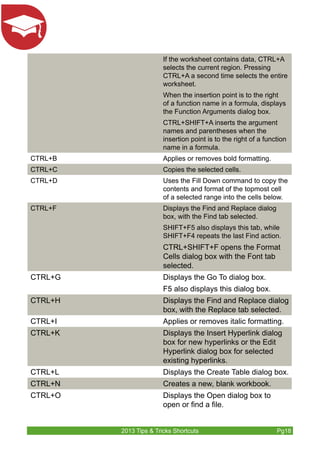
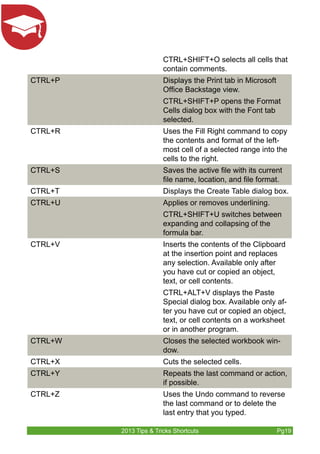
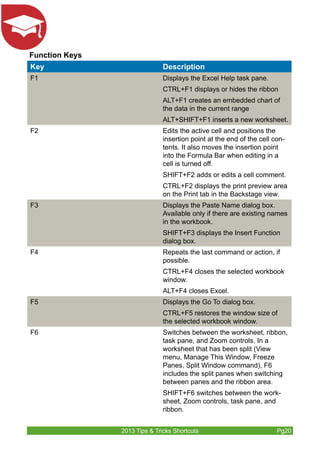
Table of Contents 
Tip 1: Quickly Closing All Open Workbooks without Closing MS Excel 3 
Tip 2: Shortcut for Date Entry 5 
Tip 3: Selecting a Column with Only Two Keystrokes 6 
Tip 4: Wrapping Text in a Cell 7 
Tip 5: Naming a Range of Cells 8 
Tip 6: Quickly Accessing a List of Named Ranges 9 
Tip 7: Filling a Range of Text or Formula 10 
Tip 8: Accessing the Ribbon Programs 12 
Tip 9: Using the Tab Key to Move to the Next Input Cell 14 
Tip 10: Keyboard Shortcuts 16
Tip 1: Quickly Closing All Open Workbooks 
without Closing MS Excel 
Sometimes you need to shut down Excel quickly, but you have multiple work 
books open that will all ask to close individually. A simple keyboard shortcut 
will help. In this example, there are two workbooks open: 
Applies To: MS Excel 2003, 2007 and 2010 
If I select the Office Icon, you’ll see that I have the Close option. However the Close 
All option is not available. 
To activate the Close All option, Select as follows: 
1. Select the Office button, Excel Options, Customize 
2. Then select as below 
2013 Tips & Tricks Shortcuts Pg3
3. Select OK 
4. The Close All Option will be added to the quick access toolbar 
5. To close all the workbooks select the Close All Option on the quick 
2013 Tips & Tricks Shortcuts Pg4 
access toolbar 
NB: Any open workbook that has changes made to it will still require an answer 
as to whether you would like to save the file, however once answered, all files 
will be closed while MS Excel will stay open
Tip 2: Shortcut for Date Entry 
To quickly enter today’s date in a cell without having to type the formula 
=Today (), one can do the following: 
Applies To MS Excel 2003, 2007, 2010 
1. To enter the date press CTRL + ; (Ctrl and semicolon simultaneously) 
2. To enter the time press CTRL+Shift+ ; (Ctrl, shift colon simultaneously) 
2013 Tips & Tricks Shortcuts Pg5
Tip 3: Selecting a Column with Only 
Two Keystrokes 
Applies To MS Excel 2003, 2007, 2010 
1. Select any cell in the column you would like to select 
2. Press Ctrl + Space Bar 
2013 Tips & Tricks Shortcuts Pg6
Tip 4: Wrapping Text in a Cell 
Applies To MS Excel 2003, 2007, 2010 
1. Enter in the desired text 
2013 Tips & Tricks Shortcuts Pg7 
2. Press Alt + Enter 
3. Press Enter
Tip 5: Naming a Range of Cells 
A range of cells can be given a name, which can then be used in place 
of the actual cell references in other formulae. 
Applies To MS Excel 2003, 2007, 2010 
1. Select the desired range of cells 
2. On the keyboard, press Ctrl + F3 
3. Select New 
4. In the Name box, enter in the desired Named Range 
5. In the Scope box, select where you would like the Named Range to 
2013 Tips & Tricks Shortcuts Pg8 
be available 
6. In the Refers to box, ensure you have the correct range 
7. Select OK, Close
Tip 6: Quickly Accessing a List of 
Named Ranges 
Once you have named the ranges in your Microsoft Excel worksheet, 
you may need to use them in such things as Formulae, Data 
Validation or Pasting a List. By pasting a list, you will get a list of the 
Named Ranges and which cells they refer to. 
Applies To MS Excel 2003, 2007, 2010 
1. To use in a Function: 
a. Once you are at the desired point in the function (VLOOKUP – Table_array) 
b. Press F3 
c. Select the desired Named Range 
d. Select OK 
2. To use in Data Validation: 
a. Once you are at the desired point in the data validation e.g. Source 
dialogue box 
b. Press F3 
c. Select the desired Named Range 
d. Select OK 
3. To Paste a List on Named Ranges: 
a. Select a cell in the worksheet where you would like the list to be pasted 
b. Press F3 
c. Select Paste List 
2013 Tips & Tricks Shortcuts Pg9
Tip 7: Filling a Range of Text or 
Formula 
There are a few ways to fill a range of text or a formula. This tip will show 
you how to firstly select the range to be filled, enter the desired text or 
formula once, and then use a keystroke combination to copy it to all cells 
in the highlighted range. 
Applies To MS Excel 2003, 2007, 2010 
1. Select the range of cells to be filled 
2013 Tips & Tricks Shortcuts Pg10
2. Enter in the desired text or formula into the cell 
2013 Tips & Tricks Shortcuts Pg11 
3. Press Ctrl + Enter.
Tip 8: Accessing the Ribbon Programs 
Access keys provide a way to quickly use a command by pressing a few 
keystrokes, no matter where you are in the program. Every command in 
a program that uses an Office Fluent ribbon can be accessed by us-ing 
an access key. You can get to most commands by using two to four 
keystrokes. 
Applies To MS Excel 2003, 2007, 2010 
1. Press and release the ALT key 
The KeyTips are displayed over each feature that is available in the current 
view 
2. To apply conditional formatting using access keys; Refer to the data 
2013 Tips & Tricks Shortcuts Pg12 
below .
2013 Tips & Tricks Shortcuts Pg13 
3. Select C2: 
4. Press the ALT key 
5. Press H 
6. Press L 
7. Press H 
8. Press G 
9. Enter as below 
10. Press the Enter Key 
11. The result will be as below
Tip 9: Using the Tab Key to Move to 
the Next Input Cell 
Scenario: You may have a spreadsheet set up with a number of data 
input cells. Wouldn’t it be nice if the user could just press the Tab key to 
jump to the next input cell? 
This type of thing is fairly easy to set up. The key is to unlock the input 
cells, and then protect the worksheet. 
Applies To MS Excel 2003, 2007, 2010 
Here is how to do it: 
1. Select all of the input cells on your worksheet. (To select non-adjacent 
cells, hold down Ctrl while you select the cells) . 
2. Choose Home Tab, Cell Group, Format Drop Down arrow, Format cells to 
display the Format Cells dialog box . 
3. Click the Protection tab and remove the check mark from the Locked check 
box . 
2013 Tips & Tricks Shortcuts Pg14
4. Click OK 
Keep in mind that all cells are locked by default. But also remember 
that locking or unlocking cells has no effect unless the worksheet is 
protected. Select the Review Tab, Change Group, Protect Sheet Icon 
to protect the worksheet. You can enter a password if you like. 
When the sheet is protected, you’ll find pressing Tab moves the 
heavy-bordered active cell indicator to the next unlocked cell. Be 
aware that this does not prevent the user from selecting unlocked cells 
using the cursor keys. 
2013 Tips & Tricks Shortcuts Pg15
Tip 10: Keyboard Shortcuts 
Are you looking for a comprehensive list of MS Excel shortcuts in one docu-ment? 
Below we provide a detailed list of all the MS Excel shortcuts. 
Keyboard shortcuts that begin with CTRL will still work in Excel 2007 & 2010. 
For example, CTRL+C still copies to the clipboard, and CTRL+V still pastes 
from the clipboard. 
Most of the old ALT+ menu shortcuts still work, too. However, you need to 
know the full shortcut from memory — there are no screen reminders of what 
letters to press. For example, try pressing ALT, and then press one of the 
old menu keys E (Edit), V (View), I (Insert), and so on. A box pops up saying 
you’re using an access key from an earlier version of Microsoft Office. If you 
know the entire key sequence, go ahead and initiate the command. If you 
don’t know the sequence, press ESC and use Key Tip badges instead. 
Applies To MS Excel 2003, 2007, 2010 
CTRL Combination Shortcut Keys 
Key Description 
CTRL+SHIFT+( Unhides any hidden rows within the 
selection. 
CTRL+SHIFT+& Applies the outline border to the selected 
cells. 
CTRL+SHIFT_ Removes the outline border from the 
selected cells. 
CTRL+SHIFT+~ Applies the General number format. 
CTRL+SHIFT+$ Applies the Currency format with two 
decimal places (negative numbers in 
parentheses). 
CTRL+SHIFT+% Applies the Percentage format with no 
decimal places. 
CTRL+SHIFT+^ Applies the Scientific number format with 
two decimal places. 
CTRL+SHIFT+# Applies the Date format with the day, 
month, and year. 
CTRL+SHIFT+@ Applies the Time format with the hour 
and minute, and AM or PM. 
2013 Tips & Tricks Shortcuts Pg16
CTRL+SHIFT+! Applies the Number format with two 
decimal places, thousands separator, 
and minus sign (-) for negative values. 
CTRL+SHIFT+* Selects the current region around the 
active cell (the data area enclosed by 
blank rows and blank columns). 
In a PivotTable, it selects the entire 
PivotTable report. 
CTRL+SHIFT+: Enters the current time. 
CTRL+SHIFT+” Copies the value from the cell above the 
active cell into the cell or the Formula 
Bar. 
CTRL+SHIFT+Plus (+) Displays the Insert dialog box to insert 
blank cells. 
CTRL+Minus (-) Displays the Delete dialog box to delete 
the selected cells. 
CTRL+; Enters the current date. 
CTRL+` Alternates between displaying cell values 
and displaying formulas in the 
worksheet. 
CTRL+’ Copies a formula from the cell above the 
active cell into the cell or the Formula 
Bar. 
CTRL+1 Displays the Format Cells dialog box. 
CTRL+2 Applies or removes bold formatting. 
CTRL+3 Applies or removes italic formatting. 
CTRL+4 Applies or removes underlining. 
CTRL+5 Applies or removes strikethrough. 
CTRL+6 Alternates between hiding and displaying 
objects. 
CTRL+8 Displays or hides the outline symbols. 
CTRL+9 Hides the selected rows. 
CTRL+0 Hides the selected columns. 
CTRL+A Selects the entire worksheet. 
2013 Tips & Tricks Shortcuts Pg17
If the worksheet contains data, CTRL+A 
selects the current region. Pressing 
CTRL+A a second time selects the entire 
worksheet. 
When the insertion point is to the right 
of a function name in a formula, displays 
the Function Arguments dialog box. 
CTRL+SHIFT+A inserts the argument 
names and parentheses when the 
insertion point is to the right of a function 
name in a formula. 
CTRL+B Applies or removes bold formatting. 
CTRL+C Copies the selected cells. 
CTRL+D Uses the Fill Down command to copy the 
contents and format of the topmost cell 
of a selected range into the cells below. 
CTRL+F Displays the Find and Replace dialog 
box, with the Find tab selected. 
SHIFT+F5 also displays this tab, while 
SHIFT+F4 repeats the last Find action. 
CTRL+SHIFT+F opens the Format 
Cells dialog box with the Font tab 
selected. 
CTRL+G Displays the Go To dialog box. 
F5 also displays this dialog box. 
CTRL+H Displays the Find and Replace dialog 
box, with the Replace tab selected. 
CTRL+I Applies or removes italic formatting. 
CTRL+K Displays the Insert Hyperlink dialog 
box for new hyperlinks or the Edit 
Hyperlink dialog box for selected 
existing hyperlinks. 
CTRL+L Displays the Create Table dialog box. 
CTRL+N Creates a new, blank workbook. 
CTRL+O Displays the Open dialog box to 
open or find a file. 
2013 Tips & Tricks Shortcuts Pg18
CTRL+SHIFT+O selects all cells that 
contain comments. 
CTRL+P Displays the Print tab in Microsoft 
Office Backstage view. 
CTRL+SHIFT+P opens the Format 
Cells dialog box with the Font tab 
selected. 
CTRL+R Uses the Fill Right command to copy 
the contents and format of the left-most 
cell of a selected range into the 
cells to the right. 
CTRL+S Saves the active file with its current 
file name, location, and file format. 
CTRL+T Displays the Create Table dialog box. 
CTRL+U Applies or removes underlining. 
CTRL+SHIFT+U switches between 
expanding and collapsing of the 
formula bar. 
CTRL+V Inserts the contents of the Clipboard 
at the insertion point and replaces 
any selection. Available only after 
you have cut or copied an object, 
text, or cell contents. 
CTRL+ALT+V displays the Paste 
Special dialog box. Available only af-ter 
you have cut or copied an object, 
text, or cell contents on a worksheet 
or in another program. 
CTRL+W Closes the selected workbook win-dow. 
CTRL+X Cuts the selected cells. 
CTRL+Y Repeats the last command or action, 
if possible. 
CTRL+Z Uses the Undo command to reverse 
the last command or to delete the 
last entry that you typed. 
2013 Tips & Tricks Shortcuts Pg19
Function Keys 
Key Description 
F1 Displays the Excel Help task pane. 
CTRL+F1 displays or hides the ribbon 
ALT+F1 creates an embedded chart of 
the data in the current range 
ALT+SHIFT+F1 inserts a new worksheet. 
F2 Edits the active cell and positions the 
insertion point at the end of the cell con-tents. 
It also moves the insertion point 
into the Formula Bar when editing in a 
cell is turned off. 
SHIFT+F2 adds or edits a cell comment. 
CTRL+F2 displays the print preview area 
on the Print tab in the Backstage view. 
F3 Displays the Paste Name dialog box. 
Available only if there are existing names 
in the workbook. 
SHIFT+F3 displays the Insert Function 
dialog box. 
F4 Repeats the last command or action, if 
possible. 
CTRL+F4 closes the selected workbook 
window. 
ALT+F4 closes Excel. 
F5 Displays the Go To dialog box. 
CTRL+F5 restores the window size of 
the selected workbook window. 
F6 Switches between the worksheet, ribbon, 
task pane, and Zoom controls. In a 
worksheet that has been split (View 
menu, Manage This Window, Freeze 
Panes, Split Window command), F6 
includes the split panes when switching 
between panes and the ribbon area. 
SHIFT+F6 switches between the work-sheet, 
Zoom controls, task pane, and 
ribbon. 
2013 Tips & Tricks Shortcuts Pg20
CTRL+F6 switches to the next workbook 
window when more than one workbook 
window is open. 
F7 Displays the Spelling dialog box to check 
spelling in the active worksheet or 
selected range. 
CTRL+F7 performs the Move command 
on the workbook window when it is not 
maximized. Use the arrow keys to move 
the window, and when finished press 
ENTER, or ESC to cancel 
F8 Turns extend mode on or off. In extend 
mode, Extended Selection appears in the 
status line, and the arrow keys extend 
the selection. 
SHIFT+F8 enables you to add a 
nonadjacent cell or range to a selection 
of cells by using the arrow keys 
CTRL+F8 performs the Size command 
(on the Control menu for the workbook 
window) when a workbook is not 
maximized. 
ALT+F8 displays the Macro dialog box to 
create, run, edit, or delete a macro. 
F9 Calculates all worksheets in all open 
workbooks. 
SHIFT+F9 calculates the active 
worksheet. 
CTRL+ALT+F9 calculates all worksheets 
in all open workbooks, regardless of 
whether they have changed since the 
last calculation. 
CTRL+ALT+SHIFT+F9 rechecks de-pendent 
formulas, and then calculates all 
cells in all open workbooks, 
including cells not marked as needing to 
be calculated. 
CTRL+F9 minimizes a workbook window 
to an icon. 
2013 Tips & Tricks Shortcuts Pg21
F10 Turns key tips on or off. (Pressing ALT 
does the same thing.) 
SHIFT+F10 displays the shortcut menu 
for a selected item. 
ALT+SHIFT+F10 displays the menu or 
message for an Error Checking button. 
CTRL+F10 maximizes or restores the 
selected workbook window. 
F11 Creates a chart of the data in the current 
range in a separate Chart sheet. 
SHIFT+F11 inserts a new worksheet. 
ALT+F11 opens the Microsoft Visual 
Basic For Applications Editor, in which 
you can create a macro by using Visual 
Basic for Applications (VBA). 
F12 Displays the Save As dialog box. 
Other useful shortcut keys 
Key Description 
ARROW KEYS Move one cell up, down, left, or right in a 
worksheet. 
CTRL+ARROW KEY moves to the edge 
of the current data region in a worksheet. 
SHIFT+ARROW KEY extends the 
selection of cells by one cell. 
CTRL+SHIFT+ARROW KEY extends the 
selection of cells to the last nonblank cell 
in the same column or row as the active 
cell, or if the next cell is blank, extends 
the selection to the next nonblank cell 
LEFT ARROW or RIGHT ARROW 
selects the tab to the left or right when 
the ribbon is selected. When a submenu 
is open or selected, these arrow keys 
switch between the main menu and the 
submenu. When a ribbon tab is selected, 
these keys navigate the tab buttons. 
2013 Tips & Tricks Shortcuts Pg22
DOWN ARROW or UP ARROW selects 
the next or previous command when a 
menu or submenu is open. When a rib-bon 
tab is selected, these keys navigate 
up or down the tab group. 
In a dialog box, arrow keys move be-tween 
options in an open drop-down list, 
or between options in a group of options. 
DOWN ARROW or ALT+DOWN ARROW 
opens a selected drop-down list. 
BACKSPACE Deletes one character to the left in the 
Formula Bar. 
Also clears the content of the active cell. 
In cell editing mode, it deletes the char-acter 
to the left of the insertion point. 
DELETE Removes the cell contents (data and 
formulas) from selected cells without af-fecting 
cell formats or comments. 
In cell editing mode, it deletes the char-acter 
to the right of the insertion point. 
END END turns End mode on. In End mode, 
you can then press an arrow key to move 
to the next nonblank cell in the same 
column or row as the active cell. If the 
cells are blank, pressing END followed 
by an arrow key moves to the last cell in 
the row or column. 
END also selects the last command on 
the menu when a menu or submenu is 
visible. 
CTRL+END moves to the last cell on a 
worksheet, to the lowest used row of the 
rightmost used column. If the cursor is in 
the formula bar, CTRL+END moves the 
cursor to the end of the text. 
2013 Tips & Tricks Shortcuts Pg23
CTRL+SHIFT+END extends the se-lection 
of cells to the last used cell on 
the worksheet (lower-right corner). 
If the cursor is in the formula bar, 
CTRL+SHIFT+END selects all text in the 
formula bar from the cursor position to 
the end—this does not affect the height 
of the formula bar. 
ENTER Completes a cell entry from the cell or 
the Formula Bar, and selects the cell 
below (by default). 
In a data form, it moves to the first field in 
the next record. 
Opens a selected menu (press F10 to 
activate the menu bar) or performs the 
action for a selected command. 
In a dialog box, it performs the action for 
the default command button in the dialog 
box (the button with the bold outline, 
often the OK button). 
ALT+ENTER starts a new line in the 
same cell. 
CTRL+ENTER fills the selected cell 
range with the current entry. 
SHIFT+ENTER completes a cell entry 
and selects the cell above 
ESC Cancels an entry in the cell or Formula 
Bar. 
Closes an open menu or submenu, 
dialog box, or message window. 
It also closes full screen mode when this 
mode has been applied, and returns to 
normal screen mode to display the rib-bon 
and status bar again. 
HOME Moves to the beginning of a row in a 
worksheet. 
Moves to the cell in the upper-left corner 
of the window when SCROLL LOCK is 
turned on. 
2013 Tips & Tricks Shortcuts Pg24
Selects the first command on the menu 
when a menu or submenu is visible. 
CTRL+HOME moves to the beginning of 
a worksheet. 
CTRL+SHIFT+HOME extends the 
selection of cells to the beginning of the 
worksheet. 
PAGE DOWN Moves one screen down in a worksheet. 
ALT+PAGE DOWN moves one screen to 
the right in a worksheet. 
CTRL+PAGE DOWN moves to the next 
sheet in a workbook. 
CTRL+SHIFT+PAGE DOWN selects the 
current and next sheet in a workbook. 
PAGE UP Moves one screen up in a worksheet. 
ALT+PAGE UP moves one screen to the 
left in a worksheet 
CTRL+PAGE UP moves to the previous 
sheet in a workbook. 
CTRL+SHIFT+PAGE UP selects the cur-rent 
and previous sheet in a workbook. 
SPACEBAR In a dialog box, performs the action for 
the selected button, or selects or clears a 
check box. 
CTRL+SPACEBAR selects an entire 
column in a worksheet. 
SHIFT+SPACEBAR selects an entire row 
in a worksheet. 
CTRL+SHIFT+SPACEBAR selects the 
entire worksheet. 
If the worksheet contains data, 
CTRL+SHIFT+SPACEBAR se-lects 
the current region. Pressing 
CTRL+SHIFT+SPACEBAR a sec-ond 
time selects the current region 
and its summary rows. Pressing 
CTRL+SHIFT+SPACEBAR a third time 
selects the entire worksheet. 
2013 Tips & Tricks Shortcuts Pg25
When an object is selected, 
CTRL+SHIFT+SPACEBAR selects all 
objects on a worksheet. 
ALT+SPACEBAR displays the Control 
menu for the Excel window. 
TAB Moves one cell to the right in a 
worksheet. 
Moves between unlocked cells in a 
protected worksheet. 
Moves to the next option or option group 
in a dialog box 
SHIFT+TAB moves to the previous cell 
in a worksheet or the previous option in a 
dialog box. 
CTRL+TAB switches to the next tab in 
dialog box 
CTRL+SHIFT+TAB switches to the 
previous tab in a dialog box. 
2013 Tips & Tricks Shortcuts Pg26
Contact Information 
http://www.alchemex.com/Training/Courses 
BI Community http://community.alchemex.com/ 
BI Blog www.alchemex.com/blog 
Subscribe to Excel 
on Steroids Tips & 
Tricks e-newsletter 
www.alchemex.com/blog/subscribe 
Connect with us 
LinkedIn Group za.linkedin.com/company/sage-alchemex 
Twitter twitter.com/excelonsteroids 
Facebook www.facebook.com/excelonsteroids 
You Tube http://www.youtube.com/user/SageIntelligence 
G+ (Google Plus) http://gplus.to/SageIntelligence 
2013 Tips & Tricks Shortcuts Pg27 
Subscibe to Sage 
Intelligence Tips & 
Tricks e newsletter 
www.alchemex.com/blog/subscribe 
Excel on Steroids 
Sage Alchemex www.alchemex.com

MS Excel E-book Sage Intelligence

  • 2.
    Table of Contents Tip 1: Quickly Closing All Open Workbooks without Closing MS Excel 3 Tip 2: Shortcut for Date Entry 5 Tip 3: Selecting a Column with Only Two Keystrokes 6 Tip 4: Wrapping Text in a Cell 7 Tip 5: Naming a Range of Cells 8 Tip 6: Quickly Accessing a List of Named Ranges 9 Tip 7: Filling a Range of Text or Formula 10 Tip 8: Accessing the Ribbon Programs 12 Tip 9: Using the Tab Key to Move to the Next Input Cell 14 Tip 10: Keyboard Shortcuts 16
  • 3.
    Tip 1: QuicklyClosing All Open Workbooks without Closing MS Excel Sometimes you need to shut down Excel quickly, but you have multiple work books open that will all ask to close individually. A simple keyboard shortcut will help. In this example, there are two workbooks open: Applies To: MS Excel 2003, 2007 and 2010 If I select the Office Icon, you’ll see that I have the Close option. However the Close All option is not available. To activate the Close All option, Select as follows: 1. Select the Office button, Excel Options, Customize 2. Then select as below 2013 Tips & Tricks Shortcuts Pg3
  • 4.
    3. Select OK 4. The Close All Option will be added to the quick access toolbar 5. To close all the workbooks select the Close All Option on the quick 2013 Tips & Tricks Shortcuts Pg4 access toolbar NB: Any open workbook that has changes made to it will still require an answer as to whether you would like to save the file, however once answered, all files will be closed while MS Excel will stay open
  • 5.
    Tip 2: Shortcutfor Date Entry To quickly enter today’s date in a cell without having to type the formula =Today (), one can do the following: Applies To MS Excel 2003, 2007, 2010 1. To enter the date press CTRL + ; (Ctrl and semicolon simultaneously) 2. To enter the time press CTRL+Shift+ ; (Ctrl, shift colon simultaneously) 2013 Tips & Tricks Shortcuts Pg5
  • 6.
    Tip 3: Selectinga Column with Only Two Keystrokes Applies To MS Excel 2003, 2007, 2010 1. Select any cell in the column you would like to select 2. Press Ctrl + Space Bar 2013 Tips & Tricks Shortcuts Pg6
  • 7.
    Tip 4: WrappingText in a Cell Applies To MS Excel 2003, 2007, 2010 1. Enter in the desired text 2013 Tips & Tricks Shortcuts Pg7 2. Press Alt + Enter 3. Press Enter
  • 8.
    Tip 5: Naminga Range of Cells A range of cells can be given a name, which can then be used in place of the actual cell references in other formulae. Applies To MS Excel 2003, 2007, 2010 1. Select the desired range of cells 2. On the keyboard, press Ctrl + F3 3. Select New 4. In the Name box, enter in the desired Named Range 5. In the Scope box, select where you would like the Named Range to 2013 Tips & Tricks Shortcuts Pg8 be available 6. In the Refers to box, ensure you have the correct range 7. Select OK, Close
  • 9.
    Tip 6: QuicklyAccessing a List of Named Ranges Once you have named the ranges in your Microsoft Excel worksheet, you may need to use them in such things as Formulae, Data Validation or Pasting a List. By pasting a list, you will get a list of the Named Ranges and which cells they refer to. Applies To MS Excel 2003, 2007, 2010 1. To use in a Function: a. Once you are at the desired point in the function (VLOOKUP – Table_array) b. Press F3 c. Select the desired Named Range d. Select OK 2. To use in Data Validation: a. Once you are at the desired point in the data validation e.g. Source dialogue box b. Press F3 c. Select the desired Named Range d. Select OK 3. To Paste a List on Named Ranges: a. Select a cell in the worksheet where you would like the list to be pasted b. Press F3 c. Select Paste List 2013 Tips & Tricks Shortcuts Pg9
  • 10.
    Tip 7: Fillinga Range of Text or Formula There are a few ways to fill a range of text or a formula. This tip will show you how to firstly select the range to be filled, enter the desired text or formula once, and then use a keystroke combination to copy it to all cells in the highlighted range. Applies To MS Excel 2003, 2007, 2010 1. Select the range of cells to be filled 2013 Tips & Tricks Shortcuts Pg10
  • 11.
    2. Enter inthe desired text or formula into the cell 2013 Tips & Tricks Shortcuts Pg11 3. Press Ctrl + Enter.
  • 12.
    Tip 8: Accessingthe Ribbon Programs Access keys provide a way to quickly use a command by pressing a few keystrokes, no matter where you are in the program. Every command in a program that uses an Office Fluent ribbon can be accessed by us-ing an access key. You can get to most commands by using two to four keystrokes. Applies To MS Excel 2003, 2007, 2010 1. Press and release the ALT key The KeyTips are displayed over each feature that is available in the current view 2. To apply conditional formatting using access keys; Refer to the data 2013 Tips & Tricks Shortcuts Pg12 below .
  • 13.
    2013 Tips &Tricks Shortcuts Pg13 3. Select C2: 4. Press the ALT key 5. Press H 6. Press L 7. Press H 8. Press G 9. Enter as below 10. Press the Enter Key 11. The result will be as below
  • 14.
    Tip 9: Usingthe Tab Key to Move to the Next Input Cell Scenario: You may have a spreadsheet set up with a number of data input cells. Wouldn’t it be nice if the user could just press the Tab key to jump to the next input cell? This type of thing is fairly easy to set up. The key is to unlock the input cells, and then protect the worksheet. Applies To MS Excel 2003, 2007, 2010 Here is how to do it: 1. Select all of the input cells on your worksheet. (To select non-adjacent cells, hold down Ctrl while you select the cells) . 2. Choose Home Tab, Cell Group, Format Drop Down arrow, Format cells to display the Format Cells dialog box . 3. Click the Protection tab and remove the check mark from the Locked check box . 2013 Tips & Tricks Shortcuts Pg14
  • 15.
    4. Click OK Keep in mind that all cells are locked by default. But also remember that locking or unlocking cells has no effect unless the worksheet is protected. Select the Review Tab, Change Group, Protect Sheet Icon to protect the worksheet. You can enter a password if you like. When the sheet is protected, you’ll find pressing Tab moves the heavy-bordered active cell indicator to the next unlocked cell. Be aware that this does not prevent the user from selecting unlocked cells using the cursor keys. 2013 Tips & Tricks Shortcuts Pg15
  • 16.
    Tip 10: KeyboardShortcuts Are you looking for a comprehensive list of MS Excel shortcuts in one docu-ment? Below we provide a detailed list of all the MS Excel shortcuts. Keyboard shortcuts that begin with CTRL will still work in Excel 2007 & 2010. For example, CTRL+C still copies to the clipboard, and CTRL+V still pastes from the clipboard. Most of the old ALT+ menu shortcuts still work, too. However, you need to know the full shortcut from memory — there are no screen reminders of what letters to press. For example, try pressing ALT, and then press one of the old menu keys E (Edit), V (View), I (Insert), and so on. A box pops up saying you’re using an access key from an earlier version of Microsoft Office. If you know the entire key sequence, go ahead and initiate the command. If you don’t know the sequence, press ESC and use Key Tip badges instead. Applies To MS Excel 2003, 2007, 2010 CTRL Combination Shortcut Keys Key Description CTRL+SHIFT+( Unhides any hidden rows within the selection. CTRL+SHIFT+& Applies the outline border to the selected cells. CTRL+SHIFT_ Removes the outline border from the selected cells. CTRL+SHIFT+~ Applies the General number format. CTRL+SHIFT+$ Applies the Currency format with two decimal places (negative numbers in parentheses). CTRL+SHIFT+% Applies the Percentage format with no decimal places. CTRL+SHIFT+^ Applies the Scientific number format with two decimal places. CTRL+SHIFT+# Applies the Date format with the day, month, and year. CTRL+SHIFT+@ Applies the Time format with the hour and minute, and AM or PM. 2013 Tips & Tricks Shortcuts Pg16
  • 17.
    CTRL+SHIFT+! Applies theNumber format with two decimal places, thousands separator, and minus sign (-) for negative values. CTRL+SHIFT+* Selects the current region around the active cell (the data area enclosed by blank rows and blank columns). In a PivotTable, it selects the entire PivotTable report. CTRL+SHIFT+: Enters the current time. CTRL+SHIFT+” Copies the value from the cell above the active cell into the cell or the Formula Bar. CTRL+SHIFT+Plus (+) Displays the Insert dialog box to insert blank cells. CTRL+Minus (-) Displays the Delete dialog box to delete the selected cells. CTRL+; Enters the current date. CTRL+` Alternates between displaying cell values and displaying formulas in the worksheet. CTRL+’ Copies a formula from the cell above the active cell into the cell or the Formula Bar. CTRL+1 Displays the Format Cells dialog box. CTRL+2 Applies or removes bold formatting. CTRL+3 Applies or removes italic formatting. CTRL+4 Applies or removes underlining. CTRL+5 Applies or removes strikethrough. CTRL+6 Alternates between hiding and displaying objects. CTRL+8 Displays or hides the outline symbols. CTRL+9 Hides the selected rows. CTRL+0 Hides the selected columns. CTRL+A Selects the entire worksheet. 2013 Tips & Tricks Shortcuts Pg17
  • 18.
    If the worksheetcontains data, CTRL+A selects the current region. Pressing CTRL+A a second time selects the entire worksheet. When the insertion point is to the right of a function name in a formula, displays the Function Arguments dialog box. CTRL+SHIFT+A inserts the argument names and parentheses when the insertion point is to the right of a function name in a formula. CTRL+B Applies or removes bold formatting. CTRL+C Copies the selected cells. CTRL+D Uses the Fill Down command to copy the contents and format of the topmost cell of a selected range into the cells below. CTRL+F Displays the Find and Replace dialog box, with the Find tab selected. SHIFT+F5 also displays this tab, while SHIFT+F4 repeats the last Find action. CTRL+SHIFT+F opens the Format Cells dialog box with the Font tab selected. CTRL+G Displays the Go To dialog box. F5 also displays this dialog box. CTRL+H Displays the Find and Replace dialog box, with the Replace tab selected. CTRL+I Applies or removes italic formatting. CTRL+K Displays the Insert Hyperlink dialog box for new hyperlinks or the Edit Hyperlink dialog box for selected existing hyperlinks. CTRL+L Displays the Create Table dialog box. CTRL+N Creates a new, blank workbook. CTRL+O Displays the Open dialog box to open or find a file. 2013 Tips & Tricks Shortcuts Pg18
  • 19.
    CTRL+SHIFT+O selects allcells that contain comments. CTRL+P Displays the Print tab in Microsoft Office Backstage view. CTRL+SHIFT+P opens the Format Cells dialog box with the Font tab selected. CTRL+R Uses the Fill Right command to copy the contents and format of the left-most cell of a selected range into the cells to the right. CTRL+S Saves the active file with its current file name, location, and file format. CTRL+T Displays the Create Table dialog box. CTRL+U Applies or removes underlining. CTRL+SHIFT+U switches between expanding and collapsing of the formula bar. CTRL+V Inserts the contents of the Clipboard at the insertion point and replaces any selection. Available only after you have cut or copied an object, text, or cell contents. CTRL+ALT+V displays the Paste Special dialog box. Available only af-ter you have cut or copied an object, text, or cell contents on a worksheet or in another program. CTRL+W Closes the selected workbook win-dow. CTRL+X Cuts the selected cells. CTRL+Y Repeats the last command or action, if possible. CTRL+Z Uses the Undo command to reverse the last command or to delete the last entry that you typed. 2013 Tips & Tricks Shortcuts Pg19
  • 20.
    Function Keys KeyDescription F1 Displays the Excel Help task pane. CTRL+F1 displays or hides the ribbon ALT+F1 creates an embedded chart of the data in the current range ALT+SHIFT+F1 inserts a new worksheet. F2 Edits the active cell and positions the insertion point at the end of the cell con-tents. It also moves the insertion point into the Formula Bar when editing in a cell is turned off. SHIFT+F2 adds or edits a cell comment. CTRL+F2 displays the print preview area on the Print tab in the Backstage view. F3 Displays the Paste Name dialog box. Available only if there are existing names in the workbook. SHIFT+F3 displays the Insert Function dialog box. F4 Repeats the last command or action, if possible. CTRL+F4 closes the selected workbook window. ALT+F4 closes Excel. F5 Displays the Go To dialog box. CTRL+F5 restores the window size of the selected workbook window. F6 Switches between the worksheet, ribbon, task pane, and Zoom controls. In a worksheet that has been split (View menu, Manage This Window, Freeze Panes, Split Window command), F6 includes the split panes when switching between panes and the ribbon area. SHIFT+F6 switches between the work-sheet, Zoom controls, task pane, and ribbon. 2013 Tips & Tricks Shortcuts Pg20
  • 21.
    CTRL+F6 switches tothe next workbook window when more than one workbook window is open. F7 Displays the Spelling dialog box to check spelling in the active worksheet or selected range. CTRL+F7 performs the Move command on the workbook window when it is not maximized. Use the arrow keys to move the window, and when finished press ENTER, or ESC to cancel F8 Turns extend mode on or off. In extend mode, Extended Selection appears in the status line, and the arrow keys extend the selection. SHIFT+F8 enables you to add a nonadjacent cell or range to a selection of cells by using the arrow keys CTRL+F8 performs the Size command (on the Control menu for the workbook window) when a workbook is not maximized. ALT+F8 displays the Macro dialog box to create, run, edit, or delete a macro. F9 Calculates all worksheets in all open workbooks. SHIFT+F9 calculates the active worksheet. CTRL+ALT+F9 calculates all worksheets in all open workbooks, regardless of whether they have changed since the last calculation. CTRL+ALT+SHIFT+F9 rechecks de-pendent formulas, and then calculates all cells in all open workbooks, including cells not marked as needing to be calculated. CTRL+F9 minimizes a workbook window to an icon. 2013 Tips & Tricks Shortcuts Pg21
  • 22.
    F10 Turns keytips on or off. (Pressing ALT does the same thing.) SHIFT+F10 displays the shortcut menu for a selected item. ALT+SHIFT+F10 displays the menu or message for an Error Checking button. CTRL+F10 maximizes or restores the selected workbook window. F11 Creates a chart of the data in the current range in a separate Chart sheet. SHIFT+F11 inserts a new worksheet. ALT+F11 opens the Microsoft Visual Basic For Applications Editor, in which you can create a macro by using Visual Basic for Applications (VBA). F12 Displays the Save As dialog box. Other useful shortcut keys Key Description ARROW KEYS Move one cell up, down, left, or right in a worksheet. CTRL+ARROW KEY moves to the edge of the current data region in a worksheet. SHIFT+ARROW KEY extends the selection of cells by one cell. CTRL+SHIFT+ARROW KEY extends the selection of cells to the last nonblank cell in the same column or row as the active cell, or if the next cell is blank, extends the selection to the next nonblank cell LEFT ARROW or RIGHT ARROW selects the tab to the left or right when the ribbon is selected. When a submenu is open or selected, these arrow keys switch between the main menu and the submenu. When a ribbon tab is selected, these keys navigate the tab buttons. 2013 Tips & Tricks Shortcuts Pg22
  • 23.
    DOWN ARROW orUP ARROW selects the next or previous command when a menu or submenu is open. When a rib-bon tab is selected, these keys navigate up or down the tab group. In a dialog box, arrow keys move be-tween options in an open drop-down list, or between options in a group of options. DOWN ARROW or ALT+DOWN ARROW opens a selected drop-down list. BACKSPACE Deletes one character to the left in the Formula Bar. Also clears the content of the active cell. In cell editing mode, it deletes the char-acter to the left of the insertion point. DELETE Removes the cell contents (data and formulas) from selected cells without af-fecting cell formats or comments. In cell editing mode, it deletes the char-acter to the right of the insertion point. END END turns End mode on. In End mode, you can then press an arrow key to move to the next nonblank cell in the same column or row as the active cell. If the cells are blank, pressing END followed by an arrow key moves to the last cell in the row or column. END also selects the last command on the menu when a menu or submenu is visible. CTRL+END moves to the last cell on a worksheet, to the lowest used row of the rightmost used column. If the cursor is in the formula bar, CTRL+END moves the cursor to the end of the text. 2013 Tips & Tricks Shortcuts Pg23
  • 24.
    CTRL+SHIFT+END extends these-lection of cells to the last used cell on the worksheet (lower-right corner). If the cursor is in the formula bar, CTRL+SHIFT+END selects all text in the formula bar from the cursor position to the end—this does not affect the height of the formula bar. ENTER Completes a cell entry from the cell or the Formula Bar, and selects the cell below (by default). In a data form, it moves to the first field in the next record. Opens a selected menu (press F10 to activate the menu bar) or performs the action for a selected command. In a dialog box, it performs the action for the default command button in the dialog box (the button with the bold outline, often the OK button). ALT+ENTER starts a new line in the same cell. CTRL+ENTER fills the selected cell range with the current entry. SHIFT+ENTER completes a cell entry and selects the cell above ESC Cancels an entry in the cell or Formula Bar. Closes an open menu or submenu, dialog box, or message window. It also closes full screen mode when this mode has been applied, and returns to normal screen mode to display the rib-bon and status bar again. HOME Moves to the beginning of a row in a worksheet. Moves to the cell in the upper-left corner of the window when SCROLL LOCK is turned on. 2013 Tips & Tricks Shortcuts Pg24
  • 25.
    Selects the firstcommand on the menu when a menu or submenu is visible. CTRL+HOME moves to the beginning of a worksheet. CTRL+SHIFT+HOME extends the selection of cells to the beginning of the worksheet. PAGE DOWN Moves one screen down in a worksheet. ALT+PAGE DOWN moves one screen to the right in a worksheet. CTRL+PAGE DOWN moves to the next sheet in a workbook. CTRL+SHIFT+PAGE DOWN selects the current and next sheet in a workbook. PAGE UP Moves one screen up in a worksheet. ALT+PAGE UP moves one screen to the left in a worksheet CTRL+PAGE UP moves to the previous sheet in a workbook. CTRL+SHIFT+PAGE UP selects the cur-rent and previous sheet in a workbook. SPACEBAR In a dialog box, performs the action for the selected button, or selects or clears a check box. CTRL+SPACEBAR selects an entire column in a worksheet. SHIFT+SPACEBAR selects an entire row in a worksheet. CTRL+SHIFT+SPACEBAR selects the entire worksheet. If the worksheet contains data, CTRL+SHIFT+SPACEBAR se-lects the current region. Pressing CTRL+SHIFT+SPACEBAR a sec-ond time selects the current region and its summary rows. Pressing CTRL+SHIFT+SPACEBAR a third time selects the entire worksheet. 2013 Tips & Tricks Shortcuts Pg25
  • 26.
    When an objectis selected, CTRL+SHIFT+SPACEBAR selects all objects on a worksheet. ALT+SPACEBAR displays the Control menu for the Excel window. TAB Moves one cell to the right in a worksheet. Moves between unlocked cells in a protected worksheet. Moves to the next option or option group in a dialog box SHIFT+TAB moves to the previous cell in a worksheet or the previous option in a dialog box. CTRL+TAB switches to the next tab in dialog box CTRL+SHIFT+TAB switches to the previous tab in a dialog box. 2013 Tips & Tricks Shortcuts Pg26
  • 27.
    Contact Information http://www.alchemex.com/Training/Courses BI Community http://community.alchemex.com/ BI Blog www.alchemex.com/blog Subscribe to Excel on Steroids Tips & Tricks e-newsletter www.alchemex.com/blog/subscribe Connect with us LinkedIn Group za.linkedin.com/company/sage-alchemex Twitter twitter.com/excelonsteroids Facebook www.facebook.com/excelonsteroids You Tube http://www.youtube.com/user/SageIntelligence G+ (Google Plus) http://gplus.to/SageIntelligence 2013 Tips & Tricks Shortcuts Pg27 Subscibe to Sage Intelligence Tips & Tricks e newsletter www.alchemex.com/blog/subscribe Excel on Steroids Sage Alchemex www.alchemex.com