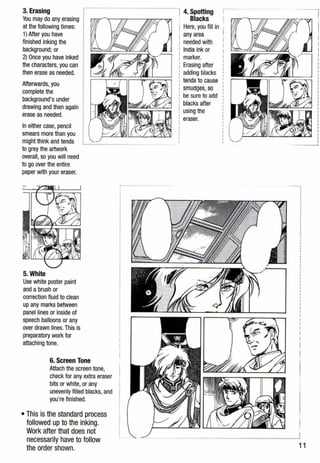
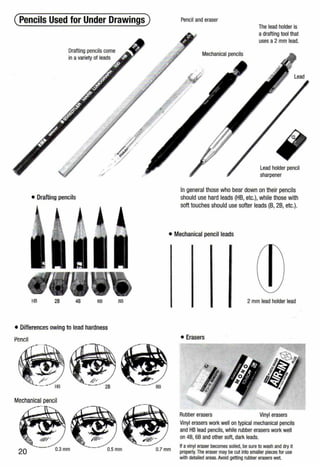
This document provides guidance on drawing manga characters with pencil, including how to do under drawings, draw faces and figures, and create postcard-size illustrations. It discusses starting with rough sketches, building up characters with basic shapes, and maintaining proportions. Tips are also given for drawing different features like eyes, hair and clothing as well as drawing super-deformed characters.
Manga School Nakano/The curriculum plansNao Yazawa
MNS is a manga school, it's located in Nakano, Tokyo.
https://www.facebook.com/MSN.English
8,000yen - 10,000 yen /2hour (private lesson) for example. From just once to 15 times course. If you are interested in it,contact me (Nao Yazsawa, the teacher of the manga class), yezawanet@yahoo.co.jp
45-minute workshop given at Sketchcamp San Diego on October 6, 2012. Video: http://vimeo.com/52665636 // Speaker notes and more information: http://huah.net/jason/blog/sketchcamp-san-diego-2012/
Model Attribute Check Company Auto PropertyCeline George
In Odoo, the multi-company feature allows you to manage multiple companies within a single Odoo database instance. Each company can have its own configurations while still sharing common resources such as products, customers, and suppliers.
Welcome to TechSoup New Member Orientation and Q&A (May 2024).pdfTechSoup
In this webinar you will learn how your organization can access TechSoup's wide variety of product discount and donation programs. From hardware to software, we'll give you a tour of the tools available to help your nonprofit with productivity, collaboration, financial management, donor tracking, security, and more.
How to Make a Field invisible in Odoo 17Celine George
It is possible to hide or invisible some fields in odoo. Commonly using “invisible” attribute in the field definition to invisible the fields. This slide will show how to make a field invisible in odoo 17.
How to Split Bills in the Odoo 17 POS ModuleCeline George
Bills have a main role in point of sale procedure. It will help to track sales, handling payments and giving receipts to customers. Bill splitting also has an important role in POS. For example, If some friends come together for dinner and if they want to divide the bill then it is possible by POS bill splitting. This slide will show how to split bills in odoo 17 POS.
Read| The latest issue of The Challenger is here! We are thrilled to announce that our school paper has qualified for the NATIONAL SCHOOLS PRESS CONFERENCE (NSPC) 2024. Thank you for your unwavering support and trust. Dive into the stories that made us stand out!
Operation “Blue Star” is the only event in the history of Independent India where the state went into war with its own people. Even after about 40 years it is not clear if it was culmination of states anger over people of the region, a political game of power or start of dictatorial chapter in the democratic setup.
The people of Punjab felt alienated from main stream due to denial of their just demands during a long democratic struggle since independence. As it happen all over the word, it led to militant struggle with great loss of lives of military, police and civilian personnel. Killing of Indira Gandhi and massacre of innocent Sikhs in Delhi and other India cities was also associated with this movement.
The Indian economy is classified into different sectors to simplify the analysis and understanding of economic activities. For Class 10, it's essential to grasp the sectors of the Indian economy, understand their characteristics, and recognize their importance. This guide will provide detailed notes on the Sectors of the Indian Economy Class 10, using specific long-tail keywords to enhance comprehension.
For more information, visit-www.vavaclasses.com
The Art Pastor's Guide to Sabbath | Steve ThomasonSteve Thomason
What is the purpose of the Sabbath Law in the Torah. It is interesting to compare how the context of the law shifts from Exodus to Deuteronomy. Who gets to rest, and why?
The Roman Empire A Historical Colossus.pdfkaushalkr1407
The Roman Empire, a vast and enduring power, stands as one of history's most remarkable civilizations, leaving an indelible imprint on the world. It emerged from the Roman Republic, transitioning into an imperial powerhouse under the leadership of Augustus Caesar in 27 BCE. This transformation marked the beginning of an era defined by unprecedented territorial expansion, architectural marvels, and profound cultural influence.
The empire's roots lie in the city of Rome, founded, according to legend, by Romulus in 753 BCE. Over centuries, Rome evolved from a small settlement to a formidable republic, characterized by a complex political system with elected officials and checks on power. However, internal strife, class conflicts, and military ambitions paved the way for the end of the Republic. Julius Caesar’s dictatorship and subsequent assassination in 44 BCE created a power vacuum, leading to a civil war. Octavian, later Augustus, emerged victorious, heralding the Roman Empire’s birth.
Under Augustus, the empire experienced the Pax Romana, a 200-year period of relative peace and stability. Augustus reformed the military, established efficient administrative systems, and initiated grand construction projects. The empire's borders expanded, encompassing territories from Britain to Egypt and from Spain to the Euphrates. Roman legions, renowned for their discipline and engineering prowess, secured and maintained these vast territories, building roads, fortifications, and cities that facilitated control and integration.
The Roman Empire’s society was hierarchical, with a rigid class system. At the top were the patricians, wealthy elites who held significant political power. Below them were the plebeians, free citizens with limited political influence, and the vast numbers of slaves who formed the backbone of the economy. The family unit was central, governed by the paterfamilias, the male head who held absolute authority.
Culturally, the Romans were eclectic, absorbing and adapting elements from the civilizations they encountered, particularly the Greeks. Roman art, literature, and philosophy reflected this synthesis, creating a rich cultural tapestry. Latin, the Roman language, became the lingua franca of the Western world, influencing numerous modern languages.
Roman architecture and engineering achievements were monumental. They perfected the arch, vault, and dome, constructing enduring structures like the Colosseum, Pantheon, and aqueducts. These engineering marvels not only showcased Roman ingenuity but also served practical purposes, from public entertainment to water supply.
How libraries can support authors with open access requirements for UKRI fund...
More how to_draw_manga_vol_1_the_basics (1)
1.
2. Vol.l :Compiling Characters
Chapter 1 Drawing the Face
Chapter 2 How to Draw Bodies
Chapter 3 Drawing Characters
ISBN4-7661-1473-6
Vol.2: Compiling Techni,ques
Chapter 1 Background Management Basics
Chapter 2Tone Techniques
Chapter 3 Expressing Light and Shadows
ISBN4-7661-1474-4
Vol.3: Compiling Application and Practice
Chapter 1 How to Draw Interiors and Exteriors
CIMpter 2 How to Draw Machines
Cl1<1pter 3 How to Create a Short Story MANGA
ISBN4·7661 1475-2
Vol. 4: Dressing Your Characters In
Casual Wear
Chapter 1 Underwear and T-shirts
Chapter 2 Sweatshirts and Skirts
Ch~pler 3 Jdckel~ and Jeans
I~BN4-766 1-1477-9
Special: Colored Original Drawing
(Copic Sketch Pen)
Chapter 1 Caple Sketch Pen
Chapter 2 Copic 1irbrushing System
ChaflTPr 1 Try Using Different Painting Materials with Markers
IS~N4-766 1 - 147 9-5
Vol. 5: Developing Shoujo Manga
Techniques
Chapter 1 How to Dr.:~w Ch.:~racters
Chapter 2 How to Dr.:~w Backgrounds
ChiiJ'lTPr 3 How to Create Stories
Chanter 4 I low to Create Manga
Manuscrints
ISI:IN4-7661-1476-0
Vol.6: Martial Artli &r Combat Sports
Ch~pler 1 Judo
Chi!ptt'r 2 Karate
Chapter 3 Kendo
Chapter 4 Boxing
Chapter 5 Street Battles
ISBN-1-7661-1478-7
~5!nbutcd by
JAPAN PUBLICATIONS TRADING CO.,LTD.
·.-.· 5ar _· -:;ho. Clwyoda-ku. Tokyo. 10HX:l64 J;Jpan
•·v~ ~ · - -- 1-~-L- .J : · r a. : ~ : -::-3292 C.:! :o :: ma:i: JPt<-.Jptco.~o.jp
4. MORE HOW TO DRAW MANGA Vol. 1:The Basics of Character Drawing
by Go Office
Copyright !C~ 2002 Go Office
Copyright M 2002 Graphlc-sha Publishing Co., Ltd.
This book was first designed and published by Graphlc-sha Publishing Co., Ltd. in Japan in 2002.
This English edition was published by Graphlc-sha Publishing C9·· Ltd. in Japan In 2004.
Artwork and Production: Ushio, Shiomi Kohhara,Yumiko Deguchl, Hazuml Amano,
Bakeko, RACHEL, Akira Gokita, Rio Yagizawa
Proclur:lion Assislant: Takuml Takahashi
Cover Artwork: Kazuaki Morita
English Main Tltle Logo Design: Hideyuki Amemura
Com~usition and Text: Hlkaru Hayashi, Rio Yaglzawa (Go Office)
Reference Photography: Yasuo lmai
Moclels: naoko, take, and Seiko Oshikawa (Photography: Junichi lijima)
English Edition Layout: Shinichi lshioka
English Translation Management: Lingua fninca, Inc. (an3y-skmt@asahi-net.or.jp)
!'Ianning Editor: Motofuml Nakanishi (Graphlc-sha Publishing Co., Ltd.)
Foreign Language Edition Project Coordinator: Kumiko Sakamoto (Graphic-sha Publishing Co.,Ltd.)
t.ll rights reserved. No part of this publication may be reproduced or used in any form or by any means
graphic, electronic, or mechanical, including photocopying, recording,taping, or information storage
and retrieval systems - without written permission of the publisher.
nistrlbutor:
Japan Publications Trading Co., Ltd.
1-2-1 Sarugaku-cho, Chiyoda-ku,Tokyo, 101-0064
Telephone: +61(0)3-3292-3751 Fax: +81(0)3-3292-0410
E-mail: jpt~jptco.co.jp
URL:http://www.jptco.eo.jp/
Arst printing:
ISBN 4-7661-1482-5
Printed and bound in China
March 2004
5. TO DRAW
Vol. 1
The Basics of Character Drawing
Be sure you / .': / .t ,: :; :'·
know the
6. Table of Contents
Chapter 1
Drawing in Pencil............................................................................7
Sketching and Doodling Are the First Steps Toward Manga....................8
Original Manga and Illustrations for Publication Start in Pencil...............10
The Process ..........................................................................................10
Creating Postcard-size Illustrations .......................................................12
The Under Drawing Process..................................................................16
The Type of Pencil Depends on the Composition's Size ........................18
Pencils Used for Under Drawings ..........................................................20
Chapter 2
Drawing Faces................................................................................21
Faces: Start with a Rough Sketch .........................................................22
The Head Is Oval ...................................................................................22
Building up the Head.............................................................................25
Making Practical Use of the Basic Layout..............................................32
Designing Faces From Profile Views .....................................................38
Four Profile Types..................................................................................40
Facial Features (Eyes, Mouth, Nose, Ears, and Eyebrows) ....................42
The Basics of the Eyes..........................................................................42
Masculine Eyes .....................................................................................44
Feminine Eyes.......................................................................................46
Rendering the Eyes and Movement.......................................................47
Four Common Mouth Types...................................................................50
Three Common Nose Types...................................................................52
Two Common Ear Types ........................................................................55
The Eyebrows as an Extension of the Bridge of the Nose......................58
Drawing Hair.........................................................................................60
Maintaining Awareness of the Direction of the Crown Whorl..................62
Profiles and Hair Movement ..................................................................66
4
7. Chapter 3
Drawing the Figure.......................................................................73
Key Points in Drawing the Figure ..........................................................74
The Basic Proportions ...........................................................................75
The Process for Drawing the figure ......................................................76
Drawing from a Frontal, Standing Position.............................................76
·Drawing Side Views ..............................................................................79
Back View .............................................................................................81
Assorted Pose Layouts ..........................................................................83
Proportioning Characters .......................................................................84
The Body-to-Head Ratio Is the Key........................................................84
Balancing Proportions ...........................................................................86
Differences in Height vs. Differences in Body-to-Head Ratios................87
Keeping Male and Female Characters Distinct.......................................88
Using the Body-to-Head Ratio to Draw Characters without Bounds.......91
Drawing from a Photograph ..................................................................96
Drawing Super-Deformed (Chibi) Characters .....................................102
How to Draw Super-Deformed Characters...........................................103
Adult and Kiddy Super-Deformed Characters ......................................106
Body-to-Head Ratios of Various Super-Deformed Characters ..............107
Moving the Characters Way.................................................................108
Chapter 4
Manga Miscellaneous...............................................................111
The Manga Clinic .................................................................................112
Drawing Characters with Cars.............................................................114
Common Minor Errors in Manga..........................................................116
5
8. Foreword
Manga allows you to communicate many things. It is capable of
communicating momentary feelings, like "I'm hungry," as well as
multifaceted issues such as "How should we, the human race be ideally?"
Somewhere along the line, manga artists sprouted up overseas and
became no longer limited to Japan. Today, manga is regarded
internationally as an aspect of Japanese culture.
I personally enjoy drawing manga and anime characters and have drawn
many since my early manga days. I eventually became a professional
artist. Since then, I have discussed manga with other friends in the field,
and everyone tends to agree that learning to draw with a pen was the first
biggest hurdle.
Without being pen-based, manga would be adifferent art form. Yet, I think
that if I had been required to be skilled with the pen right from the start, I
would not have been able to enjoy continuing my new career. Despite this
fact, I have yet to see a book on manga that says just that.
Doodling, a familiar pastime we indulge in at our leisure, lies at manga's
origins. Anything I cannot draw in pencil I certainly will not be able to
draw in pen-at first, anyway. This fact still holds true. It is important that
you feel unlimited in drawing your favorite manga and anime characters
using a regular or mechanical pencil. Once you have mastered awide
range of things in pencil, then you will be able to enjoy rendering your
manga In pen as well. It is based on that final sentiment that I have
written this book.
Rio Yagizawa
Go Office
10. Sketching and Doodling Are
the First Steps Toward Manga.
Draw on art paper.
Draw on scrap paper.
Draw in your notebook.
8
Drawing freely flowing pictures from freely
flowing ideas constitutes manga's origins.
All you need to start drawing are--t~
accessible pencil (or.mechanical pencil)
and paper.
Draw on
the ground.
:··.:-('
~ ...
. • '' . .
·. ."'/ ,,..
11. Manga and illustrations all begin in pencil.
Final artwork
Penciled drawing
Rough sketch
Professional manga artists
and illustrators also begin
their work with the user-
friendly regular or
mechanical pencil.
9
12. <
Original Manga and
Illustrations for
Publication Start in Pencil
(Or Mechanical Pencil}.
( The Process )
1. Under Drawing
(<D to @)
At this stage, the
artist redraws the
artwork any number
of times until he or
she feels satisfied.
Produce the under
drawing carefully,
trying to recreate
the image In your
mind.
r·-·----·-
'
'I
CD :
! <IIIII Sketch roughly r ····-·-----·-·-·····--·-·-
-.....,......,.-+- ! the overall panel --'----,.7--.- -+--' ,. I J
1 layout,the 1 ,· ( .... ) .
positioning of any I
- - - --- I
copy (speech I
balloons), as well I
as the characters J
and the l
composition. I ~==~~~~~~~==+="
IUse a ~ 1
straightedge to i II i
draw the panel's
1
!
1
.
1
••!1
lines. Create the 1
characters' under I
drawings. i-+'-~<.:---.-"-lJ'--fl"-'->'c.=....~"'->R~,- I'.
® I_ -~-L..
2.1nking
:-· '"-·-·--·----····-··- -------··-···--·-·----·--·-···-!
'
~-j:Jli
~'ljJE71.~~ ~-i
Ink the characters,
background, and
special effect lines. 1
At this time,you may I
pen the panel lines,
but there are artists
who do this before
®
10
i
I
I
I
I
I
I
producing the under
drawing.
l<IIIII Produce the under
1
drawing for the
I background panels.
At this time, pencil
I any reference lines
using a straightedge.
i
'-·- -----
13. 3. Erasing
You may do any erasing
at the following times:
1} After you have
finished inking the
background; or
2} Once you have inked
the characters,you can
then erase as needed.
Afterwards, you
complete the
background's under
drawing and then again
erase as needed.
Ineither case, pencil
smears more than you
might think and tends
to grey the artwork
overall, so you will need
togo over the entire
paper with your eraser.
5. White
Use white poster paint
and a brush or
correction fluid to clean
up any marks between
panel lines or inside of
speech balloons or any
over drawn lines.This is
preparatory work for
attaching tone.
6. Screen Tone
Attach the screen tone,
check for any extra eraser
bits or white, or any
unevenly filled blacks, and
you're finished.
• This is the standard process
followed up to the inking.
Work after that does not
necessarily have to follow
the order shown.
4. Spotting 1 ·
Blacks rT't'l'mr-'..-------rrrr-------w;mr- ;o-<o'7l
Here, you fill in
any area
needed with
India ink or
marker.
Erasing after
adding blacks
tends to cause
smudges, so
be sure to add
blacks after
using the
eraser.
11
14. (Creating Postcard-size Illustrations)
Apostcard is about the same size as a single panel
on an original manga copy. Consequently, practicing
composition and balance for a postcard, whether
vertical or horizontal, also makesfor reasonable
•••
12
manga practice.
Since the under drawing
establishes the layout, copy
may be added at this stage.
You may also go ahead and
mark down where to add solid
blacks and screen tone
numbers.
Aone-piece swimsuit is
transformed into a bikini
during the inking process.
Once you have become
accustomed to under
drawings, you will be able
to modify them in pen
without having to fix it in .
pencil first. Beginners will
have to adjust the under
drawing first; otherwise, a
huge mistake could result.
These "watermelon
stripes" are
indistinguishable to an
observer at the under
drawing stage. Only you,
the artist, need know
what is represented in
the drawing at this stage.
Clothing and hair tend to have
more lines at this stage.The
under drawing primarily
serves the purpose of devising
the final image.
10 em
(approx. 3 7/8")
... ....
15 em
(approx. 5 7/8")
If you use a uniform paper
size to create not only aclose-
up of faces, but also
compositions showing full
figures, etc., before you realize
it, you will be able to produce
any sized composition.
15. The postcard illustration process This process is almost identical to that for a manga original copy.
G) Produce a rough layout sketch in pencil,
plotting the composition in general terms. Artists
often redo the sketch any number of times at this
stage, until they arrive at their desired image.
Drawing a postcard-sized frame on a slightly
larger piece of paper will makethis easy.
·i . -
:i New- f'o.r
~.--- ___... ..
@ Produce an under drawing based on the rough sketch.
I
@ Ink the lines and clean it up with an eraser.
Wishing you a
happy new year!
Stay healthy!
® Draw the background and spot blacks.
.:>::
</)
-=--·?"·:":~:-
@ Add white touches and attach the screen tone. Cut along the panel lines and presto! (Actual size)
If you are planning to mail your postcard, use permanent ink or
enclose it in an envelope and send it as agreetina card.
13
16. Sample Postcards
14 All of these were originally drawn postcard-size. If you photocopy any of these at 127%, then
you will see the thickness used for the original lines and the degree of screen tone detail.
17. Draw the rest of the body even when
depicting just the head.
-The recipe to becoming a good artist
l
Artists occasionally find they have become proficient at
faces but are lost when it comes to bodies. If you make it
a habit to draw the body along with the head,then when
you are forced to perform, you will be ready.
When drawing solely the
face or the upper body,
artists often forget about
the rest of the body. If you
take care to consider how
the entire body from the
neck down is posltloned
even when drawing just
the face or upper body,
your portrait drawings will
become that much better.
Common Pitfalls When Only What Is Visible Was Drawn
At first glance,
this seems
like a normal
illustration.
15
18. ( The Under Drawing Process )
Sticks may be used for the
arms and legs.
-)
<D Create arough layout sketch. Here, you will
lay out the target composition In general terms.
Play around with the pose or the hands' positions
unUI you are certain you have captured the
-~
l!
II
'
JI
I
<:::ti'
image in your mind.
(:i) Once the image Is
set,adjust tho overall
form based on the
layout sketch. Draw
the body in blocks:
the head, the arms
and legs, and the
torso. Use circles for
the joints and curved
contours suggestive
of U1e muscles'
volume for the
silhouette lines.
16
~
!.f
Here, ahead is rendered as a circle with
an Xused to determine the direction faced.
The torso is abbreviated at this stage (see
above). There are artists who,at the layout
sketch stage,will either use an oval for the
torso or break it down, using an inverted
triangle for the chest plus a lengthwise oval
for the hips.The joints ~re often rendered as
circles.
While a portion of the right arm is hidden behind the
chest, draw the arm imagining how the hidden part
appears, starting from the shoulder on downward.
;:'~_.......
,:~;sA· , /
..~~J._~ ·~ . ,1' ~.•
~·.~~~- ~~ ~l~
~ '! i ··~.
,_ ' ,. ~ O'X
( ' . ·( -~ : ,-_~
/'f~~~· ~·
li , .." rv-~
: I
,·~ ': ·.. )
. '
/
( ..
. ' >
·.
.~,---- -- - i- j
This figure shows the body laid out in
blocks. Once you have grown accustomed
to sketching, you will be able to start from
this point. The key is to use curved lines
for the hips and groin,the knees,
shoulders, and other joints, since they are
regions where body parts connect.
j~
@ Draw the body's contours.
Adjust the general positioning of
the knees and shoulders while you
draw in order to confirm their
correct placement. Sketch in any
props (here, a sword).
19. ~ Draw the face, hair,clothes,etc. You
may design the face and clothing as
yoo draw, or you may use something
yoo have already designed beforehand.
ith respect to the sword's central line,
e~.•artists will often add props after
king all human figures.
Can the under drawing be skipped?
Under drawing
This penned drawing was produced sans under
drawing. (I looked at the subject while drawing
in pen.) Line modulation and other aspects are
unbalanced.The shapes of the cheeks and eyes
are awkward.
The above shows a cleaned up
under drawing. There arc artists
who will render the penciled under
dmwlng to virtually the same lt~vel
as the Inked drawing.
(§) Here we see the completed under
drawing.Although to the observer it
may seem sketchy and Indistinct,
this Is not a problem, provided that
you, the artist, have a clear grasp of
the drawing during the Inking
process.
This penned drawing was based
on an under drawing.The inking
process went smoothly, and the
final image is a clean version of
the under drawing.
20. The Type of Pencil Depends on
the Composition•s Size.
Use H8 or 8 leads for small compositions.
At U1e rough sketch
stage, draw lightly and
avoid putting too much
pressure on the pencil.
For a mechanical pencil,
use a 0.5 mm lead.
As the image develops,
thicken silhouette and
contour lines.
Use 28 and 38 leads for large compositions.
Pencil holds the advantage of allowing you to draw on a large
format comfortably.
As the image develops,
thicken silhouette and
contour lines.The
advantage of a mechanical
pencil is that it draws
evenly distributed, fine
lines regardless of the
pressure applied. In
contrast, a regular pencil
enables you to modulate
the thickness and
darkness of your strokes
according to the pressure
you apply.Amechanical
pencil helps when drawing
detailed areas or small
compositions and a
regular pencil helps when
drawing large
compositions. Match your
drawing tools to your
needs.
Mechanical pencils struggle with long strokes, even with 0.5 or
0.7 mm points, making them unsuited to large formats.
18
Note:An 0.3 mm mechanical pencil is suited toward detailed drawing.When sketching,
avoid using too light atouch or the drawing will appear limp and lifeless.
21. feel free to use different pencils for different parts There is areason that so many strokes are used in
the under drawing.This is because it allows you to
select which strokes are the best when inking.
Therefore, there Is no need tor you to use single,
clean lines at the under drawing stage.
Sketching:0.5 mm, 8
or 28 lead
Use extremely light strokes.
(Using an HB lead with too
heavy strokes can leave
furrows in the paper.)
Hair:0.5 mm,
8 lead
Face: 0.3 mm,
8 lead
Clothing creayes and details,hatching
strokes, etc.: 0.5 mm, 28 lead
Use a soft Bor 2B lead for skin
and other soft areas.
Use a hard Hor Flead for rocks
and other hard objects.
Use a regular or mechanical pencil first when practicing special effects.
When practicing hatching, radiating lines (burst effect),
Of other such special effect often used in manga, start
with apencil rather than jumping in with a pen. Once
you become proficient at drawing with a pencil, you will
come to understand the tricks to drawing in pen.
I
A0.5,28 mechanical pencil was used
tor all of the above special effects.
19
22. (Pencils Used for Under Drawings)
Drafting pencils come
in a variety of leads
.·/
• Drafting pencils
HB 2B 4B 68
• Differences owing to lead hardness
Pencil
Mechanical pencil
BB
Pencil and eraser
Mechanical pencils
The lead holder is
adrafting tool that
uses a2 mm lead.
Lead holder pencil
sharpener
In general those who bear down on their pencils
should use hard leads (HB, etc.), while those with
soft touches should use softer leads (B, 2B, etc.).
• Mechanical pencil leads
2 mm lead holder lead
• Erasers
Rubber erasers Vinyl erasers
Vinyl erasers work well on typical mechanical pencils
and H8 lead pencils, while rubber erasers work well
on 48, 68 andother soft, dark leads.
If a vinyl eraser becomes soiled, be sureto wash and dry it
properly. The eraser may be cut into smaller pieces for use
with detailed areas.Avoid getting rubber erasers wet.
24. Faces:
Start with a Rough Sketch.
( The Head Is Oval )
In a frontal view,the eyes
are almost at the head's
center.
This line designates
where the eyes lie.
The human face is a
relatively flat curved
surface, upon which the
eyes and nose rest. Use
a downward curve
when the face is looking
down and an upward
curve when the face is
looking up.
Draw an oval and then an X.This constitutes
the face'smost basic layout.
This line, the center line,
connects the crown to the
chin in astraight line and
denotes in which direction
the head faces.
Simply drawing an Xacross an egg will let you know
how the face appears when facing various directions.
Start with an oval and then draw an X
across it. This forms the most basic
layout of the human face. Since these
lines are crucial and constitute
guidelines for drawing the eyes and nose
to ensure their positions are well
balanced, use astraightedge to draw
them until you become more proficient.
Using an egg with an X
drawn across it will
help you capture the
sense of aspecific
direction being faced
and asense of volume.
25. lbe head remains egg-shaped, whether facing frontward or sideways.
The Xshould arc in the direction the head faces.
~~~)
--1'Draw the center line to The nose is always just
connectthe base of the outside the vertical line.
nose with the chin.
There are four ways of determining the eyes' placement using the horizontal line.
Draw the eyes centered
along the horizontal line.
Use the horizontal line to
form the boundary of the
upper eyelids and draw
. the eyes below that line.
Use the horizontal line to
denote the boundary of the
lower eyelids and draw the
eyes above that line.
lines through the center
of the vertical line. The
eyes are then drawn
between the two.
23
26. Five Pointers in Drawing a Face
From the front,the eyes
1. The Facial Features lie apart about the
distance of an eye.
i
I
The facial features do not change in
height whether seen from the fror.tt
or side.
The ears attach just behind
center.
3. The Ears 4. The Neck
i
The neck is
2. The Shape of the Head
80
The mouth lies in
The human head appears to be
almost acircle whether viewed
from the front or side, so use a
circle for abstracted heads or for
sketching the basic layout.
farther than the forehead.
Good Not good
centered in the
front view.
The neck is just behind
center and angled in
the side view.
The ears lie
along the side
or the head.
Large (sticky-out) ears
o matter U1e size, the
ears' base are the same
length, and they attach
at the same spot.
5. Back of the Head (Side VIew) Good
The back of the
head is larger than
you might think,and
artists tend to forget
this when drawing
profiles.Take care
not to draw the head
overly compressed.
The neck vertebrae are not straight,
but attached at an angle.
Draw the back of the head about the
same width as the distance from the tip
of the nose to the base of the ears.
Not good
Here,the ba~k of the head has been
overly compressed. Despite the face
having been carefully drawn, the
poor·resulting balance ruins the head.
27. (Building up the Head)
frontal View
Plot the positions of the facial features and draw the face's silhouette line.
@ Sketch in the mouth
after you have
determined where the
nose will lie.
Sketch the hair.
At this point, all that you need to
determine is the eyes' position, so
just mark them down as circles.
CD Draw an Xthrough
an oval (or circle). Next,
sketch where the eyes
will lie.
~!r---'11-~P---Use the hairline's
side points to
determine the eyes'
height.
@ Mark down the ears and
hairline. Sketch in the ears after
you have determined where the
eyes and mouth will lie.
Sketch the facial features.
®The head's silhouette line
becomes finalized once all of the
other facial features have been
plotted.
Add the hair once you have determined the face's shape.
Fill in the eyes,
nose, mouth, and
eyebrows.
)
·J
/
25
28. Add the finishing touches-eye and ear details. Draw the hair.
Completed under drawing
The pupils end up as a
contrast between black and
white light reflections: they
should be drawn once the
majority of the face has been -'~liH~.:.Y~I.;.
completed.
•.
'
'-~
The eyelashes are afinely
detailed feature: draw them
carefully after everything else
~sfinished.
Start with the bangs, which · ,
are close to the eyes and ~-}
eyebrows. Rnish with the
7
( (
hair's silhouette line. ~ I
..
When rendering the hair in lines,
draw theway the hairflows in detail.
When rendering the hair in solid
black, detailed lines are not
necessary.
)
<D Start with half theface.
26
Left
'. -
(2) Flip ~e;·the paper, lay another l
sheet of paper on top, and trace.
All in the iris and pupil
after having matched up
@ Match up the two sheets of paper. the two sides.
29. Completed drawing
Hair in screen tone
Hair in a solid
black/screen tone combo
Hair in solid black
27
30. 3/4 View
Plot the basic layout and silhouette lines
and sketch in the bridge of the nose.
First, sketch the nose and half of the face (here,the left side).
Next, sketch the second half balancing it with the first. I
recommend that those of you who are left handed start with
the right side of the face.
Eye line
Nose or
mouth line
.....
Draw the 9eneral shape of the
head and an Xover that.
Decide first the proximate silhouette lines
of the face and head. Sketch in the
bridge of the nose, even if you do not
plan to include it in the final image.
Draw the right eye, the nose, and the mouth.
Sketch the right eye behind the nose.
Take care that the comer of the eye does
not interrupt the bridge of the nose.
Draw the lett eye and sketch in the hairline and the ear.
Sketched in
hairline
Sketched in ear
Take care to balance the left eye
with the previously drawn right eye.
Proportio~s·sli'flG'Id be easier to
balance if you determine the eye's
shape before drawing the eyebrow.
As with the frontal view, start with the
central features, gradually moving
outward.
28
31. Draw the ears and the hair.
Since the ear affects how the hair
flows, draw it relatively thoroughly
before drawing the hair.
Completed drawing
Start with the bangs,
side wisps, and any
other portion
actually touching the
face.
Add the finishing touches.
Next, draw the wide
tresses of hair to the right.
Hair in solid black/screen
tone combo
Draw the lar tress ol hair,
matching it with tile near side.
Lastly,add fine flow linesto finish.
29
32. Side View
Draw the silhouette lines.
Sketch the basic layout of the
head. Note thatthe neck's
angle and head's shape should
be different from when seen
from the front.
(
!I
t
Here,we see the basic layout of
the eye and nose. For side views,
it is especially Important to
establish the positions of not
only the eye but also of the
bottom of the nose (or the
mouth).
Draw the side silhouette of the
entire head, including the face.
Sketch the eye, eyebrow, ear, and hairline.
II
Layout for the eye
Draw the hair
Draw the ear. Sketch the general
layout of the hair.
While the eyelashes of the far
eye are in actuality virtually
hidden, they are included in
manga tor the effect.Take care
not to make them too long.
Use agentle curve for the
hairline.The hairline should
appear naturally to run from
the jaw to the ear.
Draw the bangs and side wisps. Draw the silhouette line and flowing
internal lines.
33. Add the fin.ishing touches.
I
:nwhair strands from the
(riJht) side. Add the iris,
and the nostril. Adjust the
apes of the lips, jaw, etc.
Hair in screen tone
Hair in solid black
31
34. (Making Practical Use of the Basic Layout)
Always use curved lines for the basic layout.
Lines used in the basic layout serve as guides for
positioning the eyes, nose, and mouth on an
ovoid solid; hence,these lines should be curved.
Good use of these guidelines will allow you to
draw a 3-dimensional face.
;--· -··- -~·.-..
(
. !I
·r 'J;
:~_/{. , ---- 1
The curved lines project a
sense of 3-dimensionallty.
Good
The basic layout makes any angle possible.
.
I i
---~-?'f', ,,. :·.' /
.... ; • f
·"...,..... _.
- ~....,...
Here is a face seen from a
somewhat high angle. Since the
top of the head is visible,draw the
vertical guideline first crossing the
front and then the top of the head.
The horizontal lines assume a
downward curve in angles where --.0~-
. . A
the top of the head IS VISible)., --r
Here we have aface looking
downward and seen in full
profile.The horlzontal lines ·
drawn almost completely rr/ •
straight create the feeling of . ' 11{~ .
atotal side view. Angling the(:i
verticall~ne results in a /.~~ -<
head facmg . · • "··
downward. .·• _
32
/
n~~··J
ff,;' I
Using flat lines results in
asomehow flattish face.
Not good
Here we see asomewhat
low angle.The horizontal
lines, which function as
puidelines for the eyes
and nose, take on an
upward curve.
Here ls aface seen from a.
downward looking,oblique
angle.The vertical line serves
to indicate where the face is /
directed as well as a·guideline
for ho~ much volume to give
the head.
·-~~
.
AI.
/.if/
f'
.... _
35. What happens when the basic layout is ignored.-The fundamentals of basic layouts
The vertical guideline is the key to drawing the head•s silhouette line.
Here, despite that the features are Using a gently curving line to connect
shifted to the side, the silhouette where the nose attaches to the face to
line suggests a normally angled the nose's bottom reveals that the chin
face. needs to be shifted more to the left.
Here, despite that the features are
shifted to the right, the silhouette
line suggests the head is facing left.
Face drawn with guidelines
Face drawn without guidelines
Good
Not good
The eyes are not
aligned and the
nose and mouth
are shifted off
center.
33
36. Distinguish between long and round faces.
Basic layout of a long face
The eyes are located in the
center of the face and the
mouth somewhere between
the eyes and the chin.
Guideline for eyes
Guideline for mouth
Basic layout of a round face
Guidelinefor eyes
Guideline for mouth
34
Modifying distances between facial features allows
you easily to create different character types.
Distance divided into
three equal parts
37. frame the composition neatly. A sheet of paper has physical limits. Keeping the composition's dimensions
Basic layout for
head alone
The hair has not been
included in the basic
layout.
The eyes are located
north of center.
Basic layout
• uding the hair
The eyes are
centered on
the face.
in mind should help you successfully frame it. Plot the head's basic layout
maintaining consideration for the final size.
Here we see a basic
layout without
consideration shown to
the hair's volume.
The head's outline is
also the hairline.
---
Hairline
---
............
_;
---
This basic layout reflects
the hair's volume.
Try using a basic layout
when drawing within a
postcard frame.
The face is large
and has impact,
but the hair Is cut
LL...c......t!=--~[....._-.LL.._ _ _ ___..:~ out of the frame.
The hair fits
within the
composition's
l!......l~c.l....l....--------__...J frame.
35
38. Make the different characters• ages distinct.
Childlike or chibi characters
Standard or shojo (girl) characters
Realistic or adult characters
36
The eyes are located just
south of center (tomake
the head appear larger).
The hair constitutes 1/3
of thetotal head.
Thehair constitutes 1/4
of the total head.
39. wing a Face from a Snapshot
CD Draw an Xacross an oval to establish
the direction faced.
CV Roughly sketch the shoulders and hand.
® Add the hairlineand space allotted for
the hair. ® Sketch in the
eyes, nose, and
mouth.
~------------~~~------------~
@-A Realistic Style
Use dark lines for the eyes' contours and
draw the bridge of the nose faithfully.
@-B Manga Style
The eyes and nose are abstracted.
37
40. Designing Faces
From Profile
Views
There are occasions where the
profile and frontal view of the face
will seem to be from 2 different
characters. Here, we look at
composing afront view from a
target profile.
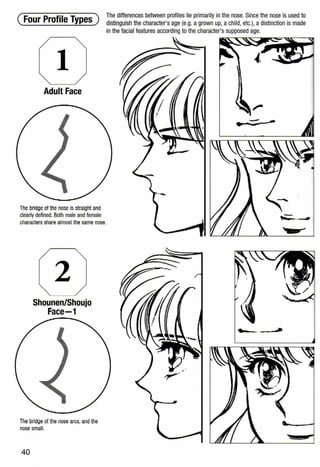
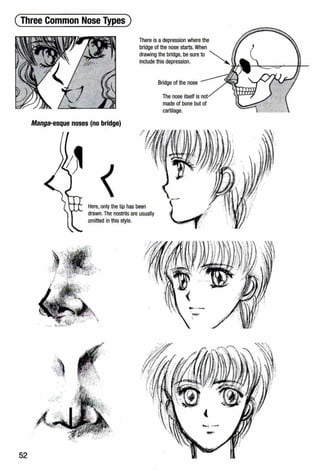
Take careful note of how much the nose projects from
the face in both the profile and frontal views.
Noses should be consistently prominent
from both thefront and profile.
Regardless of whether the
hairstyle and eyes are the
same, with a button nose
this becomes adifferent
character.
Facial feature placement
Cutie with a button nose
If a character with abutton
nose is given adefined nose
in the profile view, then she
becomes a different
character.
Artists often find when they draw lines through the two views that the
faces do not match up.Try this once for the sake of taking control over
your own style.
Top of the hair- - -- - - - - ===-"":::?--=::=-:: - - - - - ---------::::::;;;;=-=;;;;;;;;;::::::-- - -- -
~-y~ _,..-- ~~Crown -----~""-----~,..--~-==--~------------:;,.L------,==--"'"<-----
(;/·/- ~-,~ L/~/-~--~~
Bangs--------,~'----,.....,.,... ----:---.--:-.....---,-~t--''t-------.f~'-;f--rr----n----:---.--........,.---""'----'--
.·lf/l 1/ 1/1 ~ ~ ~ l ,,r // I
Eyebrow arch u/.ri 1/ ( ~ ,· ,l ~ I
Top of eye folds ...__,-::::==f1}-qr,~~i-."!~~~~~S~ft==~~~-~~ft(;!;1f/J(pr1~=f~~Start of nose ' - ·
1
(Startoreyes) '/ /~:·~ -4.'1'~- J'¥~( - -..._ll ~ -'..i/.}/jjj , / 1
Bottom of eyes !' - .X~L ...J!!:l_ t:- ,., '"r,-...' I ,
Tip or nose I',c' I A ) / n'] I
Bottom of enrs ' I l 1 ) 1
[Jottorn or nose=~~!· ~~~~ljla.:.~~§~g' -~~~~ ~~~~~;{~~u~~g'-...~~~§~~~~(m<-./·.(~l@$1t1~Upper lip
Mouth 1 ,I II i I 1 / II /
Lower lip ~~~ ""- /liP.VJ)}JiJ --~ /)} / l j}Jij
Chin
-~ - l
Base of neck- - - - --/-,4--/____t-..~.,---"----------/-f---------------'O
41. G) Adult Faces Design the nose, eyes, and mouth to have "adult" attributes. Use almond-shaped eyes with
small, black pupils and irises,straight noses, and smallish mouths to suggest a mature face.
Nostrils may be included.
~ Shounen {Boy) and
Shoujo Faces-1
® Shounen and Shoujo
Faces-2
@ Child Faces
Drawing the bridge of the nose as ashort, straight line and making the chin pointed creates a
harder-looking character.Thickening the eyebrows and adjusting the hairstyle results in a boy
character.Enlarging the irises and giving the eyes a moderate downward slant produces atomboy.
ChildJen's faces do not protrude much, so keep the features relatively flat. Here, we have
atiny button nose and no prominent bridge.The eyes occupy about 1/2of the face.
42. ( Four Profile Types )
1
Adult Face
The bridge of the nose Is straight and
clearly defined. Both male and female
characters share almost the same nose.
2
Shounen/Shoujo
Face-1
The bridge of the nose arcs,and the
nose small.
40
The differences between profiles lie primarily in the nose. Since the nose is used to
distinguish the character's age (e.g. a grown up, a child, etc.), a distinction is made
in the facial features according to the character's supposed age.
-~
43. 3
Shounen/Shoujo
Face-2
The nose has virtually no bridge and is
small and angular, comprising primarily
straight lines. On afemale character,
· would be atomboy's face.
4
Child Face
The nose has no bridge to speak of
and is round-a tiny, button nose.
··---.._...,....-.
41
44. Facial Features
{Eyes, Mouth, Nose, Ears, and Eyebrows)
(The Basics of the Eyes)
Inside corner
J:.·
. w-.:-~.
'---------',________,_, /:;_..
Including this wrinkle is ~~~~;:)
The most favored eye shape is
almond.
guaranteed to age any
character.
. CD Draw the upper eyelid.
fold
==---Light
reflection
In manga and anime,
the corner of the eye
Iris is often rendered
unconnected.
In manga,the lower eyelid
is usually rendered with a
single line.
@ Draw the lower eyelid. @ Draw acircle for the iris,
and presto! An eye!
Assorted Shapes ...~....
.......~····· ··· ~ ············· , ·····················, ·········································································
r 'f ~
t~.t.......................~....................., ;.......~ ~
Leaving both corners
unconnected results In a
more manga-esque eye.
Modifying the distances and
curves of the upper and
lower eyelids produces a
multitude of eye shapes.
Eye with the upper eyelid
accentuated
Eyelids
The eye is the most important facial feature
when drawing a character. Gives the character
a sense of presence and projects an impression
of his or her personality. In manga,the eye can
be considered the most difficult as well as the
most crucial feature.
42
Here, asingle line was
used for the eyelid.
Here, multiple, sketchy
strokes were used.
45. The Basics in Iris Size
··~
:.ere,the iris and the lower
eyelid are touching. This is
suited to children and
.mocent characters.
is eye features a squarish iris
andis sans eyelashes. Contour
s are straight.
This eye sports an enormous
pupil, an oddly shaped iris, and
loogeyelashes.
This basic, smallish iris has been
drawn without light reflections.
The eyelid's contour lines have
been rendered simply, producing
a realistic effect.
Creating Anime-esque Eyes
.-
This is the standard iris size.
The iris occupies half or
more of the total height.
' _.....-..... .- ·-
Here, the iris is small, only
occupying less than half of
the total height. This is
suited to adults and villains.
Here, the upper eyelid is thick, and
a large light reflection occupies
the pupilless eye.
Here, the entire iris has been
rendered using sketchy strokes.
Shading also defines spots of
reflected light.
Here is asquinted eye, where the
corners have been emphasized.
Extra thick strokes were used for
the iris's outline, and cross-
hatching was used for the inside.
This tall iris features compound
light reflections.
,,.
: ,"'-;~: ~· · h" . • .
Here, radiating strokes were used
to render the iris and delicate
hatching, the lower eyelid.
The lower eyelid was omitted on
this eye. Instead, only light
reflections were added to the iris.
CD Use clear, solid lines for
contour lines, outlines, and the
eyelashes.
® All in the contour lines and
outlines with ink.
43
46. ( Masculine Eyes )
Frontal View
Characteristics of masculine eyes
___.,.. ..
Plain iris
Minimal
eyelashes
Relatively straight
contour lines
Drawing Steps -----------------------------
.. ...r'"
(1) Start with the contour lines, using
relatively straight strokes.
® Sketch an outline of the iris.
~<.:r-~·::.-:, ~- ...,..,..
(3) Draw the upper eyelid and the fold line. ® Draw the lower eyelid and the
main light reflection.
@ Add an extra light reflection.
~ ~Doootda~enany
~ lines falling inside of
., ~- light reflections.
@ Draw the pupil and eyelashes.
The lower eyelid determines the eye•s shape,
so take care in rendering them.
r;,;jjji- - - -
·o·- _..,.,Not good
44
Mismatched eyelids
([) Finished!
-~ ~./77 ua&. .·' ,
·''""t . / Good
When designing the lower eyelid,try drawing
adotted line and connecting it with the upper.
47. Side View
'l! steps to drawing are almost
- same as with frontal views.
1 Draw the contour lines.
"4 Add light reflections and the
oopil to finish. If you draw two light
·eflections in the front view, be sure
also include them inthe side
view.
Gazing Downward
@ The basic layout-the eyelid is
lowered, so draw the exposed area of
the iris as if more covered than usual.
Take care with the lris•s size.
Not good
:.::..:cz::::.:~:UGood
The iris and lower eyelid are not
touching.
····n··············~·-·············Good
........ ......................
The iris and lower eyelid are
touching.
-~·····r:i>·····-···-·····
___)__ ..
····- ··········· ·············
Here, the irises in the lront
and side views are different
sizes.
@ Draw the upper eyelid and
fold. Sketch in the iris.
® Draw the iris and the
lower eyelid.
@ Here we see an under
drawing that is pretty close to
how the inked drawing will
appear.
When the character is looking downward,
the upper eyelid should swell in a downward
direction, so take extra care when drawing.
r •
•
@The completed under
drawing-light reflects off the iris
and should be included even if
the iris is more abbreviated than
usual.
Here, the iris is covered to the
extent that light just barely
reflects off the eye.
--
45
48. ( Feminine Eyes )
Frontal View
_ ,~.....
~·'..
_.'{ _/ _( : )_-.'
... , . -~ '·.·t.'}·,>
'•-..~:::~~~y~~- -~·' '
( ( I ..':.:'".. ~ ' (,
, . ·. I
. ,. ' .- t, I .
·._ : . . .
i ·.·~ · '7,· •
Characteristics of Feminine Eyes
Volume is given to the
upper and lower lids.
Draw well-defined
eyelashes.
The iris is large.
Contour lines are
rounded.
Drawing Steps ----------------------------
CD Sketch the basic layout. Use
larger, plumper eyebrows and iris
than you would for a masculineeye.
(4) Make the iris larger than you
would for a masculine eye.The light
reflections should likewise be larger.
@ Use small, delicate strokes
to build up the eyelid and iris.
@ Add the eyelashes to finish.
@ Stress light and shadow by
darkening the center of the
eyelid contour, while lightening
the corners.
Do not draw the eyelashes
individually but in clusters.This will
produce amore pleasing image.
Side Views and Gazing Upward
. ·X
'f.••Y!:--. '
.'f / J.,.·.
rJ.
-:~;.:
',l ...
. . '
.. :
...
..'~:- C. ·.r !
( I . · .. <.
'•..': ...)· ·., .
46
) ,/ ""
Follow the same drawing steps:
basic layout -+ contours and outlines -+ the iris and pupil
-+ reflected light -+ the eyelashes
49. ( Rendering the Eyes and Movement)
Methods of Rendering Distinct to the Iris
Eye1
;r D 1)- =<-~ ,___..,. ..,__,_____ .
Adding delicate
hatching to the
corner of the upper
eye produces n
glistening, moist
effect.<D The basic layout (g) Contours and outlines @ Light reflections
ewe see common light reflections
am reflections of the surrounding
·ronment rendered as triangles
other geometric shapes.
--~~For the triangular
reflections, use ~
curved lines that ~~
follow the iris's
rounded surface. @Add triangular reflections.
~ -- _ _..-------...::-
. _ You may add more
eyelashes than
shown here.
@ Draw the Iris to finish.
Do not definethe
outline of the Iris
and light reflection
too strongly, but
simply sketch them
lightly.
<D Basic layout (g) Outlines and contour lines
delicate, sketchy strokes in
;IE!Il for the entire interior of the
ris.The key is to sketch roughly
any light reflections.
Here is a rather realistic drawing.
Radiating strokes were used for
lhe iris and eyelids.
Make sure the --~~~.
reflection's
surrounding area
is solidly filled in,
using strokes that
build outward.
@ Build up the hatching
from the eyelid.
@ Fill In with delicate
strokes, leaving light
reflection white.
Draw the light
reflections' outlines
using bolder lines
than you used for
the pupil's.~
<D Basic layout (g) Outlines and contours
Feel free to add
extra lines
radiating from
the iris's center.
@ Draw the iris and the pupil. @ Completed drawing
47
50. Using Light Reflections to Reinforce the
Direction of the Gaze
Side reflections
Adding a small reflection
opposite a large reflection
suggests 2opposing light
sources (a small and
large).
Add a light reflection just right
or left of or diagonally above or
below center.
The character is gazing off to the left
(from the viewer's perspective).
~~~
~-*1 ..Alight reflection is drawn in the opposite
direction of the character's gaze (the
right side).
Central reflections
48
This is alight reflection drawn
in almost the center of the
iris.
The gaze is directed left.
Draw a large light reflection on the
same side as the gaze is directed
(i.e. to the left).
Reflections of light on the eyes indicate the
direction of the character's gaze. There are
2 basic types:those located centrally on the
iris and those to the right or left.
~- . ·.<· ·..i- ..
Here,the character is gazing at the viewer (i.e. to the
right). The light reflection in the upper left of the iris
creates this effect.
51. Iris Movement in Upward Slanting and Drooping Eyes
Gaze shifted to the right
Here, circular light reflections are used. While each
individual eye appears natural, gaze directions do not
match up.
Adding large,circular light reflections
results in a mismatched gaze.
Standard eyes
49
52. Mouths as a line
In a realistic drawing,
the upper lip protrudes
more than the lower.
This mouth was rendered using asingle
line plus ashadow formed underneath
the lower lip. The key feature of this
style, which Is the most popular mode for
shonen manga, is that the lips have not
been defined.Modifying the way the
shadow under the lip is rendered will
change the mouth's look.
Mouth with lower lip contours
Rather than opting for amonotonous
single line for the whole mouth, here this
line becomes an abbreviation of the
upper lip. Ag~ntle curve is then used to
suggest the plumpness of the lower lip.
This is not arealistic drawing employing
meticulous detail.
50
The corners are the most
important aspect of amouth.
Raising or lowering the comers
suggests the character's
personality or emotional state,
establishing the viewer's
impression.
Here, lip contour lines
were omitted.
Dimple
The junction where the upper
and lower lips meet is
rendered as 1 line and
constitutes the "mouth."
In manga, the bottom lip's lower
contour is the most frequently
manipulated feature for making
the mouth expressive.
Using arealistic style fer
the profile would make
the character seem a
different person, so use
your ingenuity to avoid
connecting lines.
In the profile, since
the lower lip must
be clearly defined,
clearly delineate the
upper lip as well.
53. Fleshy, voluminous mouths
Here, we see a realistic depiction,
emphasizing the lips' volume. The dimple
above the Cupid's bow is suggested with
aline.
Lips in lipstick
Clearly delineate the upper and lower lips'
contours.Since the composition is flat
and all parts clearly visible, modulate
lines and shapes used for the mouth's
comers, the center, and the shadow for
the lower lip.
The mouth style indicates
age in female characters.
Single line:
young girl of
about 10 yrs.
The dimple
above the upper
lip Is suggested
using ashort,
downward curve.
Clearly defining the
lips' contours allows
you to emphasize that
the lower lip Is
plumper than the
upper.
.._~.•. ;f.·
When drawing a profile,
keep U1e lower lip line
starting from U1e comer
of the mouth short,
cutting It off.
lipstick: ayoung
professional of
about 25 yrs.
51
54. (Three Common Nose Types)
52
Manga-esque noses (no bridge)
There is a depression where the
bridge of the nose starts.When
drawing the bridge, be sure to ""-
include this depression. ~
Bridge of the nose
The nose itself is
madeof bone but of
cartilage.
Here, only the tip has been
drawn. The nostrils are usually
omitted in this style.
55. .,
Realistic noses
Use contour lines that are
relatively faithful to an actual
nose.
Omit the fleshy part of the
nostril and this wrinkle.
This line indicates
where the nose begins
to swell.
-----
53
56. Somewhere between a manga and realism (intermediate style)
The bridge of the nose is
defined using a contour lines
54 not found on a real nose.
The bridge of the nose is drawn
from where the cartilage starts.
Nostrils are usually omitted.
.l
57. Sample realistic (aquiline) noses
.. ....... .~· .. .· -.::.~
·)
Assorted Styles
Realism Manga-style Nose
Again, the contour
lines are clearly
delineated.The nostril
faces downward.
Darken the nose's
lower surface and
indicate to what extent
the nose protrudes.
Nose Rendered in Shading
This nose is
rendered entirely
f---------with shading.
55
58. (Two Common Ear Types)
56
Base of the
auricle
The manga ear (the "6" ear) and
the realistic ear (the wave ear)
Earlobe
The ear from afrontal
view is about 1/2 as
wide as when seen
from the side.
This line forms the base
of the ear's design.
These lines indicate
the angle of the ear
and the thickness of
the helix (fold).
Realistic ear
Mangaear
Backside of
the concha
Earlobe
59. Mangaear
As with the realistic ear,
the manga ear in afrontal
view is about half the width
---- as in profile.Use atallish,
6-shaped whorl for the
interior.
At an angle, the ear forms an
oval. The curve of the auricle
follows the jaw line.
Points of Consideration When Drawing the Ear
The ear appears to follow the side of the face.
Nose
The manga ear consists of a "6" drawn
within an oval. Take note that for the
opposite ear, the image becomes
reversed.
When the contents of
the auricle are clearly
visible from afrontal
view, it means the ears
are sticking out. When
designing the ears,
study how they look
from above and other
angles.
Earlobes
Overhead view
Ea~_(_
~tgood
When drawing
simplified ears, take
care not to forget the
earlobe, or your ears
may not look like ears.
57
60. (The Eyebrows as an Extension of the Bridge of the Nose) The eyebr~w follows
the brow ndge.
eyebrows
Upper eyelid
~~ --~---·=~=~:-.-... / ,
· ~-
~ ···
~~>. '", .,,L
.. .~- . ~
Lower eyelid
The eyebrow follows
the brow ridge.
Eyebrows come in
various shapes and
thicknesses.
Usa the same distance eyebrow to forehead
distance in the front view as in the profile.
The eyebrow begins
close to the glabella.
58
The distance from the face's
center line to where the
eyebrow starts is short.
- ~
--....~
'
bridge of the nose.
Here, the expanse
between the forehead and
the glabella is broad.
Keep in mind where
the bridge of the nose
would be even when
omitting it from the
character.
The distance from the
face's center line to where
the eyebrow starts is long.
61. Distances between the eye and eyebrow
Long
Four common eyebrows
Thick eyebrows
This almost perfectly straight
eyebrow is commonly used on
manly characters.
Combination
thick/thin eyebrows
This eyebrow tapers near the
glabella but thickens as it
approaches the comer of the eye.
Average
Draw eyebrows on characters with long bangs
if the forehead is visible.
Good
Here,athin eyebrow is drawn
between hair strands.While the
eyebrow was added in after the hair,
it still supplies plenty of expression.
Here,the eye and
eyebrow almost touch.
Thin eyebrows
Different combinations of
distances between the eye
and eyebrow,and then the
shape and thickness of U1e
eyebrow yield a limitless
number of possible faces.
~ ~!"~ .
w ~ · ~ ·This gracefully arc.ing eyebrow . ~
mimics the line popular amongst
women who use eye pencil. Yet, this =::-
line is not limited to women and is
occasionally used on male
characters.
Arched eyebrows
Not good
Without any eyebrows,the mouth
and eyes do provide acertain degree
of expression, but the image still
seems lacking. 59
62. ( Drawing Hair )
CD Draw the face's basic layout.
If you draw the face taking up all of
the paper, then you may run out of
room for the hair, so be sure to
anticipate how the hair will lie.
® Build up the target hairstyle
while maintaining awareness
of U1e hairline. Lines for main body'..
Common Pitfalls:
Flat Faces and Scooped-out Heads
of hair and bangs all
originate at the crown
whorl In the back of
the head.
Hair layout
The hairline should
have been drawn here
and not the hair
layout.
The crown whorl was drawn
toward the inside, making it
seem like the hair was
growing from inside the head.
Thecrown whorl
actually lies toward
the back of the head.
® Draw in the hair to finish.
63. How the hair grows:
The crown whorl is located at the back of the head.
The hair originates from the crown
whorl. Drawingthehair flowingfrom
somewhere In the back of thehead
creates the look of 3-dimensional,
voluminous hair.~
The hairline is drawn
above the head contour.
Maintaining awareness of the crown whorl when
drawing the hairline will enable you to produce a head
that is round and has volume-even with short hair.
Draw the hair radiating
out from the crown whorl.
Draw the hair using arced
strokes following the head's
curved surface.
Keeping the Crown Whorl to the Back
Moving the crown whorl to the
front may cause the head to
lose its sense of volume.
Here, the head contour and
hair layout have been
handled the same as in the
figures above.
Positioning the crown whorl at the
very top or toward the front of the
head will cause the curved strokes
used for the front hair to shorten,
while those for the back to become
longer, flattening the head.
Positioning the crown whorl at the
back of the head means that long,
curved strokes must be used for the
hair In the front, allowing you to
suggest the head's curved surface.
Positioning the crown whorl toward the front will
cause your character to have dWeeby hair. Despite
that the crown whorl will not be visible from the
front,still draw the hair as If growing from
somewhere Inthe back.
Not good
~
Positioning the crown
whorl at the back of
the head will,at the
very least, giVe the
hair visually
consistent roots.
Positioning the crown
whorl at the very top or
toward the front ofthe
head will make the roots
Q.e.how the hair grows)
appear awkward.
61
64. ( Maintaining Awareness of the Direction of the Crown Whorl )
The more open the whorl, the
gentler the curves.Use S-
shaped, undulating strokes.
Swirling hair
From the front view, the
62 hair swirls to the right.
The crown whorl may swirl to the right or left.Think about how to direct
the swirl when drawing the crown whorl in the back of the head and
when designing the hairstyle.
Swirling to the left Swirli!lg to the right
Here, the whorl'scenter flows
to the right. The hair flows in
the opposite direction on the
left side.
From the back view, the
·hair swirls to the left.
This whorl, located at the back
of the head, flows to the right.
65. Swirling hair with realism
Single-length hair
Draw single-length hair as if
flowing in 3 directions.
Where the
hair is
parted
When sketching the hair layout,
assume that the crown whorl
will be positioned in the back.
These
strands fall
toward the
viewer.
Hair to the back and
opposite side flow in
the reverse direction.
When drawing the back of the
head, first draw the head's
contour and the ears, using these
as guidelines for determining the
hair's volume and flow.
Here, the hair falls
straight downward.
63
66. Hair grows like grass.
Hair grows in a radiating
pattern from the root.
Think of the crown whorl
as basically the hair's
root and Individual
strands as grass blades.
Ahead will increase in size according to the
volume of the hair drawn.This is because hair
actually grows from the scalp outward,covering
the head's contours.
The amount of volume created by the hair
depends on its stiffness and weight. The
more strands and stiffer the hair, the more
voluminous it becomes.The fewer the
strands and softer the hair, the more the hair
appears plastered to the head.
Grass always grows
upward and then falls
over from its own weight.
Think of hair as enveloping
the head's contours,forming
a "layer of hair."
Good
When consideration is not given
to the hair's volume
Not good
64
Here, the hair layout has been
drawn against the head's
contour.
The resulting head appears flat
and distorted. Not apleasing sight.
Here,the hair was drawn with the part to the
top left (character's perspective). While the
identical face was used on both figures, this
head has been given extra volume.
67. Hair with 2 parts:
Primarily for hairstyles with bangs
Creating 2 Parts
Drawing hair from the back
Drawing hair falling along
the sketched hair layout
gives the hair volume.
Back part for hair
flowing to the sides and
along the head's
contours
Front part Back part
The bangs radiate from the front part.
The sides fall in gentle,almost parallel
curves.The back part is located at the
crest of the head.
Give the hair overall volume matching
it to that of the bangs.
Draw the hair growing from
the part and then falling
straight down.
65
68. ( Profiles and Hair Movement )
Shoulder-length with bangs
The lock in front of the ear
forms anS-curve when looking
up.
To start, drawjust the general shape of the hair
and fill in the details last. Increasethe level of
detail, using more strokes as you approach the
66 ends of the hair.
When looking down,
the ear becomes the
point of reference for
movement in the
hair.
Draw the crown
whorl as aslight
indent.
The ear's helix forms ·-~~
the beginning of the
flow of the hair in the
back.
Having the front tress
of hair divide at the
ear's center. This will
give the flow a
natural feel.
Note that normally when the
head is tilted up, this lock will
not lift like this.
Crown whorl
Draw the hair
parting inagentle
curve,flowing from
the crown whorl.
69. -
'
Bending back reveals the forehead, which is
usually concealed by the bangs with this
hairstyle.
Merely concealing or exposing the forehead
results in an entirely different look.
Bending back causes the hair to flip back, potentially
making the character look like another person. In
manga,albeit unrealistic,the bangs are occasionally
drawn lying on the forehead to rectify this.
Here, the original hairstyle was emphasized.
The ends of the hair fan out, offering
variation on the look.TI1e forehead is
concealed.
67
70. Short hair without bangs
Draw the hair roundish
overall and tucking under
the chin.
In the profile, the hair
should have little volume
and hug closely to the
head's contours.
With the hair flipped back, the
hair should appear to flow
from this point.
t"
/. .
(
II ./ --
Tiling the head back exposes
the ear.This strand is defying
gravity.
~/
Looking down causes
the hair to divide at the
ear's helix.
68
v
Unlike with the head tilted
back, here the ends of the
hair all face the same
direction.
.
Tilting the head back makes
the hairline prominent.
I
The ear peeks through,
indicating supple hair.
-..+tt<r--You may keep the ear
concealed, depending
on your preferences or
intentions with portrayal.
71. Big, curly hair
The tight curls in the
bangs maintain their
positions even with the
head tilted back.
For hair long enough to cover the back,
draw the area concealed first and then
the hair over that.
The bangs are
parted down the
middle. Show abit
of the bangs on the
far side even in the
profile view.
! The thick hair tapers
in aconical shape.
In the case of big
hair, use dramatic
curves to render
/thecrown whorl.
69
72. The ear is rarely exposed with this type of
hair. However, since it is the key factor in
determining the flow of the hair, make
sure you include it.
The falls from the neck
.--down the back,
following its contour.
The hair flowsfrom the hairline
at the base of the neck.
~--
Thehair does not fan out over
the head much.
70
Adeep bow causes the
hair to cover the
majority of the face, but
with the nose and chin
visible.
Draw the hair fanning out
d_ramatically across the face.
Here, we catch aglimpse of the eyes
and mouth, normally hidden by hair.
Draw the eyes and mouth and erase
the hair where necessary.
This is a realistic depiction, where
the hair obscures the eyes and
mouth, hiding her facial expression.
73. Kinky bob cut
The hair fans out like a conical cap.
The individual hairs are fine
but stiff, so the shape is
retained in profile. Unlike the
other styles, this hairdo pretty
much maintains its shape
whether looking up or down.
When composing from a
moderately low angle, draw the
volume of the ends of hair.
Direction of the hair growing
The hair's kinkiness gives It an
unexpected amount of volume
in a bob cut. Draw the distance
from the center of the ear to
the front of the bangs the
same as that from the ear to
the very back end of the hair.
The end of the hair forms almost aperfectly
straight line with the chin.
In the back view, bring the hair
to alength that allows view of
the hairline. 71
74. The pompadour
The hair is held in place
with grease or gel and
does not lose its form.
Slicked back hair
Since the emphasis lies on
keeping the hair slick
against the skull,the artist
must make sure the head
drawn properly.
The bangs tend to fall as
time passes and may be
suggesting by drawing
several strands falling
down in front.
72
'j;
The hairline is exposed,
owing to the flipped back,
front.
The front pouf is
combed back.
The temple is
shaved into a
wedge-shape.
I
Since the hair is slicked
entirely back, there is no need
to draw the crown whorl.
When switching the
direction faced, maintain
awareness of the hairline
and take care that the
forehead's expanse does
not change.
k3 with the pompadour,
grease is used with this
hairstyle, so it rarely loses
its form.
76. (Key Points in Drawing the Figure)
Legs occupy half the total height.----- For the figure•s basic layout, - - - - - - •
start with a sewing pin.
Making the legs half the
total height will give the
character an attractive
appearance.
74
' This is the halfway mark.
Shifting this just above
the groin will result In a
moderately leggy
character.
0
CD Draw astraight
line ending in a
circle.
@ Draw aline at ® Draw the
the top of the head halfway mark.This
and at the feet to will determine the
determine the figure's upper and
height. lower halves.
Tricks to plotting the head•s layout - - - - •
when drawing the figure
Legs
Draw a line
indicating the
hairline.
@ Draw the joints: use
circles for the shoulders,
the elbows, and knees.
·- There are rules for
plotting the elbows and
knees: the elbows lie
halfway along the arms,
while the knees lie
halfway along the legs.
Hair
Hairline
Face
Draw an X
through the
face.
77. (The Basic Proportions)
---(--·------~he neck is at
.__ an angle.
The distances from
Position the
elbows about
waist level.
Ahand hanging ···
down should
come to about
groin level.
_______ -----------------~c:.- Ankle
The elbows and knees are plotted the same,
regardless of the rendering style or character
Regardless of the head's size, the
shoulders' breadth, the hips'
position·.the feet's size, etc., the
elbows and knees are still plotted
in the same positions.
Shifting the groin up
results in asomewhat
long-legged character.
(-)
(-...-~l- The hand is
{ J almost the same
~"r·· (_)size as the face.
The knee is bent,
putting the leg at
a wide V-shape. The hand is smaller
( ) than the head.
------- --------~ ')_______
( __ _) _
Shifting the groin down
results in ashort-legged
character.
The foot is the
same length as
-"""""to-~o_...,the head.
t
~·...··~t-
y
>
Here, the legs are
located about midway
along the body. 75
78. ~he Process for Drawing the Figure)
(Drawing from a Frontal, Standing Position)
)
__
CD The pose layout is
abasic stick figure.
® Sketch abasic
layout of the figure
fleshed out.
Shoulder
The elbow is about
waist-level and located
midway between the
shoulder and wrist.
Wrist
C2> Mark the joints with
circles. Sketch in the feet
at this stage as well.
Use circles, squares, and
other simple geometric
shapes to begin fleshing
out the figure.
For a male
character's pelvis,
use arectangle.
® Cleaned-up version of the
basic figure layout
Circles and curved lines are used for
the joints, because the arms and body
are basically cylinders.You will find it
easier to attain asense of volume
using curved lines than with straight.
76
Render the
neck as ajoint,
marking it with
acircle.
79. @ Define the chest muscles and joints,
giving the figure clear 3-dimensionality.
The above is abasic nude sketch.
I
~~
' j
I
(/)A cleaned up line drawing
@ Dress the nude figure in clothing.
Clothing does not come plastered to
the body, so draw the clothing outside
the body, leaving some space.
Creases form where hills and
valleys appear on the body.
Put to use here the basic
nude sketch you drew earlier.
® Rnished!
77
80. The Female Form
')
f -i
1
1'
, I
i
)
I
I
I
""'<D Draw the basic stick figure, posing
the figure and plotting the joints the
same asyou would with amale figure.
@ Basic layout of
the figure fleshed
out
Use an oval to render the
pelvis of afemale
character.
Add creases at the
Lines you used
to lay out the
groin may also
be used without
modification as
a girdle.
Usethe waistline as
a referencefor
positioning the belt
and determining its
78
@ Dress the nude figure in clothing.
v ~
'
~/ '_/
Sketch inthe
waistline as a
downward curve.
.~$
@ Cleaned-up version of
the basic figure layout
@·Draw in the clothing's details. ® Finished!
81. (Drawing Side Views)
@ Layout of the figure
fleshed out
.~
+When planning on
·'T dressing the feet
in shoes, draw the
foot at an angle,
anticipating where
the heel will go.
_L_
<D Pose Layout
-~
~)
~ Shoulder
.1(J' · Elbow (drawn
at waist level)
Above the groin
Knee
~'
® Layout with joints
@ Use contour lines to
give the figure volume.
@ Dress the nude figure
in clothing.
Usecreases running toward the
underarm and from the waist to
suggest afit figure underneath
the clothing.
The posterior
should have less
depth than the
chest.
® Cleaned-up version
of the basic figure layout
(f) Finished!
79
82. The Female Form
CD The basic stick
figure is drawn the
same as with a male
figure.
Side view
Skewed side view
80
@ Basic layout of the
figure fleshed out
® Dress the nude figure
in clothing. The skewed
side view has a slightly
more "fashion magazine"
type feel and is more
flattering to the chest.
The posterior should
have more depth than
the chest.
® Cleaned-up
version of the basic
figure layout
@ Draw In the
clothing's details.
Side view Skewed side view
® Anished!
83. (Back View) @ Layout of the
figure fleshed out
CD Posed stick figure
and layout with joints
Make the shoulder
breadth wider than the
hips. Using atrapezoidal
shape will give the back
a masculine feel.
, I
I
® Use contour
lines to give the
figure volume.
The shoulder blades
become a key point in
drawing clothing creases.
@Add clothing.
Clothing rumples around major joints
other than the wrists and ankles.
Imagining the creases forming in a
"coiling" pattern when drawing them
will give the muscles volume.
I
'1 )
· j·
I
'
.·...L- _;.
@ Cleaned-up version
of the basic figure layout
--4·.....";/
I
I
!''·.
® Rnished!
81
84. The Female Form
CDThe basic stick figure is drawn the same
as with a male figure.
--.
@ Nudesketch
82
Sketch in the hair
layout from the
start.
@ Add clothing. Be
sureto draw the
collar, even though
it will ultimately be
hidden by the hair.
Drawing the waist
narrower than the
shoulders and hips will
create that feminine
hourglass form.
® Basic layout of the figure fleshed out
.- ...
® Cleaned-up
version of the basic
figure layout
The trick to drawing afemale figure
is to make the waist the same width
as the head and the hips the same
width as the shoulders.
® Rnished!
86. (froportioning Characters )
(The Body-to-Head Ratio Is the Key) The balance between the arms and legs and the
torso constitutes the key to designing a good-
looking character. To achieve this, artists use the
head as a reference measurement for the figure
overall. The body-to-head ratio refers to how many
head lengths measure the figure's total height. A
character that is 6 heads tall has a 6:1 body-to-
head ratio. One that is 8 heads tall has an 8:1 ratio,
and so on.
84
In acharacter with an 8:1 body-to-
head ratio the character's height is
equal to 8 heads piled one on top of
the other.
Here is a contrast between an 8:1
character and a 6:1 character. The
differences in head sizes causes 2
characters of identical height to have
different body-to-head ratios,
affecting the characters' appearances
and atmospheres projected.
Character with a6:1
body-to-head ratio
87. Use a ruler to plot the body-to-head ratio.
10.5 em (approx. 4 3/32")
The body-to-head ratio is the total height divided by
the head length. The body-to-head ratio of the
character to the left is-
10.5 em 7 1.3 em =8
Thus, this character has a body-to-head ratio of 8:1.
8:1 ratio vs. 6:1 ratio
Measure the character's height and divide It by the
number of heads (for the target body-to-head ratio)
to determine the head's length.
Eg. For a character 16 em tall:
• At an 8:1 ratio
The head is 16 7 8 or 2 em
• At a6:1ratio
The head Is 16 7 6 or approx.2.7 em
What happens if the character•s body-to-head ratio suddenly changes within awork?
At first glance,these
appear to be the
same manga page.
Here, character looks the same
as when he first appeared on the
and nothing seems unusual.
Here, the head is bigger than it should.
When the character first appeared, his
body-to-head ratio was 8:1but now it is
5:1.The reader senses something odd.
88. (Balancing Proportions )
All three figures are the same height and their
heads are the same length, giving them a
body-to-head ratio of 6:1 .
The figure's proportions are balanced by adjusting the positions of the
waist and groin. Characters with the same body-to-head ratio can be
distinguished by the positions of their waists and groins.
Standard figure
Line marking the
base of the neck and
shoulder ·
_L___________________________________:-=- '!
Waist
/........................... ·
- · - -- - - - - - - -
Halfway mark
for total height
Long legs long torso
(The legs constitute 1/2 of the total height) (The groin and waist are located high
on the figure.)
(The groin and waist are located low
on the figure.)
Sample proportion balancing by
to body-to-head ratio
It is not necessarily true that all characters must be drawn with
the groin positioned halfway along the figure. Characters with
body-to-head ratios of 5:1 look awkward with their legs taking
up half their bodies.
A5:1 ratio is ideal for boys and girls in the 9 A4.5:1 ratio works A4:1 ratio means a large head. This is
suited to preschoolers around 3 to 5. The
legs are short
to 12-year range.The groin Is positioned just well for 5 to 8 year
low of the halfway mark, making the legs olds.
slightly on the short side.
86
89. Differences in Height vs.
Differences in Body-to-Head Ratios
Note that changing a character's height means
that you will also have to change that
character's body-to-head ratio.
A6.5:1 ratio may be used for older
elementary school students.This can be used
for boys and girls alike who are aged about 9
to 12 years. This ratio may also be used with
middle school girls about 13 to 15 years.
An 8:1 ratio IS suited
toward high school
student and adult male
and female characters.
A4.5:1ratio Is used for
young elementary
school students around
5 to 6 years.
A7:1 ratio is used for
middle to high school
students, both boys and
girls alike, between 13 and
17 years.
Characters with different heights but identical body-to-head ratios Putting a7:1
character and a
6:1character of
different heights
side by side
gives the
appearance of
only a difference
in height
existing.
160 em ···- ·- ·
(approx.
62 7/16")
All three figures have a7:1 ratio
140 em ········
(approx. - ·- ·- ·
54 518")
120 em ········ .·
(approx. - · - - ·--;- ~
4613116")
80 em .::::::
(approx.
311/4")
Setting the height to 180
em, the same proportions
may be used for high-
school aged characters
and older.
At this height,
the figure
looks like a
leggy boy.
Now the figure
just appears to
be the 160-cm
character seen
from adistance.
6:1 ratio
This figure
appears to be an
elementary
school to middle
school aged boy.
········;:;..1' ''''''''''''''i'''''':·,·······-
';1 1' ;1
rr,c.>: r-- ~ ,
'R~ I ,·, ' I
lr --~~ .'1-: f,,
, I' ~ .,,
~-; ·j,,l
):1 j I ,
i)n · .~::,
...CJ....,)......~.:: C)._
When we stand a7:1character and a6:1
character of the same height side by side,
the two characters immediately appear
different. (This Is also because normally,
these characters would be drawn with
different faces and hairstyles as well.)
90. (Keeping Male and Female Characters Distinct)
Male character
A7:1 ratio is suited to
adolescent boys to adult
male characters.
Female character
The groin is
usually located
halfway along
the figure;
however, when
you intend to
make the
character a
little leggy (like
this one), move
it north of the ~
halfway mark. ··-···
Halfway mark
The breasts start to
swell about here.
While they are
positioned a bit higher
than they would in
reality, this offers a
cute, manga-ish look.~ _
For this figure, I
moved the groin
above the halfway
mark, making her
alittle leggy.
A6:1 ratio Is suited toward
cutesy characters from
about elementary school to
high school in age.
The chest is usually
located about 1-head
length below the
head.
Position the waist
between the chest
and the groin.The
pelvis (hips) should
be drawn wider when
the waist is
positioned higher and
narrower when the
waist is positioned
lower.
Since the groin has been
raised, the knees
likewise have been
·· · · ·· raised by the same
- ----:::~;:~~:~';:..,
Halfway mark
for the legs
The chest is situated
··············································· close to the waist,
compressing the upper
body, giving the
character a "cute" look.
···· ·· ""' This marks the waist.
""'Since the groin has been
drawn higher than its
normal position, the hips
...................~ are likewise made
""'narrower.
Halfway mark
-~
Halfway mark for the legs
91. Key points in distinguishing male and female characters
Adjust the height
Usually when drawing acouple, it is a good idea to make the female
character shorter than the male.Use about a half or full head
shorter in height as your rule of thumb.
The woman's
eye comes to
about the man's
chin.
Male character: 8:1
Female character: 7.5:1
Adjust the proportional balance
Adjust depths
The heads are equal in depth
for both male and female
characters. However,the
male character has athicker
chest about the same depth
as his head.
Give your male
characters broad
shoulders about twice
the head's length to get
aproperly masculine
look.
Give your female
characters narrow
shoulders about 1.5
times the head's length.
Female characters have
shallower chests. Aim for
about 3/4 that of the male
character (excluding the
breasts).
············F ::::..::::..::·.
·- ·- ·- ·- ·-·- ·...///
For both male and female
characters, draw the
waist about 1 head's
length above the groin.
.----r
89
92. Differences in layouts for male and female characters
Adjust the size of the circles used for the joints.
Male character Female character
Give male characters larger joints and female
characters smaller ones. At this stage, the
shoulders and pelvis may be drawn the same
size for both sexes.
Lines for male
characters tend to
be straight. Use
squares and
trapezoids.
I
..<:t /
I
....:--..:1
Lines for female
characters tend
to be curved.
Use circles and
ovals.
The male torso is an inverted triangle. The female torso is atriangle.
90
Using large circles for the
joints will facilitate drawing
muscular, masculine arms.
Waist
_, II
II
I ~~I I .
I )/ ,'
' .
' .~-· ..._.)
Waist
The torso tapers toward the
waist, and the hips are
narrower than the shoulders.
Using small circles
for the joints will
help you produce
slender, feminine
((
I
/
C../
The torso broadens
expansively from the waist,
and the hips are wide.
93. (Using the Body-to-Head Ratio to Draw Characters without Bounds)
Measure body-to-head ratios. Just what do you think the body-to-head ratios
for the figures on this page are? When you find
a character in awork of manga that appeals to
you and think you would like to draw it, take a
careful look not only at the character's face or
clothing, but also the body and head's
proportions. These are the key ingredients to
drawing avisually pleasing character.
91
94. Measuring body-to-head ratios
92
r·~
~.j
Head:8.3 mm
(approx. 5116") :;:::~~:._,
Torso to toe:
60.7 mm
(approx. 2 3/8")
Body-to-head ratio: height .;- head = 7.9
- approx. 8 heads (8:1)
Try drawing those
parts you cannot see.
Head: 10.6 mm
(approx. 215")
Torso: 30 mm
(approx. 1 1/5")
Legs 1: 14.7 mm
(approx. 9/16")
Legs 2: 27.6 mm
(approx. 1 1/16")
Head: 10 mm
(approx. 215")
Chin to waist 23 mm
(approx. 7/8")
Waist to knee: 25.5 m
(approx. 1")
Knee to foot: 27.7mm
(approx. 1 3132")
Body-to-head ratio: height .;- head = 8.2
- approx. 8 heads (8:1)
95. Making a seated character stand You might feel a bit confused to be told to make aseated
character stand. However, basically this means,for example,
drawing aseated 8:1 character standing.
..... r··.
)-v
This is not to
establish the
head's length.
Now the head's
····;.:;' "'.:;~·· · length is
...., ..,/....J established.
CD Draw alayout at
the target height.
Halfway mark
® Decide the groin's
position. Here, I set the
groin halfway along the
figure.
Torso
-+-....I. Groin
........................ Legs
® Once you have
established the groin's
position, the torso and
legs are also
automatically set.
@ Draw according to the
proportion layout.
® Rnal under drawing
.. J..i
® Since the target
ratio is 8:1, divide
the height intoeight
equal parts.
/
. I
...
If you establish first
the target head
length, then the
total height
becomes eight
times that.
93
96. Drawing yet another pose
Target pose
Draw a proportion layout using
a4:1 ratio.
94
The key point here
is the posterior.You
need to know the
distance from the
head to the posterior
to draw this pose.
ITo start, draw a stick figure side
view to help you understand the
pose.
The posterior (hips from
the front) is located about
four heads down.
Side view
Now your proportion
layout is set.
The distance from the knee
to the foot is 2.5 heads. Use
2 1/2 circles in your
proportion layout.
Here we see the final drawing. It
has been drawn so that the body is
visible from underneath. Normally,
the body is not drawn in such
detail, but I intended on this
serving as reference for studying
the relationship between figures
and clothing.
97. Drawing a Character within Defined Parameters (Frame or Panel)
Position a
1
character's full
figure on a sheet
of paper, like this.
22 em
(approx.8 9/16")
17 em
(approx. 6 5/8")
.~
_-t-_.....................................
Panel length divided j
by the number of
heads (from ratio)
:.......~...................................i
...............................................................
20 em
(approx. 7 4/5")
15em
(approx.5 7/8")
<D Determine the inner
margins.
In the case of an 8:1 ratio:
20 em .;. 8 = 2.5em
If the head is drawn at
2.5 em, then an 8:1
ratio character should
'
20 em
(approx. 7 4/5")
® Aheight for the
character that fits exactly
within these dimensions is
then automatically set.
@ Decide the
body-to-head ratio
for the character.
® Calculate the length of 1 head. be able to fit on this
paper.
@ Draw aproportion layout for
a8:1 ratio figure.
® Build up the figure based on
the layout.
:····························· ·····························:. .
; ;. .
: :. .
~ ~. .. .. .. .. .. .
: :. .
: :
. .. .. .. .. .
I I. .: :. .
~ ~. .. .. .
~ ~. .. .. .: :. .
: :. .:............ ............... .......................:
(f) Rnished!
Note that the head size should include the
hair.The actual measurement of the face In
this instance is about 1 em or 2/5".
Check to see what body-to-head ratio you normally use for your
characters. This will help you when you absolutely must draw afull
figure within a panel.
Suppose you were to
draw the face at 2.5 em.
1 em
(approx.2/5")
The head {or rather the hair)
would stick out of the panel.
95
98. (Drawing from a Photograph)
Drawing a woman from a photograph of a man
When using a photograph or print as
reference for a drawing, use the
body-to-head ratio and proportion-
balancing techniques.
Analyze the proportional balances
of a man seated in a chair.
I1.: ---
r'~---- Center line
'I
The forehead or
top of the head
Shoulders
Lines marking
the figure's
width
Seat edge
Bottom of the foot
Let's say you would like to draw
awoman seated in a chair but
all you have is this photo.
G) Do a rough layout of the
overall figure.
Create asilhouette
image of the figure.
@ Roughly mark down
where the joints lie to
determine their positional
relationship.
96
Head
Shoulder
Elbow
Wrist
Waist (Hips)
Lett knee
Right knee
Lett ankle
Right ankle
® Sketch a layout
of the whole figure
while referring to
the photo.
Key points in the layout
• The position of the knee of the top leg
• The face (head), knees and right
foot are aligned along the vertical
center line.
• The positions of both hands
@ Capture the positional relationship of
the joints as accurately as possible.The
trick is to draw while picturing the
contours of the body underneath the
clothing.
99. Transform the layout of the man into a woman.
@ Adjust the layout of the
man into awoman.The key
points here are the shoulder
breadth, the girth of the
neck and arms,and the size
of the feet. Try to make use
of the hip width as is.
@ Shrink the joints'
sizes and adjust the
figure to make it
slenderer.
Be careful not to
change the
positions of the
elbows. (You could
potentially cause
1
them to "not rest"
· . 1/ on the armrest.)
( .'
·r
@ Draw the details.Accentuate
the arms, legs,waist, chest, etc.
® Add the face, hair, clothing,
etc. Use the photo as reference
for how the clothing sags or
creases form.
,,~f(,r)1
·It ' f ·, .11I . .
'.~~ ~~ ·
® Rnished!
rf.I
Make the shoulders
narrower.
Slim the waist.
1 Round out the
thighs.
(J) Adjust the layout to
give the figure a
feminine form.
97
100. Drawing a boy from a photograph of a woman
Refer to the body parts in
the photo while drawing.
Here, your goal is to
draw a back view of
the boy to the right
seated on the floor.
What you have is this
photo of awoman for
reference.
The hips (groin) are
critical in drawing
seated poses.
- ·
This boy has abody-
to-head ratio of 5:1
. !:=-"""'
CD Use the upper body as the ® Sketch the layout according
to the body-to-head ratio
planned for the seated
character. (The distance from
head to hips is 2.5 heads.)
front side of ablock and sketch
the layout. Usea block with
angles that are as faithful to
those in the photo as possible.
Think of the elbows
and waist as visual
points of reference.
The distance from head
to hips is approximately
2.5 heads.
@ Sketch the shoulders, arms,
and back. The key point here is
that the wrists and hips rest on
almost the same line.
® Note the positional relationships
between the knees, the shoe toes,
and the left arm. @ Sketch the left leg.Thef_
trick is to use angles faithful
98
to those in the photo.
101. @ Here, a sketch has been made of
the leg. The leg is 2.5 heads long, but
since it is viewed from an oblique
angle, it is foreshortened.
(J) Cleaned-up version of
the basic layout
® Cleaned-up version
of the contour lines
® Draw the hair and
clothing.
Sketch in the right elbow
and the right wrist.
The shoe toe is distant
and consequently
appears small.
and ankles.
® Draw the figure's
contour lines.
® Finished!
• '7..:;- - --
Include as well lines
that are otherwise
concealed.
Adding black shadows
where needed will result
in a pleasing final image.
102. Differences in Proportions between Adults and Children
Shoulder
Chest
Waist
Groin
Knee
Ankle
Adult
I
I
When drawing both an adult and achild together, you will first have
to sketch layouts of the full figure before dividing up the figures
according to the body-to-head ratio.This is crucial toward gaining
an understanding of the visual height differences.
8-year old boy to grown man 12 to 16-year old 5 or 6to 11-year old
6:1 (5:1 to 6:1)
Adult vs.
elementary
school child
8:1 (7:1to 8:1) 7:1(6:1 to 7:1)
18-year old girl to
Shoulder
Chest
Waist
Groin
Knee
Ankle
100
12 to 16-year old
......7 :1 (6:1to 7:1)
2or 3to 4-year old
4:1 (3:1to 4:1)
... 5 or 6to 11-year old
6:1 (5:1to 6:1)
2 or 3 to 4-
........Year old
4:1(3:1 to 4:1)
103. Differences in Hands and Feet
Grown man's hand
The fingers are thick, and the hand
broad. Include the joints. Give the back
of the hand a sinewy appearance.
Grown woman's hand
The fingers should be slender,
and the hand narrower and
slighter than that of a man.
Child's hand
There is practically no difference
between a boy's and girl's hand.
The fingers are stubby, and dimples
form at the knuckles.
Grown man's fist Grown woman'sfist Child's fist
Add plenty of dips and
protrusions and give it an
angular appearance.
The woman's fist is
smoother with less dips and
protrusions than the man's.
The child's hand is tiny with
short digits, so give the fist
a round appearance.
Whether the proportional balances for men and women, children
and adults are different, the elbows are approximately waist level
and the wrists, groin level.
Align the wrists
and groin parallel
to the waist line.
Standard male and
female body types
Grown man'sfoot
Accentuate the bony,
angular appearance
of the joints.
Child's foot
Grown woman's foot
Round off the joints
and omit drawing
thetendons.
The child's foot is almost the
same asthe grown woman's
foot but shorter.
Shortening the forearms of
a 4:1 ratio character
generates a more childlike
appearance.
To draw a 4:1 ratio
character with his
arms linked in
back,follow the
same rule and
bend the arms
back at waist
level.
This rule holds true evenwhen proportional balances differ______________________.
(i.e. the waist and groin are situated at different levels). 101
104. Super-Deformed
(Chibi) Characters
Drawing super-deformed(chibi)
characters is extremely
helpful for drawing regular
characters as well.
1. Characters' facial expressions
become more varied and
dramatic.
2.It helps you study how the
human body moves.
3.It is useful for not only dynamic
action but also commonplace
activities and minor movements.
102
D
6:1 ratio character
The 2-head torso has
been shrunk in half,
and the 3-head legs
have been reduced to a
third. This stylization by
~55iiii~~=--- shortening is the
hallmark of the chibi
character.
3:1 ratio character
Dogs too can be chibi-
ized by shrinking a 4:1
ratio dog into a3:1 pup.
105. (How to Draw a Super-Deformed Character)
Super-deformed (Chibi) character look faces
Exaggerate facial features.
Creating super-deformed characters
by simplifying the faces
Typical manga-esque boy
...........Hair
......Eyeglasses
...........Nose............,...
.... Head shape...........,....
... Collar ·
Here, the number of lines has
been reduced to simplify the
character.
Here,the mouth and eyes have been
enlarged, the ear has been simplified,
and the number of strokes used for the
hair reduced.
1. Omit the nose.
2. Magnify the eyes' expressiveness.
3. Exaggerate the mouth.
The slightly shifted
eyes are now glinting.
The nose is gone.
The sneering mouth
now sports afang.
The shape of the head
has been simplified.
The number of strokes
used for the hair has
been reduced.
The earring Is still
present. (The key isto
retain any idiosyncratic
features for the chibi
character.)
0
The hair, head,glasses, eyes,
nose, mouth, collar and all other
elements have been simplified
in form and rendered using less
lines.
Here, the mouth is in its most stylized
form to evoke the emotional state. The
head has been squashed and rounded,
resulting in aclassic chibi face. 103
106. Big heads and short limbs do a super-deformed character make
Making regular characters look super deformed characters
• Transforming a 7:1 character into a4:1 character
Super-deformed
characters have a
body-to-head ratio of
2:1 to 4:1. Since we
are attempting here to
create a 4:1 character,
sketch a4:1figure
layout.
• Transforming a 7:1 character into a 3:1 character
104
The trick is to
determine which
features to stylize.
tLegs
~
Draw the groin at alower level than you would for
a regular manga character. One of the things that
makes achibi cute are its short legs.
Here, the above 4:1 character has been
changed to a girl. Making the legs
slenderer gives the figure afeminine feel.
107. Changing a super-deformed character into a regular character
Here we see a 4:1 super-deformed
character
Divide the height
into 7 heads.
Sketch the layout
for a 7:1 ratio.
Angles that do not allow calculation
of the body-to-head ratio
In this composition, the hand extends
out toward the picture plane. Since
super-deformed characters are
typically drawn with tinier than normal
hands, the hand is drawn either the
same size as the face or smaller.
Sketch of the
super-deformed
character
In the case of aregular
character, the palm is drawn
larger than the face.At this
angle, the thigh appears about
the same size as the face as
well.
Not only do you need tD
copy everything about tbe
super-deformed
character, incftxfng the
way he wears his hal, but
you also need to be
aware of creating asense
of volume when drawing
the cuffs, the belt, the
shoes, and other details.
addition, super-
deformed characters'
movements are often
embellished.
Consequently, you will
need to tone down the
The body-to-head ratio of a regular character ranges from
6:1to 8:1. Retain the idiosyncratic features of the super-
deformed character and draw aregular 6:1to 8:1 ratio
character.
Render the hair in greater detail and elongate the
face. Drawing the arm bending at the elbow further
distinguishes the regular from the super-deformed
character.
105
108. (Adult and Kiddy Super-Deformed Characters)
Adults have small heads and long legs. Children
have big heads and short legs. Retain these
differences when turning both into super-
deformed characters.
The adult super-deformed
character has a body-to-head
ratio of 4:1 and short hands
and legs.
Adult
106
While this adult super-deformed
character's head may look extra
big owing to her voluminous hair,
she is actually drawn at a 4:1 ratio.
The luscious lips and chest, waist
and other adult characteristics
have been retained but stylized.
Child
The child super-
deformed character has
a body-to-head ratio of
3:1 and a big head,
making him look like a
kid.
Both
characters
have legs of
the same
length.
This child super-deformed character has been
drawn at a 3:1 ratio. Characteristics identified
with adulthood have been eliminated to the extent
reasonable. The arms and legs are smooth
cylinders. Childlike characteristics have been
retained and stylized.
112. Good Posture: Giving Standing
Figures an S-Curve
Arealistic rendition of the posture when standing makes the figure
look slouched. Posing the layout with an S-curve will cause the chest
to stick out, giving the figure avisually pleasing posture.
Natural posture
when standing
110
Figure with the
center line given
an S-curve
Natural posture Standing figure
drawn with an
S-curve
Natural posture Standing figure
drawn with an
S-curve
The neck straightens, and the
chest appears to stick out.
Natural posture Standing figure
drawn with an
S-curve
Almost no difference is visible
from afront view,so use the
S-curve for side views, etc.
114. The Manga Clinic
Doctoring the cover
Space for the title
The arm is
bending
unnaturally.
Cover of awork for publication
submission
• Correcting the drawing
Key correction points
forearm is short,
l
it appears feeble
in contrast with
the shoulders.
I
The hips and
legs are too
thick.
Theright and left shoulders
and again the right and left
elbows are different sizes.
After correction
Although it is just that the
man's head is small, the
impression is that of aface
seen at a distance.
Creating aline drawing
of only the figure's
contours and tracing
the joints reveals to us
the problematic areas.
Final corrected image
The man's
arm should
be drawn
first, then
followed by
the woman's
arm which
loops
through his.
115. Recomposing the cover
With the figures in their
original position, the man
is cropped off the page.
Yet, when the figures are shifted to
the right so the man fits on the
page, the rear character becomes
obscured.
L-------------------~
Since the goal is to
maintain the pair's size
while keeping the two
within the panel, the
composition will have
to change.
Ideas for poses
Artists use the cover to convey the
work's contents or insight to the
internal world to the reader with a
single glance. Allowing a main
character's face to be cut off is a
big no-no. I also looked into.a pose
that would better represent the
relationship between the two.
Shrinking the figures to allow view
of the rear character causes the
pair to become less prominent,
making it unclear just who the
main characters are.
The woman's face is the same size that it was on the original,
and the two fit neatly within the composition while retaining
their relationship with the rear character. 113
116. Drawing Characters with Cars
Make the car about as tall as acharacter'sshoulder.
Pay careful attention to the
positions of the doors and tires.
Hood
The front wheels are
centered underneath the
hood, so keep ashort
distance between the -
front wheel and the front
door.
114
Roof
Cars always appear on the scene with
characters. Since the dimensions of acar
(height and width) have all been estab~shed
according to the human body,compare it to
the characters' figures when drawing.
,.
-~1--- -- ·- ----- ---------
The rear wheel extends
into the rear door.
Having the front wheel extend
into the front door results in an
odd and unbalanced image.
117. The Car Drawing Process
<D Start with the
floorboard.
Use straight
lines for the
verticals.
® Establish the height
and render the car's basic
shape using blocks. This
will become the layout.
@ Draw the tires.
Include the tires that will
be omitted from the final
drawing.
Use acharacter as
aheight guide.
® Completed under drawing
Shadows are part of the car
Use solid blacks
when characters
are getting into the
car and when the
car is being started
o.e.when
Slam!
stopped). When the car is driving at a leisurely
pace, use solid blacks or hatching for
shadows.
t
Here,the root has been
separated from the rest of
the car. Since the basic
shape of vehicles is abox,
use straight lines for the ca1
body's layout.
@ Layout the tires' positions
and shapes in blocks.
Have the lines
fade out around
When the car is speeding along, here.
use speed lines for shadows.
115
118. ICommon Minor Errors in Mangal
Whether the right or left side of clothing
goes on top-Both the girl's kimono and
the man's suit should show the left side
overlapping the right.
Here we see a
gift-presenting
scene. The artist
composed the
scene from the
giver's
perspective,
resulting in an
upside-down gift.
The characters
and cord should
..._,_--~....__,..>o..J.....__'-""'--.::..~ face the recipient.
you.
116
In earlyApril, Furano in Hokkaido (northernmost
island of Japan) would still be covered in snow.
The swords blade
should face upward.
Not good
Not good
or:.[]FllVertical stripes
on kimono should
not suddenly
switch to
horizontal stripes
at the sleeves.
119. us $19.99
Vol.7: AMAZING EFFECTS
Chapter 1The Basics in Composition
Chapter 2 The Basics in Character Portrayal
Chapter 3 The Basics in Voice Portrayal
Chapter 4 The Basics in Panel Design
Chapter 5 The Basics of Manga Portrayal
ISBN4-7661-1 480-9
Vol. 8: SUPER BASICS
Chapter 1 Materials ilnd Simple Means of Usage
Chapter 2 Creating Manga
Chapter 3 Drawing People and Animills
Chapter 4 Manga Techniques
Chapter 5 Depicting Greenery and 3-Dimensioniil Object~
Chapter 6 Creating Well-composed Manga
ISBN4-7661 -1481 -7
More How to Draw Manga
Vol. l :The Basics of Character Drawing
Chapter 1 Drawing in Pencil
Chapter 2 Draw ing Faces
Chapter 3 Drawing the Figure
Chapter 4 Manga Miscellaneous
ISBN4-7661 -14B2-5
More How to Draw Manga
Vol. 2: Penning Characters
Chapter 1 Pen Fundamentals
Chapter 2 Making Chardeters Distinctive
Chapter 3 l'acial Expressions
Chapt er 4 Manga M iscellaneous
IS!lN4-7661-1'183-3
More How to Draw Manga
Vol. 3: Enhancing a Charact@rAfs S@nS@ of Pr@S@nC@
Chapter 1 The Trick to a Character's Seme of Pre~em.e Lie' in
the Tone Work
Chapter 2 What Is Meant by Character Shading and Color Portrayal
Chapter 3 Portraying Movement to Enhance a Character's Presence
Chapter 4 More Manga
ISBN4-7661-1484-1
More How to Draw Manga
Vol. 4: Mastering Bishoujo Characters
Chapter 1 Twelve Character Types
Chapter 2 Making the Figure Move
ISBN4-7661 - 1485-X
Distributed in North America by
Diamond Comic Distributors/Diamond Book Distributors
1966 Grccnspring Drive
Timonium, MD 21093
Phone (410) 560-7100
www.diamondcomics.com
www.diamondbookdistributors.com
newaccounts@diamondcOinics.com
All of Graphic-Sha's publications can be found at
your local comic book store.To find a store near you.
please use the Comic Shop Locator Service bycalling toll free;
1-888-COMIC-BOOK (1-888-266-4226) in the U.S, or lOll on to
csls.diamondcomics.com