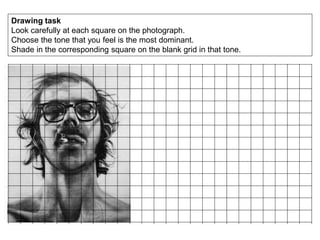
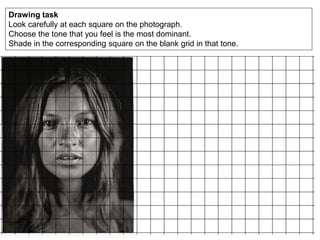
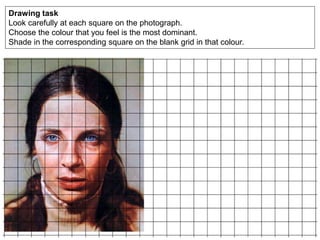
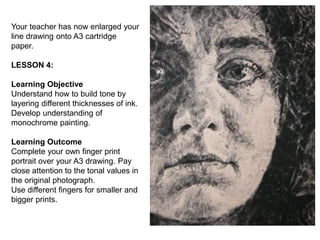
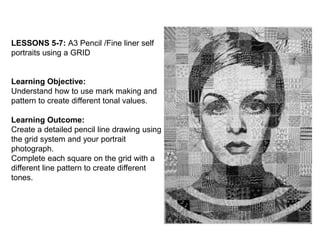
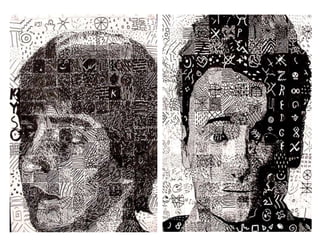
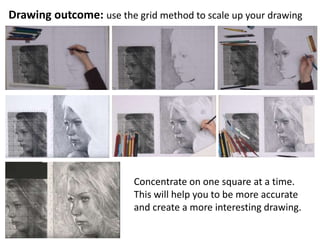
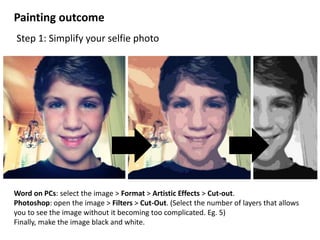
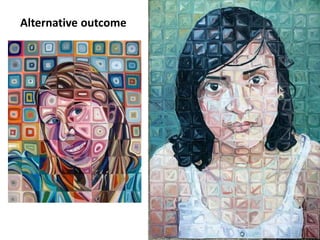
Selfie
CHUCK CLOSE
Watch the clip ‘On following the
Grid’ (on dept website)
Why did Close start using the
grid in the first place?
How does he paint each
square?
Why doesn’t he feel the need to
step back form the painting to
see how he is getting on?
Self Portrait
“Inspiration is for amateurs. The rest of us just show up and get to work. If you wait
around for the clouds to part and a bolt of lightening to strike you in the brain, you are
not going to make an awful lot of work. All the best ideas come out of the process;
they come out of the work itself.” ― Chuck Close
“I absolutely hate technology, and I’m computer illiterate, and I never use any labour-
saving devices although I’m not convinced that a computer is a labour-saving device” ―
Chuck Close
Finger prints
Paper making
Grids
LESSONS 1 & 2
Learning Objective:
Understand how to use the “Grid Method” in drawing and be
able to apply a range of tones using a 2B /4B pencil
Learning Outcome:
Choose one of the following 4 images by Chuck Close and
copy each square carefully using the grid provided.
Meanwhile…. you will have your
portrait photograph taken
(profile and straight on)
Drawing task
Look carefully at each square on the photograph.
Choose the tone that you feel is the most dominant.
Shade in the corresponding square on the blank grid in that tone.
Drawing task
Look carefully at each square on the photograph.
Choose the tone that you feel is the most dominant.
Shade in the corresponding square on the blank grid in that tone.
Drawing task
Look carefully at each square on the photograph.
Choose the colour that you feel is the most dominant.
Shade in the corresponding square on the blank grid in that colour.
Drawing task
Look carefully at each square on the photograph.
Choose the colour that you feel is the most dominant.
Shade in the corresponding square on the blank grid in that colour.
LESSON 3: CHUCK CLOSE FINGERPRINT TASK
Chuck Close Fingerprint portrait of Phillip Glass (1979)
Learning Objective:
Understand how to build up tonal values using layering
Learning Outcome:
Using only your fingers/thumbs and black printing ink try to copy the image on to A3
cartridge paper.
Once completed make a line drawing tracing of your portrait photo.
Your teacher has now enlarged your
line drawing onto A3 cartridge
paper.
LESSON 4:
Learning Objective
Understand how to build tone by
layering different thicknesses of ink.
Develop understanding of
monochrome painting.
Learning Outcome
Complete your own finger print
portrait over your A3 drawing. Pay
close attention to the tonal values in
the original photograph.
Use different fingers for smaller and
bigger prints.
LESSONS 5-7: A3 Pencil /Fine liner self
portraits using a GRID
Learning Objective:
Understand how to use mark making and
pattern to create different tonal values.
Learning Outcome:
Create a detailed pencil line drawing using
the grid system and your portrait
photograph.
Complete each square on the grid with a
different line pattern to create different
tones.
12
Design 6 patterns.
Take each pattern
through six stages-
lightest to darkest.
Use the grid method to carefully
transfer your portrait to a piece
of paper.
OUTLINE ONLY
See each square as an individual
drawing- it will be more
accurate than drawing across
several squares at once.
Fill each square on the grid with the
pattern you created for each tonal
value.
LESSON 8: What is a selfie?
Learning Objective:
Analyse the concept of a ‘selfie’.
Learning Outcome:
Create a ‘selfie’ that is derived from a personal piece of writing.
• Over 1 million selfies are taken every day
• The average age of selfie ‘takers’ is 23.6 years old
• The earliest use of the word was in 2002 in an online forum.
• In 2013 ‘selfie’ was announced the word of the year by the Oxford
English Dictionary
Discuss:
Is a selfie merely self-promotion or a more accessible form of
self-representation?
How trustworthy are selfies?
Write an ‘I am’ poem
I am (your name)………………………………………………….
I am (two physical characteristics)…………………………
I am (two personality traits)…………………………………
I wonder (something you are curious about)……......
I hear……………………………………………………………….
I see………………………………………………………………...
I am (repeat first line of your poem)……………………..
I want (a desire)…………………………………………………...
I pretend (something you imagine)………………………
I worry (something that concerns you)………………..
I cry (something that upsets you)…………………….……
I understand…………………………………………………………
I am (repeat first line of your poem)………………………
I say………………………………………………………………….
I dream………………………………………………………………
I try…………………………………………………………………..
I hope………………………………………………………………..
I feel………………………………………………………………….
I am (repeat first line of your poem)………………………
Ana Stumpf
Use the photograph of you in profile
to draw an outline within the phone.
Fill the silhouette with words, doodles
and pictures from your ‘I am…’ poem.
Think carefully how you write and
incorporate any text.
Fill the silhouette- leave no white
spaces.
Is this a better representation of you
than a selfie photo? Do we find out
more about you?
Why? Why not?
LESSONS 9-13: Final outcome
Learning Objective:
Apply prior knowledge of scaling up using the grid system.
Either
Develop use of tone and mark making when using graphite.
Or
Develop understanding of colour mixing and application of
paint.
Learning Outcome:
Enlarged line drawing or painting of the selfie photograph.
Create an exhibition of the work in school.
Drawing outcome
It is important to explore
different mark making
techniques in order to
create a breadth of textures
and tones.
Drawing outcome: use the grid method to scale up your drawing
Concentrate on one square at a time.
This will help you to be more accurate
and create a more interesting drawing.
Word on PCs: select the image > Format > Artistic Effects > Cut-out.
Photoshop: open the image > Filters > Cut-Out. (Select the number of layers that allows
you to see the image without it becoming too complicated. Eg. 5)
Finally, make the image black and white.
Painting outcome
Step 1: Simplify your selfie photo
Step 2:
Use the grid method to
transfer your new, simplified
selfie onto a board or canvas.
Remember- outline the
features and shapes of colour.
Do not attempt to shade.
Before you begin, mix 8 different
tones of paint using just black and
white and create a tonal scale in
your sketchbook.
Experiment with other colours
next to your monochromatic scale-
8 shades for each one.
Choose your favourite colour for
your final painting.
Learning Objective:
Develop an understanding of mixing shades and tones using acrylic paint.
Learn from painting experiments before starting the final painting.
Learning Outcome:
Painting experiments and the lightest tones on the painting filled in.
Value Scale is a scale that
shows the gradual change in
value from its lightest value,
white to its darkest value black.
Monochromatic is where one
color is used but in different
values and intensity, from the
darkest of darks to the lightest
of light values.
On the right are the hues
(colours) and the tones (dark
and light) scales of each.
In preparation for your painting explore how you can make colours
change in value.
Step 3: Paint your selfie portrait using your preferred colour.
Alternative outcome
Combine pattern and colour: paint, pencil crayons or oil pastels
Alternative outcome
Year 9 Selfie

Year 9 Selfie

  • 1.
  • 2.
    CHUCK CLOSE Watch theclip ‘On following the Grid’ (on dept website) Why did Close start using the grid in the first place? How does he paint each square? Why doesn’t he feel the need to step back form the painting to see how he is getting on?
  • 4.
    Self Portrait “Inspiration isfor amateurs. The rest of us just show up and get to work. If you wait around for the clouds to part and a bolt of lightening to strike you in the brain, you are not going to make an awful lot of work. All the best ideas come out of the process; they come out of the work itself.” ― Chuck Close
  • 5.
    “I absolutely hatetechnology, and I’m computer illiterate, and I never use any labour- saving devices although I’m not convinced that a computer is a labour-saving device” ― Chuck Close
  • 6.
  • 7.
    LESSONS 1 &2 Learning Objective: Understand how to use the “Grid Method” in drawing and be able to apply a range of tones using a 2B /4B pencil Learning Outcome: Choose one of the following 4 images by Chuck Close and copy each square carefully using the grid provided. Meanwhile…. you will have your portrait photograph taken (profile and straight on)
  • 8.
    Drawing task Look carefullyat each square on the photograph. Choose the tone that you feel is the most dominant. Shade in the corresponding square on the blank grid in that tone.
  • 9.
    Drawing task Look carefullyat each square on the photograph. Choose the tone that you feel is the most dominant. Shade in the corresponding square on the blank grid in that tone.
  • 10.
    Drawing task Look carefullyat each square on the photograph. Choose the colour that you feel is the most dominant. Shade in the corresponding square on the blank grid in that colour.
  • 11.
    Drawing task Look carefullyat each square on the photograph. Choose the colour that you feel is the most dominant. Shade in the corresponding square on the blank grid in that colour.
  • 12.
    LESSON 3: CHUCKCLOSE FINGERPRINT TASK Chuck Close Fingerprint portrait of Phillip Glass (1979) Learning Objective: Understand how to build up tonal values using layering Learning Outcome: Using only your fingers/thumbs and black printing ink try to copy the image on to A3 cartridge paper. Once completed make a line drawing tracing of your portrait photo.
  • 13.
    Your teacher hasnow enlarged your line drawing onto A3 cartridge paper. LESSON 4: Learning Objective Understand how to build tone by layering different thicknesses of ink. Develop understanding of monochrome painting. Learning Outcome Complete your own finger print portrait over your A3 drawing. Pay close attention to the tonal values in the original photograph. Use different fingers for smaller and bigger prints.
  • 14.
    LESSONS 5-7: A3Pencil /Fine liner self portraits using a GRID Learning Objective: Understand how to use mark making and pattern to create different tonal values. Learning Outcome: Create a detailed pencil line drawing using the grid system and your portrait photograph. Complete each square on the grid with a different line pattern to create different tones.
  • 15.
    12 Design 6 patterns. Takeeach pattern through six stages- lightest to darkest.
  • 16.
    Use the gridmethod to carefully transfer your portrait to a piece of paper. OUTLINE ONLY See each square as an individual drawing- it will be more accurate than drawing across several squares at once.
  • 17.
    Fill each squareon the grid with the pattern you created for each tonal value.
  • 19.
    LESSON 8: Whatis a selfie? Learning Objective: Analyse the concept of a ‘selfie’. Learning Outcome: Create a ‘selfie’ that is derived from a personal piece of writing.
  • 20.
    • Over 1million selfies are taken every day • The average age of selfie ‘takers’ is 23.6 years old • The earliest use of the word was in 2002 in an online forum. • In 2013 ‘selfie’ was announced the word of the year by the Oxford English Dictionary Discuss: Is a selfie merely self-promotion or a more accessible form of self-representation? How trustworthy are selfies?
  • 21.
    Write an ‘Iam’ poem I am (your name)…………………………………………………. I am (two physical characteristics)………………………… I am (two personality traits)………………………………… I wonder (something you are curious about)……...... I hear………………………………………………………………. I see………………………………………………………………... I am (repeat first line of your poem)…………………….. I want (a desire)…………………………………………………... I pretend (something you imagine)……………………… I worry (something that concerns you)……………….. I cry (something that upsets you)…………………….…… I understand………………………………………………………… I am (repeat first line of your poem)……………………… I say…………………………………………………………………. I dream……………………………………………………………… I try………………………………………………………………….. I hope……………………………………………………………….. I feel…………………………………………………………………. I am (repeat first line of your poem)……………………… Ana Stumpf
  • 22.
    Use the photographof you in profile to draw an outline within the phone. Fill the silhouette with words, doodles and pictures from your ‘I am…’ poem. Think carefully how you write and incorporate any text. Fill the silhouette- leave no white spaces. Is this a better representation of you than a selfie photo? Do we find out more about you? Why? Why not?
  • 23.
    LESSONS 9-13: Finaloutcome Learning Objective: Apply prior knowledge of scaling up using the grid system. Either Develop use of tone and mark making when using graphite. Or Develop understanding of colour mixing and application of paint. Learning Outcome: Enlarged line drawing or painting of the selfie photograph. Create an exhibition of the work in school.
  • 24.
    Drawing outcome It isimportant to explore different mark making techniques in order to create a breadth of textures and tones.
  • 25.
    Drawing outcome: usethe grid method to scale up your drawing Concentrate on one square at a time. This will help you to be more accurate and create a more interesting drawing.
  • 27.
    Word on PCs:select the image > Format > Artistic Effects > Cut-out. Photoshop: open the image > Filters > Cut-Out. (Select the number of layers that allows you to see the image without it becoming too complicated. Eg. 5) Finally, make the image black and white. Painting outcome Step 1: Simplify your selfie photo
  • 28.
    Step 2: Use thegrid method to transfer your new, simplified selfie onto a board or canvas. Remember- outline the features and shapes of colour. Do not attempt to shade.
  • 29.
    Before you begin,mix 8 different tones of paint using just black and white and create a tonal scale in your sketchbook. Experiment with other colours next to your monochromatic scale- 8 shades for each one. Choose your favourite colour for your final painting. Learning Objective: Develop an understanding of mixing shades and tones using acrylic paint. Learn from painting experiments before starting the final painting. Learning Outcome: Painting experiments and the lightest tones on the painting filled in.
  • 30.
    Value Scale isa scale that shows the gradual change in value from its lightest value, white to its darkest value black. Monochromatic is where one color is used but in different values and intensity, from the darkest of darks to the lightest of light values. On the right are the hues (colours) and the tones (dark and light) scales of each. In preparation for your painting explore how you can make colours change in value.
  • 31.
    Step 3: Paintyour selfie portrait using your preferred colour.
  • 33.
    Alternative outcome Combine patternand colour: paint, pencil crayons or oil pastels
  • 34.