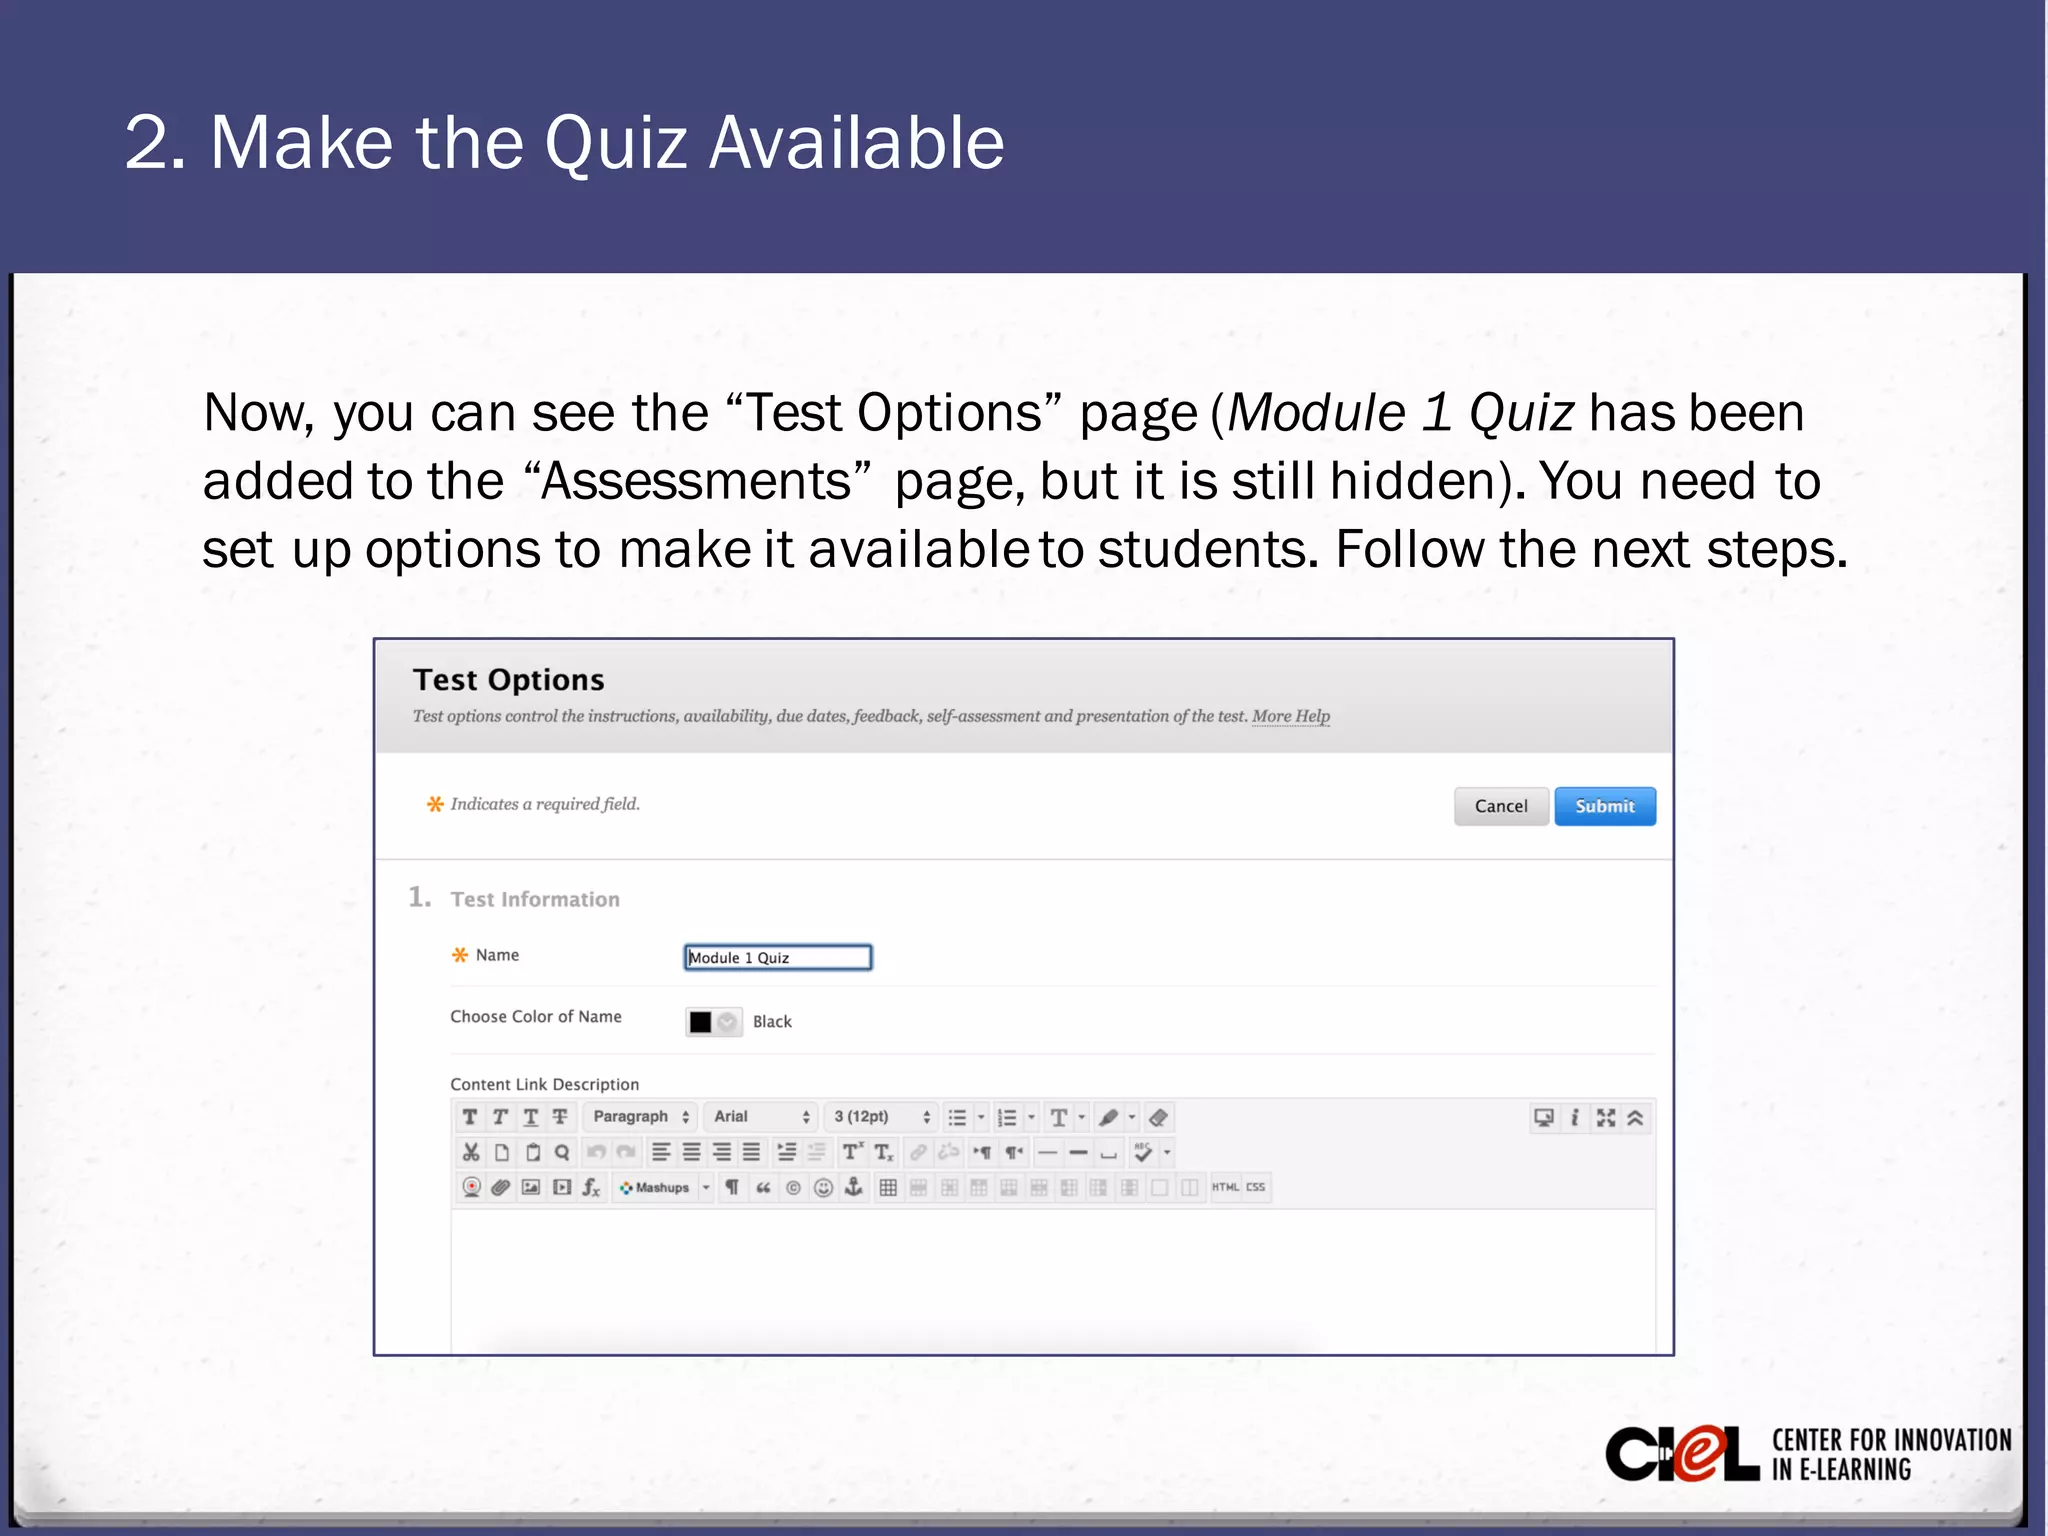
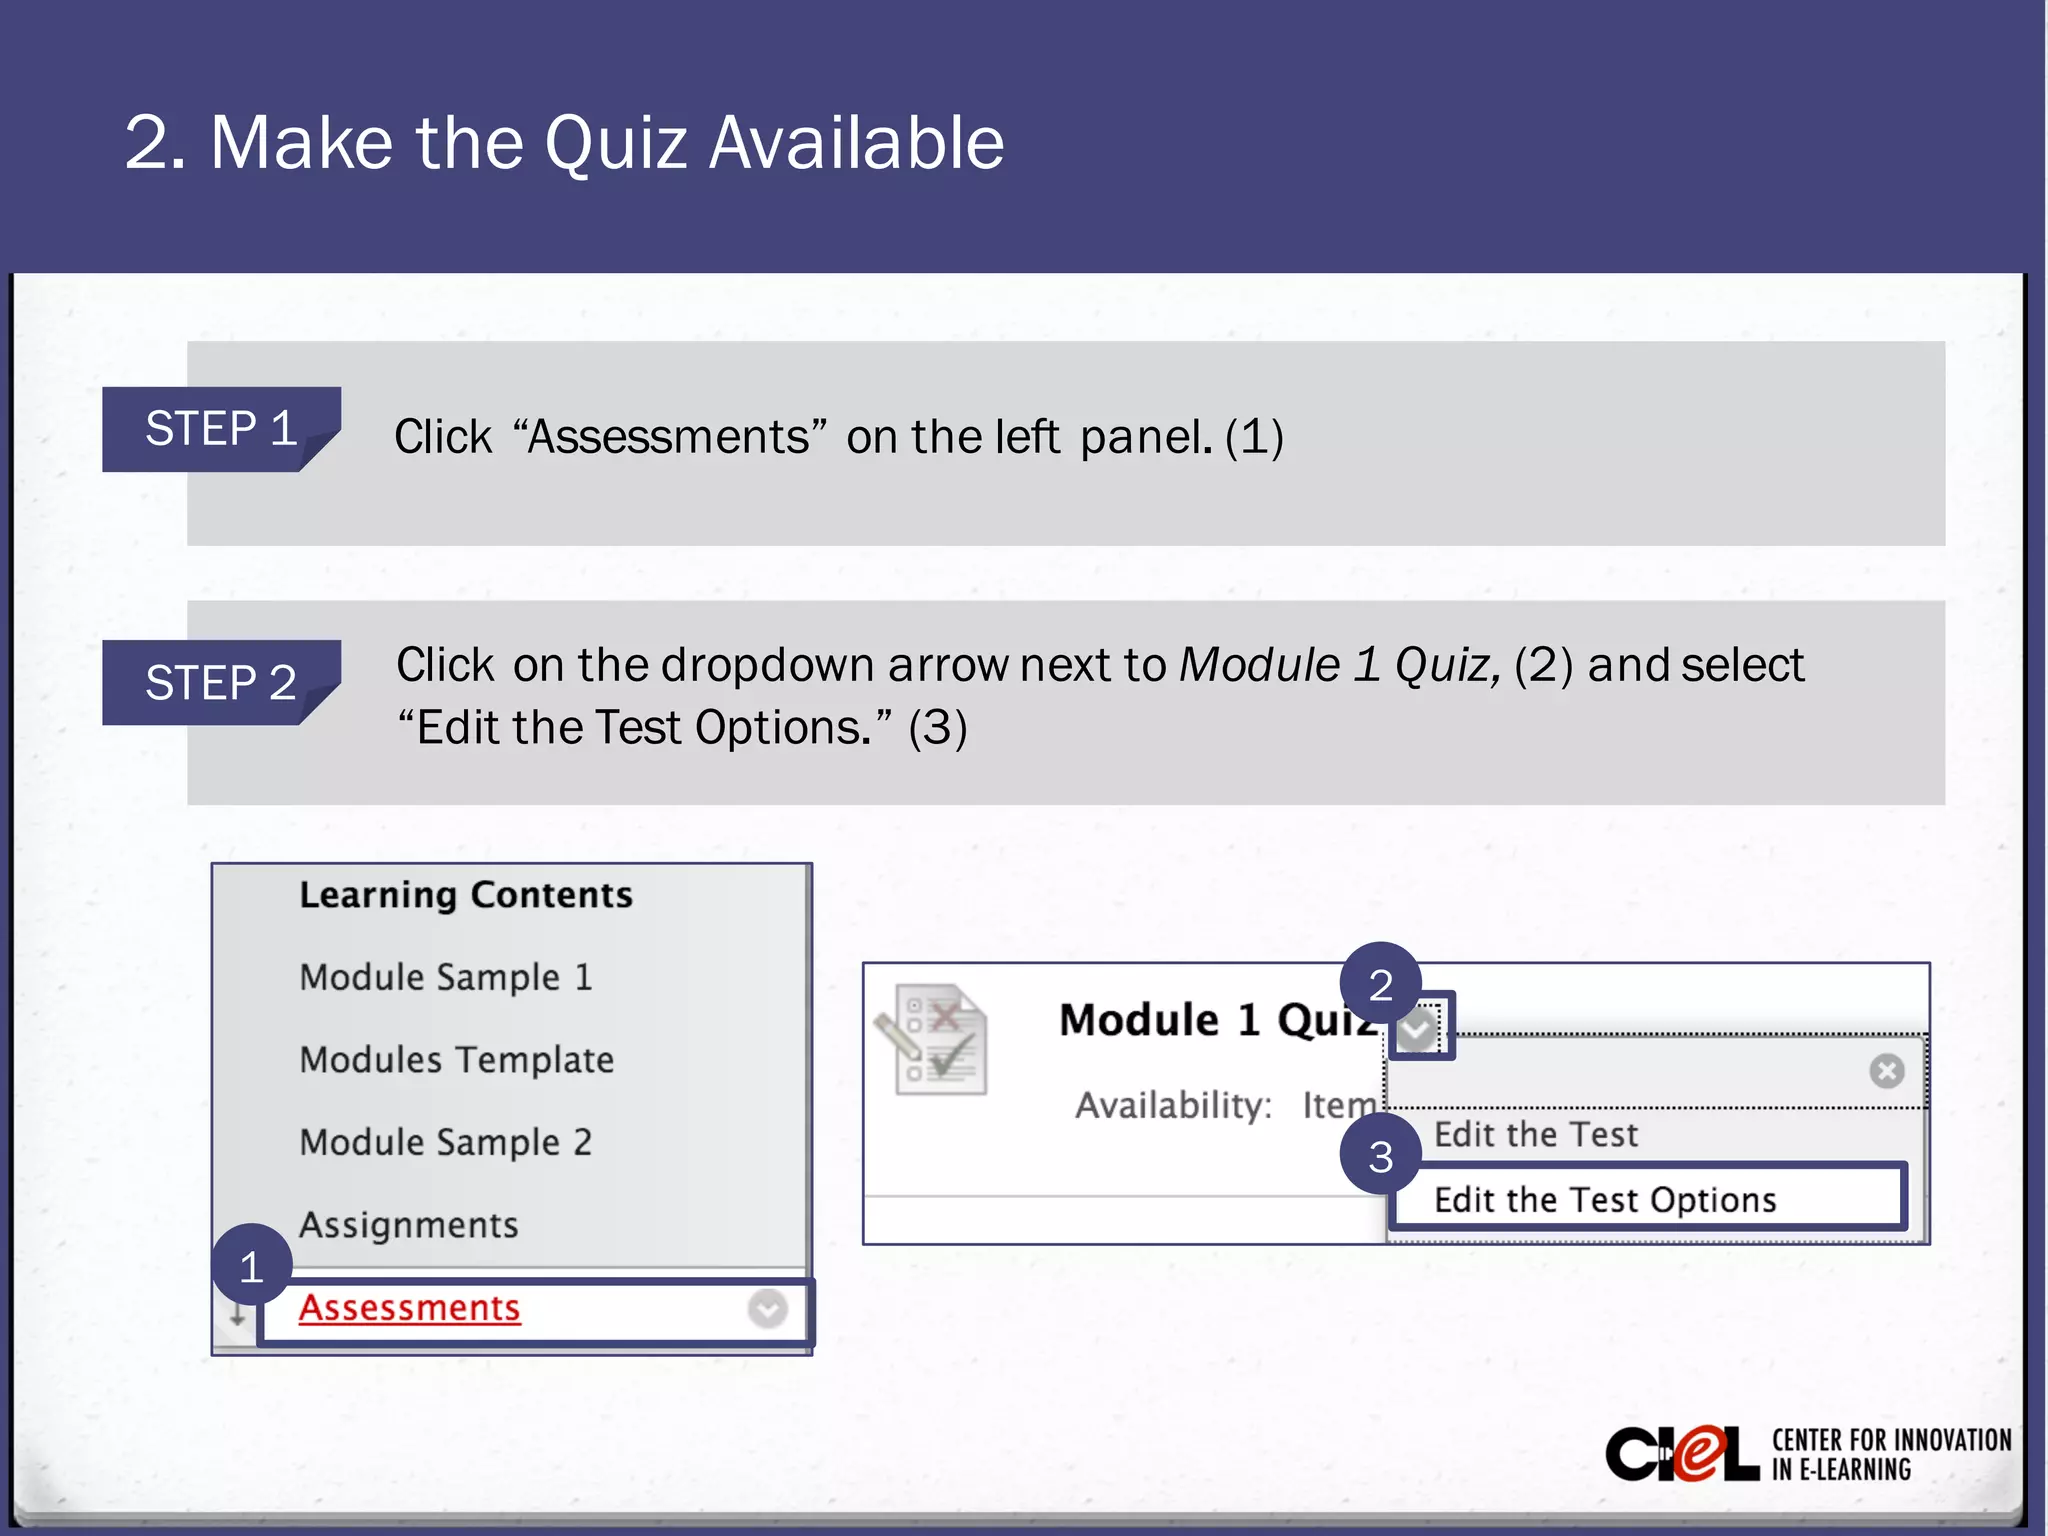
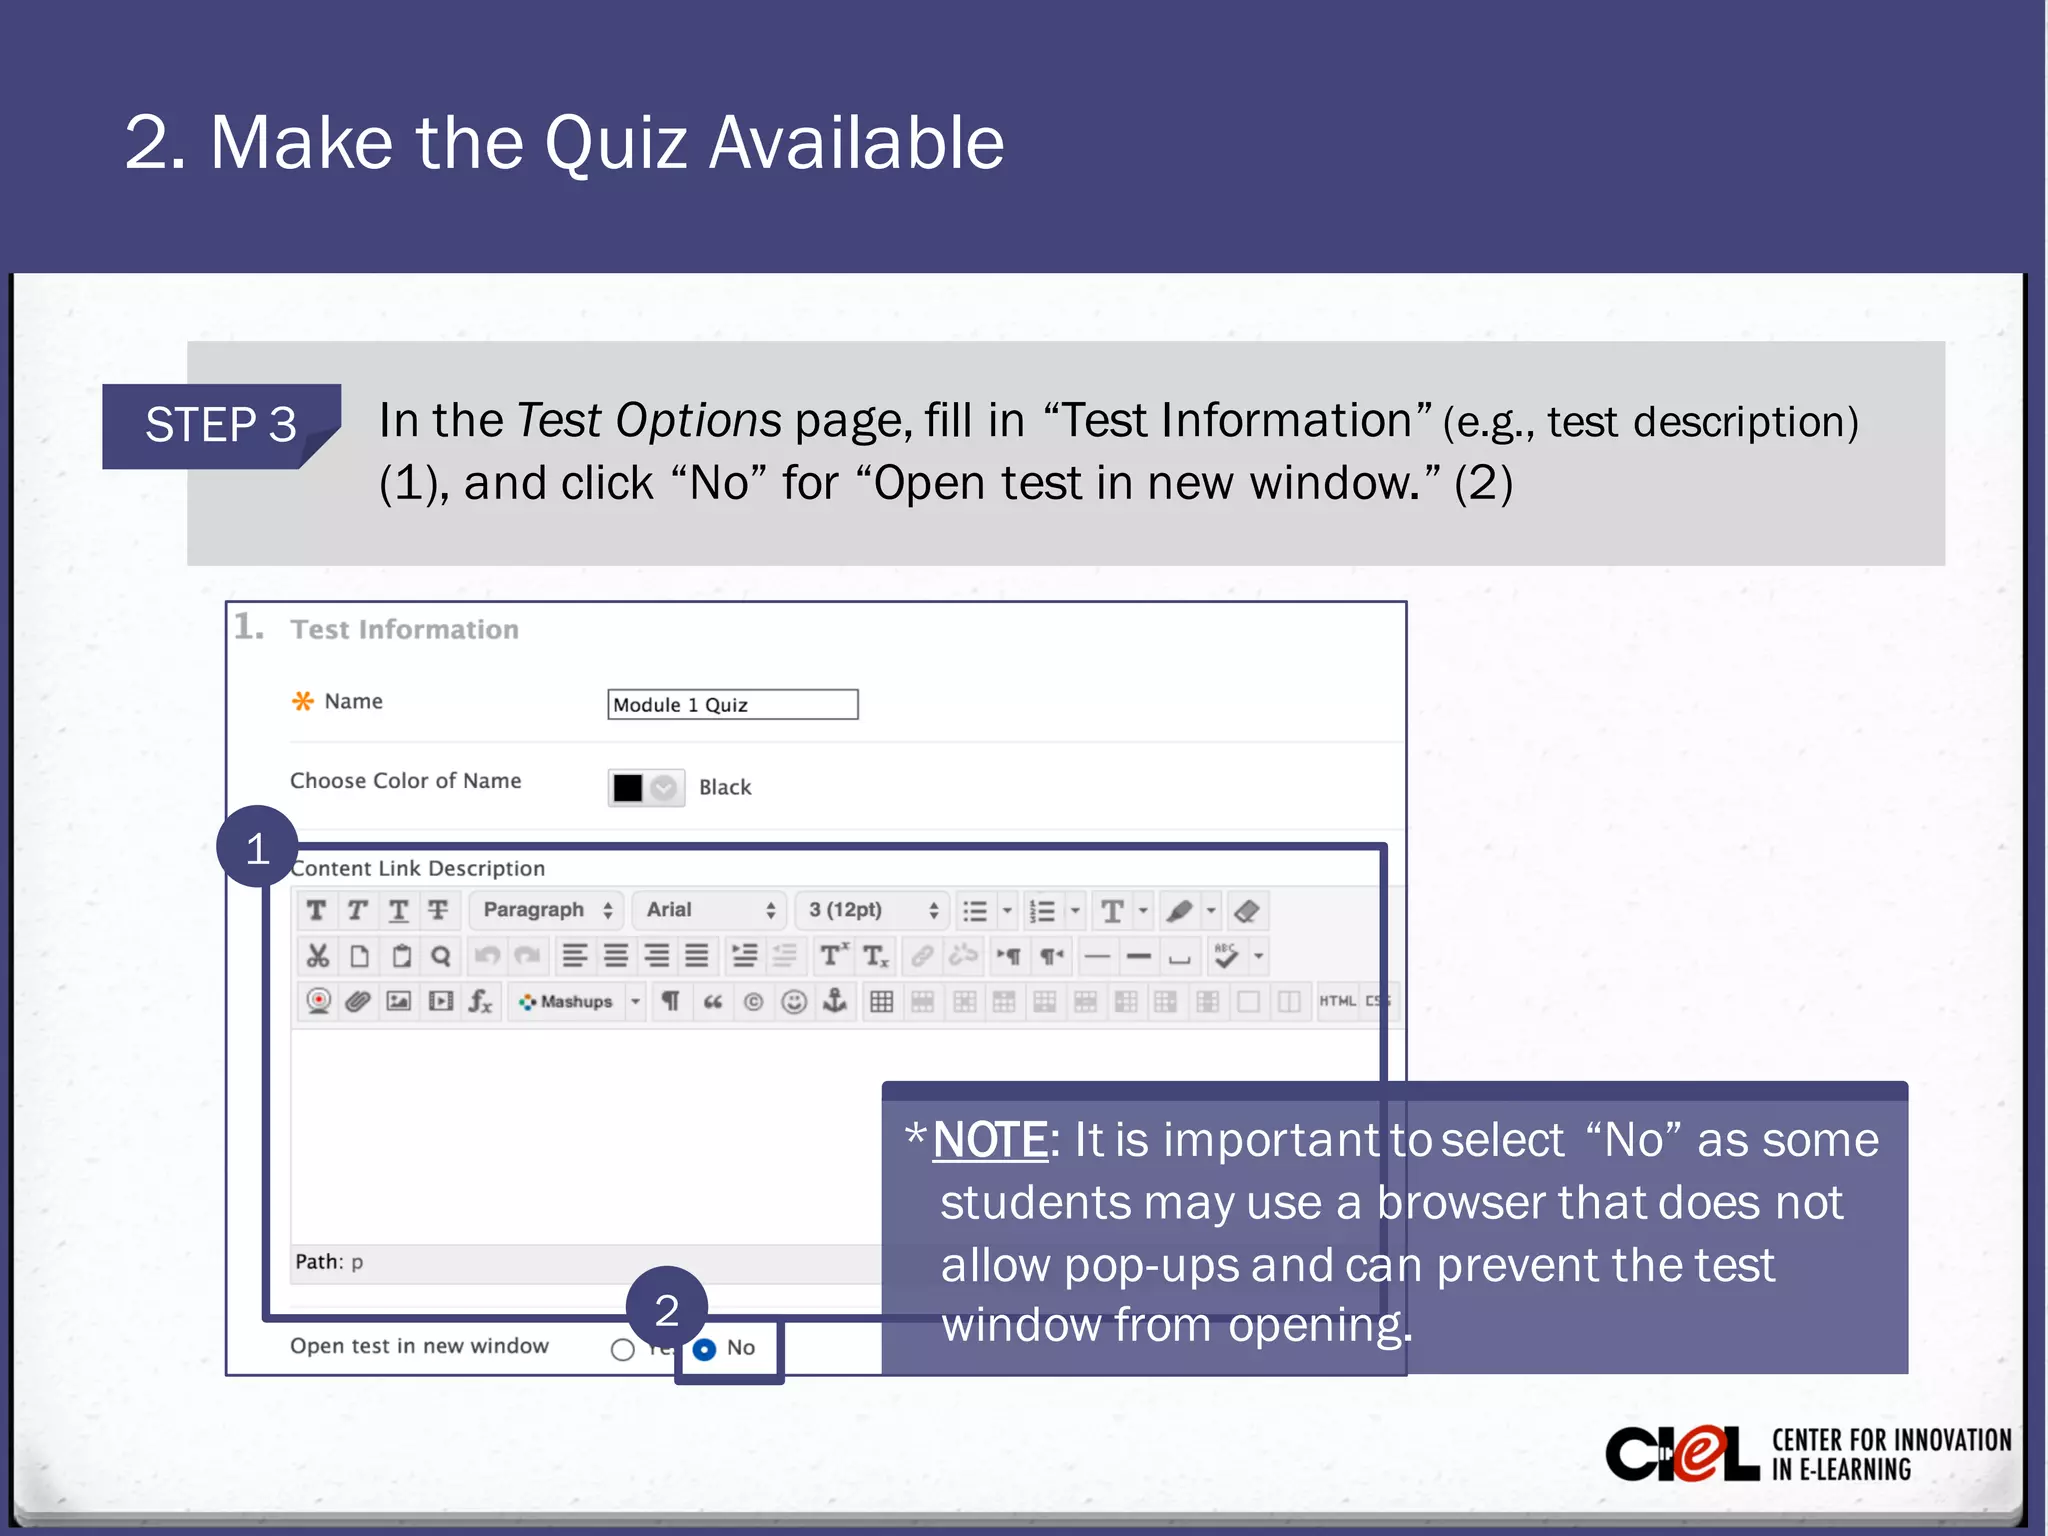
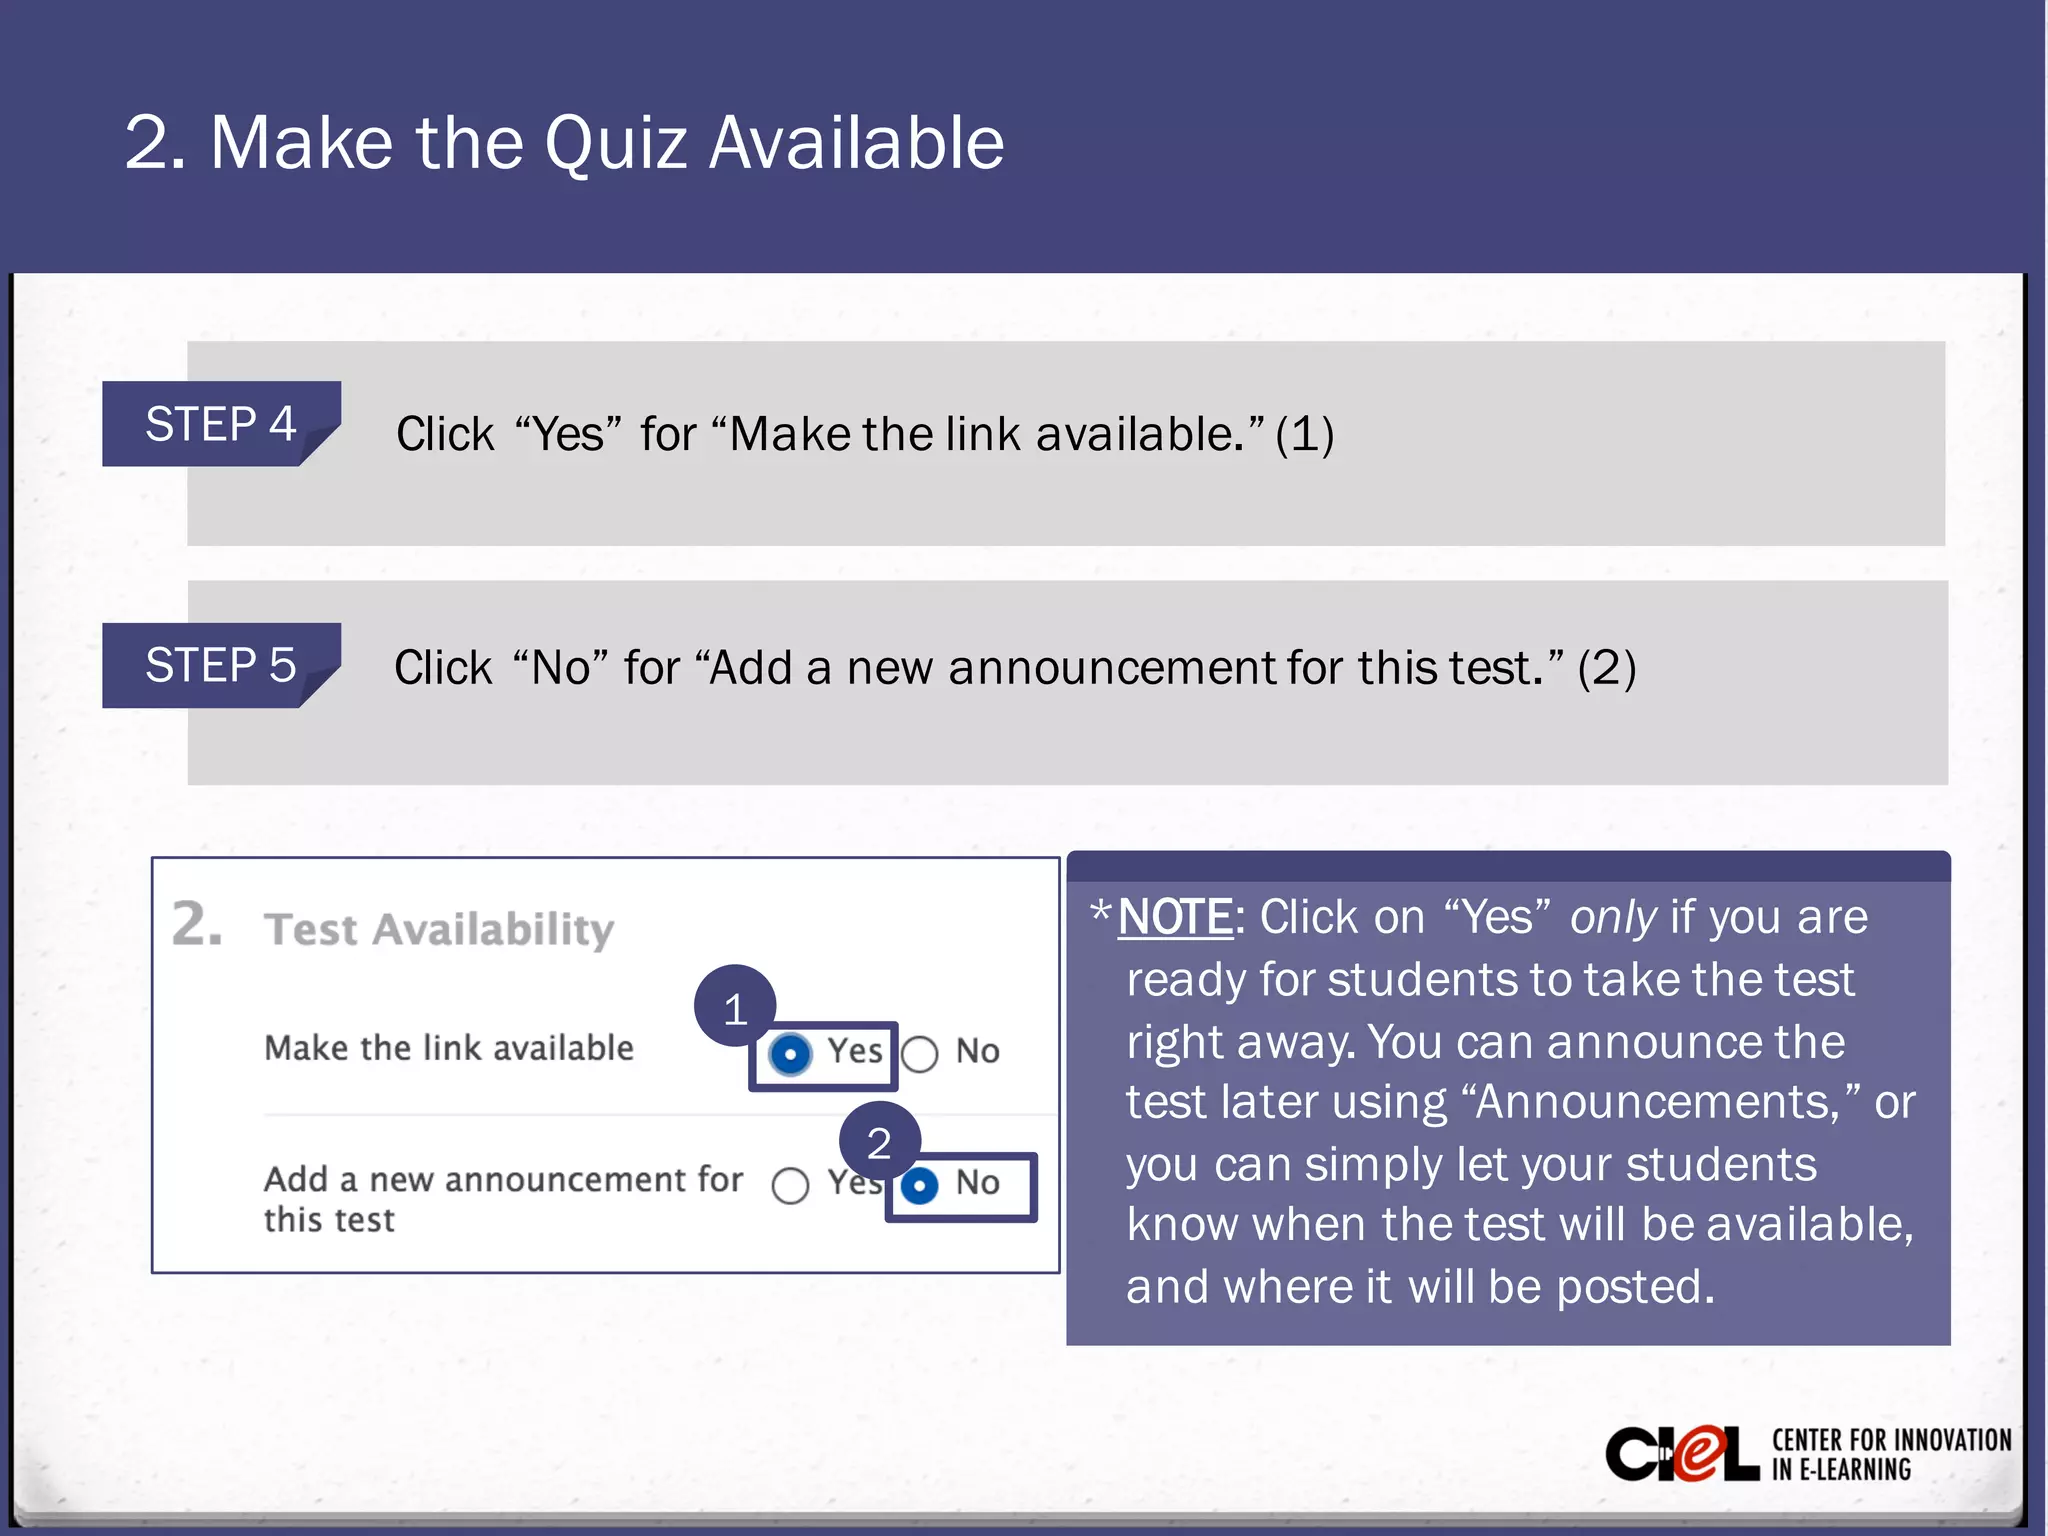
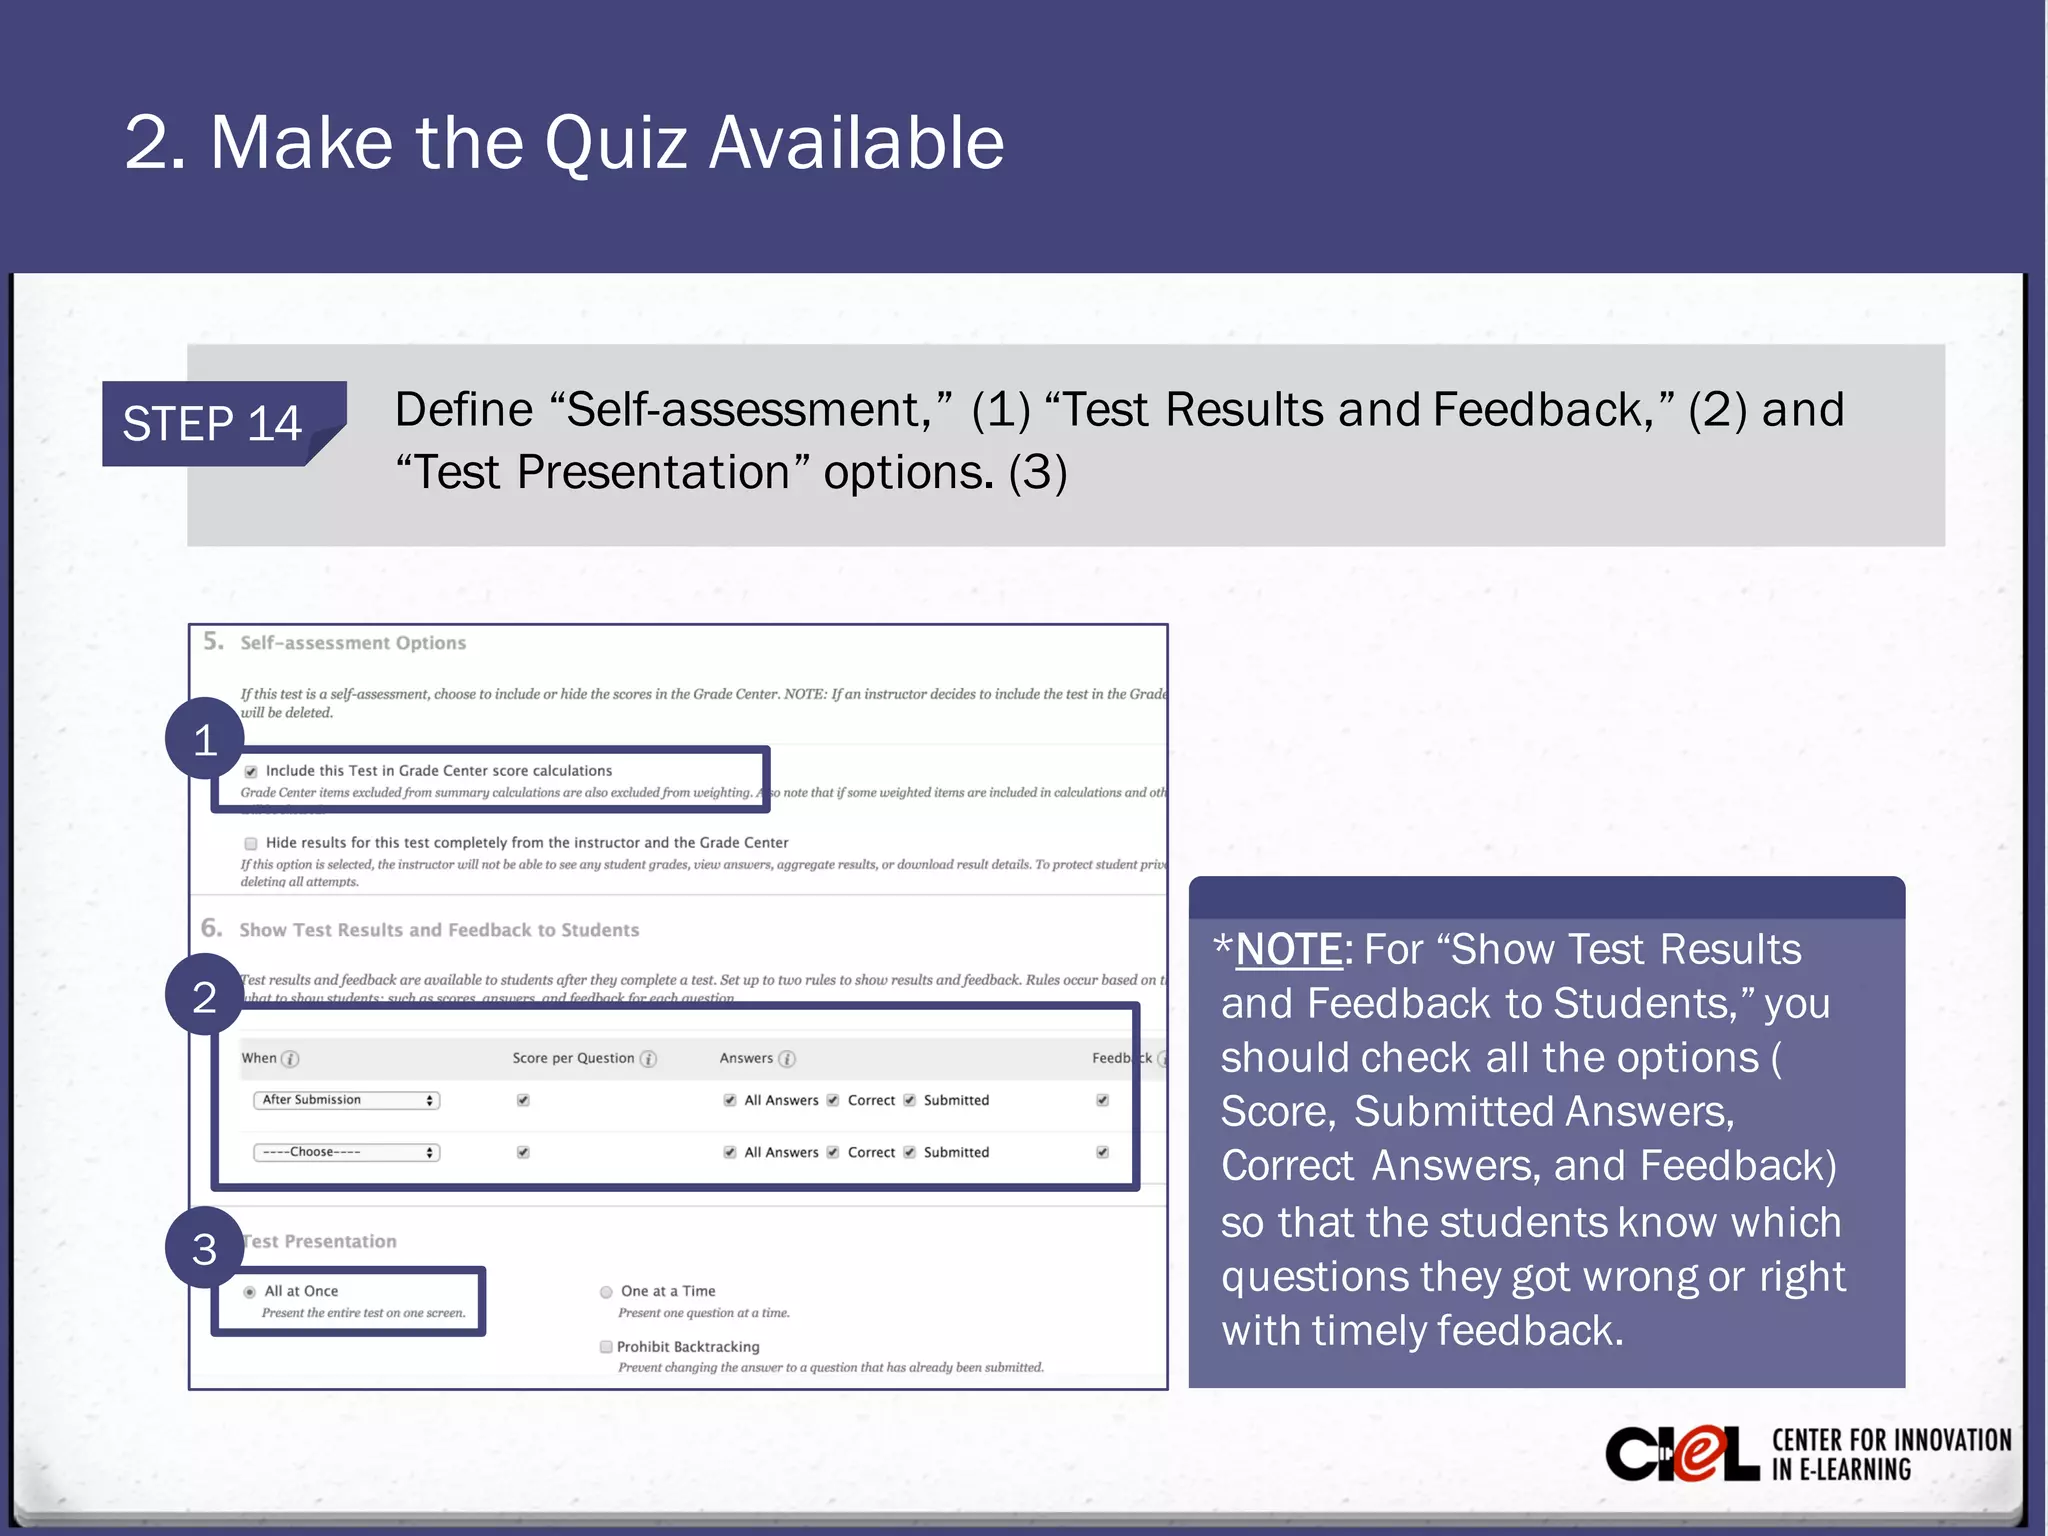
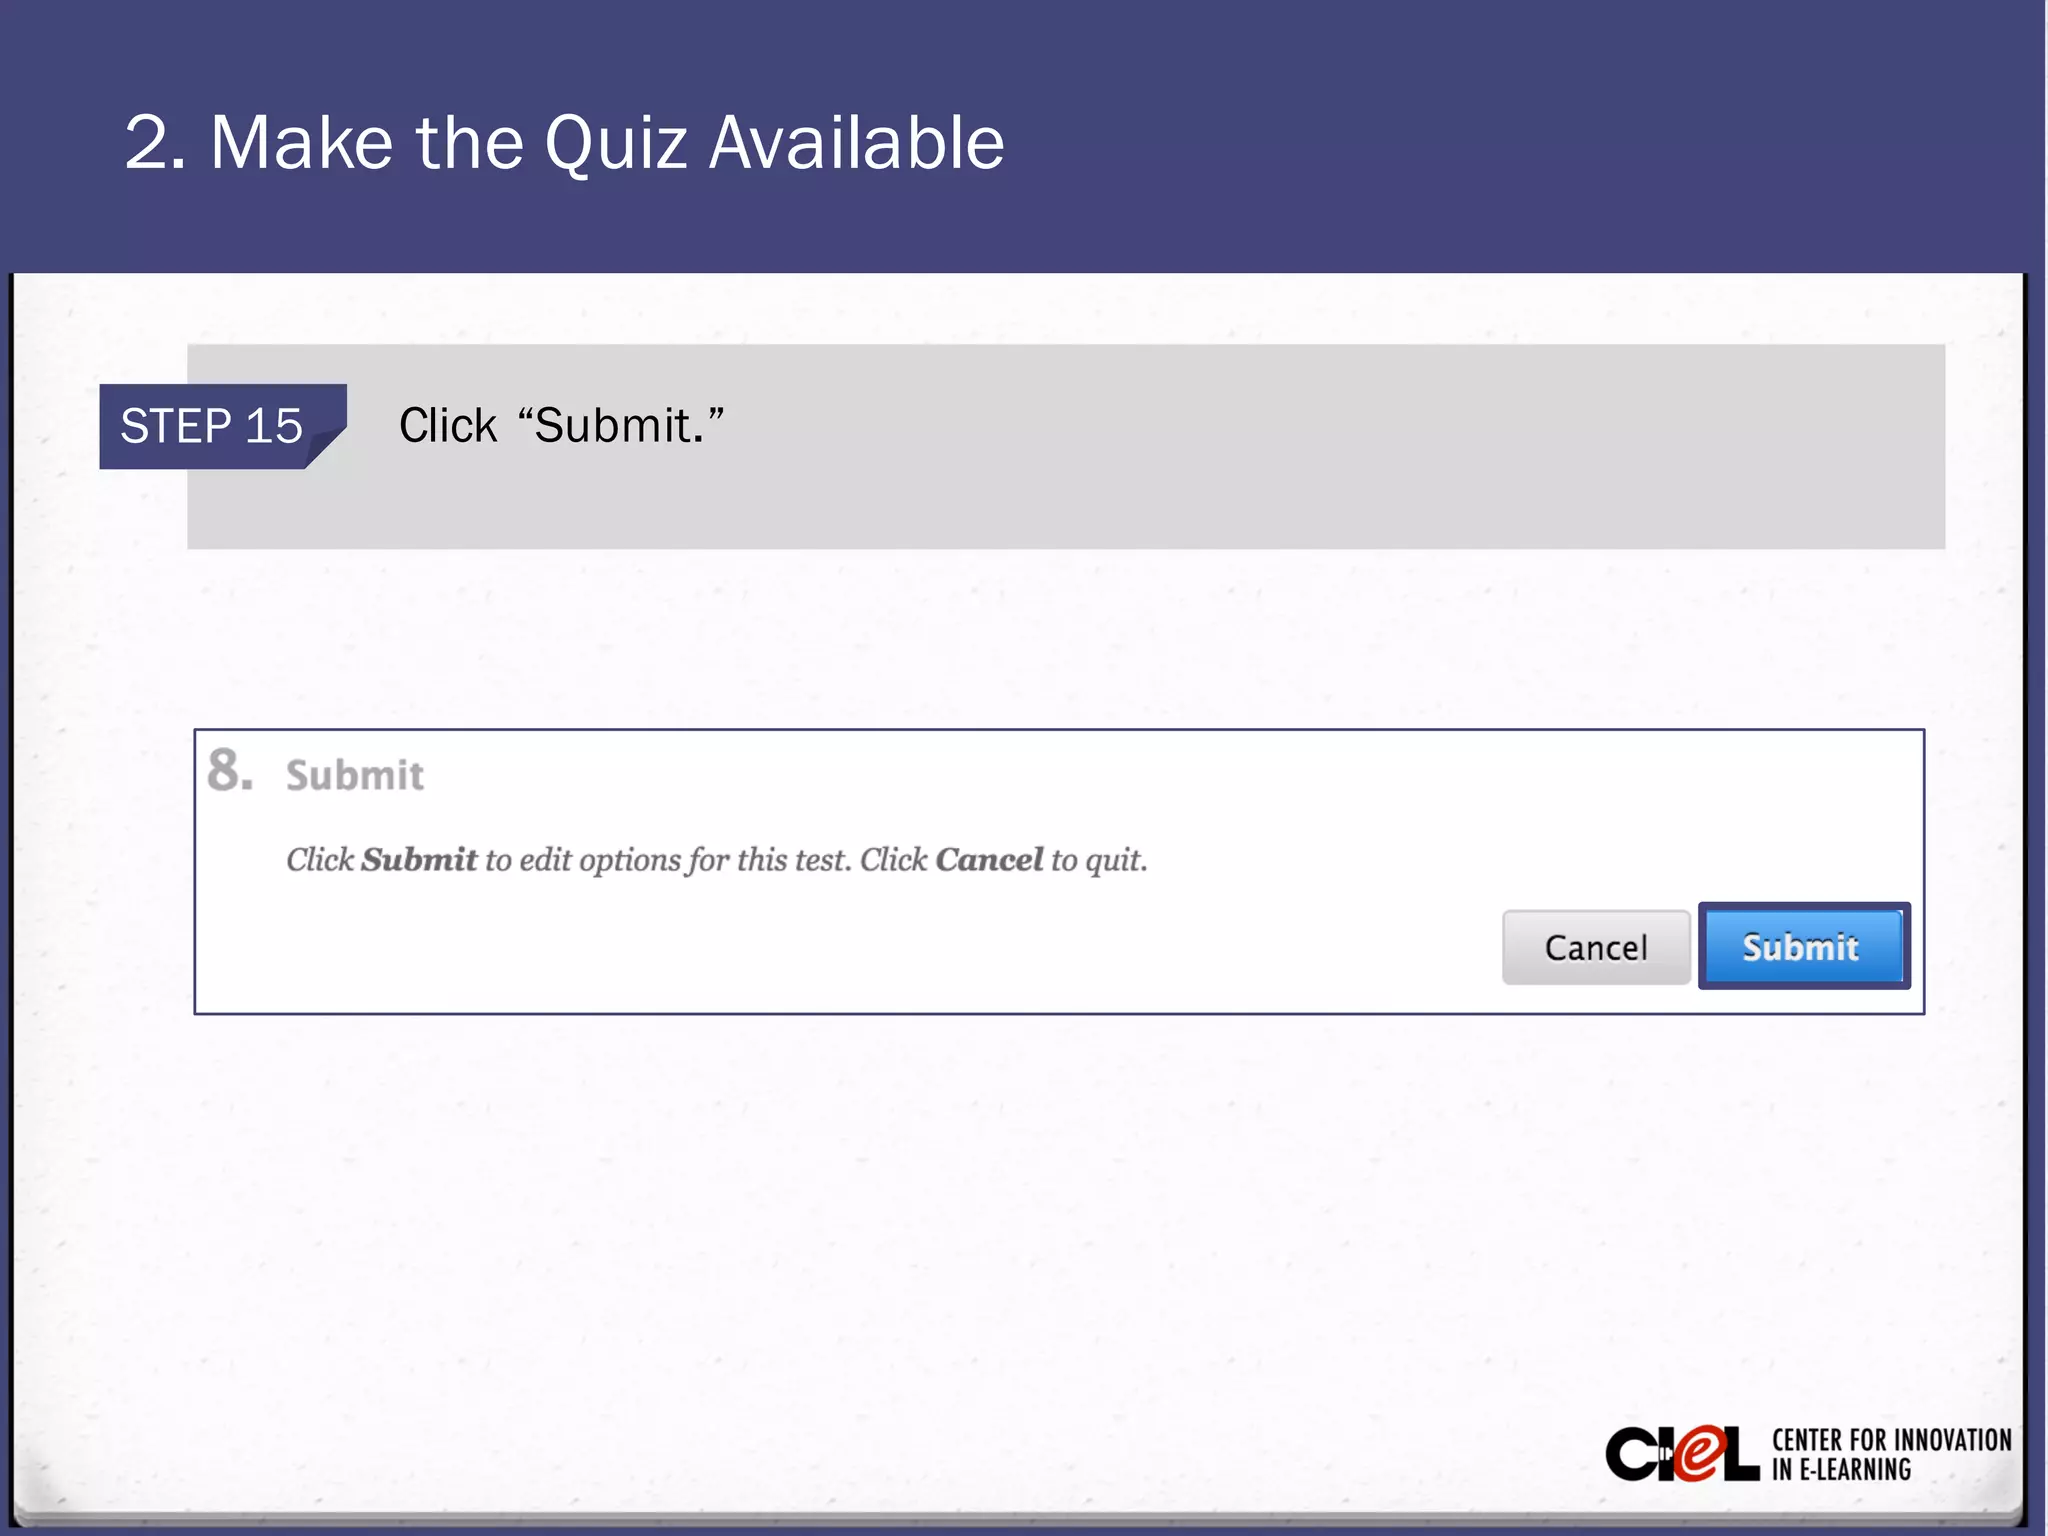
Task 3: Deploy the Quiz to Students
MODULE 7: Advanced Quiz Options
Quick Review:Add “Assessments”in the Menu Bar
Click the “+” icon on the
top left panel, (1) then
click “Content Area.” (2)
STEP 1
Type in Namefor “Content
Area” (e.g., Assessments) (3)
and check the“Availableto
Users” box. (4)
STEP 2
Click “Submit.” (5)STEP 3
1
2
3
4
5
1. Add a Quiz to the Content Page
STEP 1 Click “Assessments” on
the left panel. (1)
STEP 2 Select “Test” under
“Assessments.” (2)
1
2
If you want toedit thesettings of an existing quiz, follow the steps.
1. Add a Quiz to the Content Page
STEP 3 Select Module1 Quiz from the
“Add an Existing Test” box. (1)
STEP 4 Click “Submit.” (2)
1
2
2. Make the Quiz Available
Now, you can see the “Test Options” page(Module 1 Quiz has been
added to the “Assessments” page, but it is still hidden). You need to
set up options to make it availableto students. Follow the next steps.
2. Make the Quiz Available
STEP 1 Click “Assessments” on the left panel. (1)
STEP 2 Click on the dropdown arrow next toModule 1 Quiz, (2) and select
“Edit the Test Options.” (3)
1
3
2
2. Make the Quiz Available
STEP 3 In the Test Optionspage, fill in “Test Information” (e.g., test description)
(1), and click “No” for “Open test in new window.” (2)
1
2
*NOTE: It is importanttoselect “No” as some
studentsmayuse a browser that does not
allow pop-upsand can prevent thetest
window from opening.
2. Make the Quiz Available
STEP 4 Click “Yes” for “Makethe link available.” (1)
STEP 5 Click “No” for “Add a new announcement for this test.” (2)
1
2
*NOTE: Click on “Yes” only if you are
ready for studentsto takethe test
right away. You can announcethe
test later using “Announcements,” or
you can simply let your students
know when thetest will be available,
and where it will be posted.
2. Make the Quiz Available
STEP 6 Click “MultipleAttempts,” (1) select “Number of Attempts” (2), and put
number 2 in thebox. This allows studentsto takethe test twice.
STEP 7 Click the dropdown arrow next tothebox “Score attemptsusing” to
select “Highest Grade.” (3)
1
2
3
2. Make the Quiz Available
STEP 9 Click “Set Timer” to set a
time limit for completing
the test. (2)
STEP 8 Click “Force Completion” to
mandatetest completion
once launched. (1)
STEP 10
Type a number for
“Minutes” to set the time
limit (e.g., 20 minutes). (3)
1
2
3
2. Make the Quiz Available
STEP 12 Check “Password” toset a password toaccess the test (optional). (2)
STEP 11 Use “DisplayAfter” and “DisplayUntil” dateand timefields to define
the availabilityofthe test (optional). (1)
1
2
2. Make the Quiz Available
STEP 13 Set up “Due Date” for thetest (1). Check “Do not allow studentsto
start thetest if the due datehaspassed,” (2) if necessary.
1
2
2. Make the Quiz Available
STEP 14 Define “Self-assessment,” (1) “Test Results and Feedback,” (2) and
“Test Presentation” options. (3)
1
3
2
*NOTE: For “Show Test Results
and Feedback to Students,” you
should check all the options (
Score, Submitted Answers,
Correct Answers, and Feedback)
so that the students know which
questions they got wrong or right
with timely feedback.
2. Make the Quiz Available
STEP 15 Click “Submit.”
From this task, you have learned how to set up options for
the quiz to make it availableto students.
Review
Room 151, College of Education Building
(806) 742-0222
ciel.educ@ttu.edu

Module 7: Advanced Quiz Options Task 3

  • 1.
    Task 3: Deploythe Quiz to Students MODULE 7: Advanced Quiz Options
  • 2.
    Quick Review:Add “Assessments”inthe Menu Bar Click the “+” icon on the top left panel, (1) then click “Content Area.” (2) STEP 1 Type in Namefor “Content Area” (e.g., Assessments) (3) and check the“Availableto Users” box. (4) STEP 2 Click “Submit.” (5)STEP 3 1 2 3 4 5
  • 3.
    1. Add aQuiz to the Content Page STEP 1 Click “Assessments” on the left panel. (1) STEP 2 Select “Test” under “Assessments.” (2) 1 2 If you want toedit thesettings of an existing quiz, follow the steps.
  • 4.
    1. Add aQuiz to the Content Page STEP 3 Select Module1 Quiz from the “Add an Existing Test” box. (1) STEP 4 Click “Submit.” (2) 1 2
  • 5.
    2. Make theQuiz Available Now, you can see the “Test Options” page(Module 1 Quiz has been added to the “Assessments” page, but it is still hidden). You need to set up options to make it availableto students. Follow the next steps.
  • 6.
    2. Make theQuiz Available STEP 1 Click “Assessments” on the left panel. (1) STEP 2 Click on the dropdown arrow next toModule 1 Quiz, (2) and select “Edit the Test Options.” (3) 1 3 2
  • 7.
    2. Make theQuiz Available STEP 3 In the Test Optionspage, fill in “Test Information” (e.g., test description) (1), and click “No” for “Open test in new window.” (2) 1 2 *NOTE: It is importanttoselect “No” as some studentsmayuse a browser that does not allow pop-upsand can prevent thetest window from opening.
  • 8.
    2. Make theQuiz Available STEP 4 Click “Yes” for “Makethe link available.” (1) STEP 5 Click “No” for “Add a new announcement for this test.” (2) 1 2 *NOTE: Click on “Yes” only if you are ready for studentsto takethe test right away. You can announcethe test later using “Announcements,” or you can simply let your students know when thetest will be available, and where it will be posted.
  • 9.
    2. Make theQuiz Available STEP 6 Click “MultipleAttempts,” (1) select “Number of Attempts” (2), and put number 2 in thebox. This allows studentsto takethe test twice. STEP 7 Click the dropdown arrow next tothebox “Score attemptsusing” to select “Highest Grade.” (3) 1 2 3
  • 10.
    2. Make theQuiz Available STEP 9 Click “Set Timer” to set a time limit for completing the test. (2) STEP 8 Click “Force Completion” to mandatetest completion once launched. (1) STEP 10 Type a number for “Minutes” to set the time limit (e.g., 20 minutes). (3) 1 2 3
  • 11.
    2. Make theQuiz Available STEP 12 Check “Password” toset a password toaccess the test (optional). (2) STEP 11 Use “DisplayAfter” and “DisplayUntil” dateand timefields to define the availabilityofthe test (optional). (1) 1 2
  • 12.
    2. Make theQuiz Available STEP 13 Set up “Due Date” for thetest (1). Check “Do not allow studentsto start thetest if the due datehaspassed,” (2) if necessary. 1 2
  • 13.
    2. Make theQuiz Available STEP 14 Define “Self-assessment,” (1) “Test Results and Feedback,” (2) and “Test Presentation” options. (3) 1 3 2 *NOTE: For “Show Test Results and Feedback to Students,” you should check all the options ( Score, Submitted Answers, Correct Answers, and Feedback) so that the students know which questions they got wrong or right with timely feedback.
  • 14.
    2. Make theQuiz Available STEP 15 Click “Submit.”
  • 15.
    From this task,you have learned how to set up options for the quiz to make it availableto students. Review
  • 16.
    Room 151, Collegeof Education Building (806) 742-0222 ciel.educ@ttu.edu