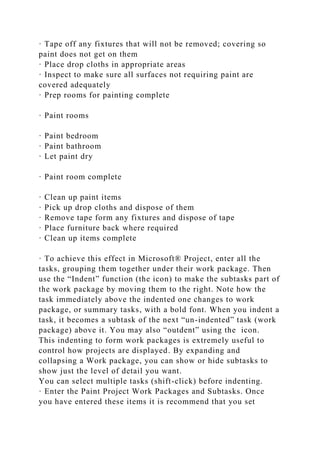
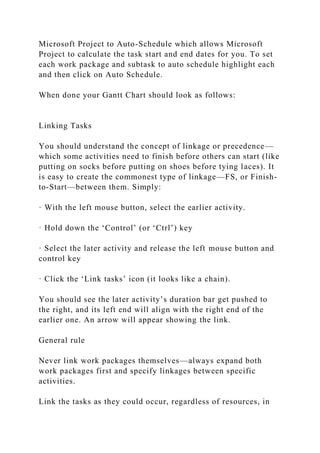
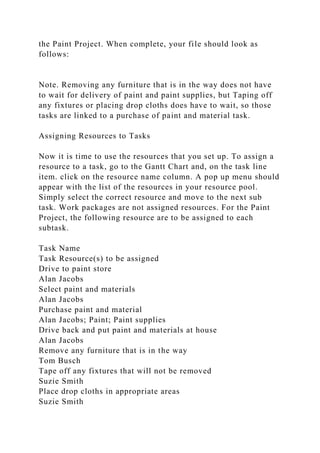
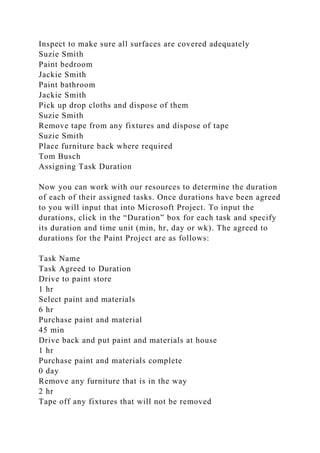
Microsoft® Project Painting Exercise
Microsoft® Project
· Microsoft® Project (also called “MS-Project”) is one of the most popular tools for project planning projects today. It is relatively easy to use and makes it easier to manage projects.
· Microsoft® Project Exercise: The Painting Project
· This is a simple exercise in Microsoft® Project. These instructions are brief and only cover the basics. The objective of this exercise is to prepare you for Week 3 Learning Team assignment. This exercise only covers how to log into Microsoft® Project, set up a simple schedule, and log out. The exercise is not concerned with monitoring or controlling the execution of a plan.
Start Microsoft® Project
To start Microsoft® Project; click through “Start > Programs > Microsoft Office 2013 > Microsoft Project” Microsoft® Project should start up, with a blank “Gantt chart” view of a new project.
Saving Microsoft® Project
It is recommended that you save your project immediately. So please Save your project now using the following format ‘Last Name_Paint_Project’. If you last name is Allen, your Microsoft® Project file name will be ‘Allen_Paint_Project’.
If you are prompted to save the project with a baseline, click Yes. You may continue to work on the baseline until you have completed the exercise and turned it in as the final baseline.
Microsoft® Project Settings
Before getting into the details of a the Painting Project, it is beneficial to enter a few Microsoft® Project settings. These settings are:
· Duration Unit of Measure. The normal default for duration is the day (day) which consist of 8 hours. There are other unit of measures that you may decide to use. The most popular are minute (min), hour (hr), and week (wk). For this exercise we will use the default setting.
· The working calendar. There is a default Standard Calendar which consists of a 5-day work week (Monday through Friday) with Saturday and Sunday set as non-working days. A day is made up of 8 hours. It is recommended for this exercise that you leave Microsoft® Project set to the Standard Calendar. If you want to explore other calendars or how to set up your own calendar, click as follows “Project > Project Information”. The following pop up menu will appear with Calendar showing as ‘Standard’.
· Available resources. It is beneficial to set up your known resources pool at the start of the project. Note. You may change the resources in the pool at any time, as resources are added to and subtracted from the project. To set up the resource pool click as follows “Resource> Resource Sheet”. You’ll get a table in which you can define the names of resources that you wish to be available.
Simply type a name in the “Name” field, and use a new line for each different resource. For the Painting Project, the following are the resources.
Jackie Smith – Standard Rate $25.00; Overtime Rate $37.00
Tom Busch – Standard Rate $20.00; Overtime Rate $30.00
Alan Jacobs – Standard Rate $15.00; Overti ...
“Oh GOSH! Reflecting on Hackteria's Collaborative Practices in a Global Do-It...
Microsoft® Project Painting Exercise Guide
1. Microsoft® Project Painting Exercise
Microsoft® Project
· Microsoft® Project (also called “MS-Project”) is one of the
most popular tools for project planning projects today. It is
relatively easy to use and makes it easier to manage projects.
· Microsoft® Project Exercise: The Painting Project
· This is a simple exercise in Microsoft® Project. These
instructions are brief and only cover the basics. The objective of
this exercise is to prepare you for Week 3 Learning Team
assignment. This exercise only covers how to log into
Microsoft® Project, set up a simple schedule, and log out. The
exercise is not concerned with monitoring or controlling the
execution of a plan.
Start Microsoft® Project
To start Microsoft® Project; click through “Start > Programs >
Microsoft Office 2013 > Microsoft Project” Microsoft® Project
should start up, with a blank “Gantt chart” view of a new
project.
Saving Microsoft® Project
It is recommended that you save your project immediately. So
please Save your project now using the following format ‘Last
Name_Paint_Project’. If you last name is Allen, your
Microsoft® Project file name will be ‘Allen_Paint_Project’.
If you are prompted to save the project with a baseline, click
2. Yes. You may continue to work on the baseline until you have
completed the exercise and turned it in as the final baseline.
Microsoft® Project Settings
Before getting into the details of a the Painting Project, it is
beneficial to enter a few Microsoft® Project settings. These
settings are:
· Duration Unit of Measure. The normal default for duration is
the day (day) which consist of 8 hours. There are other unit of
measures that you may decide to use. The most popular are
minute (min), hour (hr), and week (wk). For this exercise we
will use the default setting.
· The working calendar. There is a default Standard Calendar
which consists of a 5-day work week (Monday through Friday)
with Saturday and Sunday set as non-working days. A day is
made up of 8 hours. It is recommended for this exercise that you
leave Microsoft® Project set to the Standard Calendar. If you
want to explore other calendars or how to set up your own
calendar, click as follows “Project > Project Information”. The
following pop up menu will appear with Calendar showing as
‘Standard’.
· Available resources. It is beneficial to set up your known
resources pool at the start of the project. Note. You may change
the resources in the pool at any time, as resources are added to
and subtracted from the project. To set up the resource pool
click as follows “Resource> Resource Sheet”. You’ll get a table
in which you can define the names of resources that you wish to
be available.
Simply type a name in the “Name” field, and use a new line for
each different resource. For the Painting Project, the following
are the resources.
Jackie Smith – Standard Rate $25.00; Overtime Rate $37.00
Tom Busch – Standard Rate $20.00; Overtime Rate $30.00
3. Alan Jacobs – Standard Rate $15.00; Overtime Rate $22.00
Suzie Smith – Standard Rate $15.00; Overtime Rate $22.00
Paint – One time cost of $700
Paint Supplies (paint brushes and tape, drop cloth, etc.) – One
time cost of $450
Enter these in your resource sheet.
· Project start or end date. When you first start developing a
schedule for a project it is useful to set up the project start or
end date. To enter this date, click as follows “Project > Project
Information”. At work you may have a project that will start in
a few weeks so you would use a project start date. If this is the
case you will select ‘Project Start Date’ in the ‘Schedule from:’
field and enter the projected project start date in the ‘Start date’
field as follows:
If you are doing a project for a wedding or an event, the project
would have an end date; the date the event will occur. If this is
the case you will select ‘Project End Date’ in the ‘Schedule
from:’ field and enter the desired project end date in the ‘Finish
date’ field as follows:
For the Paint Project, select Project Start Date and enter June
21, 2014.
· Creating Tasks (aka activities). When you start Microsoft®
Project, by default you’ll see a blank Gantt chart. The first three
columns (on the left) are headed “”, “Task Mode”, “Task Name”
and “Task Duration”. To enter the tasks, work down the third
4. column, entering Task Name and pressing the Down Arrow key
(↓) at the end of each entry.
Note. Microsoft® Project assigns each task a Task ID or line #
and inserted a default duration of 1 day for each task. Do not
worry about this duration at this point in time.
· Creating work packages and subtasks. Just like outlining a
report in Microsoft® Word, or a presentation in Microsoft®
PowerPoint®, you can outline a project’s tasks. There are
several ways of doing this, but here’s just one.
· First (outside of the software), write down your tasks, grouped
under headings that describe their intended effect. These
headings are called “Work packages”. For example, the Paint
Project consist of several work packages:
Painting bedroom and bathroom
· Purchase paint and materials
· Prep rooms for painting
· Paint rooms
· Clean up paint items
· These work packages are then expressed in detail as sets of
subtasks, as follows:
Painting bedroom and bathroom
· Purchase paint and materials
· Drive to paint store
· Select paint and materials
· Purchase paint and materials
· Drive back and put paint and materials at house
· Purchase of paint materials complete
· Prep rooms for painting
· Remove any furniture that is in the way
5. · Tape off any fixtures that will not be removed; covering so
paint does not get on them
· Place drop cloths in appropriate areas
· Inspect to make sure all surfaces not requiring paint are
covered adequately
· Prep rooms for painting complete
· Paint rooms
· Paint bedroom
· Paint bathroom
· Let paint dry
· Paint room complete
· Clean up paint items
· Pick up drop cloths and dispose of them
· Remove tape form any fixtures and dispose of tape
· Place furniture back where required
· Clean up items complete
· To achieve this effect in Microsoft® Project, enter all the
tasks, grouping them together under their work package. Then
use the “Indent” function (the icon) to make the subtasks part of
the work package by moving them to the right. Note how the
task immediately above the indented one changes to work
package, or summary tasks, with a bold font. When you indent a
task, it becomes a subtask of the next “un-indented” task (work
package) above it. You may also “outdent” using the icon.
This indenting to form work packages is extremely useful to
control how projects are displayed. By expanding and
collapsing a Work package, you can show or hide subtasks to
show just the level of detail you want.
You can select multiple tasks (shift-click) before indenting.
· Enter the Paint Project Work Packages and Subtasks. Once
you have entered these items it is recommend that you set
6. Microsoft Project to Auto-Schedule which allows Microsoft
Project to calculate the task start and end dates for you. To set
each work package and subtask to auto schedule highlight each
and then click on Auto Schedule.
When done your Gantt Chart should look as follows:
Linking Tasks
You should understand the concept of linkage or precedence—
which some activities need to finish before others can start (like
putting on socks before putting on shoes before tying laces). It
is easy to create the commonest type of linkage—FS, or Finish-
to-Start—between them. Simply:
· With the left mouse button, select the earlier activity.
· Hold down the ‘Control’ (or ‘Ctrl’) key
· Select the later activity and release the left mouse button and
control key
· Click the ‘Link tasks’ icon (it looks like a chain).
You should see the later activity’s duration bar get pushed to
the right, and its left end will align with the right end of the
earlier one. An arrow will appear showing the link.
General rule
Never link work packages themselves—always expand both
work packages first and specify linkages between specific
activities.
Link the tasks as they could occur, regardless of resources, in
7. the Paint Project. When complete, your file should look as
follows:
Note. Removing any furniture that is in the way does not have
to wait for delivery of paint and paint supplies, but Taping off
any fixtures or placing drop cloths does have to wait, so those
tasks are linked to a purchase of paint and material task.
Assigning Resources to Tasks
Now it is time to use the resources that you set up. To assign a
resource to a task, go to the Gantt Chart and, on the task line
item. click on the resource name column. A pop up menu should
appear with the list of the resources in your resource pool.
Simply select the correct resource and move to the next sub
task. Work packages are not assigned resources. For the Paint
Project, the following resource are to be assigned to each
subtask.
Task Name
Task Resource(s) to be assigned
Drive to paint store
Alan Jacobs
Select paint and materials
Alan Jacobs
Purchase paint and material
Alan Jacobs; Paint; Paint supplies
Drive back and put paint and materials at house
Alan Jacobs
Remove any furniture that is in the way
Tom Busch
Tape off any fixtures that will not be removed
Suzie Smith
Place drop cloths in appropriate areas
Suzie Smith
8. Inspect to make sure all surfaces are covered adequately
Suzie Smith
Paint bedroom
Jackie Smith
Paint bathroom
Jackie Smith
Pick up drop cloths and dispose of them
Suzie Smith
Remove tape from any fixtures and dispose of tape
Suzie Smith
Place furniture back where required
Tom Busch
Assigning Task Duration
Now you can work with our resources to determine the duration
of each of their assigned tasks. Once durations have been agreed
to you will input that into Microsoft Project. To input the
durations, click in the “Duration” box for each task and specify
its duration and time unit (min, hr, day or wk). The agreed to
durations for the Paint Project are as follows:
Task Name
Task Agreed to Duration
Drive to paint store
1 hr
Select paint and materials
6 hr
Purchase paint and material
45 min
Drive back and put paint and materials at house
1 hr
Purchase paint and materials complete
0 day
Remove any furniture that is in the way
2 hr
Tape off any fixtures that will not be removed
9. 6 hr
Place drop cloths in appropriate areas
1 hr
Inspect to make sure all surfaces are covered adequately
1 hr
Prep rooms for painting complete
0 day
Paint bedroom
1 day
Paint bathroom
4 hr
Let paint dry
1 day
Paint rooms complete
0 day
Pick up drop cloths and dispose of them
1 hr
Remove tape from any fixtures and dispose of tape
4 hr
Place furniture back where required
1 hr
Clean up paint items complete
0 day
Upon entering these durations, you should see Jackie Smith as
an over-allocated resource.
If Jackie is the only painter available then the resource must be
leveled so that Jackie is not working a 12 hour day and getting
paid overtime. To level resources in Microsoft® Project go to
‘Resource’ tab and click on Level Resource. Then select Jackie
Smith and click on level now.Scheduling a project –
determining duration and the critical path
By default, the Gantt chart shows what is happening in the
project. With the Gantt Chart open, click the Format tab and
notice the Critical Tasks checkbox.
10. If you check the box, Microsoft® Project will show you the
Critical Path highlighted in red as follows.
At this point you have completed the Paint Project Exercise.
Save the file and submit in the Assessments Tab.